Penoplex is rightfully considered the optimal material for insulating floors on the ground, concrete slabs, ventilated subfloors and interfloor ceilings. This is explained by close to zero water absorption, biological and chemical resistance, high insulating and strength characteristics and ease of installation. Laying a Penoplex coating with your own hands is not particularly difficult and helps save at least 50% of the total costs. It is important to adhere to the manufacturer’s recommendations; nuances include the need for waterproofing in certain areas, the exclusion of compositions with substances that dissolve polystyrene foam, and tight joining of adjacent slabs.
Depending on the type of base, one of the following options is selected:
- Thermal insulation on the ground: Penoplex is laid on top of the sand and gravel cushion and under the waterproofing membranes. Particular attention is paid to the preparation of the base and the thickness of the layers.
- Placement on concrete floor. One of the most common schemes, found in apartments and already used private houses.
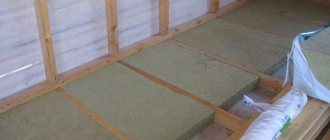
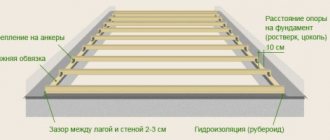
- Laying Penoplex on a wooden covering over logs (ventilated underground).
- Insulation of concrete floors between heated rooms. Often this option is combined with laying electrical cables or water pipes in the screed. The requirements for insulation thickness are minimal here; a slab of 40 mm or even less is sufficient.
- Special cases: balconies and loggias, rooms with high humidity.
What is Penoplex
We must start with the fact that “Penoplex” is the name of a Russian trademark, which has gradually transformed into a common name for a building material. Essentially, it is extruded polystyrene foam, and nothing more.
That is, the production process of penoplex is as follows:
- polystyrene granules are melted with the addition of a special preparation - pyrophores, under the influence of which the resulting mass begins to foam;
- the foamed material is fed to the extruder, where it is passed under pressure through nozzles - slots of a certain thickness;
- the mixture cools and hardens;
- a tape is formed, which is cut into standard slab sizes.
The most important thing is that the material essentially consists of hollow granules with a diameter of 0.10.2 mm, which are pressed tightly against each other. In this case, the granules have a closed structure. Hence the high technical characteristics of penoplex.
The manufacturer today offered several models of material with different technical characteristics and has recently changed the labeling. So let's look at what the construction market offers.
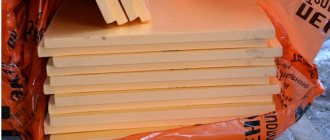
Penoplex panels Source remontistrojka.com
Penoplex Wall
This brand of material is used to insulate walls with penoplex. Previously, it had a different name - Penoplex 31. There are so-called two subgroups in this brand, which differ from each other in the use of fire retardant compounds in the production process. So, the Penoplex-Comfort brand does not have them, but they are added to the Penoplex-Facade brand. That is, by adding a fire retardant, the flammability class of the material changes. Let us add that the “Facade” brand has higher strength characteristics.
And a few characteristics:
- density varies from 25 to 32 kg/m³;
- thermal conductivity – 0.03 W m/K;
- compressive strength – 0.2 MPa;
- water absorption 0.5%;
- temperature range: from -50C to +75C.
Just a few words about water absorption. Tests were carried out when a penoplex slab was completely immersed in sight for 18 days. So, during this time, the material gained only 0.6% moisture only due to open-type granules, which were located at the edges of the slabs in the places where they were cut. Therefore, penoplex is recommended for insulating walls and other structural elements in wet rooms.
Thermal insulation of the facade of a brick house with penoplex Source stroyka-ug.ru
Penoplex-Foundation
Old marking - Penoplex 35 without fire retardant additives. This model has a higher compressive strength, namely 0.27 MPa, so it is often used for thermal insulation of floors. Other characteristics:
- density: 29-33 kg/m³;
- water absorption – 0.5%;
- thermal conductivity 0.03 W m/K;
- operating temperature: -50C to +75C.
Penoplex for thermal insulation of foundations Source aleakrd.ru
Penoplex-Roof
From the name itself it becomes clear where these thermal insulation boards will be used. They are usually used to insulate both flat and pitched roofs. The insulation technology is different in the two cases. But in this article we are interested in another question, so we will simply designate the characteristics of this thermal insulation material:
- strength – 0.25 MPa;
- thermal conductivity – 0.03 W m/K;
- density – 28-33 kg/m³;
- water absorption – 0.5%.
Thermal insulation of a pitched roof with penoplex panels Source dmcp.ru
See also: Contacts of construction companies that specialize in the installation of engineering systems.
Types of dowels
There are 3 types of fasteners:
The standard dimensions of such fasteners are 200x10 mm. They are usually used for thermal insulation of ceilings and facade walls, because they are able to withstand a heavy cladding layer. The only disadvantages include the appearance of cracks through which the cold will pass.
Insulation mushrooms with thermal heads are an alternative to metal nails. They consist of a steel rod, the cap of which is coated with a metal with low thermal conductivity. Typically, impact-resistant polyamide is used for this. The nail is completely covered with a polymer composition that protects it from moisture. The thermal conductivity of polyamide is 0.027 W/μ, which is comparable to mineral wool and polystyrene foam. This results in the absence of cold bridges when installing insulation. The only drawback can be considered the high price of the product.
The dowel can be of different lengths. There are 3 sizes on the market:
There are also threaded anchors that need to be driven into the wall. They are made from the following materials:
Metal dowels are used when installing insulation if a heavy facing layer is planned. Plastic fasteners are divided into:
Roofing fungi are used when installing soft tiles, roofing felt, acoustic slabs, thermal insulation for concrete, etc. They consist of:
Floor insulation technology
So, having dealt with all the penoplex models, let’s move on to the main topic - insulation of floor bases with penoplex.
Let's start with the fact that in private housing construction, floor foundations come in three types: on the ground, in the form of a reinforced concrete slab, and wooden floors. Let's consider each option separately.
Insulation of floors on the ground
What is the construction of a floor on the ground? This is a section located between the strip foundation elements. To form a floor base, the space between the foundation elements is filled with either gravel, crushed stone, or sand, over which a thick reinforced screed is poured.
As for insulation, you need to approach this process a little differently:
- the soil is compacted so that the bulk materials poured onto it do not fall through in sections;
- crushed stone of the middle fraction with a thickness of 10-15 cm is poured in, which is also compacted;
- a sand layer 30 cm thick is poured with a tamper.
Insulation of the floor on the ground with penoplex Source pol-exp.com
Pay attention to the thickness of the sand. The thing is that moisture coming from below cannot overcome a sand layer more than 30 cm thick. And although penoplex is not afraid of water, it is worth taking care of this too.
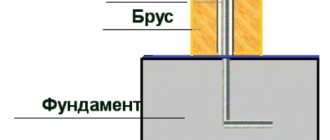
So, the filling is ready. Penoplex slabs are laid on it in rows. It is important here to strictly follow the manufacturer’s recommendations. And they say that the panels in each row relative to the slabs of the other row should be located with an offset of half a slab. This way the heat-insulating layer will be evenly loaded. This is the first.
Secondly, a small gap of 2-3 cm is left between the foundation and the insulation boards, which will subsequently need to be filled with a special foam sealant.
The next stage in the formation of the floor base is pouring the screed. To do this, a reinforcing frame in the form of a finished galvanized mesh is laid on the foam slabs, which must be laid on stands to a height of 2.5 cm. After which a screed 5 cm thick is poured. That is, the mesh will be inside the screed exactly in the middle of the thickness, which is what is required to form a strong floor.
Some masters add two more layers to these layers:
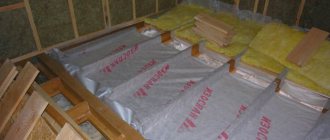
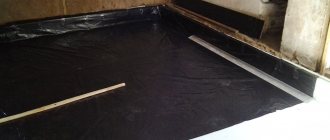
- one is a waterproofing film, which is laid between penoplex slabs and a concrete screed;
- A screed 2-3 cm thick is poured under the insulation over the pillow.
The last layer is optional if the pillow was made according to all construction laws. Namely: it is leveled and compacted.
Do-it-yourself styling features
The gaps between the joists and the insulation are sealed with polyurethane foam.
The technology for laying EPS on a concrete floor involves installing slabs followed by pouring a screed up to 5 cm thick. An exception to this rule is made for apartments in multi-storey buildings, where the load-bearing structures are designed for a certain load.
Laying penoplex on a concrete floor is carried out in the following order:
The coating is monolithic and waterproof. If this is provided for in the project, you should proceed to arranging the screed.
If penoplex is laid under a screed, waterproofing is placed on it
This event is carried out in the following sequence:
It takes 3-5 days for a gypsum screed to completely harden, and 14-28 days for a concrete screed, depending on the temperature in the room.
Source
Video description
In the video, the owner of a private house tells how floors were poured over the ground with the installation of penoplex slabs:
See also: Contacts of construction companies that specialize in the installation of stoves and fireplaces.
Insulation of a concrete slab
This technology belongs to the category - floor insulation for concrete under screed. In private housing construction, concrete floor slabs are not uncommon. More often, finished products are used for this; less often, a monolithic structure is poured. And although the second one is cheaper, there is less fuss with the slabs, and besides, they comply with GOST standards in terms of strength and reliability.
So what is gender in this case? These are reinforced concrete slabs laid on a foundation or on walls, between which there are often gaps. So, the latter must be filled with concrete mortar, with linings made of sheet material installed underneath.
The slabs themselves, or rather their surfaces, do not always meet the standards of evenness. That is, they have protrusions, depressions, and cracks that need to be gotten rid of. Typically, a repair cement-sand mortar is used for this. The main task is to bring the surface of reinforced concrete slabs to maximum evenness.
Floor slabs laid with gaps Source profrab.allgranite.com.ua
As for laying foam flooring under the screed, the slab material in this case must be fixed to the surface of the concrete base. To do this, you can use two methods:
- A special adhesive composition made for Penoplex boards.
- Mushroom screws. The latter are either driven or twisted products. We choose the first option. They are made of either plastic or steel. We choose the first option so as not to create cold bridges.
The method of attaching thermal insulation panels to the floor using self-tapping screws is simple. To do this, the panel is laid at the destination. Two holes are drilled through it with a drill and a drill so that holes for the dowel are created in the concrete floor. A dowel is inserted into the concrete base directly through the panel, into which a self-tapping screw is then simply driven with a hammer. It turns out to be a very reliable mount.
As for the holes, their location is in the middle of the width of the slab at a distance of 20-25 cm from the edge.
Forming a floor using a foam screed is done using the same technology mentioned above. That is, with the laying of a reinforcing frame.
Preparing the concrete base
The concrete floor must be leveled and cracks repaired.
Before attaching penoplex to the concrete on the floor, a number of measures should be taken to prepare the base. Ignoring this stage is fraught with rather unpleasant consequences.
- Dismantling the old coating. Cleaning the surface from debris and dust.
- Removing nails, screws, protruding reinforcement and other foreign objects.
- Carrying out measurements and inspection of the activity area. Determining the level of the subfloor, the presence of open seams, cracks and holes.
- Leveling the slab, sealing all openings with cement mortar or sealant.
- Sanding the floor. Removing all protrusions and uneven surfaces. The height difference should not be more than 1% per linear meter.
- Concrete primer. This procedure must be carried out at least twice to ensure deep penetration of the liquid.
Finally, a damper tape is installed around the perimeter of the room. It will provide space for thermal expansion of the insulation when heated. If there is no door, a board, plywood or steel profile is inserted into the opening, the height is designed to raise the floor level after laying the penoplex and pouring the screed.
Thermal insulation of walls with Penoplex
Let's start with the fact that the process of insulating walls with polystyrene foam boards requires one thing from this process. It consists in the fact that penoplex should be laid on the surface of the walls without gaps and air layers. That is, tight. This is what ensures high thermal insulation of walls.
Therefore, before starting the thermal insulation process, the surfaces of the walls must be leveled to the maximum. The easiest way is plastering or applying a layer of façade putty. In this way, the wall is not only leveled, but also repaired: cracks, chips and potholes are repaired, stains of paint and other materials are covered. Often craftsmen lay insulation directly on a brick wall. But at the same time they must be secured with self-tapping screws.
And one more point related to preparing walls for insulation is primer. The primer liquid will increase the adhesive qualities of the wall surface, which will create improved conditions for attaching penoplex to the walls with glue.
Finishing the facade with penoplex slabs Source 2gis.com
How to properly attach polystyrene foam?
Various types of foam plastics, including polystyrene foam, are among the best insulation materials that are used in both industrial and private construction. In terms of thermal insulation, only mineral wool can compete with this material, which has a slightly lower thermal insulation index, but is distinguished by an increased level of fire safety. In addition to good thermal insulation properties, expanded polystyrene is also characterized by:
Expanded polystyrene must be insulated with non-combustible materials, for example, brickwork or plaster, because it is highly flammable.
Due to the fact that foam plastics are highly flammable, it is recommended that during installation they be insulated with layers of non-combustible materials (brickwork or plaster). The best option is to enclose expanded polystyrene inside a stone wall. Next we will look at how to attach polystyrene foam with your own hands.
Briefly about the main thing
Having understood the topic - insulating a house with penoplex, it can be noted that the process itself is not so complicated. There are not many nuances and steps in it, because penoplex is a durable material in itself. It does not require frames or complex sheathing designs. It is simply laid on the insulated surface and attached to it with glue and self-tapping screws. If gaps remain between the slabs during the installation process, they are filled with a special foam sealant. This is not polyurethane foam, because the sealant does not expand in volume.
Ratings 0
Ceiling insulation
When insulating the ceiling in an apartment or on a balcony, penoplex is attached to the surface with a special glue prepared according to the manufacturer’s recommendations. After it dries, which usually takes about a day, the slabs are pulled to the surface with plastic dowels. Then you can lay the reinforcing mesh, plaster and finish it.
Advantages and disadvantages
Insulation materials are classified according to their form:
- liquid – cement mortar, polymer penoizol;
- bulk – expanded clay, sawdust, foam crumbs, penoizol, slag;
- block (in the form of slabs and mats) - mineral wool, polystyrene foam, expanded polystyrene, vermiculite, wood concrete;
- rolled - polystyrene, mineral wool of lower density, isolon, penofol.
Liquid materials are good for obtaining seamless screeds. Bulk compounds fill the space very tightly. However, their installation requires a frame, while block and roll insulation can do without them. Liquid solutions take time to dry completely, but have a long service life. The roll has a lower density compared to the block, which is reflected in the difference in thermal conductivity.
The most common types of heat insulators have their pros and cons, which are, to one degree or another, inherent in their analogues:
Expanded polystyrene and polystyrene foam. These insulation materials are characterized by average mechanical strength and compression resistance. Low density contributes to low water resistance. Under normal conditions, the materials are non-toxic and resist combustion well, but under the influence of high temperatures, polystyrene foam begins to smolder and release toxic substances. Experts note absolute biological stability; rodents, insects and microorganisms will never grow in extruded polystyrene foam.
Mineral wool, according to users, has a number of advantages, thanks to which it is still the most popular type of insulation. The most important thing is its low cost, due to which it can be used in unlimited quantities. Also especially noted are vapor permeability, noise insulation properties, a high degree of fire resistance and low thermal conductivity. Among the disadvantages, it is worth highlighting hygroscopicity, since when mineral wool gets wet, it loses its remarkable characteristics.
Expanded clay and other bulk compositions do not leave waste after installation. They are environmentally friendly, vapor permeable, fireproof, and immune to biological agents. Professionals highlight expanded clay as almost the only type of insulation possible for insulating floors on the ground. As for the disadvantages, the main one is low hygroscopicity. The second significant drawback is the thickness of the layer, since at least 15 cm is required to achieve the effect. This means that it cannot be used in places with a lack of height.