The door jamb is an important element of the door structure. Manufactured according to precise rules, it ensures that the door has a supporting function and functions well. The design of the jamb is quite simple, you can even make it yourself by watching a couple of videos on YouTube on the Internet. The door jamb can be refined by covering it with special materials. The door jamb is finished using sandwich panels, plasterboard or decorative stone. You will learn further how to make a door jamb.
Doors - jambs
When renovating, each of us faces the problem of doors and jambs.
The door jamb, or frame, consists of two posts and a crossbar; the frame also includes a special strip that helps stop the door. The most popular material from which door jambs are made is wood. In addition to wooden structures, boxes can be metal or made of special materials. The width of the jamb is equal to the thickness of the partition. Notched jambs, crossbars and custom strips are cut to size and assembled into a box at the factory.
When renovating, each of us faces the problem of doors and jambs. Which doors are best to choose, where to buy, or maybe make them yourself? If you do not plan to implement the latest design innovations in your apartment, then this article may be useful for you.
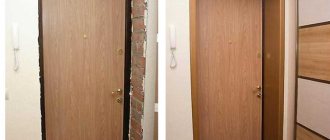
When we were renovating the apartment, we didn’t want to radically change the doors. Those. We didn’t need new ones, we needed to improve the appearance of the old ones. But they didn’t look very good, because the wooden surface was covered with paint more than once, in some places pieces fell off, in some places there were gouges. In general, it was simply necessary to modify them. As usual, there were several solutions to this issue.
We'll look at some ways to improve the appearance of old doors:
- If the doors are wooden, then the most effective method is to sand the surface. Grinding removes the top layer with irregularities, if they are not very deep. Layers of paint or varnish, whatever is on your door, are also removed. After the procedure, do not forget to clean the surface from dust after sanding. You can start working.
- If there is a pothole on the door, then sanding alone will not get rid of it. It is necessary to level the surface. This can be done using a spatula and the appropriate working mixture - putty. If you don’t want to fuss around and dilute the mixture again, then buy it ready-made.
- Sold in bags of at least 0.5 kg. You work with your hands. When you're done and the whole thing is dry, you need to achieve a perfect plane again.
- If the surface of the door is so damaged that it is not possible to restore it using the above methods, then the only option is to close it completely. This can be done by screwing, for example, a sheet of chipboard. Evenly and angrily. Don’t forget to accurately fit and file the edges so they don’t get in the way.
Next, it’s just a matter of giving the color and, if you want, the texture of your updated door. It worked out well for us - a roll of paper wallpaper painted to look like wood helped. They glued it on, and when it dried, they varnished it. Sweetie! More precisely, the lollipop shines! Don't look for too complicated ways to solve this problem. If your repair is simple, then this article will help you. I dare to hope!
Plastering slopes
First of all, it is necessary to complete the preparatory stage. To begin with, the entire surface and objects must be covered with film so that they do not get dirty. Remove debris and dust and prime. This will eliminate the possibility of fungus appearing in the future.
Now you need to set the guide beacons, which are placed on the plaster or mortar. All potholes should be filled with cement mortar. After drying, you can begin applying the starting plaster. After the walls have dried, a reinforcing mesh should be applied and a second layer of putty should be applied, leveling the surface along the beacons.
After the second layer has dried, you can begin applying the finishing putty. Next, the surface is cleaned with sandpaper and painted or covered with wallpaper.
How to make a door jamb
Door jambs are often called decks
Door jambs are quite often called decks. There are usually serious requirements for cutting decks. To make a door frame, you need to prepare thick logs in advance. You also need to have some skills in processing wood materials.
Lay the logs with wedges on two or four blocks. From the resulting blocks it will be possible to cut four-rope beams. Make a groove in them on one side, which is needed for attaching to the wall studs. On the other side, select the quarter into which the door leaf will be installed.
Cut out spikes at the ends of the logs. Also, adjust them exactly to the size of the grooves in the door jambs. Please note that the box is attached to the wall only with spikes. There is no other fastening. Quite often wooden doors are installed indoors. They are very heavy. When fully opened, they will try to turn the decks inside out. When closed tightly, they become loose. If the fit is poorly done, the defect will immediately begin to appear. The decks will become loose, moss will begin to fall out, and strong air will begin to blow into the resulting cracks.
Next, proceed to installing the box in the required location. Make the opening width on both sides of the door frame to the depth of the tenon. The depth of the tenon completely depends on the thickness of the decks.
Then choose one of two options: first, the door frame is made and an opening in the wall is cut along it, or the opening is cut first, and the frame is already cut to it. If you already have some experience in these matters, then feel free to cut the door “by eye.” Using a plumb line, make markings on the wall of the log house in the form of vertical lines. They will show the border of the opening for the door frame. Using a level, break through the upper and lower boundaries. Draw all the lines on the wall. Then cut out the doorway according to this marking.
If your doorway is wide, then use freshly cut short logs from the opening to make logs. Then place the selected logs with wedges on the blocks. The profile of the resulting decks may not be rectangular. It can be in the shape of a trapezoid.
GOST requirements
To avoid problems during installation and operation, standards were established regarding the size of door units. All parameters are divided into three categories:
- Height. Depends on the ceilings in the room and, according to GOST, can vary between 2050-2400 mm. This is especially important for openings in load-bearing walls.
- Width . Here GOST standards are divided into requirements for interior and entrance doors. For the former, an opening of 700-800 mm is allowed. Sometimes it can be reduced to 600 mm or increased to 1000-1200 mm. The width of entrance doors should not be less than 800-900 mm. The maximum opening allowed is 2000 mm for double-floor structures.
- Thickness _ This indicator is more important for determining the dimensions of the box. It correlates with the size of the septum. Wooden blocks are usually 90-100 mm thick.
Schematic representation of the opening parameters required to determine the size of the door block
In order to ensure proper installation and normal functioning of the GOST structure, it is mandatory to have technological gaps between the wall and the frame, the size of which must be within 10-20 mm. And also between the frame and the canvas, the optimal value here is 3 mm.
Door jamb yourself
When manufacturing and installing door frames, certain requirements and technologies must be met. Before making a joint, you need to prepare thick logs. If you have construction skills, then this will be quite easy to do. If you do not have such experience, then in this case it is best to seek help from specialists in your field.
The logs are split into 2 or 4 blocks using wedges. Four-roll bars are turned from the resulting parts. On one side, a groove is made for fastening to the wall, and on the other side, one quarter is removed, into which the door leaf will subsequently fit.
This example of making a door frame is applicable for a wooden house. The next stage is sawing out tenons from the ends of the logs, corresponding to the size of the grooves on the bars.
The fit must be done very accurately so that during further use, defects do not appear - loosening of the door frame and the appearance of cracks. After all the preparatory work, it is necessary to install the jamb on the prepared place, that is, on the doorway, the finishing of which will later be carried out according to your taste and preference.
Measurements
Making a door frame, in particular when doing it yourself, begins with taking measurements. It is advisable to carry out this procedure after removing the old frame and preparing the surface, otherwise inconsistencies may arise when installing a new door.
In order to construct a box with your own hands, you need to measure the length of each side, that is, the height of the opening, as well as the width in several places. In the future, it will be necessary to create an even perimeter, and eliminate all differences when installing the tray. The diagonal serves as a check digit; its size should also be written down. Another important figure is the width of the box itself. It depends on the thickness of the wall.
When taking measurements, it is necessary to take into account all structural elements and the gaps between them
How to install door jambs
Door jambs are quite often called decks. The installation of door jambs usually has serious requirements. To make a door frame, you need to prepare thick logs in advance. You also need to have some skills in processing wood materials.
Door jambs are quite often called decks. The installation of door jambs usually has serious requirements. To make a door frame, you need to prepare thick logs in advance. You also need to have some skills in processing wood materials.
Door jambs are often called decks
Lay the logs with wedges on two or four blocks. From the resulting blocks it will be possible to cut four-rope beams. Make a groove in them on one side, which is needed for attaching to the wall studs. On the other side, select the quarter in which the door leaf will be installed. Installation of old casings Cut out tenons at the ends of the logs.
Also, adjust them exactly to the size of the grooves in the door jambs. Please note that the box is attached to the wall only with spikes. There is no other fastening. Quite often wooden doors are installed indoors. They are very heavy. When fully opened, they will try to turn the decks inside out. When closed tightly, they become loose. If the fit is poorly done, the defect will immediately begin to appear. The decks will become loose, moss will begin to fall out, and strong air will begin to blow into the resulting cracks.
Next, proceed to installing the box in the required location. Make the opening width on both sides of the door frame to the depth of the tenon. The depth of the tenon completely depends on the thickness of the decks.
Then choose one of two options: first, the door frame is made and an opening in the wall is cut along it, or the opening is cut first, and the frame is already cut to it. If you already have some experience in these matters, then feel free to cut the door “by eye.”
Using a plumb line, make markings on the wall of the log house in the form of vertical lines. They will show the border of the opening for the door frame. Using a level, break through the upper and lower boundaries. Draw all the lines on the wall. Then cut out the doorway according to this marking.
If your doorway is wide, then use freshly cut short logs from the opening to make logs. Then place the selected logs with wedges on the blocks. The profile of the resulting decks may not be rectangular. It can be in the shape of a trapezoid.
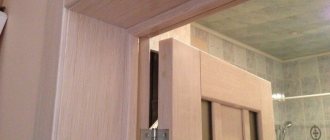
Strengthening the door jamb
Sometimes the door frame is supplied disassembled; it will need to be assembled and firmly connected at the corners with nails. It is clear that this only applies to wooden jambs.
Before making a jamb, it is important to know that it needs strengthening; to do this, you need to frame it around the perimeter with a metal corner and secure it to the wall with iron pins about 120 mm long at a distance of 700 mm.
The iron door, that is, the frame, is welded around its circumference to metal pins that are firmly embedded in the doorway. Door hinges must be reliable and made of durable material, preferably steel. Fastening is usually carried out using screws, screws or welding, it all depends on the material from which the door jamb is made.
When the door opens outward, end hooks or anchor pins are installed on the hinge side. This device prevents the door from being removed if the hinges are cut. Hooks are made of metal rod having a cross section of 6-8 mm. When strengthening door jambs, you must remember that the door leaf must be made of high-quality and durable materials.
Prefabricated frame elements
The frame consists of four main parts. They are beams with an L-shaped cross-section, laid along the perimeter of the opening and fixed in it with screws. The sash fits into the inner corner of the letter “L”. The parts differ in shape, size and purpose.
- Threshold - it is installed flush with the floor or made voluminous. In the first case, the canvas does not fit tightly to the bottom. In the second, the connection is more tight, especially when using seals. There are U-shaped structures without a threshold.
- Hinge posts - they hold the sash.
- Fake racks - they stand opposite the loop ones. Models with a smooth surface and with a hole for the lock cylinder are available.
- Upper support.
For normal closing and opening, gaps of 3 mm are left on each side. If there is no threshold, 10-15 mm is left below the floor. Inside, under the outer cladding, you can put a layer of hydro- and sound insulation.
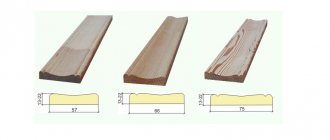
When assembling the door frame of an interior door, the top and sides are covered with platbands - decorative strips. If there is free space between the platband and the frame, it is filled with an additional board - an additional decorative strip inside the opening. There are telescopic extensions that can be adjusted to any width.
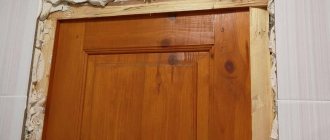
External door jamb
The presence of external trim on the door jamb gives a finished look to the entire opening. In construction magazines you can find various finishing options: how you can design a door slope or jamb (photos of which are presented in large numbers). It is necessary to carry out external finishing with your own hands in stages:
- First, the door frame is measured, after which the dimensions are transferred to a separate strip, which will subsequently serve as the external jamb. Color and texture are chosen in accordance with your taste preferences.
- The planks are cut to size, aligned along the outside of the opening and the necessary measurements are taken using a level and square, maintaining an angle of 90 degrees. When everything is done, the strips can be nailed to the door jamb, the photo of which is presented below. First, install the top bar.
- The final stage is the threshold, which closes the inner area of the doorway. It must be made and precisely aligned with the outside of the box.
Preliminary installation work
Do-it-yourself installation of interior doors is carried out after finishing work on leveling wall surfaces, installing floor cladding and other finishing work.
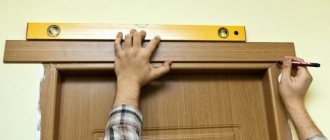
Finished slopes must be checked vertically in several places. If a difference of up to 5 cm is detected, the slopes are leveled. The horizontal jumpers are checked in the same way. A technological gap of 15 mm should be maintained between the floor surface and the door.
Beginning craftsmen are recommended to choose the simplest and most accessible box assembly scheme, which involves assembling individual elements at an angle of 45 degrees.
Proper assembly of the door frame determines the step-by-step work:
- Using a cutter, small recesses are made for hinge joints in the door leaf. The distance from the edge of the fabric to the edge of the loops (top and bottom) must be at least 18 cm.
- The slopes are sawn at an angle of 45 degrees. The surfaces are carefully cleaned and trimmed, applied to the canvas and marks are made where the hinges will be placed on the jamb. Using a milling cutter, recesses are made for the door hinges.
- The finished loops are inserted into the existing recesses in the canvas, and holes are made for self-tapping connections using a drill. It is recommended to choose a drill whose diameter is equal to the diameter of the screws. Finally, the hinges are fixed to the door leaf.
DIY door frame
Preparing door frame parts
For the door frame, it is important to choose wood that does not warp. In this case, the master chooses pine, but other types of wood that are resistant to external influences, in particular teak and oak, can be used to make door frames.
To ensure that the door frame fits perfectly with the door panels, the craftsman lays it in folds on both side panels of the future door frame.
To ensure the correct position of the door, the master places 3 mm spacers between the frame elements and the door leaf - in the upper part, exactly in the middle and in the lower part.
This distance ensures that the door opens and closes freely.
Fixing door frame parts
To maintain the correct position of the door relative to the door frame, the master fastens them with long clamps.
Now the main thing is to keep all the elements in place; for this, the master uses three screw clamps. They are placed in the upper, middle and lower parts, exactly where the spacers are located.
Preparing the top panel
For the door frame, it is important to choose wood that does not warp.
Now the master takes measurements for the top of the door frame, which will adjoin both side panels of the frame on top.
The size is taken from the outer edge of one side panel of the door frame to the outer edge of the other panel and in our case is 86.2 cm.
Saw off the top panel of the door frame.
Now we still need to cut it so that it rests on top of both side elements of the door frame.
The parts to be removed must have a width equal to the thickness of the jamb, that is, 2.8 cm. The master places this size on the top panel.
When marking, it is important to use a square so that the cuts are absolutely accurate. It is also very important to adjust the saw as precisely as possible so that the width of the rebate is exactly 2.8 cm.
The cutting depth should be 1.4 cm (this is the distance to the bottom surface of the rebate). Then the top panel of the door frame will ideally fit the upper ends of the side panels of the frame.
So, all that remains is to simply cut out the marked pieces of the top panel on both sides. If you don't have a miter saw, you can use a fine-toothed hacksaw.
Before attaching the top panel, you need to double-check that it fits neatly between the side panels.
Securing the top panel
Everything is in order, and now it can be secured. We do this using wood glue, applying it along the edges where the top panel will come into contact with the side panels. We press the top panel, but not all the way yet. First you need to squeeze the glue a little between the outer edges of the panels on both sides. And then we press the panel properly.
The door frame needs to be assembled and fastened, and the master takes a 3.5 mm drill. He drills three holes: one at the top, one at the bottom and one in the middle. Then he screws in the 4.5 x 70 mm screws. The same must be done on the other side. Now the door is almost ready.
Adjusting the height of the door frame
Before the door frame leaves the workshop, the craftsman will reduce the height of the frame. Since the height of the threshold under the door frame is 1.8 cm, the master puts this measurement on the frame below. He draws lines using a square and saws off the excess with a hacksaw. Finish cuts carefully to avoid splitting the wood.
Once both frame side panels have been cut to the correct length, a support board should be installed to ensure the door frame remains stable during transport.
The long clamps can now be removed. The new door frame is ready for installation. It took the craftsman about 45 minutes to make a new door frame for an old door.
Some nuances when installing platbands
It is necessary to install platbands or a finishing frame on the doorway, the finishing of which will give a finished and aesthetic appearance to the structure. You can select the necessary platband from a large number of standard ones presented in a hardware store. They are fastened using finishing and liquid nails and self-tapping screws. Some tips that will make the process of installing trim on doorways easier:
- Heads of screws/nails or small cracks can be hidden using a wax corrector or acrylic-based sealant.
- Gaps where the planks meet each other can be eliminated with a single finishing nail.
- Large defects in the door frame can be hidden with wider trims.
Methods for finishing door jambs
There are times when only the door leaves need to be changed, but the door frame remains the same. In this situation, it is recommended to repair the door jambs so that the new leaf does not particularly stand out against the background of outdated and deformed trim. You can finish the jambs to suit every taste, it all depends on the chosen end result. There are many ways to make a door jamb so that it matches the overall interior of the home, here are some of them:
- Paint the jamb. To do this, you need to walk over its surface with sandpaper or sandpaper, first coarse, then finer. This will allow you to remove the top layer, which has already peeled off in places or is simply damaged by time.
- If the jambs do not have openwork patterns, they can simply be sanded using a machine. Then you need to cover all the cracks and depressions with a special wood putty, and after drying, cover with varnish.
- Cover the jambs with self-adhesive paper. To do this, you need to remove the door from its hinges. Remove all dust and dirt, and possibly grease, using detergents or alkali. It is necessary to take into account that the door jambs, that is, their surface, must be painted or varnished. Next, strips of the required size are cut out, the bottom paper layer is removed and glued to the work surface.
Decorative processing
Since you need to make the door frame with your own hands not only durable, but also beautiful, you need to take care of the decorative processing of the material. However, before this, it is recommended to carry out additional manipulations, especially if we are talking about wood. It is necessary to provide it with proper protection from moisture, fungus and insects. To extend its service life, the wood is coated with a layer of special impregnation.
Next, you can begin applying the coating. The most common option is painting. This is usually done after the box has been installed. The color matches the canvas.
It is necessary to leave a small gap between the door and the frame in advance. This is done so that the elements do not rub against each other after painting, since after processing a couple of millimeters will be added to the dimensions of the product.
The metal is coated with regular paint or spray enamel. Wood can also be simply painted, but to preserve the design it is better to use stain and then cover everything with varnish.
Common materials for finishing doorways
High-quality finishing of doorways guarantees an aesthetic appearance, as well as sound insulation and tightness
High-quality finishing of doorways guarantees an aesthetic appearance, as well as sound insulation and tightness. Materials that are in demand for finishing doors:
- MDF panels or laminated fiberboard. These materials are durable, environmentally friendly and hygienic. They have excellent noise and heat insulation qualities.
- Drywall. Before making a jamb, you can look at photos of various modifications in advance, and you may choose the appropriate option for finishing the doorway. Drywall is an excellent alternative to plaster. This type of finishing is a simple, fast and aesthetic way to decorate a surface.
- Sandwich panels. This material has excellent noise and sound insulation properties. The most modern finishing method.
- Decorative stone finishing. Basically, this material is used to decorate door jambs without using doors, for example, arches.
- The classic option is plaster. This type of finish, in addition to its aesthetic properties, retains heat well and is highly durable.
As you can see from this article, there are many options for designing doorways. The main thing is to choose the most suitable one according to your tastes and preferences. In addition, the finishing method must meet all technical requirements and criteria, then it will delight the eye with its appearance for a very long time.
Sources:
- https://www.supersadovnik.ru/video/dvernaya-korobka-svoimi-rukami-10181
- https://goodlinez.ru/installation/613
- https://monateka.com/article/35211/
- https://jprosto.ru/kak-sdelat-dvernoy-kosyak/