Category: Repair (1 ratings, average: 2,00 out of 5)
Published 03/19/2020 · Comments: · Reading time: 9 min · Views: Post Views: 11,730
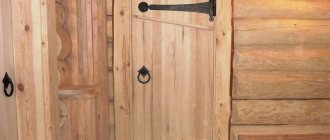
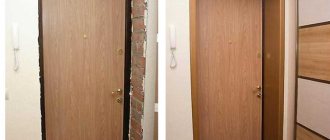
The repair work can be completed by installing cashing on the door openings. They hide minor flaws that appear during installation, such as cracks in the door leaf and wall. Racks come in various shapes, from different materials and mounting options.
Why do we need platbands - advantages of use
When the installation of the door leaf is completed, there are always gaps between the wall and the frame. And the platband on the door allows you to hide these defects. The racks are installed on the wall on all sides of the doorway. They cover up all the sloppiness, and the result is a beautiful composition. Advantages of use: 1. Allows you to smooth out the loss of verticality, if there were shortcomings during installation - it visually makes it smoother. 2. Hides communications (cables, wires) in different rooms. 3. Hides cracks and hangers that appear at the edge of the frame and wall. 4. Acts as a decorative element. For example, curly or teardrop-shaped ones emphasize different interior styles.
Important! Installation begins after the door is installed, but before the baseboards are installed.
General rules for installing doors
A door block is a prefabricated structure consisting of a frame, a leaf, installation and connecting units, and fittings.
The box is mounted in the opening and consists of vertical profiles and a crossbar. The sash is installed on one of the profiles using hinges. The profiles are made of durable wood. Sometimes the box is supplemented with a threshold and seal for sound and thermal insulation. In installer slang, a door frame is called a “ludka”.
A movable panel made of wood, veneered with MDF, PVC or metal, closes and opens the opening. Lightweight frames with honeycomb filling or reinforced frames made entirely of wood are sold.
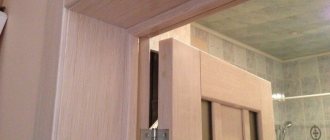
Component elements include platbands and extensions. Framing strips perform a decorative function and cover the joints of the canvas and the box. Extensions cover slopes and joints with walls. Elements come in a special format: for decorating arches and non-standard doorways.
The category of fittings includes all possible latches, handles, hinges, and crossbars. This group includes door closers, opening angle limiters, seals
.
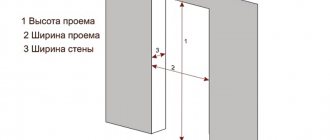
To install a door system yourself, you need tools and basic skills. The quality of installation is affected by the accuracy of measurements: from minimal misalignment of parts, system defects will appear in the future: cracks will form or jamming of the canvas.
The dimensions of the frame must be smaller than the size of the opening, otherwise it will need to be expanded. Professionals consider the optimal size of gaps to the wall to be 10-40 mm.
Door blocks are presented on the construction market in disassembled or assembled format. In the first case, the installer's work will be more complex and time-consuming, since the box will need to be assembled.
The general procedure for attaching an interior door frame looks like this:
- Installation of a disassembled box.
- Equipping all elements of the door block with the necessary fittings, fastening the door leaf to hinges.
- Installing the frame: the door frame is fixed in the opening using hangers or anchors, the gaps are filled with foam
- The sash is hung on the fixed “bowl” and adjustments are made.
- Platbands and extensions are installed.
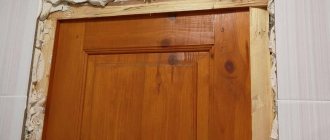
Platbands are a mandatory decorative element of the door structure to design the opening around the entire perimeter. Extensions are purchased if the opening in depth exceeds the dimensions of the frame. The protruding surface of the wall is hidden under decorative strips.
What types are there
There are various options for overlay strips. They differ in functions (to support the structure or for decoration), color palette, installation method (telescopic or overhead), shapes (rounded, flat, curly), sizes, materials (wood, metal, aluminum), texture (simple, carved elements, made according to a template). The finish is selected according to the style of the interior, the installation location and the volume of hidden elements (for example, a lot of cables and wires).
Made of wood
The wooden panel is made from soft linden, spruce, pine raw materials (budget models), from hard (expensive products) - ash, oak, Karelian pine, walnut, beech. They are suitable for any door materials, easy to install, environmentally friendly, adapt to any interior design, have a long service life (with proper care) and can be repaired in case of minor damage.
They are mainly used for interior door frames because they are not resistant to changes in room humidity and temperature. Strong changes lead to swelling or drying of the material.
If the surface is poorly processed, it may darken and lose its original shade. The cost of a wooden plank may be more than a door leaf if there are brass or copper elements. They are present only in designer products, but even without them the cost is higher than other types of cash.
From MDF
MDF paneling is almost no different from wooden types, so it often replaces its competitor. MDF panels are laminated with PVC film or covered with veneer, obtaining a good imitation of the structure of wood. MDF is safe for humans, because it is environmentally friendly. Wear-resistant, resistant to mechanical damage. But it can swell from high humidity. For example, in the bathroom. Materials laminated with PVC film are not expensive, but those covered with natural veneer are the opposite.
Made of plastic
Plastic paneling is made from a strong plastic mass that does not change under various negative conditions. They do not require special care products or frequent cleaning (once a week is enough), they do not melt and do not fade in the sun. The cost is low, so paneling is often used to complete repair work on installing door panels.
Don't miss: Self-installation of interior doors at home: simple instructions
The disadvantage of the material is the small palette of colors and models. Usually ready-made ones are available in white and brown, other colors are made to order. In addition, plastic trims must be secured carefully, because they cannot be repaired and are easily scratched.
Made of metal
This type is used for installing steel doors. Usually they are placed on the side of the street or corridor, then they are combined with the box. This allows you not to worry about how to install the panel, because the installation is carried out simultaneously with the box. But there are also separate metal racks, because there are interior steel and aluminum doors that require a metal design.
It has many advantages: resistance to moisture, sunlight, and mechanical stress. They can also be used forever, because they do not wear out like other types.
Important! People without experience may have difficulty sizing. To get everything straight, they hire craftsmen.
Necessary equipment for installation
Good fastening of platbands is impossible with insufficient preparation. The technician must have all the required equipment on hand before installation:
- miter saw, hacksaw for cutting metal;
- for measuring panels - a tape measure, for drawing a simple pencil or chalk, a plumb line, a square are required for planning;
- a miter box is the best thing you can use to cut out a beautiful corner. Used for even cutting of the workpiece at an angle of 45 degrees;
- a level for installation on the wall, a hammer, if attached to nails, for tapping on the structure and identifying empty spaces.
Mounting Instructions
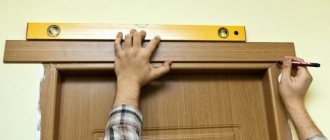
After selecting the fastening material, the process of installing platbands on interior doors begins. First you need to determine how level the walls are and what shape the panel has. There should be no gaps when joining.
If the walls are perfectly level, you can attach them using adhesive mass (liquid nails). If the walls have slight irregularities, then it is better to use finishing nails or self-tapping screws.
The design of gaps at the door frame and wall begins at the opening point. There are hinges on the opening side that prevent the box from closing completely. Therefore, equal indentation is left on all three sides.
Interesting! At doors located in the corner, cashing is done in the shape of the letter L. For symmetry, some install a narrow strip of the same shade and material in the corner.
For doors located in the corner of the room, an additional narrow strip for symmetry may not be installed when finishing the slopes with decorative stone or tiles.
Do you do the cashing yourself or call a professional?
I call the master myself
At an angle of 90
There are 3 options for sawing the casing at 90 degrees: vertically, simply horizontally or horizontally with an overlap. A vertical type connection involves the placement of the top board inside the side boards. Horizontal means that the plank will not be located between the racks, but will complete the design with one line.
For vertical it is necessary: 1. Attach the stand at a distance of 3mm. up to 4mm. from the loops and from the top on the inside, mark a line for the beginning of the top element. The same is done on the opposite side. They need to be marked somehow so that you know where the right and left are (the floor may not be level and you may accidentally install a rack of the wrong length). 2. Then the length of the top post is determined from the marks on the wall. Moreover, you need to align it as much as possible with the door frame. 3. Then a cut is made along the marked lines with a hand saw with a miter box or a jigsaw.
For a simple horizontal cut, apply the top strip to the box. Focusing on the bottom edge, find the exact mounting location and draw lines to determine the exact length of the right and left trim. The size of the vertical board is also determined based on the length of the side boards.
Expert opinion
Sergey Dymchuk
Expert of our site. He has been working in the field of door production and installation for more than 10 years. Implemented hundreds of different projects. Helps make the content of our site interesting and useful.
Ask a Question
You can first secure the trims on the sides, and then measure the missing top element.
Designers use horizontal design of the door space with an overlap. To do this, the top one should protrude slightly at the edges. It is installed after installing the right and left racks.
Don't miss: Installing hinges on a door
At an angle of 45
Joining a panel with a shape in the form of a semicircle or any shape is more difficult. After all, you need to know how to cut material at an angle of 45 degrees. This type of joining helps hide the gap and allows you to create a beautiful door frame. 1. Determine the length of the side panels. To do this, attach the casing at a distance of 3mm. up to 4mm. from the loops. Then mark the bottom cut point. 2. Then the planks are marked with a pencil. The lower cut point is increased by the width of the panel and a cut line is drawn. 3. Cut the cut with a hand saw. Moreover, the material is fixed in a miter box so that the mark is visible. If you cut with a jigsaw, a drawing is required. 4. Side strips are installed. 5. Similarly, we measure the top bar, make a drawing and sawdust. The top panel should coincide with the edge of the side board. 6. Mount the upper part. 7. Seal the joints with sealant containing acrylic or silicone, and after drying, paint with a corrector.
Types of fastening
Before installing the trim on the workpiece, you must mark the cut angle and the desired length. Using this marking, the plank is cut with a miter saw, or, if it is not available, with a hacksaw using a miter box, which will help cut at an angle of 45 degrees. As in any other case, it is better to use a high-quality tool. This will help to avoid unnecessary irregularities, inaccuracies and, accordingly, unnecessary problems.
Flat platbands are attached at an angle of 90 degrees, wooden and MDF - at an angle of 45 degrees. Let's consider possible fixation options.
Features of installation of wooden and plastic platbands
Home owners who are making renovations are interested in how to install door frames with their own hands from various raw materials: wood, plastic. In order to understand how to attach platbands to interior doors for greater reliability, you need to start from the weight and structure of the material.
Wooden racks weigh a lot compared to plastic ones. Therefore, the question of how to securely fasten them does not arise - select nails for finishing, self-tapping screws. The tree can also be simply repaired if any defects occur. For example, a wax pencil for furniture or special pads. Gaps between joints can simply be eliminated with putty.
Plastic models can be glued to liquid nails. Moreover, you need to be very careful during installation, because scratches cannot be covered up with a furniture wax pencil, and the paint will be very visible. Plastic is often used for doors, so there are other ways to eliminate the shortcomings. For example, different types of film for pasting furniture: select the desired color, texture and paste over the damaged surface.
Preparing for work
Before installing door frames, you should prepare the walls around the opening. If they have defects larger than 5 mm, the bar may move away from the plane, forming a noticeable gap. The curvature of surfaces can also cause such an unexpected effect as a mismatch of edges at the junction of the side and top trim.
To avoid unpleasant surprises when installing decorative elements around the door, it is recommended to level the wall, making sure that both the side and top sides of the opening are in the same plane. This can be done using a long straight board, placing it across the opening and moving it from bottom to top. In some places under the tool you will notice voids if the planes are not level enough. Mark the boundaries of each defect.
The wall is leveled with finishing gypsum putty. The solution must be mixed according to the manufacturer's instructions and applied to the surface, stretching with a long rule. Dry the wall for 24 hours and begin installing the front door casing.
When choosing in a store, you need to visually evaluate the smooth surface of the planks. The part adjacent to the wall should not have any curvature. Particular attention should be paid to planks made of solid wood: if dried incorrectly, thin planks may “screw”, that is, bend along the long side. Due to improper storage, door frames made of any material can bend. Such a part cannot be installed smoothly and accurately.
In addition to the platbands themselves, you need to prepare the following:
- finishing nails;
- hammer;
- side cutters;
- saw;
- drill and thin drill (1.5 mm);
- wax pencil;
- miter box or protractor;
- roulette
In some cases, instead of nails, you can use screws or special glue. If the platbands are made of solid wood, a longitudinal crack may appear when driving nails. To prevent such a defect, you need to use a drill, drilling narrow holes in the places where the profile is attached.
Joining and alignment with the baseboard and the wall
In order to connect the racks well with the baseboard and walls, the installation of platbands on interior doors should end in the floor.
If the plinth is already installed, then it is dismantled and adjusted to fit the bar. There are various decorative plastic plugs that allow you to neatly decorate your plastic baseboard. For wooden skirting boards, a 45 degree cut is made. and you get neat rounded edges.