Types of wood putty
There are several types of material available on the market, differing in the binder. Strength depends on it, as well as the maximum layer that can be applied to putty in one pass, moisture resistance, and drying time.
Acrylic
The light, almost white composition of the consistency of sour cream easily penetrates into the cracks, filling the unevenness. The hardened putty adheres perfectly to the wooden surface.
Pros:
- high adhesion;
- strength after hardening;
- forms a layer up to 3 mm.
Minuses
- not used in cold weather;
- only light colors: oak, pine; white.
Acrylic putty for wooden floors
Serves as an optimal base for water-dispersed paints and varnishes.
Polymer
Prepared on a water basis. Perfectly matches parquet or tongue and groove boards.
Pros:
- plasticity allows it to flow into the narrowest cracks;
- low shrinkage makes it possible to get by with a single layer.;
- quick drying.
Minuses:
Not suitable for hard wood, cork floors, causes stains.
Polymer compositions must be selected strictly to match the tone of the floor material.
Solvent based
The compositions tend to dry quickly. Essential resins diluted with organic solvents are used as a binder. The basis is wood dust generated during woodworking. It is recommended to use dust from the same wood from which the floor material is made. This will allow you to achieve maximum naturalness, especially when using colorless varnishes.
Pros:
- ease of application;
- quick drying;
- low shrinkage;
- natural look.
Minuses:
- sharp unpleasant odor at the time of application;
- the need for ventilation until completely dry.
Supplied as a colorless base, which is tinted with pigments. Ready-made compositions painted in one color or another are also available.
Oily
The composition of the putty includes water, oil, chalk. Suitable for treating all types of wood floors. High strength and a large number of available shades make oil compositions one of the most popular. They repel moisture, are resistant to low temperatures, strong, durable.
Pros:
- rich palette of shades;
- water-repellent properties;
- suitability for outdoor use.
Minuses:
- During the long drying period, you cannot walk on the floor;
- The strong smell requires frequent ventilation of the room.
Oil-based putties are supplied in a variety of packaging, from small tubes to 20-liter buckets. For any amount of work you can choose the right container.
Wood putty
Wood putty is used to fill cracks, nail holes, voids and other defects in wood. If the surface will be painted after filling, it should be treated with sandpaper.
Depending on the material on which the wood putty was made, there are the following main types:
- water based;
- on an alabaster base.
Wood putty, which is made on the basis of varnish, can be diluted or removed from the surface using thinner or acetone. Water-based putty can be washed off with water. Alabaster putty is produced in powder form, which is mixed with water before application.
The most famous manufacturers of wood putty are Tikkurila and Extra.
Tikkurila wood putty is a special-purpose material that, after drying, adapts to the color of the wooden surface.
The material is used to correct uneven surfaces made of wood indoors. The treated area can be painted, varnished, or stained.
Tikkurila wood putty can be used on doors, panel walls, furniture and other wood surfaces.
- applied using a spatula;
— depending on the thickness of the layer, it can dry from four hours to a day.
The surface on which the material is applied must be clean and dry.
Wood putty Extra is a waterproof material made on an acrylic base, which is used for work both indoors and outdoors. The material has high hardness, moisture resistance and strength. Very easy to match the color of the wood. Extra wood putty can be used as a finishing material, including in conditions of high humidity.
The mixture is used to seal cracks, knots and other imperfections. The surface to be treated must be free of dirt and dry. Old decorative materials must be removed.
Extra wood putty is applied using a spatula in one continuous layer. Layer thickness up to one millimeter.
You can also make your own wood putty. It can be oil or resin based.
Do-it-yourself oil putty for wood is made in this way: take 60 grams of turpentine oil and 280 grams of linseed oil, 30 grams of ground pumice and mix everything thoroughly. Add 12 grams of borax, 20 grams of casein and gelatin, 18 grams of ammonia and 290 grams of water. Stir and place in a water bath. When the composition heats up, it should be stirred until a homogeneous mass is obtained. Before using wood putty with your own hands, it should be cooled.
DIY resin wood putty is a waterproof, fusible mixture. In an enamel pan, stir 200 grams of rosin and 400 ozokerite. Add yellow ocher and stir until smooth. Apply hot. This elastic wood putty will perfectly seal large defects.
Do-it-yourself wood putty is applied using a sprayer or spatula. The material, which has the consistency of sour cream, is used to cover large wooden surfaces, and the dough-like material is used to seal individual areas.
The surface on which you apply wood putty with your own hands must be pre-primed. The material must be spread thinly, forming a flat surface.
The price of wood putty depends on the manufacturer of the material, the container in which it is sold on the building materials market and other indicators.
We use environmentally friendly polymer mixtures in living rooms
In the living rooms, we decided to level the floor with polymer putty – acrylic. Warm plaster is more suitable because it does not deteriorate due to temperature. The laminate was chosen without a wax coating, which melts when heated.
PVA glue diluted with water was used as a primer for the concrete floor in dry rooms. We purchased acrylic varnish for wet rooms. These substances:
- penetrate deeply into the pores of the concrete floor and close them;
- increase adhesion to putty.
Before starting work, the floor was cleaned and vacuumed. The first layer of putty was poured a day after treatment with the primer, allowing it to dry completely. The solution was made liquid so that it flowed into all the cracks. The maximum layer thickness is 3 cm. Where more was required, repeat after 24 hours.
After complete drying, the friend primed the floor himself and applied a thin layer of finishing putty of the same brand. Vadik already had experience working with ceilings and walls, so smoothing with a large comb spatula was not difficult.
Self-cooking
If desired, it is easy to prepare the putty mixture with your own hands. The main ingredient is 10% animal glue. You will need 100 g of it. In addition, you will need 500 ml of drying oil, 125 g of turpentine (can be replaced with kerosene), and 25 ml of liquid drier. An additional ingredient is liquid soap. Chalk will add thickness. It must first be dried and sifted.
First of all, heat up the glue. Soap is gradually added to it. The solution is not removed from the heat and stirred constantly. Then drying oil, drying agent and turpentine are introduced into it. Chalk is added last. The consistency should be like thick sour cream. The floor is treated with a warm mass. To maintain the temperature, it is placed in a steam “bath” or placed in a container with hot water.
An easier way to putty with your own hands involves using PVA glue with chalk or dry finishing putty. Glue is poured into the container, water is added to it (for 1 part of glue, take 2 parts of water). Gradually add the dry mixture, stirring until a homogeneous thick mass is obtained. If there are a lot of uneven surfaces on the wooden floor, you can add small sawdust. This mixture dries in about a day.
Execution of work
Putting the floor with your own hands is an activity that requires certain skills. With the help of putty, you can qualitatively update the existing floor covering made of wooden boards during cosmetic repairs. Even re-applying the paint composition to the surface requires preliminary puttying, which will help make the floor even and smooth.
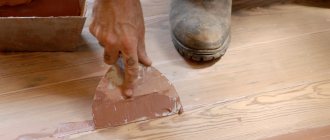
The putty is applied in a thin layer using a special steel spatula.
It is important that during the work the mixture fills all existing cracks and cracks
You should pay attention to the thickness of the putty layer, because after complete drying the floors will have to be sanded. The number of layers of the applied composition depends on the degree of damage to the coating
Each subsequent one (after it has completely dried) is sanded again. This continues until there are no bumps or depressions left on the floor surface.
Using wood putty is not always suitable for existing flooring. Therefore, after all the cracks between the boards have been filled, sheets of plywood are laid on top of the old covering, and linoleum or laminate is laid on them.
How to make putty
Wood putty. Prepare PVA glue and small sawdust. Take out a small container to prepare the solution. Place sawdust in a container and fill it with glue. Stir everything thoroughly until it reaches the consistency of thick sour cream. Let it dry for 15-20 minutes. The putty is ready.
Concrete putty. Prepare chalk and drying oil. Take out a small container. Mix chalk and drying oil in a container. Stir everything thoroughly until the sour cream becomes thick, let it set a little and dry. The putty is ready.
Putty for painting. Prepare a 15% glue solution, drying oil, turpentine, laundry soap, chalk, and casein paint. Prepare the container. Dilute casein paint with water and heat to a temperature of 60 degrees, then strain through a sieve and pour in drying oil, and then chalk soaked in water, laundry soap and turpentine.
The same putty can be made from a slightly different composition. To do this, instead of casein paint, use glue on the same base. First, mix dry powder materials: chalk, pigment, laundry soap. And then add liquid materials: casein glue, turpentine, drying oil, varnish. Stir everything thoroughly and let it brew until it reaches a viscous consistency.
Select the color of the putty pigment depending on the paint with which you will cover the surface, so that spots and stains do not appear on the wall. To choose the right color and percentage of pigment in the putty consistency, apply it to a small area of the wall, let it dry and cover it with paint on top.
Products for eliminating cracks in wooden floors
When choosing how to seal cracks in a wooden floor, you need to pay attention to the size of the damage and the type of floor covering. Possible options:. Possible options:
Possible options:
- wood putty;
- construction foam with polystyrene foam;
- sealant;
- sawdust or paper mixed with an adhesive base;
- sealing with wedges, cord or slats;
- tow;
- sawdust mixed with oil paint;
- wax and oil;
- epoxy glue with cement;
- plywood, OBS boards or chipboards (for significant damage).
Before covering the cracks, the surface should be prepared: clean it of debris, dirt and dust. Additional treatment of wood with antiseptic agents will protect it from negative factors (fungus, mold, pests) and increase its service life.
Indications for use
Wood putty for floors is necessary to solve the following problems:
- eliminating cracks and joints;
- correction of depressions, deformations;
- elimination of height differences;
- leveling the surface for painting, applying varnish;
- increasing the water-resistant characteristics of wood;
- increasing the shelf life of plank coverings;
- improving surface adhesion characteristics before dye treatment;
- reducing the costs of paint and varnish products.
Types of wood putty
There are several types of material available on the market, differing in the binder. Strength depends on it, as well as the maximum layer that can be applied to putty in one pass, moisture resistance, and drying time.
Acrylic
The light, almost white composition of the consistency of sour cream easily penetrates into the cracks, filling the unevenness. The hardened putty adheres perfectly to the wooden surface.
Pros:
- high adhesion;
- strength after hardening;
- forms a layer up to 3 mm.
Minuses
- not used in cold weather;
- only light colors: oak, pine; white.
Acrylic putty for wooden floors Serves as an optimal base for water-dispersed paints and varnishes.
Polymer
Prepared on a water basis. Perfectly matches parquet or tongue and groove boards.
Pros:
- plasticity allows it to flow into the narrowest cracks;
- low shrinkage makes it possible to get by with a single layer.;
- quick drying.
Minuses:
Not suitable for hard wood, cork floors, causes stains.
Polymer compositions must be selected strictly to match the tone of the floor material.
Solvent based
The compositions tend to dry quickly. Essential resins diluted with organic solvents are used as a binder. The basis is wood dust generated during woodworking. It is recommended to use dust from the same wood from which the floor material is made. This will allow you to achieve maximum naturalness, especially when using colorless varnishes.
Pros:
- ease of application;
- quick drying;
- low shrinkage;
- natural look.
Minuses:
- sharp unpleasant odor at the time of application;
- the need for ventilation until completely dry.
Supplied as a colorless base, which is tinted with pigments. Ready-made compositions painted in one color or another are also available.
Oily
The composition of the putty includes water, oil, chalk. Suitable for treating all types of wood floors. High strength and a large number of available shades make oil compositions one of the most popular. They repel moisture, are resistant to low temperatures, strong, durable.
Pros:
- rich palette of shades;
- water-repellent properties;
- suitability for outdoor use.
Minuses:
- During the long drying period, you cannot walk on the floor;
- The strong smell requires frequent ventilation of the room.
Oil-based putties are supplied in a variety of packaging, from small tubes to 20-liter buckets. For any amount of work you can choose the right container.
Wood putty, what is the technique for making it yourself?
When processing any wood material, wood putty is often used, a video on how to make it is available on the website. It is used to repair irregularities, cracks and other surface defects. We will discuss its types and manufacturing method below.
Wood putty - let's get acquainted with the main varieties?
According to the manufacturing method, there are: factory-made and home-made mixtures. Based on their composition, they are divided into: adhesive, oil-adhesive and nitro putty for wood. The first group consists of self-made putties. They include ingredients made from oil, adhesive and plasticizers. The second group includes compositions made from oil varnish with various fillers or drying oils. An example of such putties can be LSh-2 and LSh-1. It can also be filled paints or glyphthalic varnishes (M-180,175).
The third group includes nitro putties, which are produced in factories. They are called quick-drying mixtures. These compositions are made from resins, cellulose ethers, diluted with appropriate solvents. The mixtures also contain fillers and plasticizers. At the construction site, nitro putties are once again diluted with special compounds (R-645, R-646 and other solvents) to bring the mixture to working condition. A striking example of nitro putties are: ASh-32, 30, 24, MBSh.
Mandatory characteristics of any putty composition?
Any putty, regardless of which group it belongs to, must have a number of required properties
Firstly, it is important that it is properly connected to the base, that is, it has high adhesion. Secondly, the putty must be homogeneous, that is, not contain any impurities or mechanical inclusions
If they are contained in the solution, this will create a number of problems when installing the putty. Specks can get stuck in the sprayer and also scratch the coating when applying the mixture with a spatula.
Thirdly, it is good if the putty gives minimal shrinkage, since it will be possible not to cover the walls with an additional layer. This will significantly reduce the time of facing work and financial costs. Fourthly, the dried putty should not crack or crumble. It should also be easy to sand. If this is not the case, then the putty composition was of poor quality. Fifthly, the next facing coating (paint, wallpaper, etc.) should easily lie on the walls and dry within the specified time.
How to make wood putty with your own hands.
As already mentioned, putty for wooden floors and walls is usually made at the factory and by hand. If you wish, if you have extra time, you can make this mixture yourself. To do this you will need a number of ingredients. So, for oil putty you need to grind 30 grams. pumice and mix it with 280 gr. linseed oil and 60 gr. turpentine oil Next, add 17 grams to this mixture. ammonia (18%), 12 gr. borax, 19 gr. gelatin, 19 gr. casein and about 300 gr. water. The resulting composition is stirred again.
Then the mixture is prepared in a so-called “water bath” and gradually brought to 90C. Moreover, all this time the composition must be mixed. The mixture can be removed from the water bath when it acquires a paste-like consistency. Next, the putty is given some time to cool. And then they use it completely
It is important to use up the entire composition at once, since later the mixture loses its properties. This putty is an excellent alternative to store-bought mixture, and is much cheaper.
In addition to oil putty, you can also prepare a water-based resin mixture with your own hands (acrylic putty for wood). They do it as follows. 400 grams of ozokerite are poured into a deep container. and rosin 200 gr. All this is melted, and then yellow ocher 400 g is added there. This is then stirred until a paste-like mixture is obtained. It must be applied while hot. A typical metal spatula is used. When the composition hardens, it can be reheated and reused.
The composition is applied to the surface quite simply. A certain amount of the mixture is strung with a spatula and the depression on the surface is sealed. But the main thing is to match the color of the putty to the shade of the wood before doing this. There are 2 ways. The first is to paint over the putty during the preparation of the mixture. The second is to paint the resulting patch on the surface. That is, first a colorless putty for wood is used, and then it is given a shade (the most suitable for the given wood). But you should do this only after the mixture is completely dry.
Which putty is suitable?
When it comes to high humidity, usually in the kitchen or bathroom, you need to pay attention to mixtures that contain oils. If the humidity in the room is low, then an adhesive version of the mixture is suitable. Today, the building materials market can offer many high-quality putty options for wooden floors
Let's start with the fact that acrylic putty for wooden floors is used to hide defects and finish grouting joints.
Its main feature is resistance to moisture and the absence of harmful substances in its composition, as well as fire safety, reliability and elasticity. It can only be used after the wood surface has been cleaned and dried. The main properties of this finish appear only after the drying process is completed. Another mixture that works great on wood is a solvent-based material that necessarily contains wood dust. Most often it is used for parquet floors and underfloor heating systems. I can confidently say that this variety allows you to easily process wooden floors made from exotic wood species, since it is quite easy to apply and dries quickly.
I have already mentioned oil putty. It contains water, malo and chalk, which make it strong and durable. The only disadvantage of this coating is that the wooden floor treated with it will take a very long time to dry. Water-based polymer putty can also be used. Its main function is to level and fill cracks. According to experts, this finish helps protect the floor from dust accumulation. It dries quite quickly, and over time it does not begin to fall into the cracks. It is strictly forbidden to use it with floorboards and floors made of balsa wood.Whatever mixture you choose, it must have certain properties: firstly, it must create good adhesion to surfaces and dry quickly without cracking. The ideal option is no compression of the material after drying.
Please also note that the putty should be easy to sand and also provide a good surface for adhesion to paints and varnishes.
Conclusion
The advisability of using one or another type of putty depends on the place and purpose of its use. If this is sealing cracks and chips in a house or apartment, then any material is quite suitable here . It is only undesirable to use a solvent-based mixture because of its pungent odor.
But this composition dries quickly and can be successfully used in non-residential premises. If you need to level the surface, then it is best to use homemade mixtures, which are a less expensive option.
Putty technology
Work on leveling a wooden floor with putty includes the following activities:
- Preparing the base. It is necessary to remove all particles of dust and dirt from the surface, as well as remove greasy stains. Before starting work, you should make sure that the floor covering is completely dry, otherwise the putty will not be applied well.
- Puttying. Putty is applied to the treated surface using a spatula. The layer should rise slightly above the surface, since during the drying process the mixture will shrink slightly and you will have to apply the putty again.
- Grinding. For this step, use a sanding machine or a holder with sandpaper attached to it.
- Elimination of remaining defects. If shells are found after sanding, it is necessary to fill them with putty, and after drying, sand again until the surface is as smooth as possible.
Thus, puttying wooden floors is not particularly difficult, and anyone who is doing work of this kind for the first time can cope with this task. At the final stage of puttying, the surface is treated with a primer, and after 2-3 days you can begin finishing the floor.
Peculiarities
Floor puttying is carried out to give it greater strength and increase service life.
The work of applying the leveling mixture is not difficult; it is only important to know some of the characteristics that the putty should have, including:
- increased elasticity. This property of the product helps the solution to be evenly distributed over the floor;
- absence of large parts. The presence of such elements can lead to scratches on the base during the coating process;
- adhesion ability;
- environmental friendliness;
- fire resistance.
Compliance with all requirements is ensured by adding various chemical elements to the putty.
The peculiarity of leveling mixtures is that different products are selected for different coatings. You can achieve a perfectly even floor if you carry out the puttying process correctly. Before laying linoleum, the surface must be leveled especially carefully, otherwise all defects will be noticeable. After all finishing work is completed, the floor may be constantly exposed to various temperatures, moisture, and the weight of furniture. To ensure the durability of the coating, you need to use only reliable types of products and methods of applying putty.
Preparation of working tools
To carry out puttying work, you will need to purchase some tools to make application easier and get the most even, smooth surface:
a fairly wide brush with soft bristles or a roller, with which the façade surface is primed;
Maklovitz brush
Rollers for priming walls
a construction mixer or electric drill with an attachment for high-quality mixing of the putty mixture;
Construction mixer
Several spatulas of different sizes allow you to process large areas of the facade, as well as corners or hard-to-reach areas.
Spatulas
Construction mixer price
Construction mixer
If paint is to be used as the final finishing of the facade, then the surface must be absolutely flat and smooth, so a well-dried layer of putty will need to be rubbed with a special fine-grained mesh.
Mesh for grouting putty
Recipes for making putty at home
Before filling a wooden floor, many people prefer to prepare their own finishing product.
If there are small defects in the form of wobbly boards, then first the floor is strengthened, and then a frame is made of thin beams, and the holes between the boards are filled with PVA glue.
This way you can level the coating before installing the laminate or linoleum.
Putty material according to component composition for concrete surfaces
Indeed, with skillfully selected and high-quality putty, you can level any surface and mask even the largest cracks. Based on the component composition for these purposes, you can select the following types of putties:
- Cement;
- Lime based;
- Oily;
- Adhesive;
- Varnish;
- Polymer nature or acrylic.
Often they try to improve the standard formula with the help of polyester and polyurethane additives, as well as other components that, to one degree or another, improve the quality of the finishing material. Puttying can be carried out with both liquid and thick compositions.
The first type is represented by self-leveling compounds, which are used exclusively to treat concrete surfaces. Such mixtures are distributed over the floor under their own weight, filling the cavities of the cracks, creating a perfectly smooth canvas. This technique is also called “solid putty.”
Video “Putty wood floor”
The recording shows a method for sealing cracks in a wooden floor with acrylic putty.
We recommend that you read
We build a high-quality wooden frame garage
We save wisely - we make decorative plaster from ordinary putty
Perfect surface by sanding walls after puttying
The best finishing putties
The purpose of this finishing material is to create a finishing coating, which should serve as the basis for painting or wallpapering. For analysis, 6 mixtures and liquid compositions were taken, of which only 3 combine high quality, safety, affordability and ease of use.
Danogips Sheetrock SuperFinish
Danogips Sheetrock SuperFinish putty is sold in ready-to-use paste form. You can find two volumes on the market - 5, 5.6 and 28 kg in buckets. The mass has an optimal consistency, does not spread over the surface and does not dry instantly. This makes it possible to adjust the applied layer, which, according to the instructions, should be thin - about 2 mm. The scope of application of this material is quite extensive - processing of concrete, drywall, lime plaster. It is used both for complete finishing of walls and ceilings, and only for closing seams or small cracks.
Danogips SuperFinish putty mixture is suitable for use in both industrial and residential construction. It can be applied either manually, using a spatula, or mechanically. This material is intended only for indoor work; the temperature at this time should be within +13ºC. The composition has a uniform texture and allows you to obtain a smooth white coating.
Advantages
- Does not require mixing components;
- Good astringent properties;
- Tight fit to the base;
- Does not crack or chip for a long time;
- Easy to sand.
Flaws
- During processing, the surface splashes a little;
- A special application tool is required - a gun, brush, etc.
TEX finishing Pro
We present latex finishing putty in a ready-to-use form. According to reviews, it is not difficult to apply due to its soft texture and optimal consistency. It is actively used both for complex wall finishing and for partial treatment of seams, joints, and cracks. The composition fits perfectly on a concrete, plasterboard, or plastered base, and you can safely glue wallpaper or apply paint on top.
TEX Pro works well on both ceilings and walls, but can only be useful when carrying out interior work. For their successful implementation, the air temperature in the room should not be lower than +5ºC, and the humidity should not be less than 80%. This composition is not obstinate in application, but thorough cleaning of the base from contaminants still cannot be avoided.
After this, it is important to let the coating dry, which will take up to 4 hours. If desired, a primer from the same manufacturer can be applied over the putty layer.
Advantages
- Easy to apply;
- Levels the surface well;
- The finished coating does not crack;
- Wide selection of packaging - 1.5, 5, 8, 16 and 30 kg;
- The coating dries quickly - about 4 hours.
Flaws
The maximum permissible layer thickness is 3 mm.
TEX Pro putty is applied using an ordinary spatula, and it is better if it is wide and long enough to prevent the composition from spreading.
Hercules GT-33
Finishing putty “Hercules GT-33” was created for leveling joints in gypsum fiber boards and gypsum boards, as well as ceilings and walls. It is sold in dry form, and the powder must be diluted with water in the proportions of 0.55-0.7 liters of liquid per 1 kg of raw materials. It is not recommended to prepare a lot of composition at once due to the rapid loss of elasticity. Thanks to the fine grinding (the largest particle size is 0.3 mm) and good solubility, there are no lumps left in the mixture and it does not require intensive stirring.
This composition has high plasticity, facilitating surface treatment. It is primarily intended for work on concrete, but the finished coating can be painted or finished with wallpaper. Due to the combination of polymers, gypsum and fine mineral fillers, high-quality adhesion to the base is ensured. Its minimum permissible thickness is 0.3 mm, but there is no maximum limit.
Advantages
- Beautiful white color;
- Homogeneous texture;
- Shelf life – 2 years;
- Adequate consumption of the working mixture is 1.0 kg/m2;
- Tightness of packaging;
- Good density.
Flaws
- Must be applied strictly at a temperature not lower than +5°C;
- Not intended for use outside buildings.
Dry putty mixture “Hercules GT-33” is available for sale in two volumes - 5 and 15 kg; if you choose a larger quantity, you can save a little.
Application rules
To make the coating look more natural after treatment, you need to follow certain conditions when working:
- It is necessary to cover all the cracks in the wood outdoors at a temperature of at least five degrees Celsius, otherwise the composition will turn out to be too viscous and will not be able to fill the cracks and crevices well. Air humidity at this moment should exceed 75 percent.
- The surface to be treated must be well prepared in advance - clean all the voids that will be filled with the mixture, wipe off the dust with a damp cloth, remove the old varnish coating if necessary and clean the surface with sandpaper.
- The putty should be applied with a stainless steel spatula or a simple plastic spatula.
- If you need to fill a large crack with a diameter of one centimeter with the mixture, then it is better to putty it in several layers at once, allowing each previous layer to dry well. The thickness of each layer should not be more than 2-3 millimeters. Drying time directly depends on the composition of the putty (it is best to study the instructions on the package).
Algorithm for using putty
If, for example, putty is used for a board floor, then the work must be performed in the following order:
- Only prepared surfaces can be puttied. If local defects are being repaired, then it is necessary to run a grinding machine over the area next to the crack or chip. The inside of the defective object can be cleaned with a simple knife or other sharp object;
- if in the future you plan to replace the existing floor covering, then, first of all, it is necessary to examine the flooring for rotten and poorly secured boards. Then they are replaced, the surface is ground and sanded. Very deep cracks must be cleaned;
- After preparing the surface itself, it is necessary to eliminate existing deep defects. Any cavities must be filled. However, starting putty is usually used for these purposes. If work is carried out with the finishing composition, then it is not advisable to prepare two mixtures and spend money on their purchase. It would be more practical to use twine or rope of suitable sizes. The element is impregnated with an adhesive mixture and pushed into the crack using a screwdriver. After the mixture dries, you will get an almost uniform coating, ready for processing; the putty process itself is carried out using a rubber spatula. The applied composition dries in about a day, but if defective areas with a deep structure were eliminated, then you should wait 2-3 days.
You can give a woody tint to our putty by adding certain additives to the composition. The cheapest way to prepare the composition yourself is gouache or ocher.
Choice depending on the type of base
One of the main criteria for choosing a putty is the type of surface you will be working with. This can be wood (boards, plywood, parquet, fiberboard or chipboard), gypsum fiber sheets or concrete. To work with the latter, cement putty with a waterproof effect is used. With its help it is possible to produce a very durable surface.
Parquet putty
Each type of base requires special qualities from the putty. So, for working with wood, the composition should be:
- Plastic throughout the entire stage of work.
- Do not form cracks on its surface after drying.
- Create an organic combination with paintwork finishes.
When working with chipboard, the working composition should not shrink. This quality is typical for acrylic, latex and silicone putties. Oil and adhesive compositions successfully cope with large cracks.
Types, composition and characteristics of putties
Depending on the method of application and purpose, the following types of putties are distinguished:
- Basic (starting). Used to eliminate serious flooring defects.
- Finish. Allows you to complete the processing of parquet and rid it of minor defects.
- Universal. This type of putty is suitable for any work on grouting parquet.
In addition, all putties differ in composition. Different components give materials different properties and characteristics.
On solvents
The main advantages of solvent-based putty are its rapid drying and high strength. The use of such materials reduces the time required to repair flooring. Natural wood sawdust acts as fillers in the putty, thanks to which the composition quickly fills all pores and gaps. Solvent-based alkyd putties are also produced, additionally including alkyd resins and linseed, soybean or other vegetable oil. The only disadvantage of solvent-based products is the strong unpleasant odor. When working, you will have to strictly observe personal protective measures and constantly ventilate the room.
Acrylic
Grouts containing acrylic are the most popular when working with parquet. They reliably fill pores, cracks, chips, small grooves, and are suitable not only for parquet, but also for other similar coatings. The acrylic composition is safe, environmentally friendly, does not harm the body and is odorless.
Among the advantages of such putties are elasticity, resistance to mechanical stress, and suitability for grinding. Unfortunately, acrylic has an average degree of adhesion to substrates and over time can peel off from the edges, especially with frequent exposure to moisture. The coating with acrylic putty applied will have to be restored periodically.
Oily
Oil putties contain only natural raw materials - vegetable oils, chalk, water, they are harmless and environmentally friendly. The oil solution fills gaps and cracks well and is suitable for working with any type of wood, including maple, pine, and oak. The putty lasts for several years without the need for repair. The only disadvantage of such products is the long drying time, so the speed of rubbing the parquet will be low.
Polymer
Putties based on polymers and latex are used for all types of parquet, except for cork flooring. They are laid in a fairly thin layer (up to 3 mm), so they practically do not crack. Polymer materials have high adhesion to substrates, even very smooth ones, last a long time, do not sag, are elastic and very durable. They are not afraid of moisture, water vapor, and can be used in rooms with any level of humidity. The disadvantage of such funds is their high price.
Homemade putties
If necessary, you can make high-quality putty for parquet with your own hands. To do this, you need to prepare a small set of available components and a mixing container. The most popular recipe is the following:
- drying oil - 0.5 l;
- animal glue - 100 g;
- liquid drier - 25 g;
- turpentine - 125 g;
- liquid soap;
- chalk powder.
The glue is heated in a water bath, since it is sold in solid form. Add the remaining ingredients, except soap and chalk, and mix well. Add the remaining two ingredients in small quantities so that the mixture acquires the consistency of thick sour cream. The finished mass is immediately used for its intended purpose, periodically heating, otherwise it will quickly thicken. The quality of such a mixture will be inferior to professional ones, but it will perform the main tasks.
There are other recipes that are suitable for making putties. Here are the most popular:
- Take PVA wood glue, add equal parts of chalk and small sawdust. Mix the ingredients until a mixture resembles sour cream. Seal the cracks in the parquet with the mixture and leave to dry for a day.
- Mix sawdust and crushed chalk (equal amounts) and dilute the mixture with a transparent water-based varnish. This mixture dries faster and gives minimal shrinkage, and is also highly elastic. It can be easily tinted with stain or pigment for water-dispersion paint of the desired tone.
- Take a base of sawdust and chalk, dilute it with nitro varnish to a thick sour cream, add color. Apply immediately to the coating, as nitro varnish dries quickly. You only need to work with good ventilation of the room - the varnish has an unpleasant odor.
Varieties of putties for different types of base
| Photo | Name | Rating | Price | |||
| Putty for working with concrete | ||||||
| #1 | Gypsum mortar | ⭐ 98 / 100 | More details | |||
| #2 | Cement mortar | ⭐ 96 / 100 | More details | |||
| #3 | Acrylic mixture | ⭐ 95 / 100 | More details | |||
| #4 | Epoxy composition | ⭐ 95 / 100 | More details | |||
| #5 | Waterproofing solution | ⭐ 92 / 100 | More details | |||
| Types of putty for working with wood | ||||||
| #1 | Water-based putty | ⭐ 91 / 100 | More details | |||
| #2 | Solvent putty | ⭐ 90 / 100 | More details | |||
| #3 | Oil solution | ⭐ 93 / 100 | More details | |||
| #4 | Polymer-based composition | ⭐ 96 / 100 | More details | |||
Making your own putty for flooring
An example of applying putty to parquet
The base for the mixture, which you prepare yourself, is drying oil. The following components are taken per 500 grams of the base substance:
- glue 10% - one hundred grams;
- varnish kerosene or turpentine - one hundred twenty-five grams;
- liquid drier - twenty-five grams;
- dry chalk;
- regular liquid soap.
Heat the glue over low heat and pour liquid soap into it. The mixture is heated over the fire for some time and must be constantly stirred. Then drying oil, drying agent and kerosene (turpentine) are added to the composition. The mass is boiled for 5-10 minutes, and then chalk is poured into it. The mixture is stirred until thick sour cream thickens, after which it can be used to putty on wooden surfaces.
However, you need to know that when working with homemade putty, many nuances must be observed: in particular, the mixture should not cool down and should be constantly heated in a water bath. This is not very convenient and therefore it is better to purchase a ready-made composition, which is easier to work with your own hands.
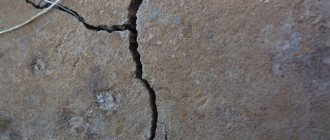
Reasons for the formation of cracks
To choose the best method for sealing cracks, you first need to accurately determine and eliminate the cause of their appearance. If this is not done, the result of the repair work will be short-lived and after a while everything will have to be repeated again.
The following factors contribute to the formation of cracks:
- natural drying - any wood is subject to drying, only with different intensities. Boards processed in vacuum chambers almost do not change their geometry during their service life, but ordinary lumber can dry out by 5-10%, or even more, depending on the initial moisture content and the type of wood;
- Wood is subject to natural shrinkage
- low humidity in the room - if the air in the house is too dry, the boards will intensively release moisture and decrease in size. For wooden floors, the optimal air humidity should be between 40-65% at a temperature of 18 to 25°C;
- improper installation - violation of laying technology leads to loosening of the boards, their subsidence and deformation, as a result of which gaps form between the floorboards. The most common mistakes are failure to maintain the plane when installing joists and weak fixation of the flooring;
- If installation is performed incorrectly, cracks may appear.
- rodents living under the floor - mice and rats are able to chew through the thickest boards in order to get into the room. The more active the pests are, the more cracks and holes they will create, and such damage is the most difficult to eliminate;
- laying raw lumber - drying of the boards during the use of the floor almost always leads to significant deformations of the flooring and the appearance of gaps between the floorboards. That is why when choosing, you should give preference to well-dried, smooth boards with a relative humidity of 8-12%.
- Laying raw lumber leads to significant deformation of the deck
Depending on the number and size of cracks, as well as the general condition of the wooden elements, repairs can have varying degrees of complexity - from repairing individual damage to completely replacing the flooring.
Types of putty for wooden floors
Today, the construction market offers a large number of different putties for wooden floors, which, based on their composition, can be divided into several main types:
- solvent-based putty mixtures;
- acrylic mixtures;
- oil putties;
- polymer mixtures;
- DIY mixtures.
- Solvent-based mixtures contain fine wood chips as the main component, which are considered a reliable coating for floor coverings made of any type of wood. The main positive characteristics of this composition are ease of use and quick drying of the mixture, which significantly speeds up the process of laying or repairing the floor.
Solvent based mixture.
- Acrylic parquet putty also has several positive qualities and is indispensable in work on eliminating minor wood defects. It is often used for grouting joints between wooden tiles, as it is environmentally friendly and does not release toxins when exposed to high temperatures. The main quality is elasticity and resistance to various mechanical loads. Acrylic also significantly increases the water-repellent qualities of wood and significantly increases its service life.
Acrylic mixture for puttying parquet floors.
- Oil compositions contain components such as oil, water and regular chalk, which makes it possible to use it on any type of wood. The putty has a very long service life, however, due to the presence of oil in the composition, it takes a very long time to dry, which significantly reduces the speed of work. Putting parquet with your own hands using oil mixtures requires strict adherence to the instructions for use, which are indicated on the packaging from the manufacturer.
Oil mixture for parquet putty.
- Polymer solutions are environmentally friendly and are usually used in rooms with increased sanitary requirements. Can be used on any type of wood except cork. The main advantages of polymer putty mixtures are the following features:
- filling small voids and cracks;
- smoothing out unevenness and other natural defects;
- protection of the end edges of the tree;
- does not settle after drying;
- does not create static electricity, which prevents dust from sticking.
Polymer mixture for puttying wooden floors.
- It is very often practiced to putty parquet from personally prepared solutions, which allows you to significantly save money and make exactly the composition that is necessary for a particular case.
Homemade putty mixture
First option
In order to prepare this mixture at home, you need the following ingredients:
- 500 grams of drying oil;
- 100 grams of animal glue with 10% concentration;
- 125 grams of varnish kerosene or turpentine;
- liquid drier 25 grams;
- liquid soap;
- regular chalk in powder consistency.
Heated animal glue.
Animal glue is heated in a metal container over a fire, stirring constantly. While heated, the remaining ingredients are added to the glue and stirred until a mixture is formed, which in consistency will resemble thick sour cream. This solution is mainly used as a putty for parquet: oak, aspen or pine.
It is important to remember that the mixture must be used only in a warm state, maintaining its constant temperature during operation
Option two
The second option is a simpler, but no less effective method of preparation.
To do this, you need to take regular PVA glue and add wood dust that remains after processing your parquet. The dust is mixed with glue to form a thick mass (photo) and applied to the surface using a spatula. This type of putty will provide a natural color when sealing joints, but it has its drawbacks. When the glue dries, it settles and hardens.
Self-prepared putty from PVA glue and wood dust.
Putty process
Before puttingtying the parquet, it must be thoroughly vacuumed and, if possible, wiped with a damp cloth. Puttying is used in all types of work, both when installing new parquet and when repairing or maintaining old ones.
The putty is applied to the parquet using a regular metal spatula in a circular or semicircular motion in order to fill all the seams and small cracks as much as possible. After the mixture has hardened, the floor is ready for polishing.
Puttying parquet.
Concrete floor
The most important stage of repair work is the creation of a flat, durable concrete surface. If there is a base with defects, putty is successfully used to eliminate them.
Concrete floors initially have high strength, but their top layer can begin to collapse in the presence of various kinds of defects that are insignificant at first glance - chips, crevices, cracks. Subsequently, expensive repairs will be required, especially if this is an industrial or public premises.
Recommended putties for working with concrete surfaces
With the help of putty, the surface of the concrete floor becomes more even and prepared for laying the finishing coating.
Putty for working with concrete
To putty a concrete floor, you can choose a base and finishing mixture. But according to experts, a more economical option would be to use universal compositions that work equally at both the preparatory and final stages. At the same time, the consumption of the mixture is significantly reduced.
Self-leveling mortar
Concrete putty is dry and paste-like - ready for use. The mixtures also differ in the method of application - a more liquid composition has self-leveling properties and is applied over the entire surface of the floor. Thicker compositions are suitable for local repairs of individual damaged areas.
A rough screed does not require special qualifications of the builder, but, nevertheless, involves a large number of works associated with its creation. You will find the features of the device and a calculator for calculating the amount of ingredients for a floor screed solution in our article.
Gypsum mortar
Gypsum-based putty is one of the common types of solutions for leveling concrete bases.
Preparation of gypsum solution
pros
The advantages of this composition include the following:
- Gypsum plaster does not shrink.
- The solution has a high drying rate.
- The material is available and has a low cost.
- A smooth surface is created by applying one layer.
- Suitable for tinting in any shade.
Minuses
The only, but significant, disadvantage is
vulnerability to moisture. Therefore, the composition is not suitable for leveling concrete floors in rooms with high humidity.
gypsum putty
Cement mortar
Cement putty is an example of a combination of reasonable cost of material, high quality repair layer and moisture resistance.
Working with cement mortar
pros
The advantages of finishing concrete with cement plaster include the following:
- The concrete surface acquires excellent resistance to high temperatures.
- The floor becomes moisture resistant .
- The coating becomes strong and durable.
Minuses
The disadvantages include noticeable shrinkage when the solution dries completely and the need for skill in working with cement composition.
cement putty
Acrylic mixture
One of the easy-to-use varieties for working with concrete is a ready-made paste putty based on acrylic copolymer and reinforcing fibers. Its purpose is to repair deformed foundations, seal joints, cracks and seams. The main advantages of the multicomponent composition are moisture resistance and the absence of shrinkage of the created layer.
Restoration acrylic putty
pros
The advantages of the material include:
- Elasticity and strength.
- Easy to apply.
- High adhesion.
- Can be used for interior and exterior work.
Minuses
Not detected.
acrylic putty
Epoxy composition
If it is necessary to carry out work to level and strengthen concrete foundations that have noticeable damage in the form of large cracks, embroidered seams, traces of removed reinforcement, it is better to use epoxy putty, which effectively tightens the concrete and increases its strength and service life.
Epoxy two-component composition for concrete
The advantages of this composition include the following:
- The composition qualitatively fills cracks, crevices and joints. Eliminates voids formed after replacing pipes and other communications.
- Epoxy mortar can be used to securely bond difficult areas and repair structural damage.
- The coating is durable, wear-resistant and monolithic , not requiring additional processing.
- The composition has excellent adhesion to any surface.
- The composition forms a coating that is resistant to moisture, chemicals, microorganisms, fungus and mold.
epoxy putty
Waterproofing solution
Waterproofing putty has increased moisture resistance due to its special composition - urethane components, a dry mixture of base, hardener, targeted additives and dispersion emulsion, and can be used as an independent coating, which allows you to save money when performing repair work.
Putty with increased moisture resistance
This putty is used for the restoration of concrete bases in rooms with high humidity - bathrooms, steam rooms, showers. The main advantage of this composition is that it is not necessary to wait for it to dry completely - further work can be done on the wet layer.
waterproofing putty for floors
Selection of putty - criteria
When choosing a putty, you must first take into account the purpose of the room, the type and properties of the base to be treated and the technical parameters of the solution itself. The main criteria that will need to be taken into account are the following:
- Adhesion level. For surfaces with a smooth texture, special mixtures are chosen.
- Base material.
- The degree of moisture resistance of the composition.
- The level of vapor permeability of the resulting coating.
Characteristics of the compositions and their purpose
Note! Putty designed for working with concrete is not suitable for aerated concrete, since the mixtures contain different components and additives selected taking into account the structure of the material.
Application
At the first stage, it is necessary to carry out a number of preparatory activities. First, dismantle the old coating.
After removing the old coating, you may notice signs of damage to the base
If signs of concrete destruction are detected, it will be necessary to joint and clean deep cracks and crevices using a drill and a construction vacuum cleaner to remove the weak surface layer.
Cleaning the base
Deep cracks are sealed using cement mortar with bitumen or PVA glue as a binder.
Using special products or soapy water, remove grease and rust stains, dirt, mildew and mold from the surface of the base.
Base primer
An intermediate and very important stage is priming the concrete base. The primer composition has a liquid consistency and is designed to strengthen the surface of the concrete base, as well as increase the adhesive properties of the surface.
Expert opinion
Afanasyev E.V.
Chief editor of the pol-exp.com project Engineer.
The concrete surface tends to generate dust from the porous structure of the coating, which, as a result of the formation of microcracks, becomes increasingly prone to destruction. Primers for concrete are most often made on the basis of polymers and contain quartz sand, which allows you to obtain a rough surface with excellent adhesion. For rooms with high mechanical loads, use a polyurethane or epoxy primer.
Betonkontakt is the best choice for concrete foundations
You can apply the primer to the surface using a spray gun, roller or brush.
Primer Tools
Table 2. Applying a primer to a concrete base
| Illustration | Description |
| Immediately before applying the primer, the base must be thoroughly vacuumed. | |
| If the primer is two-component, then its preparation must be carried out in strict accordance with the manufacturer’s recommendations indicated on the packaging. | |
| The primer is applied using a roller, first parallel to one of the walls, then perpendicular. | |
| Particular attention should be paid to the joint between the wall and the floor; you can use a brush to treat hard-to-reach places. | |
| After applying the primer evenly over the entire surface of the floor, it is left to dry. Then the processing is done again. |
At the next stage, a solution is prepared if it is purchased in dry form and requires mixing with solvents or water. It is important to follow all manufacturer's recommendations regarding the proportion of components to be mixed. At the same time, according to experts, water can be added 15% more than the value specified in the instructions.
Preparation of the solution using a special mixer tool
Additionally, additives are added to the solution in the form of PVA glue, chalk, crushed sawdust, pre-soaked in water for 12 hours. To make the coating resistant to temperature changes, drying oil can be added to the solution.
Note! Each package of putty indicates the pot life of the solution - this is the time interval during which the entire diluted composition must be used. After this time, the solution begins to harden. Therefore, it is not recommended to immediately perform a large batch, especially if there is no experience in such work.
The putty is applied in several steps - each layer should have a thickness of no more than 5 mm. At the same time, you should not get hung up on removing all the irregularities.
The putty is distributed evenly over the entire surface
Depending on the consistency of the solution, the putty is thrown onto the floor surface in small portions or poured and spread with quick movements using a spatula. To prevent cracks from appearing on the coating after drying, the first layer should not be made too thick.
Each layer must dry within 12 hours. After this, you can begin applying the next layer. The putty dries completely within a day. If there are deep cracks, drying will take a couple of days.
Important! While the putty is drying, there should be no drafts or sudden temperature changes in the room.
Recommendations for repairing seams
When the putty has completely dried, it is necessary to eliminate large irregularities. To do this, you can use sandpaper with a grit of P120-150.
Video - Floor putty
Video - Technology of puttying a concrete base
Popular manufacturers and prices
Tikkurilla
One of the most popular brands. Combines uncompromising quality with increased moisture resistance. A liter jar will cost 500-600 rubles.
VGT
The acrylic composition has a unique layer thickness - up to 7 mm can be applied in one pass. Durability and quality are combined with an affordable price - 90-120 rubles.
Tex-pro
latex polymer putty is intended for interior work and is applied in a thin layer - up to 1 mm. It serves to smooth out minor defects. A liter jar costs only 55 rubles.
Borma Wachs Holzmasse K2
The manufacturer cannot yet boast the same fame as Tikkurilla, but is not inferior to it in quality. Dries up to twelve hours. The polyester composition for external work feels great in rain and snow. It will cost 480 rubles.
Master City furniture
The acrylic composition is ideal for hard and dense wood and has high moisture resistance. A liter tube costs 189 rubles.
Parade S40
Acrylic-based putty is suitable for damp rooms and can be applied in a layer up to 5 mm thick. Complete drying time is 12 hours. A 1 liter jar will cost 180-200 rubles.
Parade S40
Lacra on wood
This acrylic composition dries in just three hours. For use in dry rooms. Designed for painting and costs 80-90 rubles.
Somitek Fine WR
The finishing putty is designed specifically for wet rooms, such as baths, showers, and yacht cabins. It can be applied in a layer of up to 5 mm, and dries within a day. 350-380
Neopur Filler Solution
An alcohol-based composition for interior work, which recently appeared on the domestic market, is characterized by an uncompromisingly short drying time - only half an hour. But a liter jar will cost 860-890 rubles.
Putty for wooden floors is an effective means for leveling the surface and preparing it for painting. Among the large number of compositions on different bases and with different drying times, you can always find one that best suits the floor material, paint and does not overload the repair budget. The application of putty can be done by a home craftsman with minimal construction experience.
Wood putty
Kinds
First of all, it should be said that the quality of putty largely depends on the choice of composition. Therefore, first of all, we will consider how to putty wood.
Currently, there are quite a few varieties of putties, which makes their choice somewhat complicated. Therefore, first of all, let’s get acquainted with the most common of them:
| Tish putty | Peculiarities |
| Plaster | It is often used for woodworking, so it can be considered a classic option. This composition has good adhesion and elasticity, and its price is quite low. The only thing to keep in mind is that gypsum putty does not tolerate moisture. |
| Acrylic | The cost of such putties is much higher than gypsum compounds, but they have a number of advantages, such as:
The disadvantages of this composition include the fact that it is not intended for sealing wide and deep cracks. |
| Polymer | They are also considered expensive putties, but they lie smoothly, dry quickly and are highly durable. Therefore, they can be used to work with parquet and other surfaces that will subsequently be subject to significant mechanical loads. Prominent representatives of polymer putties are latex and silicone compounds. As for the disadvantages, besides the high cost, they have no obvious disadvantages. |
| Nitro putty | Resistant to chemicals and water, does not shrink and is easy to sand. For this reason it is also very popular. |
Please note! The putty can be starting and finishing. As a rule, the finishing putty is more liquid and elastic. Latex putty
Latex putty
As we can see, each material has its own characteristics, and it is quite difficult to say which wood putty is better. Therefore, you should choose depending on the operating conditions of the wooden structure and the characteristics of the defects that need to be eliminated.