Most small saunas and bathhouses, as a rule, are designed with a simple one-slope roof. You can talk for a long time about the advantages of other roofing schemes, but in practice, a pitched roof for a bathhouse remains the most preferable option. Unless, of course, the area in which you plan to build a steam room is not characterized by strong winds or arctic frosts. Only in this case does it make sense to change the project, build a bathhouse with a flat roof or install a gable roof with additional insulation of the ceiling.
A pitched roof looks no worse than any other option.
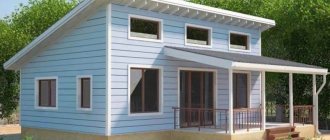
Bathhouse with a pitched roof: projects
In order not to make a mistake in choosing the design of the rafter system and then the roofing covering, you need to decide in advance on the main characteristics:
- Dimensions and material of the lean-to bathhouse box. It is believed that stiffer brickwork makes it possible to use lighter rafters and fewer auxiliary struts and struts;
- The planned angle of inclination of the pitched roof, the dimensions and method of fastening the rafters;
- The nature of the roof covering.
In addition, you will need to make a choice regarding the insulation scheme. For example, a pitched roof of a bathhouse does not need to be insulated by laying thermal insulation on the ceiling. The roof turns out to be cold and as light as possible, so there is no particular need to make the rafters very thick and rigid.
Schemes of a lean-to bathhouse with a warm roof (above) and an insulated ceiling (below)
The second option is more labor-intensive, but it is often used for small steam rooms built of brick or block. Many owners prefer to insulate a pitched roof for a bathhouse with their own hands. At first glance, there is no logic in such a decision, since heat and moisture will affect the rafters and other wooden parts of the frame. In fact, the benefit is that in such a lean-to sauna project there is no attic, and the entire under-roof space is included in the useful volume of the sauna.
Important! True, such a solution can only be used for pitched roofs with a small angle of inclination and a special rafter laying pattern. Accordingly, roofing coverings such as bitumen and clay tiles and ondulin cannot be used.
For different walls
Depending on the material from which the bathhouse is built, the roofing system is also calculated. For example, for frame structures, the weight of the roof cannot be too large, because the walls will not support it. Let's look at the nuances associated with two types of walls other than brick, which are primarily referred to in various manuals for the calculation and installation of roofs.
For a log house
Since you have decided to make the roof for the bathhouse with your own hands, then most likely you are making the frame yourself. In this case, it will not be news to you that a rafterless system was usually used in log houses. That is, what is today called pediments were called “males”, laid out from logs, and transverse logs, which were called “slegs”, were laid on the resulting ledges with locks. However, this system requires two ramps.
If preference is given to a pitched roof, then using the old system will not work. Well, or we don’t have information on how to implement this. Instead, a return to the rafter system is proposed, in which the upper crown will be considered as a Mauerlat, but in this capacity it will require more reliable fastening with the previous crowns.
Then the fastening of the rafters will be similar to that described above. However, in the case of a wooden building, such properties of wood as shrinkage and changes in dimensions during operation become of great importance.
Since shrinkage lasts much longer, and under the influence of temperature and humidity the log house will “breathe” - increase and decrease the volume, you should choose movable connections of the upper crowns (= log frame mauerlat) with the rafters. To do this, you should pick up metal fasteners called “sliders” in stores. They can be of different designs, and also give freedom of movement to different distances.
Here is an example of attaching rafters to sliders:
This concerns the lower mount. Since we do not have a ridge, and on the opposite side we are dealing with the same upper crown, it is possible, and best of all, to be attached to a sliding connection .
swivel and are also possible . The second involves just cutting the rafters (described above). In this case, laying the rafters becomes easier.
If rigid fixation is chosen using various types of metal fasteners, this leads to a shift in the bending moment closer to the ridge. However, in our case this is not a ridge, but a load on one of the walls, so we will not recommend it. In addition, spacer pressure compensation is needed there.
Options for rafter systems for pitched roofs
The layout of the rafters for the bathhouse must be selected for the specific type of roofing. If you have to use the steam room quite often, then it is best to choose a project with a warm ceiling, an uninsulated roof with a fairly large slope, and use corrugated sheets or metal tiles as a covering.
Project with a light pitched roof
If the weight of the roofing covering is relatively small, then the rafter system can be laid on the ceiling of the bathhouse on the so-called racks. Single supports are attached directly to ceiling joists and rafters using metal or wood flashings.
Next, sheathing boards are sewn over the rafters, on which the vapor barrier and roofing are laid.
Classic version of a pitched roof
The previous rafter laying scheme has one significant drawback. The racks and rafter frame parts are attached directly to the ceiling beams of the bathhouse. In conditions of strong wind, rain or snow, the roof rafters can push through the ceiling of the bathhouse and even deform the insulation and vapor barrier.
To avoid such problems, a pitched roof is built by laying the rafters on a so-called bench - a system of supports with struts
In fact, this is just a support system for the central part of the rafter beams. The main load from the roof and snow is transferred to the Mauerlat and to the timber panel installed on the facade and rear of the bathhouse box.
Rafter system for a log bathhouse
For log buildings, sliding rafters are used. Any log boxes, including log baths, shrink after assembly; the walls can sag by 5-7 mm due to deformation of the material. Therefore, the rafters are supported on the walls in a hanging pattern with a groove cut along the upper crown.
In addition, the rafter beams of a log bathhouse with a pitched roof are fixed with a special sliding suspension or support. In the lower part, the rafter is laid on the wall with an overhang that provides a protective cornice over the upper rims of the walls.
The same cornice is attached with bolts to the upper ends of the rafter beams; its presence, in addition, makes it possible to press and fix the top of the roof to the log wall.
The simplest version of a roof without rafters
The most affordable roofing scheme for a bathhouse is shown in the drawing below.
It is also called the garage option, since the device does not have classic rafters. Their functions are performed by the beams of the ceiling of the bathhouse, laid in a direction transverse to the facade.
The roof slope is formed due to the fact that the crossbars are laid on the walls at different heights. After sewing on the counter-lattice boards, a frame of a pitched roof is obtained, onto which plywood is sewn and the roofing covering is laid. In this case, it can be asbestos-cement slate or two-layer glass roofing felt on fused mastic.
Important Calculations
Of course, you cannot start construction without checking with your own hands, step by step, its most important parameters for a pitched roof of a bathhouse.
These include:
- Selecting the section and length of the rafter beam;
- Determining the angle of inclination of a pitched roof.
You can try to perform a verification calculation using a specialized program, but it is much easier to check or select a section using the table below.
The correctness of calculating the dimensions of a pitched roof can be checked using the diagram below.
Device: design
The slope of the roof, called the “slope”, is intended to ensure that precipitation does not linger . The angle of its inclination can be different, and it depends on various factors - the presence or absence of an attic/attic, the wind load characteristic of a given area, the amount of precipitation characteristic of a given area, as well as the material used to cover the roof - for each of them there are restrictions on the permissible angle of inclination of the surface.
who draws up a report on a leak in an apartment?
It is advisable to install pitched roofs so that their
low part is turned towards the main and strongest wind of the area.
The design of a pitched roof for a bathhouse is very simple: the rafters are supported on two opposite walls of the building, and the support can be either the walls or various trusses and other structures built on these walls. (A lot depends on the project and the material from which the bathhouse is built).
If the bathhouse is built of block material (brick or cellular concrete), then the support will be the Mauerlat - this is a special strapping beam made of wood, which is attached to the main material of the walls with strong metal pins and serves, in turn, to fasten the rafters.
The beam on the high side is called “ridge”, but this is a conventional name adopted from gable roofs.
Therefore, you need to carefully consider what is suitable for your bathhouse, and what you yourself want to see in it. In principle, it is possible to make without an attic , only the ceiling will need to be properly insulated (link to an article about materials, etc.). And here is another article about insulating the roof of a bathhouse.
A 50X150 board is well suited for rafters.
And if you want both an attic and a pitched roof, then you can raise the walls or make trusses in such a way as to create a space that meets fire requirements.
Rafters or rafter legs are either logs/beams or boards that serve as the foundation of the roof. They are distributed as follows: it is imperative that the rafter leg rests on the walls from the edges
The remaining legs are distributed as follows: the step between them is quite arbitrary, so placing them is simple - for logs/beams the step is 1.5-2 m, for boards 1-1.75 m. The main thing is an equal distance between adjacent rafters.
The cross-sections of the materials used for the rafters are as follows:
As for the need for struts, it arises only if the length of the run is more than 4.5 m. If the length is up to 6 m , one strut is made, if 6-9 m , two struts are made on both sides. Next, we need a cantilever-girder structure, but we are talking about a bathhouse, and where did it get such dimensions?
Strut (brace, jib)
- a diagonal structural element designed to connect and transmit compressive stresses that form in various floors and trusses. Used in rafter roofs, trusses and other frame structures. Wikipedia.
The sections of the struts are also standard:
Now a little about materials. Each roofing material has a range in which it best adheres to the roof surface. Typically, manufacturers indicate the minimum angle at which the material retains its performance characteristics.
Look at the table we borrowed from the book by Nazarova V.I. “Modern work on the construction of roofs and roofing.”
It goes without saying that when choosing the cross-section of the rafters, you need to take into account the total weight of the entire flooring and the future snow load, which is calculated from precipitation maps (the amount of snow per square area is taken from there) and the roof area.
Calculation of the cross-section of rafters for a pitched roof with an area of 7 by 9 m (this is a sample, no more)
(kg)
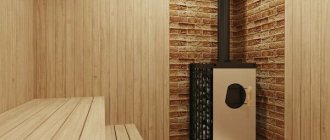
Bathhouse with a pitched roof: photo
For those who like classic forms, we can recommend a sauna in the style of a country bungalow or guest house. The roof is formed with a slight slope towards the rear wall, the entrance to the bathhouse is traditionally closed with a huge overhang, while the rafter heads are deliberately not lined in order to make the design of the sauna close to the shape of the Chalet.
For a log bathhouse, making a protective canopy for the bathhouse at the entrance will be quite difficult, primarily due to the large angle of inclination of the roof plane. This is required by the specifics of laying ondulin or slate, so the canopy has to be built additionally over the open terrace.
The entrance to the bathhouse can be arranged not from the facade, but from the side wall.
Shed roofs for the smallest steam rooms and bathhouse buildings without ceiling insulation.
The advantage of a pitched roof is the ability to create a full-fledged place for relaxation under the overhang, for example, a veranda or terrace.
A special chic is a separate sauna for two families under one flat roof. One room can even be converted for use as a living room.
Useful tips
If you dream of a home with impeccable style, the following recommendations will be useful:
- If your house has a traditional look
, in most cases it is assumed that a roofing material that is darker than the façade finish will be chosen (although the opposite solution is not prohibited). If the dominant color seems bland, you can dilute it with bright accents. - For a home in a classic style,
bright and provocative colors are prohibited. The combination of white and dirty pink tones for facade decoration has a noble sound; white and hot pink will remind you of a bowl of marshmallows.
How to properly make a pitched roof on a bathhouse
For a novice builder, the process of making a frame and installing rafters may seem quite complicated, but this is only the first impression. If you follow the diagram below, then laying the base of a pitched roof will not be difficult.
Advice! Do not rush to cut the finished rafters until the blanks have been lifted onto the ceiling and accurately measured at the installation site. Any attempts to build a pitched bathhouse roof according to drawings, without sufficient experience, usually end in waste of wood.
The easiest way is to build a lean-to bathhouse as an extension to a residential building. The principle is the same, but the risk of making a mistake is noticeably less, and the roof is much more stable.
Preparing the bathhouse floor for laying rafters
Before assembling the frame, the upper part of the walls of the bathhouse must be aligned with the horizon. This can be done using masonry mortar. It is impossible to level the base for the support of rafter beams using a Mauerlat; it is necessary that the beam rests evenly on the wall over the entire surface. In addition, you will need to lay roofing felt waterproofing and lay ceiling beams on the walls. In this case, it is a beam with a section of 150x90 mm.
The distance between the beams of the bathhouse ceiling must be adjusted using a template and each one must be temporarily secured with a couple of nails. To make it more convenient to walk on the beams of the bathhouse, overhangs protruding beyond the walls are also temporarily covered with boards. This gives rigidity to the structure and secures the beams from displacement.
Making rafters
Boards purchased for the manufacture of rafter beams must be treated with an antiseptic. The Mauerlat and all elements of the wooden frame that have already been laid on the walls of the bath should also be etched.
The rafters will have to rest with their lower end on the mauerlat of the bathhouse box, and with their upper part on a wooden support sewn to the wall of the residential building. Since the slope of the pitched roof will be small, we raise the upper support for the rafters by the width of the board.
Align the position of the upper purlin and lay the ceiling beams
The wooden purlin on which the rafter will rest cannot be secured to the wall only with an anchor, since both the house and the bathhouse extension are made of lightweight material. The pressure from the rafters can simply break the fastening. Therefore, we additionally support the purlin on the wall on vertical posts.
We try on the rafter for the purlin, mark and file the end
Installation of truss structure
We cut out each rafter beam for the pitched roof of the bathhouse and install it according to the following scheme:
- You need to measure the length of the future rafter and mark the purlin on the wall. We simply transfer the line of laying the ceiling beam to the vertical surface of the purlin;
- We cut out a blank of the required length from the board;
- We apply the end of the rafter beam to the purlin, transfer the markings and file the edge;
- We lay the future rafter beam with one end on the mauerlat, the other on the corner.
All that remains is to secure the metal corner.
We attach the second end of the rafter to the bathhouse ceiling beam with a bolt. We reinforce the junction of two frame elements with a metal corner. We attach it to the Mauerlat of the pitched roof.
Construction of sheathing
We use an inch board and a beam with a section of 50x50 mm. We treat all parts of the sheathing and the counter-lattice with an antiseptic.
We wrap each bar of the counter-lattice in foamed polyethylene, thereby protecting the frame from moisture accumulating on the waterproofing membrane
We sew a waterproofing membrane onto the rafters of the pitched roof and secure it with counter-lattice bars.
Next we sew on the sheathing of boards.
We nail the cornice strip
After installing the sheathing, you need to pull the marking cord and carefully cut the boards, thereby forming the side edge of the pitched roof.
Do it yourself step by step
Now that there is at least some idea of what the construction of a pitched roof for a bathhouse is like, you can begin a rough work plan. What makes it approximate is the fact that each project is individual, with its own dimensions and materials.
Step one: preparation and calculations
The total area of the rectangle or square to which your bathhouse is reduced is already known to you.
Snow load maps can be found in books or on the Internet. Here is an example of a large map showing areas with different loads (clicking will open in a new window). The legend to the map is as follows:
I - 0.8 kPa or 80 kg/m² II - 1.2 kPa or 120 kg/m² III - 1.8 kPa or 180 kg/m² IV - 2.4 kPa or 240 kg/m² V - 3.2 kPa or 320 kg/m² VI - 4.0 kPa or 400 kg/m² VII - 4.8 kPa or 480 kg/m² VIII - 5.6 kPa or 560 kg/m²
To calculate, we also need to know the angle of inclination of the roof. You determine it yourself, based on the fact that the smaller it is, the more often you will have to remove snow manually (the roofing material should support a person and not be deformed), and the steeper it is, the more material it will take, but the snow will slide off on its own. Let's say you choose a neutral 30 degrees.
The formula for calculating the snow load is:
Required load = snow load * coefficient Mu
The Mu coefficient is equal to 1 for an inclination of up to 30 degrees inclusive, 0 for an inclination of 60 degrees or more, and for the range between 30 and 60 degrees it is calculated by the formula: 0.033 * (60-angle of inclination).
Wind load is also calculated using the map:
I - 0.17 kPa or 17 kg/m² Ia - 0.23 kPa or 23 kg/m² II - 0.30 kPa or 30 kg/m² III - 0.38 kPa or 38 kg/m² IV - 0.48 kPa or 48 kg/m² V — 0.60 kPa or 60 kg/m² VI — 0.73 kPa or 73 kg/m² VII — 0.85 kPa or 85 kg/m²
The calculation formula is:
Required load = wind load * coefficient. in height * aerodynamic coefficient.
For buildings with a height of up to 5 meters, the height coefficient is:
In the calculation of the roof, it is also necessary to include (in addition to snow and wind) the weight of the following components:
Here are a couple of tables that will make the calculations easier:
All you have to do is summarize the received data to find out the total load. And she already determines the dimensions of the rafters. But first, calculate the distributed load:
Distributed load = pitch between rafters (m) * total load per square (m2) of the roof.
The resulting value is included in the following formula, designed to calculate the thickness of the board that will be used for the rafters. To begin, choose a random board width that seems acceptable to you.
Now take into account the bending resistance values of wood for different types, for example, pine:
This is enough to start calculating using the following formula (you already know the distributed load):
Further, the thickness of the board will depend on the obtained value and the selected angle of inclination of the roof.
If the roof slope is less than 30 degrees, then multiply the figure obtained from the last formula by 8.6. The thickness value must be greater than or equal to the obtained value.
If the roof slope is more than 30 degrees, then the coefficient will be 9.5 - repeat the operations described in the paragraph above and select the closest standard board thickness value.
Step two: fastening the rafters
Let's continue the story about how to make a step-by-step pitched roof for a bathhouse with your own hands. We know the cross-section of the rafters. Let us describe how they are usually attached to different types of harness.
We will also talk about the features associated with the material of the walls, but for now we will say that the rafters are always attached to a timber frame (also called a Mauerlat), which can be either a separate beam attached to a wall made of brick or cellular concrete using an armored belt, and part of the wooden structure - the upper crown (which also needs reinforced fastening to the underlying logs or beams).
A shed roof does not have a ridge ; the rafters are also fastened to a strapping beam laid on top of a higher wall. About the trussless system - see the chapter on a pitched roof for a log bathhouse.
Rafters without struts (without supports) are made only for runs up to 4.5 meters inclusive. For a bath this is often enough. Therefore, we will consider the option of attaching rafters 4.5 m long.
Professionals say that the support for the rafters should be:
To create support on the mauerlat of a lower wall, you need to either cut down the rafter leg with a tooth, or hem a support block to it.
The support on the mauerlat of a higher wall is made as an enlarged horizontal cut with a bevel.
suspended ceiling with transition to the wall
It is very important that when creating a post, some rules are not violated:
The support area should not exceed the length of the rafter height.
If cutting the top is not possible, it can be hemmed with a piece of rafters, secured on both sides with mounting plates.
The figure shows everything that was described above.
Here is another video, however, it has a gable roof, but the technological aspects are worth watching, everything is shown clearly:
Step three: sheathing
The sheathing is a load-bearing structure that connects the roof to the rafters. There are several types of it, and all of them are directly related to the roofing material that is supposed to be used in the future.
In essence, it all comes down to whether the roofing material can independently withstand the load from snow and wind . Rigid materials can, so it is not necessary to make a continuous or even frequent sheathing for them. Quite sparse.
The pitch of the sparse lathing also depends on the dimensions of the sheets of material. For asbestos-cement and cement-fiber boards, the pitch is selected in such a way that there are 3 laths (lathing elements) under each sheet.
If the standard sheet height is 1.3 m, then the step is 60 cm. The material of the laths is poles or sawn bars with a cross-section of 60x60 or 40x40 mm (the latter should be placed more often). Laths are laid across the rafters.
If the roofing material is hard but small - various types of tiles , for example - then the sheathing is sparse, but more frequent. Such that each element lies on two slats. This is from 16 to 40 cm, on average - 33 cm. The cross-section of the laths depends on the weight of the tiles - for single-layer and light tiles 50x50 or 50x60 mm, for double-layer or heavy ones - 60x60 mm.
Metal tiles and other types of corrugated sheeting are placed on boards 100 mm wide, laid in increments of 35-40 cm.
Solid battens are made for softer materials. The gap between the slats can be 2-5 cm, but the first two and last two slats are placed without a gap.
However, there are very soft roofing materials . For them, it is better to cover the rafters with moisture-resistant plywood or OSB sheets.
Of course, the coating goes end-to-end. The weight of the material varies depending on the thickness, below is a table of recommended thicknesses.
All of these were traditional methods, and in our time, when more and more new roofing materials are appearing, their fastening also requires new approaches. This is how a type of lathing appeared, supplemented by a counter-lattice . The figure shows that the counter-lattice is boards that are laid at an angle of 45 degrees. The gap between the slats is still the same 2-5 cm. The design increases the rigidity of the roof. It can be considered universal - it is suitable for fastening almost all types of roofing materials.
Step four: roofing
As mentioned above, the roof today can be anything - soft or hard, metal or composite, roll, slab, and so on. There are many options. Each of them has its own mounting features.
The slate is attached to roofing nails or screws. Nails can be smooth or rough. The length of the nails is 7-12 cm. The nail head is enlarged; a rubber washer is also put on it, covering the nail and the attachment point from precipitation. The screws are also equipped with an enlarged head. Fastening is done through the upper wave.
The corrugated sheet is fastened with self-tapping screws through the bottom wave. We invite you to watch a video that clearly demonstrates the installation of this roofing material:
Ondulin externally resembles wavy slate, and its fastening is the same as that of wavy slate (see above).
Metal tiles are best secured with self-tapping screws with hexagonal heads. The attachment point is the middle between the ridges, and the height is 1-1.5 cm down from the stamping line. The main thing is that there is a lath under the fastening point and that the self-tapping screw does not fall into the edge of this lath (say, 5 mm from the edge is not enough). To do this, you need to correctly calculate the pitch of the sheathing.
Flexible tiles (shingles) can be fastened with nails, self-tapping screws, staples and welded with a torch. For a bath, it is best to use nails or screws. Roofing varieties of both are used.
Ruberoid is the cheapest type of roofing material. It is attached using mastic, cold or heated. Instead of mastic, you can use ready-made glue that does not require heating. There are also roofing felts with a layer of bitumen applied on the bottom side, which will require use for attaching a gas burner.
And the most modern variety is self-adhesive roofing felt , with a protective film on the adhesive side, which is removed when applied. Close to roofing felt, but with a different composition, you can find “liquid roofing felt” on sale - it is applied to a roof with a slope with a roller or spray.
Roof waterproofing and vapor barrier
The roof parts are insulated from internal moisture using a polymer membrane with one-way conductivity. It is laid on top of the rafters immediately after assembling the pitched roof base. It turns out that the waterproofing will protect the insulation of the bath from moisture condensing on the thermal insulation.
Modern diffusion membranes based on polypropylene fiber can be used as a vapor barrier; it is laid before installing the roofing.
Installation of roofing material
For a pitched roof with a small angle of inclination, the best solution would be a regular corrugated sheet with a metal thickness of 0.45 mm and a wave height of 20 mm. The roofing covering is laid with an overlap in one wave. The material is attached to the sheathing using a screwdriver using special spring self-tapping screws with a hex head.
The most difficult thing in laying the covering on the roof of a bathhouse is the correct installation of the first sheet; it will need to be aligned with the purlin line and the cut side edge of the sheathing.
Using a corner, we check the amount of overhang of the sheet beyond the wall of the bathhouse.
All that remains is to mount the drain and lay the element connecting the roofing to the wall of the residential building.
Do-it-yourself pitched roof for a bathhouse: video
A lot of useful things can be learned from practical lessons. For example, from a video or It is clear that many details and details may be missed, but practical experience is the most valuable, it is almost impossible to replace it.
Construction method
Step-by-step instructions with photos for constructing a pitched roof in a bathhouse, based on many years of experience of professionals, are as follows:
- At the initial stage, walls of various heights are erected, in accordance with the design of the bathhouse. For such a roof structure, shorter rafters will be required, so there is no need to compose them from several parts. This roof is quite durable.
- A waterproofing layer is laid on top of the walls and the Mauerlat is secured. This beam can be fixed with either anchors or metal pins, depending on the type of walls.
- Next, calculate the number of rafters based on the distance between them of 50-80 cm, and cut out a template. Grooves are cut out in each of the rafter legs, which are connected to the Mauerlat and secured with self-tapping screws, nails or overlays.
- Between the rafters, counter-batten slats are attached, which are covered with a layer of waterproofing film, fixed with staples. This lathing creates a gap between the rafters and the film to prevent moisture or condensation from getting on the wood.
- A sheathing is attached to the waterproofing perpendicular to the rafters to distribute the weight of the roofing material over the entire roof plane. If the material is light, use slats, nailing them with a gap of 15-20 cm. But for heavy or incapable roofing materials, use a continuous sheathing made of moisture-resistant plywood.
- The last stage of work will be roof sheathing. Begin fastening the sheets of material from top to bottom, laying them with an overlap of 10-15 cm. Self-tapping screws with rubber caps are used as fastening elements to prevent moisture from getting into the holes. As an option, you can take rubber pads and ordinary self-tapping screws.
When all the work on installing the roof, its insulation and cladding is completed, you can begin installing the flashings, sewing up the gables and moving on to the final finishing of the bathhouse inside.
How to insulate a pitched roof of a bathhouse
In this case, the bathhouse box is built with a warm ceiling. Thermal insulation will be laid directly on the ceiling. For pitched roofs, it is best to use mineral wool, so we line the ceiling with a block.
To prevent the insulation from falling through, you can tighten the cords.
We lay insulation on the beams of the bathhouse ceiling. The vertical part and gables of a pitched roof also have to be insulated.
We cover the surface with agrotextile fabric and additionally sew it with wooden slats to secure the insulation layer from inside the bathhouse.
Owner reviews
The article would not be complete and not very correct if I had not collected for you reviews from the owners of these roofs. I have been sent letters more than once with questions and advice about this roof, and I have put them together for you. I opted for a gable roof because I wanted to organize a full-fledged attic space.
Leave your review in the comments and we will add it to the table!
For insulation from outside
The roof of the bathhouse should be insulated from the outside during the assembly of the wooden frame. The process will have to be repeated in a year, when the tree has “settled” and new cracks and gaps appear.
The best materials for external insulation are flax tow, felt, hemp hemp and moss.
I would like to draw your attention to the use of moss for insulation purposes. A wonderful material, which, however, has one significant drawback: it rots very quickly
But even among such materials there are exceptions: red moss, for example, which is not subject to rotting. It’s inexpensive, about 300 rubles for a 40-kilogram bag, and it holds heat excellently.