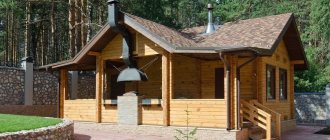
Are you planning to build a bathhouse? A decision that can only be welcomed. Especially if you take this matter very seriously and want to not only set up a steam room in a separate building, but also create a truly comfortable and incredibly pleasant place to relax. For family and friends - as it should be! And if so, then a bathhouse with a gazebo and barbecue under one roof will be an ideal project. All that remains is to correctly implement it - and for this you will have to take into account many important factors regarding the proper use of free space and more.
All the advantages of the combination
- wide functionality of the solution - can be used both as a bathhouse and as a site for summer recreation;
- unified design style - all elements of the structure are made of the same materials and visually complement each other;
- serious savings - combining several functional elements under one roof allows you to reduce the cost of expensive building materials; according to experts, savings can range from 15 to 30 percent;
- increased comfort - you steamed in a jar and immediately went out into the fresh air on the gazebo, and there’s also a barbecue - isn’t it lovely?;
- quick construction - of course, in the end everything will greatly depend on your finances and weather conditions, but in general, projects of such a bathhouse are implemented much faster than separate buildings;
- everything for relaxation - it’s always nice to know that you have the opportunity to escape the bustle of the city and indulge in maximum relaxation in the company of people close to you, colleagues or friends;
- 2 recreation areas - under the roof and outside, in fact, this allows you to move freely around a fairly spacious area, which is very convenient if there is a large company gathered.
There is no doubt that such a bathhouse is not just a promising, but an obviously winning idea, but only under one condition - if you have really thought through the project from start to finish. And to do this, you need to take into account the quality of the materials used, the nuances of the placement of premises, and the nature of the design of individual elements.
Projects of a house under one roof with a bathhouse
Combining a bathhouse with a house is an ideal solution if the size of the plot is so small that it is not possible to build two separate buildings. The project allows you to create a building with a common roof and a set of communications.
The bathhouse can be located in an extension or occupy a separate floor
Accommodation options
The bathhouse can be placed under a roof shared with the house as follows:
- as a separate full-fledged room, if designed in advance;
- as an extension - the most common option. The construction requires the construction of a strip foundation, as well as the construction of walls from the same type of material as the house itself.
When building a house combined with a bathhouse, it is necessary to provide and carefully consider the following communications:
- ventilation system - high humidity in the bathhouse can destroy the structure of the house;
- waterproofing, both for the bathhouse and for the external walls of the house;
- combining a bathhouse with a sanitary unit, regardless of whether it has an autonomous or central sewerage system;
- general electrical wiring.
It is recommended to choose a kitchen wall as an adjacent wall. This will make it possible to install a single stove. In addition, you can make a covered corridor that will serve as a transition. This will allow you to visit the bathhouse in winter without going outside. If there is sufficient space in the passage, you can equip a font or a swimming pool.
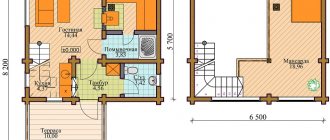
Before building a combined house with a bathhouse, you need to draw up a plan.
There are three main degrees of combination of these buildings:
- at the design stage, as a result of which the bathhouse is located on the first floor;
- a full extension of the log house, after which the roof is extended and the bathhouse is completely covered;
- the use of a joint wall, which greatly simplifies the process of joining buildings.
When combining a bathhouse and a house, it is important to determine where the exit will be. It is better to place it on the side of the house, since in winter it is not very convenient to go outside. But this can be easily fixed if you make a covered terrace with glazing, which will be much more expensive.
Attention must also be paid to the foundation. Its construction depends on the material used to build the house. It must be strong and autonomous, because high humidity from the bathhouse can damage the foundation of the house. During the construction of the foundation, it is very important to ensure a reliable sewerage outlet. To do this, you need to remove two pipes. One is for the home, the second is for the bathhouse. If the sewage system on the site is autonomous, then a separate cesspool must be installed for the bathhouse.
The size of the foundation depends on the size of the house itself. A wooden house, combined with a small bathhouse, can stand on a foundation about 50 cm deep and 30 cm wide. If bricks or blocks were used to build the house, then the foundation must be full-fledged, capable of withstanding a large load.
Video: project of a country house with a bathhouse
How to build a house combined with a bathhouse with your own hands
The process of building a bathhouse combined with a house consists of several stages:
- First of all, you need to determine the location of the bathhouse. Drive pegs around the perimeter and stretch construction twine between them. Determine the width of the foundation and stretch the second line of twine. After this, it is necessary to check the evenness of the diagonals and the accuracy of all angles. For this purpose, you can use a rangefinder and a laser level.
A bathhouse needs a solid foundation - Dig a trench according to the markings. The walls of the trench must be perfectly smooth. If necessary, temporary formwork can be installed.
- Dig a trench for communications. If the sewerage system is central, then it should be located near the nearest pipe connection. If the sewage system is autonomous, it is necessary to dig a trench to the drainage hole. Lay the pipe in this trench at a slight slope, then fill it with sand and soil.
For water pipes you need to dig a separate trench - The trench under the bathhouse foundation must be filled 2/3 with crushed stone and sand. Next, the sand must be moistened with water and compacted thoroughly.
- Install formwork from boards in both trenches. The foundation must protrude at least 20 cm above ground level. It is recommended to wrap the inner sides of the formwork with waterproofing film or roofing felt. Remember the need for a ventilation pipe.
The formwork must protrude above the trench - Place reinforcing bars on top of the bedding, tying them together. Plastic clamps can be used to connect the rods. The distance between the formwork walls and the reinforcing mesh must be at least 5 cm.
The reinforcing mesh should deviate from the formwork by 5 cm - Pour concrete. The poured concrete mixture must be leveled. After complete drying, cover the concrete with film, be sure to periodically moisten it. For waterproofing, you can use bitumen mastic or roofing felt.
The foundation of a bathhouse combined with a house must be waterproofed - After the foundation is completely dry, you can begin building the walls. Remember that a wooden bath will experience significant shrinkage, which can continue for several years. If the walls were built, for example, from brick, it is necessary to ensure that they are perfectly vertical, and also carefully follow the rules of masonry. If the bathhouse is made in the form of an extension, then it is very important to correctly join the walls and tie them down. To do this, holes are first drilled in the wall of the house into which the reinforcement is inserted. It is knocked down so that the free end is sufficient to hold the wall of the bathhouse.
The choice of material for a bath should be approached responsibly - After laying the walls, you can install double-glazed windows. Most often these are metal-plastic structures. Remember that the windows in the bathhouse should be equipped with vents with a minimum number of lintels.
- Now you can build the roof. This must be done so that it has a solid structure. A gable or hipped roof is ideal. The reliability of the structure largely depends on the correct calculation of the height. It is necessary to install two separate chimneys. You need to take care of the drainage system and snow holders in advance. Absolutely any roofing material can be used. If you approach the issue from a cost-effective perspective, it is better to choose metal tiles or galvanized profiles.
Photo gallery: houses with a bathhouse
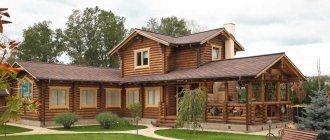
A house that combines a bathhouse and a glassed-in terrace is beautiful and functional
Sometimes the bathhouse is located in the attic
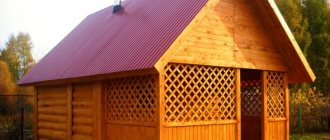
A bathhouse in an extension under a gable roof is the most common option
The bathhouse can be located both on the first and second floor
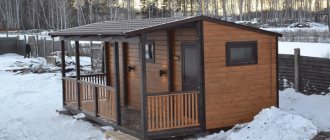
The bathhouse located in the extension has a separate exit to the terrace
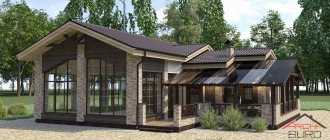
Individual houses form a single ensemble, thanks to the passage connecting them and a common roof
Which material to choose?
Of course, the best material for a bathhouse is natural wood . Including one that combines a barbecue area and a gazebo under one roof. Of course, one project can use several types of both natural wood materials and their derivatives, but care should be taken to ensure that the visual design does not look eclectic. In addition, working with wood is very easy: you can build a frame bathhouse with your own hands in about 3-4 weeks, depending on how you work with the foundation. Let's look at the most popular wood derivatives.
Rounded log
- versatility;
- low cost;
- excellent for organizing baths with integrated relaxation areas;
- has suitable characteristics to cope with the required temperature loads.
Wooden beam
- very easy to use material;
- allows you to create the desired comfort in the room;
- easy to process;
- emits a pleasant smell, which is usually called “country”;
- inexpensive and practical.
In addition to natural wood and its derivatives discussed above, you should also pay attention to the following 3 materials:
- foam blocks are a very cheap and lightweight material that is convenient for non-professionals to work with, but requires very good steam and waterproofing; you can make a bathhouse from foam blocks with your own hands very quickly and save a lot of money;
- brick is a very good option, which has, perhaps, ideal heat resistance, but also puzzles the owner with the issues of developing a vapor barrier layer;
- stone is the most durable and strong material, but very expensive, so it is best to use stone to decorate the facade of a bathhouse or gazebo, but select rocks that are organically combined in color and pattern.
Typical building sizes
Standard bath structure with an attic and a small porch measuring 6*6 m. The foundation under the attached canopy is columnar. The cladding material of the main building is block house.
This is an example of a typical log bathhouse with a small veranda - 6*4 m. A company of 3-4 people can accommodate here. A larger number of vacationers is allowed, but it will be a bit crowded inside.
The standard choice for summer residents is a 4*4 m bathhouse. With a terrace of 8 square meters. m can comfortably accommodate a family of 4 people. If you expand the extension to 15 sq. m, then the number of vacationers will be increased to 10 people.
A few tips for a successful layout
If you are studying various bathhouse designs, where a gazebo and barbecue are located under one roof, then you have probably already noticed how many variations can be used even in a rather modest area. Therefore, our advice will come in handy.
- It’s not enough to just build a gazebo with a barbecue - you also need to improve the area adjacent to the bathhouse, and then take care of it, otherwise there will be little pleasure from such close communication with nature;
- if you are new to this area, then it is best to use ready-made projects - as a rule, in the relevant offices you can easily find an option that suits you in all respects;
- sometimes it’s worth moving away from classic solutions and paying attention to something new - a thatched roof on a bathhouse and a rejection of strict geometry sometimes work real miracles with our perception;
- avoid using flashy tones in the decoration of the bath - the combination of green with brown or beige looks very good, and leave experiments at least for decorating the rest room;
- a bathhouse with a pitched roof is the simplest solution, which, despite its simplicity, looks very harmonious and interesting.
Baths under one roof with a swimming pool
Having a bathhouse is already a luxury, and if it is also combined with a swimming pool, then you will always have guests. To arrange a bathhouse, you can choose one of two types of pool:
- Stationary. Installation requires digging a deep pit, laying sewer pipes and installing special equipment.
- Mobile. It can be assembled and disassembled. It can be plastic, frame, composite, inflatable. No additional sewer pipes are required for installation.
A bathhouse is very often combined with a swimming pool.
To build a bathhouse combined with a swimming pool, you can choose various building materials:
- Logs. This material can be considered traditional for a bathhouse. This structure is visually attractive, retains heat well, is environmentally friendly, and has healing properties. Also, the logs are absolutely not deformed. They can crack, but only vertically, which does not affect the thermal insulation in any way. However, a log bathhouse will shrink by 10–12 cm every year. This size must be taken into account during design.
Logs are considered a traditional bathhouse material - Beam. This material is the most popular due to the fact that a bathhouse can be erected in a short time for relatively little money. Timber is also a tree, so it has the same properties as a log. However, the material can crack horizontally, which reduces the service life of such a bath. Before construction, the timber must be thoroughly dried. Therefore, after purchasing, it is recommended to wait about a month before starting construction. This is done to minimize shrinkage of the bath. Wood must also be treated with antiseptic agents to prevent rot and excessive moisture absorption.
The timber may crack - Brick. A brick bathhouse with a swimming pool will last a very long time. However, such a building requires a solid foundation. Careful thermal insulation is also necessary, since brick can freeze under the influence of negative temperatures. Despite this, brick has an undoubted advantage. It is fireproof, the material is not afraid of attacks from mice and insects, and mold or mildew will never appear on the walls. However, such a bathhouse cannot be called a budget structure; the environmental friendliness will be much lower than that of a wooden bathhouse.
Brick bathhouse requires insulation - Foam block. The foam block structure is the most economical. The advantage is that you can build a bathhouse yourself, and you can do it quite quickly. It is not afraid of mice, harmful insects and mold, so you can safely not use antiseptics. Also, block construction does not have an increased level of fire hazard, which is a definite advantage for a bathhouse. Be prepared for the fact that such a bathhouse will not be entirely attractive in appearance.
Foam block is a good thermal insulation material
The pool can be located in any of the rooms of the bathhouse. However, the most economical would be to build a bathhouse with a two-story pool. This will allow you to build a comfortable lounge, which is best located on the second floor. On the first floor you can arrange a steam room and install a swimming pool. In such a bath you can not only perform hygiene procedures, but also relax. With this arrangement, it is necessary to take care of high-quality waterproofing. This is necessary to ensure that the upper room remains dry in any case. If this rule is neglected, a problem of fungus will arise on interfloor ceilings, since they are necessarily made of wooden boards.
One of the main elements of a two-story bathhouse with a swimming pool is a staircase. It can be compact, screw or spacious classic. It is better to give preference to wooden options. It is recommended to place it only inside the building, since going outside in the winter after a steam room or swimming pool can lead to negative consequences.
A bathhouse combined with a swimming pool may contain:
- shower;
- fuel room;
- a pantry where you can store tools.
It is recommended to place the shower as close to the pool as possible, since after being in chlorinated water it is necessary to wash it off the body. The relaxation room should be located in such a way that you can quickly get to the pool and sauna from it.
How to do it yourself?
Sooner or later, every owner of a summer cottage has to think about the issue of expanding a house or bathhouse.
Before starting to independently build extensions to a bathhouse, it is important to take into account their design features and draw up the project correctly. If you plan to build a major extension, then you must also decide in advance on the type of foundation
Most often, a columnar or strip foundation is chosen for this.
To build a frame extension, the following types of work should be performed sequentially:
- draw up a project;
- choose a material (for frame structures it is recommended to use timber pre-treated with antiseptics);
- establish a reliable foundation (it should be the same as the foundation of the bathhouse itself);
- lay a waterproofing layer and seal the seam between the walls of the steam room and the extension;
- dismantle part of the roof of the main building;
- install doors and windows;
- carry out the interior arrangement by covering the walls with clapboards and placing furniture.
The construction of an extension made of wood differs from the construction of a structure made of brick or foam blocks. But in both the first and second cases, an estimate should be drawn up, then the site should be cleared. When erecting a frame structure, first of all, the lower crown is laid, then a bundle of beams from the walls of the steam room is made with the lower crown and an angular connection is made “into a tenon” or “into a paw”. The walls of the extension should rise above the level of the bathhouse.
As for the construction of extensions made of brick or foam blocks, it has its own characteristics and consists of the following stages.
- The site is being prepared for construction. To do this, the perimeter of the area for the future structure is cleared - the top layer of soil is removed, stones, debris and vegetation are removed.
- The foundation is being installed. First, a trench is dug under the concrete base according to the design, then holes up to 50 cm deep are drilled, and rods are driven into them. Next, the trench is covered with a layer of gravel and sand, the strapping is welded, the formwork is laid out and it is filled with concrete.
- Foam blocks are being laid. It can be done using cement mortar or special glue.
- The roof is being installed. To do this, it is recommended to wait until the walls settle (2-3 months). It is difficult to install a common roof for the steam room and the extension, since you first have to disassemble half of the roof and then reassemble it. Therefore, many craftsmen prefer to install a separate roof; it is assembled in the shortest possible time from boards with a section of 15x50 cm and 10x40 cm.
- Upon completion of construction, the internal arrangement of the extension is carried out. Thus, anyone can add a veranda, spacious terrace or gazebo to the finished steam room.
The main stages of creating a design
Having settled the legal issues of the legality of such a building, and having received permission for its construction from the relevant services, you can begin to implement the technical work plan.
It consists of the following steps:
- Preparation of territory and materials.
- Site marking.
- Drawing up an individual drawing or choosing an existing building project.
- Laying the foundation.
- Assembling the frame and walls.
- Establishing communications.
- Construction of the roof.
- The final stage of construction is the completion of interior and exterior finishing.
- Interior decoration.
If the layout of the room implies the presence of a second floor, when laying the roof you need to worry about its thermal insulation.
Extension to a mobile barrel bath
An extension to a barrel sauna allows you to get a compact and mobile sauna complex assembled from separate parts. Having installed the main structure, over time it can be equipped with additional structural elements that will ensure maximum relaxation and wellness.
The main advantages of a mobile barrel sauna made from boards are its ergonomic design, ease of construction and financial benefits. If it is impossible to build a stationary steam room, then it is enough to equip a barrel-shaped bathhouse with an extension. The mobile design provides the following options for extensions:
- Canopy and canopy.
- Mini gazebo.
- Open veranda or terrace.
- Patio.
Recommendations for self-building
- To save money, you can build a bathhouse from timber, logs, and make a panel extension. An alternative is to combine brick or concrete blocks with wood.
- It is better to pour a strip foundation for a bathhouse; a columnar foundation is enough for a gazebo.
- To reinforce the tape, you should take profile reinforcement with a diameter of 10 mm or more.
- The foundation must be allowed to stand and settle. For these purposes, marks are placed on poles and tape, which are periodically checked with a water level.
- The construction of the frame and walls begins only after the foundation has completely settled.
- For a columnar base, anchors are taken on which vertical supports are mounted. The width of the pillars is at least 40*40 cm.
- A septic tank 4–6 m deep must be installed near the bathhouse.
- The floors of the steam room and shower are made at a slight slope towards a special water collector, to which a sewer pipe is connected from below.
- For baths that are used all year round, the drainage pipe must approach the septic tank at a depth of 60 cm.
Despite the popularity of the gable roof, the hip roof looks much more luxurious. It is difficult to arrange, the consumption of materials is higher, but if you have the financial resources, the beautiful appearance of its design will justify the costs.
Execution options
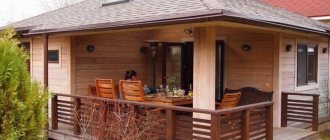
Depending on the type of construction, the sauna gazebo can be open or closed. An open structure is considered to be a light structure that has a single roof and floor combined with a bathhouse. The roof is often placed on supports, which are sometimes connected by railings or combined with curbs. This will allow you to most accurately mark the border of the territory. This option is considered more profitable from a monetary point of view, because there is no need to erect walls or permanent partitions.
Bathhouse with an open gazebo Source pynari.kapigyzes.ru.net
A closed one is considered a permanent building because it has panoramic windows and real walls. What it looks like is shown in the figure:
A closed gazebo near the bathhouse will allow you to continue relaxing over a meal after the steam room in the winter Source erp-mta.ru