Characteristics and composition
Before talking about the characteristics of the product, we should understand what we are dealing with, namely, talk about the composition.
It may change from manufacturer to manufacturer, but the essence remains the same. The main component of mineralite is cement. It is at least 70% here. The rest is taken up by cellulose, as well as special additives. Despite the appearance and overall strength of the product, mineralite does not contain asbestos. This means that when heated, not a single gram of harmful substances is released, and destruction is also excluded.
Asbestos is known to even explode at critical temperatures. All products must include hydrobisifiers. These are special elements that protect the structure from moisture absorption, which prevents cracking in frosts, possible rotting and other types of damage.
Now, it's time to move on to the characteristics. Let's list the most important of them:
- High strength. This applies not only to exposure to shocks and external damage, but also to the effect of moisture on the surface when it is heated to a high degree, for example, in a bathhouse, as well as resistance to temperature changes and air humidity levels. The surface and structure as a whole are resistant to humidity levels, which expands the scope of use even to outdoor use.
- Does not burn. Manufacturers of mineralite indicate the class “NG”, which indicates the complete non-flammability of the product. This makes its scope wide and not limited only to saunas and baths.
- Invariance under various influencing factors. As previously mentioned, water repellents prevent moisture from getting inside. As for low/high temperatures, in the range from -100 to + 180, the structure does not react in any way, including the properties of linear expansion remain unchanged. The product is also resistant to chemically active environments, which is why mineralite is often used in the finishing of industrial premises.
- Stronger every day. We said that 70 percent of the material is cement. Thus, the more time passes from the date of production, the stronger the product becomes. And this continues for at least 50-70 years, after which the cement will lose its properties with the same uniformity.
- Environmentally friendly. Judge for yourself: cement, sand, cellulose and other mineral additives cannot harm humans and others. Thus, it is completely safe under any conditions.
As you can see, there are many characteristics that will become important and fundamental when choosing. But we must not forget about the fragility of products
The material is very fragile, so it must be transported, stored and stored with extreme care.
The same applies to processing. It cuts softly, you can use a hand or power tool, but to achieve the best result it is best to use cutting elements with a fine tooth.
Price
We have found out that mineralite slabs for baths are considered the most reliable and fireproof material. Their price starts from 890 rubles per square meter. The cost may vary depending on the manufacturer and additional polymer additives that are included in the panels.
Now you know for sure that a mineralite slab will help protect the structure from burning out. For a bathhouse this is the best and most reliable insulating material. All you have to do is buy and install it, and the mineralite slab will take care of your safety.
Fiber cement boards Minerit
The building materials market is growing and developing dynamically, replenished with new generation products. Minerite is one of them. The product range covers several types of slabs, which are intended for various uses. They serve as a finishing material for decorating facades, including the basement of buildings. Minerite panels are widely used to ensure fire safety; they are used in the construction of fire-resistant partitions and the construction of heat-resistant screens for sauna stoves.
Minerite: technical characteristics
Minerite is a fiber cement board. The main component in its composition is cement; cellulose fibers are used as reinforcement. Mineral fillers are also added. The slabs do not contain asbestos, so the products are classified as environmentally friendly building materials. The positive qualities of the slabs are:
- heat resistance;
- high waterproofing characteristics;
- good sound insulation performance;
- durability and wear resistance (plates are not subject to rotting and decomposition).
Ease of installation and processing is another advantage of the material. You can cut Minerite, cutting out fragments of the required size and configuration, with a regular hacksaw, and fasten it using self-tapping screws. The material is produced in different interpretations, which makes it possible to choose a product that meets the purpose and requirements of the consumer.
What types of slabs are produced?
Manufacturers produce several types of mineralite fiber cement boards. Among the modifications are the following and are in demand:
- Windproof panels. They are used in the construction of ventilated and non-ventilated facades, in frame construction technology, where the slabs simultaneously serve as a structural material and act as wind and hydraulic protection. The manufacturer produces Minerita VZ slabs with sheet sizes of 900x2700 mm and 1200x2700 mm.
- Construction slabs Minerit HD. This is a universal material designed for finishing buildings, both indoors and for external cladding. They are not afraid of strong changes in temperature and moisture. The panels are durable and are available in various thicknesses from 3.2 to 10 mm, depending on their purpose. The most in demand are 8mm slab samples.
- Flat PC façade panels. They are based on HD modification slabs, the material is coated with a primer on both sides, and the front side is also painted with an acrylic composition that ensures a long-lasting color. The panels are presented in 4 variations of standard sizes, 6 and 10 mm thick.
- “Pastel” facade slabs have a hydrophobized coating, a polished surface and are painted.
- Heat-resistant and fire-resistant Minerit boards. Designed to protect wall and ceiling structures from thermal effects, for lining and decorative finishing of the inside of stoves and fireplaces.
The slabs also perform a decorative function. Manufacturers offer products whose surface resembles various finishing materials. An example is Minerite, a decorative stone look. It will be the best option when arranging structures in residential and bathing areas to ensure their fire safety, insulation and sound insulation.
Installation of facade slabs Minerit
Installation of building facade panels is not difficult. However, the question arises: how to attach Minerite to the wall correctly? Previously, a load-bearing profile is mounted on the wall structures in the horizontal and vertical direction.
It is imperative that when fixing the slabs, gaps are provided to ensure freedom of temperature expansion. This gap value should not be less than 6 mm per 3 meters of slab. For the installation of mineral panels, the company has specially developed and produces a special type of self-tapping screws.
By screwing it in, the hardware makes a hole with a diameter larger than its own cross-section.
How to cut mineralite? Minerite is easy to process; cutting is done with a regular hacksaw. As for the Minerit LV brand, when cutting the slabs, proceed in the same way as with gypsum-fiber material: make an incision with a knife, and then bend it.
Taking care of fire safety
In individual private sector homes, owners are increasingly installing fireplaces that not only perform a heating function, but also add zest to the interior. And in country cottages there are also Russian stoves. In such cases, it is advisable to protect the home from possible fire. For these purposes, various materials are used, often choosing Minerite, which is a fire-resistant slab. It belongs to the non-flammable class. And when heated, due to the absence of asbestos and other harmful compounds, it does not emit substances harmful to health.
Safety in the bathhouse and sauna. Thermal protection of walls and flammable materials. Brick or mineralite.
During the construction of a bathhouse in general and a steam room in particular, many bathhouse lovers and connoisseurs ask questions: “How to protect yourself in a bathhouse?”, “How to protect the walls from the stove?”, “How to make a fireproof sauna and bathhouse?”, “From What material should thermal protection be made for a bath or sauna?
Let's look at these issues in this article and give you some recommendations and tips.
There are many materials on the market suitable for the task of thermal insulation of combustible materials from heating elements of sauna and heating stoves and chimneys.
1. Vermiculite is a wonderful material for thermal insulation work.
Feature of the material: withstands high temperatures; Quite fragile, extremely afraid of moisture.
2. Minerite is a useful material during the manufacture of any structures (boxes) protecting from direct contact with heated elements, a convenient material for covering walls as protection from stoves, boilers, chimneys.
Feature: Not afraid of moisture, convenient to cut with cutting tools; Withstands low temperatures of 150-180 0 C.
3. Flamma - identical material to mineralite.
4. Kerablanket is a fibrous fabric, useful for insulating flammable wooden elements.
Feature: withstands high temperatures up to 1450 0 C; When used inside a steam room, it is necessary to cover it with additional fire-resistant materials.
5. BSTV (basalt fiber) is a very common material for thermal insulation work.
Feature: When used inside a steam room, it is necessary to cover it with additional fire-resistant materials.
6. Brick is a universal material for constructing simple thermal protection from a stove in a bathhouse or sauna.
Feature: Heavy material; It is necessary to maintain air gaps between the stove and the brick wall, as well as between the brick and the bathhouse wall made of flammable materials.
In this article we suggest that you familiarize yourself with brick and mineralite or flamma.
Imagine the situation that you are planning to install a stove in your bathhouse in a steam room or a heating stove in your house. To save space, you want to place it in the corner of the room. Let’s also take it for granted that your walls are made of “wood” (log house, frame, timber, lining, etc.).
Your task is to build a corner thermal protection configuration.
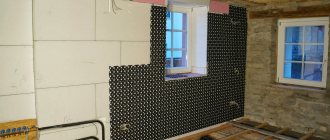
When using mineralite, it is important to know that the mineralite (Flamma) slab has fire-resistant characteristics, but it conducts heat sufficiently to understand that it cannot simply be fixed to the wall.
It is recommended to install the mineralite to the wall, then use ceramic bushings to attach a second mineralite to the already attached mineralite. Due to the ceramic bushings, an air gap is created. Also, due to the air gap, air convection will be created between the plates. This will allow the slabs to cool while the oven is running.
For example, we suggest that you familiarize yourself with photographs found on the Internet.
The second method, which we most often use, is to create a “sandwich” using mineralite (flamm), basalt fiber and metal profiles.
This method allows you to subsequently lay tiles on the mineralite wall to decorate this area.
Basalt fiber will effectively absorb the heat emanating from the furnace.
It is important that an air gap is maintained between the furnace and the mineralite wall.
If you decide to make thermal protection from brick, we recommend first of all making sure that the floor and foundation allow you to do this; it is also important to maintain an air gap between the brick and the stove, as well as between the wall and the brick.
Interesting fact, it is not necessary to use fireclay refractory bricks. In our opinion, there are no such prohibitive temperatures near the stove and red brick will also do an excellent job while maintaining air gaps. Although the use of fireclay bricks is a purely personal matter.
Examples of work using brick as thermal protection.
If we talk only about indoor areas, we always recommend making thermal protection from floor to ceiling, as you all saw in the photographs.
If you have questions about the choice of a particular material for a bath and sauna, the choice of material for thermal protection, then we suggest you contact the “Everything for Bath” stores in Kazan, Naberezhnye Chelny, Nizhnekamsk or call us for consultation.
Technical characteristics of mineralite
Let's take a closer look at the characteristics of mineralite in order to compare them with their counterparts from this category of materials. The slabs may differ slightly in the additives in their composition, which is dictated by their different functional uses. I will outline the main technical characteristics:
- High strength, when exposed to loads, the surface is virtually not deformed, the panels are inherently impact resistant.
- It has absolute fire resistance, it is not subject to combustion or ignition.
- The panels have proven themselves to work well in a humid atmosphere, without deteriorating their strength parameters. This is due to the fact that the composition contains water repellents - components that protect the slab from absorbing moisture and allowing it to evaporate. In addition, mineralite successfully tolerates temperature changes.
- Minerite slab is highly heat resistant. It does not change the original characteristics, operating within the temperature range from minus 80° to + 150°.
- The cement component ensures the material’s resistance to mold and mildew and prevents rotting processes.
- Stability to chemical reagents in the form of alkalis and acids is noted.
- It has soundproofing properties, is an environmentally friendly building material, and has a long service life.
These characteristics and properties of mineralite are considered the advantages of a building material. But its fragility is a weak link, therefore cutting and cutting into blanks must be done extremely carefully. You can cut mineralite with a regular hacksaw, grinder, jigsaw, or other tools, which is very convenient.
Types and sizes
There are not many varieties of mineralite, but they exist, which makes it possible to isolate the material for a specific area of application. For example, decorative mineralite , labeled “Pastel”, has a polished smooth surface and is used for finishing facades. The “PC” variety, more than other options, is represented by a wide variety of colors. Also suitable for facade and interior work.
The variety labeled “HD” is most often used in its pure form, where aesthetics are not so important. Its price is lower, but its technical characteristics are in no way inferior in quality to other varieties.
Minerite size
In addition, the “HD” series reserves the right for the buyer to independently choose the paint and apply it if necessary. The main thing to remember is that if you are going to use the material in finishing areas near flammable areas, it is important to use fire-resistant types of paints.
The “VZ” variety is aimed at facade work, and the main goal is to protect the building from moisture and wind. The dimensions and thickness of products are individual and, basically, they depend on the manufacturer.
Facade finishing is characterized by slabs measuring 60 by 30 cm, with a slab thickness of 8 mm. A mineralite slab 6 mm thick is also suitable for interior work Its sizes are individual and can have different shapes, including mineralite like a brick. On average, the dimensions of the panels can be 60 by 120 cm.
Materials and tools for insulation
There are 2 ways to insulate with mineral wool: using a frame and U-shaped hangers. The second option is suitable for 2 layers of insulation.
First you need to create a frame that will hold the mineral wool on the walls, for this you will need:
- wooden beam 50x50;
- galvanized screws;
- screwdriver;
- U-shaped hangers;
- mineral wool.
You will also need additional materials for processing wood and protecting the wooden wall and the wool itself from moisture:
- vapor barrier roll;
- wind protection or waterproofing;
- antiseptics for external work.
Auxiliary tools and electrical appliances:
- stapler;
- screwdriver;
- stationery knife for cutting cotton wool;
- roulette, level;
- acrylic adhesive tape.
Workers need special clothing to cover the body, assembly glasses, gloves and a respirator if necessary.
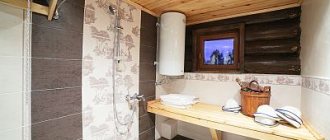
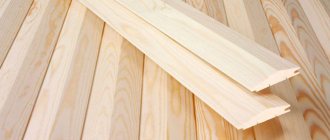
Interior design: unlimited possibilities of thermowood
The color and texture of thermowood depend on the type of wood and processing temperature. Wood of any species subject to heat treatment can have at least 2 shades and 2 types of texture. This offers unlimited possibilities for flights of fancy in the interior design of a bathhouse and steam room.
By alternating bars of different shades you can achieve an unprecedented effect. Moreover, heat-treated wood, unlike ordinary wood, does not change color and texture during operation in conditions of high temperature and humidity.
vote
Article rating
SNiP standards for the location of the furnace from the walls
The standards for these requirements are specified in 2 main documents:
- SNiP III-G.11-62;
- SNiP 2.04.05-91.
Based on these regulatory documents, each owner of a solid fuel stove is required to maintain minimum clearances from the wall and ceiling, taking into account the surface material:
| Parameter | Requirement |
| Installing the stove on a floor made of flammable materials. | The distance to the bottom of the stove must be at least 140 mm. |
| Foundation size. | When installing a steel stove on a wooden floor, the size of the foundation should be 1000 mm larger than the dimensions of the stove. |
| The ceiling is protected by asbestos slabs, plaster and sheet metal up to 1 cm thick. | In this case, the brick-lined stove is made in height so that the gap to the ceiling is at least 250 mm. |
| When installing a steel stove with a protective layer of thermal insulation. | The minimum distance to the floor slab is 700 mm. |
| Installation of a steel stove without a protection layer. | This size increases to 1000 mm. |
| Minimum dimensions for walls according to SNIP from 1962 | |
| Distance from stove to wood stove with unprotected surface. | From 1000 mm. |
| The walls are lined with brick and plastered with lime mortar with a layer of 25 mm. Or an asbestos heat insulator 4 cm thick is fixed. | 130 mm |
| The wooden walls are lined with brick, 120 mm thick and plastered with lime and asbestos. When installing protection on the walls in the form of a 40 mm asbestos-vermuculite slab. | 300 mm |
By maintaining the minimum dimensions, or better yet, making gaps with a small margin, every owner of a wooden house can be sure that its walls and ceiling are protected from high temperatures.
One of the main methods of protection is the manufacture of devices installed to protect the front and side surfaces near the stove itself.
Brick screens
The furnace fence in the steam room can also be made of brick. A brick screen can be installed on all sides of a metal furnace, forming a protective lining. Also, such a screen can only be installed between the flammable surface and the stove, representing a protective wall.
Having decided to lay such protection, use solid fireclay bricks, for the binding of which you can use clay or cement mortar. Typically, half-brick masonry (120 mm) is used, but due to lack of material, quarter-brick masonry (60 mm) is suitable. When using the latter installation method, remember that the thermal insulation properties of such a screen are reduced, so the distance to the wall should be increased.
This finishing of an iron stove in a bathhouse is also carried out in compliance with certain rules:
- In the lower part of the shield it is necessary to provide special openings that will ensure air convection between the furnace wall and the brick;
- The height of the brick wall should exceed the height of the stove by 20 cm, but it is often built right up to the ceiling;
- Maintain a distance of 5-15 cm between the stove and brick screens;
- There should also be a distance of 5-15 cm between the flammable surface, for example, a wall and a brick protection.
Minerite slab
Previous reviews of the construction magazine have already described what minerite is. This is a fiber cement board with high fireproof and waterproofing properties. In addition, its difference from other similar building materials is the absence of any harmful substances in its composition.
Even earlier, when there was no mineralite, it was partially replaced by asbestos. And although asbestos does not burn, it is harmful to human health, therefore, over the past decade, the production and use of this material in construction has been significantly limited.
- Cellulose;
- Limestone;
- Mica;
- Sand;
- Cement.
But in addition to being environmentally friendly and harmless for everyday use, mineralite slabs have other, no less important, advantages.
- High fire-resistant properties, as well as very decent strength characteristics;
- Almost complete absence of deformation during operation (even with significant temperature changes);
- Ease of installation and versatility in use.
Minerite slabs do not have any significant drawbacks, except that they do not have a very presentable appearance. However, today there is decorative mineralite, so if there is no need for additional surface finishing, then perhaps this is what you should give your preference to.
Characteristics of mineralite slab
As you can see, the mineralite slab has a number of serious advantages compared to other similar building materials. It can be used to protect baths and houses from fire, completely replacing materials such as fiberglass, natural stone and metal.
- The mass of the 1st mineralite slab is only about 26 kg;
- The length of the material ranges from 1200-3600 millimeters, and its width can be 450-1500 millimeters;
- Completely environmentally friendly and harmless composition.
All of the above characteristics of mineralite slab make it a very convenient and versatile building material to use.
Advantages
- Having made the insulation with mineralite, you will forget about replacing them for a long time. They serve well and properly.
- The panels do not burn or ignite. This fiber cement board meets the most stringent fire safety requirements.
- Minerite is considered a universal material. It can be used not only for insulation, but also for decorative finishing.
- Installation of the plates is extremely simple. You can do everything yourself without resorting to outside help.
A mineralite slab for a bath, like any other material, in addition to its undeniable advantages, also has disadvantages. And most buyers note only one thing - the unpresentable appearance of some types of such panels. If you choose more decorative specimens, they will cost a little more.
Fiber cement boards Minerit
The building materials market is growing and developing dynamically, replenished with new generation products. Minerite is one of them. The product range covers several types of slabs, which are intended for various uses. They serve as a finishing material for decorating facades, including the basement of buildings. Minerite panels are widely used to ensure fire safety; they are used in the construction of fire-resistant partitions and the construction of heat-resistant screens for sauna stoves.
Minerite: technical characteristics
Minerite is a fiber cement board. The main component in its composition is cement; cellulose fibers are used as reinforcement. Mineral fillers are also added. The slabs do not contain asbestos, so the products are classified as environmentally friendly building materials. The positive qualities of the slabs are:
- heat resistance;
- high waterproofing characteristics;
- good sound insulation performance;
- durability and wear resistance (plates are not subject to rotting and decomposition).
Ease of installation and processing is another advantage of the material. You can cut Minerite, cutting out fragments of the required size and configuration, with a regular hacksaw, and fasten it using self-tapping screws. The material is produced in different interpretations, which makes it possible to choose a product that meets the purpose and requirements of the consumer.
What types of slabs are produced?
Manufacturers produce several types of mineralite fiber cement boards. Among the modifications are the following and are in demand:
- Windproof panels. They are used in the construction of ventilated and non-ventilated facades, in frame construction technology, where the slabs simultaneously serve as a structural material and act as wind and hydraulic protection. The manufacturer produces Minerita VZ slabs with sheet sizes of 900x2700 mm and 1200x2700 mm.
- Construction slabs Minerit HD. This is a universal material designed for finishing buildings, both indoors and for external cladding. They are not afraid of strong changes in temperature and moisture. The panels are durable and are available in various thicknesses from 3.2 to 10 mm, depending on their purpose. The most in demand are 8mm slab samples.
- Flat PC façade panels. They are based on HD modification slabs, the material is coated with a primer on both sides, and the front side is also painted with an acrylic composition that ensures a long-lasting color. The panels are presented in 4 variations of standard sizes, 6 and 10 mm thick.
- “Pastel” facade slabs have a hydrophobized coating, a polished surface and are painted.
- Heat-resistant and fire-resistant Minerit boards. Designed to protect wall and ceiling structures from thermal effects, for lining and decorative finishing of the inside of stoves and fireplaces.
The slabs also perform a decorative function. Manufacturers offer products whose surface resembles various finishing materials. An example is Minerite, a decorative stone look. It will be the best option when arranging structures in residential and bathing areas to ensure their fire safety, insulation and sound insulation.
Installation of facade slabs Minerit
Installation of building facade panels is not difficult. However, the question arises: how to attach Minerite to the wall correctly? Previously, a load-bearing profile is mounted on the wall structures in the horizontal and vertical direction.
It is imperative that when fixing the slabs, gaps are provided to ensure freedom of temperature expansion. This gap value should not be less than 6 mm per 3 meters of slab. For the installation of mineral panels, the company has specially developed and produces a special type of self-tapping screws.
By screwing it in, the hardware makes a hole with a diameter larger than its own cross-section.
How to cut mineralite? Minerite is easy to process; cutting is done with a regular hacksaw. As for the Minerit LV brand, when cutting the slabs, proceed in the same way as with gypsum-fiber material: make an incision with a knife, and then bend it.
Taking care of fire safety
In individual private sector homes, owners are increasingly installing fireplaces that not only perform a heating function, but also add zest to the interior. And in country cottages there are also Russian stoves. In such cases, it is advisable to protect the home from possible fire. For these purposes, various materials are used, often choosing Minerite, which is a fire-resistant slab. It belongs to the non-flammable class. And when heated, due to the absence of asbestos and other harmful compounds, it does not emit substances harmful to health.
Taking care of fire safety
In individual private sector homes, owners are increasingly installing fireplaces that not only perform a heating function, but also add zest to the interior. And in country cottages there are also Russian stoves. In such cases, it is advisable to protect the home from possible fire. For these purposes, various materials are used, often choosing Minerite, which is a fire-resistant slab.
Therefore, mineralite panels are used to shield stoves in bathhouses and saunas, construct fire-resistant partitions, and line walls and ceilings, thereby increasing fire safety.
When carrying out such work, owners sometimes ask themselves the question: Superizol or Minerite, which one is better to use? The quality indicators of these materials are almost similar. However, experts consider the low moisture resistance to be a significant disadvantage of Superizol. As for Minerite, it is harder, denser and somewhat heavier.
Minerite, whose price is reasonable and competitive, is easy to use, can be combined with other building materials, can withstand high temperature loads and has proven its effectiveness in various fields of application.
Choosing the type of painting
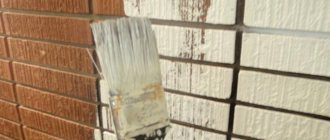
Painting with chalk or lime – the base of a brick (stove or fireplace) can be painted with your own hands using limestone whitewash. When mixing the composition (100 grams of lime, 40 grams of salt diluted in water), it should resemble liquid sour cream. Before painting, the surface of the fireplace must be prepared, cleaned of dirt and dust using a scraper or spatula. Uneven areas must be filled with putty (brick flour and latex paint).
You can also paint the stove or fireplace in your home with chalk. it should be sifted and diluted with low-fat (preferably skim) milk, to remove yellowness, you can add blue. Before painting, the base is moistened with water. The painting process is long, you need to paint in 2-3 layers. Layers are applied only when the previous one is completely dry.
If the question “How to paint the stove? “If you are inclined towards more modern methods, then when choosing paint the main emphasis should be on its heat resistance.
Painting with oil or enamel paints will increase heat transfer; it is better to choose a dark color, such a surface gives off more heat. You should not choose glossy or smooth surfaces; they can significantly reduce efficiency.
Water-based paint is a common option, applicable to brick and concrete surfaces, plaster or drywall. Dries quickly, safe, easy to apply with a brush or roller, easy to choose the right shade. The disadvantages of this are the speed of absorption and its price is higher than other means for upgrading the furnace.
If the oven is manufactured to the required standards, then surface heating can reach 80 degrees. For such temperatures, synthetic-based paints are suitable - nitro paints, pentaphthalic paints. If the paint base contains drying oil, it may darken at temperature.
Silicon-organic enamel is heat-resistant, durable, this paint should be applied in a thin, even layer, for optimal color in 2-3 layers.
When is this required?
There are times when there is no need to protect walls. If the stove is located at a safe distance from the wall from a fire safety point of view, the installation of protective screens and other measures can be neglected. The distance from the walls that is required to reduce the heat from the source varies:
- A stove laid in a quarter of a brick should be located no closer than 35-40 cm from the wall;
- A metal stove without lining should be placed a meter away and no closer;
- A metal one with a lined furnace can be installed 70-75cm from the wall.
Technical characteristics of mineralite
Let's take a closer look at the characteristics of mineralite in order to compare them with their counterparts from this category of materials. The slabs may differ slightly in the additives in their composition, which is dictated by their different functional uses. I will outline the main technical characteristics:
- High strength, when exposed to loads, the surface is virtually not deformed, the panels are inherently impact resistant.
- It has absolute fire resistance, it is not subject to combustion or ignition.
- The panels have proven themselves to work well in a humid atmosphere, without deteriorating their strength parameters. This is due to the fact that the composition contains water repellents - components that protect the slab from absorbing moisture and allowing it to evaporate. In addition, mineralite successfully tolerates temperature changes.
- Minerite slab is highly heat resistant. It does not change the original characteristics, operating within the temperature range from minus 80° to + 150°.
- The cement component ensures the material’s resistance to mold and mildew and prevents rotting processes.
- Stability to chemical reagents in the form of alkalis and acids is noted.
- It has soundproofing properties, is an environmentally friendly building material, and has a long service life.
These characteristics and properties of mineralite are considered the advantages of a building material. But its fragility is a weak link, therefore cutting and cutting into blanks must be done extremely carefully. You can cut mineralite with a regular hacksaw, grinder, jigsaw, or other tools, which is very convenient.
Furnace shielding
You can also provide protection from heat radiation with a screen around or near the stove. Insulation can be brick or metal.
Brick shielding
Bricks can be used to protect either one of the stove sides or all three - the sides and the back. In the latter case, essentially a brick casing is formed.
Bricks are placed maintaining a distance between the stove walls. Recommended distance is 5-10 cm. Approximate diagram of the protection device:
- ventilation gap – 5-10 cm;
- brick – 6-12 cm (depending on the format of the masonry);
- ventilation gap – 5-10 cm;
- bake.
Figure 6. Brick shielding
Fireclay bricks are usually used as a screen. It is distinguished by optimal thermal characteristics. It is advisable to lay it in half a brick (12 cm), but if you increase the intervals between the walls and the stove, laying it in a quarter of a brick is allowed. Fireclay is placed on clay (or cement-clay) mortar or on a special heat-resistant masonry mixture.
Convection holes are formed at the bottom of the screen. Sometimes they are made in other areas of the shielding wall. To regulate air circulation, holes are made with doors.
Important! The brick must vertically overlap the stove by at least 20-30 cm
Metal shielding
This is the most popular option, characterized by availability and fast execution. There is a need for metal if factory furnaces are not initially equipped with thermal protection.
Most often, cast iron or steel sheets play the role of insulation in bathhouses. They are mounted around the hearth, maintaining a distance of 1-5 cm. If there is no thermal insulation of the factory stove in the bathhouse, the fireplace is equipped with either front or side sheets. The type of screen depends on the location and design of the furnace.
Figure 7. Metal furnace screen
Such shielding makes it possible to reduce the temperature of the stove surface to 100 degrees and below. This, in turn, makes it possible to reduce the standard distance between the heat source and the opposite wall by half - to half a meter.
Do not forget! The floor also needs protection. The larger the oven, the stronger the foundation should be. And if the floor is wooden, it is thermally insulated in the same way - using a heat insulator and an outer layer (metal, brick, tile)
How to install correctly
In order to start insulating walls, you will need the following tools:
- a screwdriver (preferably a cordless one, since you will have to move around a lot);
- self-tapping screws with galvanized coating;
- tape measure, building level and various rulers - corners;
- fastenings - umbrellas for insulation;
- jigsaw with wood blade;
- metal profiles and corners.
The insulation process occurs as follows:
- It is necessary to attach a frame made of wooden (metal) profiles to wooden walls in increments of at least 50 cm. The distance between the beams is dictated by the width of the insulation - it must fit tightly into the opening. The frame is erected using a building level and attached to metal corners.
- This is followed by the first layer of ecowool or mineral wool. Install the insulation tightly to the base of the frame. Loose insulation materials should be laid in a special way: a special membrane fabric is attached to the finished frame so that a bag is formed. Insulation is placed on top and secured with a construction stapler.
Minslabs or basalt slabs are the second layer after the membrane fabric. Secure the insulation pie with plastic dowels in the form of a fungus for the stability of the structure. Install membrane thermal insulation on the sheathing. Secure it to the wooden frame using construction staples or small self-tapping screws. This substrate prevents excess moisture from entering the insulation, which reduces heat loss. Now you can start finishing: siding, brick or building slabs.
Since siding tends to expand in direct sunlight, do not tighten the screws all the way and leave a small distance between the profiles so that they can “walk” in hot weather. If this is not done, the plastic will begin to bend, which will lead to depressurization of the facade.
Watch the video in which the user demonstrates in detail the process of attaching insulation to a wooden wall:
Installation of mineralite furnace thermal insulation
The photo gallery for the article “Stoves and heaters in the log house of a bathhouse and a house” is here >>
Additional photographs of stoves and heaters installed in a steam bath or in a house. Scheme for attaching fireproof insulation (minerite sheets) to the floor and walls.
Installation of thermal insulation (minerite) when installing a stove in a steam room of a log bathhouse
When installing a heater in a steam room of a log bath or sauna, first of all, it is necessary to comply with fire safety rules. In other words, it is necessary to reliably insulate the wooden walls of the bathhouse from the heated elements of the heater.
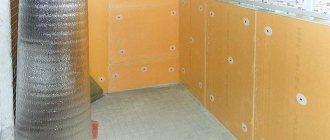
One of the most heat-resistant and at the same time environmentally friendly materials is mineralite, which is produced in Finland. Manufacturers recommend installing mineralite on the walls of a steam log bathhouse in 2 layers as follows: the first sheet is installed on the wall, then ceramic spacers (tubes) follow, after which the second sheet is attached. However, from construction practice, one correctly installed sheet for thermal insulation of the walls of a log bathhouse is quite enough.
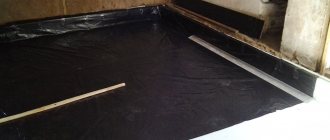
To insulate the floor of the bathhouse, a sheet of mineralite is placed under the stove-stove. Before installing a mineralite bathhouse on the floor, the floor must be thoroughly swept so that the sheet does not bend or crack in the future. The mineralite is laid close to the walls (when installed at an angle of 45 degrees, the cut corners are laid on the sides - see the picture), after which it is immediately screwed to the floor with self-tapping screws (otherwise debris will get under it, which can lead to bending and damage to the mineralite). The edge of the sheet is cut to the level of the open oven door. For greater aesthetics, the corners of the mineralite before firing the heater can be cut at an angle of 45 degrees (the length of the cut edge is 50 mm) and processed with sandpaper.
Minerite sheets are also installed on the walls of the log bathhouse (with self-tapping screws through ceramic or metal tubes 30 mm long). The air gap between the wall of the bathhouse frame and the mineralite is therefore 30 mm. The gap between the floor of the steam room and the bottom of the sheet is 20-30 mm. The bottom gap is very important, as it ensures air circulation between the wall of the bathhouse frame and the heat-resistant mineralite sheet. If this is not done, the air between the wall of the bathhouse log and the mineralite will heat up to several hundred degrees!
When installing mineralite, you must remember that it is not a deformable material. That is, if you attach it to the wall of a log house or bathhouse, which is still shrinking, the mineralite may burst. Installation to the “living” wall of a log house is possible, but in this case, vertical cuts must be made in the mineralite, along which the self-tapping screws will slide when the log house shrinks. The lower gap between the floor and the mineralite sheet screwed to the wall of the bathhouse frame is in this case ensured by inserting spacers under the sheet (for example, from mineralite scraps). When the frame has completed its final shrinkage, the mineralite is leveled and screwed permanently.
It is not recommended to move the stove after installing it on a mineralite sheet, since the mineralite can be scratched. To install the stove in another place, it must be raised and lowered again.
Thermal insulation must be installed not only between the heater stove and the walls of the log house, but also behind the “bare” (that is, not insulated with mineral wool and a sandwich-type casing) pipes. As a rule, this is at least one bend (1 meter) extending from the stove. That is, the height of the mineralite sheets (one or several) should be the height of the furnace plus the height of the “bare” pipe.
The minimum distance from the heating parts of the heater (including “bare” pipes) to the mineralite sheet is 100 mm.
Main types of insulation installation
To insulate a building, it is better to opt for external installation of mineral wool. Experts recommend this method as the most effective. One of the common methods is to install slabs with the creation of a ventilated gap. This method has been described below.
There are also other ways to insulate walls from the outside:
The wet method consists in the fact that after installing the mineral wool, a reinforcing mesh with plaster is applied to it. After this, the facade of the building is painted. More details about the wet insulation method can be found in the video. In the video you can more clearly see the correct installation of sheets, which will help you complete this process without outside help.
Installation of mineral wool according to the “Well” type is carried out using the following technology: the insulation is mounted between the double wall of the building. To do this, sheets of material are mounted to a brick wall, and then a cladding is made of concrete, brick or other materials. Thus, the insulation is contained in the gap between the double wall of the building.
How to protect the walls of a bathhouse from the heat of a stove - technologies and materials
When planning the construction of a bathhouse, it is important to remember to create safety indoors. First of all, this concerns fire safety. By melting the bathhouse, the stove can be heated to 300-400°C, which significantly exceeds the combustion temperature of the wood from which the bathhouse is most often built.
All the heat from the stove is released into the room, but the main heat is absorbed by nearby walls, which leads to their charring and fire. It is extremely important to avoid such consequences, so in this article we will tell you in detail how to insulate a stove in a bathhouse from the wall.
Cladding with cladding
This option is practically no different from the previous one, however, if you don’t know how to decorate the wall behind the stove in the steam room in such a way as to preserve the beauty of the room while creating safe conditions, then this option is undoubtedly for you. Protect the walls using heat-resistant decorative materials laid on thermal insulation.
The finishing around the stove in the bathhouse can be done with the following materials:
- Clinker tiles are made from baked clay. It is characterized by high strength, heat resistance and durability. One of the advantages of this option is also the rich color palette, which includes not only black and white tones, but also blue or green colors;
- Terracotta tiles are also made from clay, but they are inferior to the previous option in terms of density and the number of possible colors;
- Soapstone is a good cladding option for a bathhouse, made from rocks of green and grayish shades. Has good heat resistance and strength;
- Tiles are ordinary ceramic tiles, characterized by good heat resistance and a pattern on their surface;
- Porcelain tiles are heat-resistant tiles that imitate natural stone or wood.
The tile will not dissipate heat, protecting the walls from fire, so it cannot be mounted directly on the wall. We recommend using the following design:
- Wall;
- Clearance for ventilation;
- Fireproof material;
- Tiles (the distance from the tile to the stove must be at least 15 cm).
Such a “pie” will create reliable protection for walls from heat, preserving the beauty of the room.
One of the following options can be used as a fireproof material:
- Fireproof drywall - made from the same materials as regular drywall, but using fiberglass;
- Minerite slabs for baths are absolutely not exposed to moisture and heat.
- Glass-magnesium sheet - plates made of fiberglass and magnesium binder. Excellent resistance to heat, moisture and noise.
This option will perfectly protect your bathhouse from the possibility of fire, and will also insulate the room, preserving its aesthetic component.
Non-combustible wall coverings
The second option for protecting walls from fire is special sheathing, which is made from non-combustible materials. The working element of this protection, which reflects IR rays that are dangerous for flammable surfaces, is a reflective material, for example, stainless steel.
There are also decorative finishing options that preserve the aesthetic purity of your bath. One of the advantages of this method is that protecting the walls in the bathhouse from the stove will not only prevent fire, but also retain heat inside the room.
Compound
Minerite is known to many as a fiber cement panel, which has been used until today as a finishing for ventilated building facades. The plate differs from many similar materials in its increased impact resistance. This panel is practically not deformed and can withstand heavy physical loads. Minerite slabs for baths are produced using energy-saving and environmentally friendly technologies. The protective panels contain the following ingredients:
As you can see, the composition does not contain asbestos. All other components are absolutely harmless when heated.
Advice! The composition may vary slightly depending on the selected manufacturer. The only difference is in special mineral and synthetic additives.
Do you need protection in your bathhouse?
Fire safety of the bathhouse is the main condition of operation. First of all, having erected such a structure, you must think about how you can prevent all accidents associated with damage to property and a threat to human health. If the bathhouse is equipped with a wood-burning stove, the following structural elements must be secured:
- walls and ceiling;
- bake;
- chimney.
For a bathhouse in which such a stove is installed, you need to choose materials for insulation that are not just high-quality, but environmentally friendly. Gone are the days when asbestos was used everywhere, which became the main cause of cancer. This happened due to the vapors released during constant heating.
Advice from professionals! Do not use not only asbestos for insulation, but also all materials that contain resins.
Only natural materials are recommended for use, for example:
- natural stone;
- fiberglass;
- stone fiber;
- stainless metal.
Today we are interested in a mineralite slab. For a bathhouse, the feasibility of its use is confirmed by its quality characteristics.
Protecting the walls of the bathhouse from the heat of the stove is not always required. For example, you can provide a distance between the wall and the stove, which will allow you to achieve fire safety without additional protection. The fact is that at some distance the IR rays emitted by the furnace begin to dissipate, which significantly reduces their impact on nearby surfaces.
The distance from the stove to the wall in the bathhouse varies depending on the type of stove:
- 0.32 m or more - the distance for a stone oven with quarter-brick masonry;
- 0.7 m or more is the required distance between the wall and the metal furnace lined with fireclay or brick from the inside;
- 1 m or more is a safe distance for an unlined metal furnace.
On glue
As the only method of fastening exclusively with adhesive mass, it is rarely used and only under ventilated facades. For plastering work, additional reinforcement with umbrella dowels is required. However, this method has its own characteristics that need to be considered separately.
Firstly, there are two types of adhesives:
The dry mixture is sold in bags and requires dilution. Adhesive foam is sold in cans and does not require preliminary preparation. The latter is a little more expensive, but the convenience is worth it.
Sets the bottom bar, which will be the starting point of thermal insulation. The dry mixture is applied to the slab itself.
In the case of a dry mixture, you need to apply the glue to the slabs in several pieces and spread it evenly over the entire surface using a comb. After this, the insulation board is fixed to the wall. Typically, the installation of mineral wool or other materials begins from the corner and always from the bottom row.
Adhesive foam is applied around the perimeter of the slab and in several strips in the middle. After application, press the slabs flat. The foam hardens in 30 minutes to 2 hours. During this time, it is possible to slightly adjust the position of the slab using a level.
Dry mixtures are often used:
- EK THERMEX;
- Ceresit CT 190;
- Ceresit CT180.
Popular foam options:
- Ceresit CT 84;
- Soudabond EASY;
- Insta STIK.
The cost of one cylinder is from 200 to 500 rubles.
We discussed the basic principles of how to attach insulation to a wall using adhesive. You can decide what exactly to use by reading a couple of opinions.
For large differences in walls, it is recommended to use polyurethane foam, specifically for polystyrene foam. It is also called “liquid foam”. If the wall curvature is one to three centimeters, this is not a problem at all. I bought it at Epicenter a year ago, glued the sheet on just for fun - a year has passed, everything is holding together, the sheet cannot be torn off. The foam breaks, but holds up.
Thermal protection of wood: maximum information
Very, very, very often I get asked about thermal protection. How, what, where, how one differs from the other. I decided to include all my knowledge about thermal protection in this post.
The first thing you need to know is one single principle by which any thermal protection is calculated, purchased and installed: it is better to be overprotected than underprotected.
Let me explain: it is better to buy thermal protection with a reserve, and protect the maximum number of surfaces with it, than to rely on chance, thinking that it will blow through. It won't carry through.
Even if everything is fine for a year, two, three - and on the fourth, rrrrrrrrrr! and flares up like “by itself” But “by itself” doesn’t flare up. Flares up due to lack of thermal protection. Or incorrect installation. Or insufficient amount of thermal protective material. Or from saving on the chimney, when “there is no money for a sandwich, but you need a chimney.” Or for all reasons at once
The second thing you need to know: there is thermal protection that is harmful to human organisms and not harmful.
One, accordingly, is not used in residential premises, the other is used
Proof
Which means I’ll talk about harmless thermal protection.
The third thing you need to know: how and what to protect?
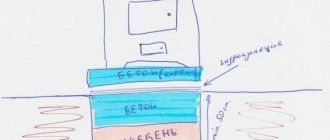
The first thing we protect. floor.
calculation formula: oven bottom area + 10 cm around the edges. If the stove is heated from the inside of the room, then a firebox is needed, at least half a meter from the stove door.
Clear picture
The second thing we protect is the walls. When making calculations, you need to know that radiation from the stove and from the chimney (single-circuit and double-circuit) chars wood at a distance of half a meter. And sometimes more. This means that all flammable surfaces of the walls next to which the stove and chimney are located must be insulated.
It was wrong
It became right
The third thing we protect is the passage of pipes through the walls.
1) The inside of the polyurethane foam is filled with mineral wool, expanded clay, but not sand!
But the best thing is to protect the wood from the inside by covering the “insides” of the cutout with thermal protection
Fourth - passage through the roof. There are no photos, so I'll just explain: you cut a hole in the roof and inserted the chimney module.
It is advisable to treat all “pieces of wood” at a distance of 30-40 cm from the “pipe” with fire impregnation and cover them with thermal protection
Total needs to be protected: Floor + walls + passage through the ceiling + passage through the roof
Thermal protection, as far as I understand, comes in three types:
- metal
- stone
- fiber cement
- ceramic
What is the difference?
Not with anything.
Everything is equally suitable if it is made with high quality and installed correctly. Even the prices for thermal protection for 1 square meter are approximately the same, regardless of the material
Metal thermal protection
Metal thermal protection is sheets of mirror stainless steel, each side of which is bent by half a centimeter
Inside the stainless steel sheet, a sheet of stone sheet is inserted: basalt cardboard or basalt fiber, but not mineral wool. Mineral wool is thick and often has resinous binders, which are destroyed when heated and the mineral wool turns into sand.
Use self-tapping screws to attach the stainless steel to the wall.
The inner side is the one with basalt
It turns out something like this
They usually come in two sizes: meter by meter and 0.6 meter by meter. Stainless steel sheets with a basalt gasket can be placed without restrictions both inside the house and inside the steam room.
Stone thermal protection
Brick
It's a brick, and in Africa it's a brick. The downside is that it needs to be laid out and the mortar mixed, and the brick is heavy - it won’t fit on every floor. Well, the roof and ceiling cannot be protected with bricks. Pros: heat capacity, beauty, accessibility. For thermal protection, you can use any brick. Either fireclay or construction. Do not confuse thermal protection with laying out the oven. Thermal protection is not critical to the quality of the brick. These are the beauties where the tree protects the brick
You also need a brick to make a portal! Well, to heat it across the street or through another room. And to make a podium-substrate for the stove - a brick is the best!
In short: no bricks, neither here nor there!
Fiber cement boards
Under the terrible word fiber-cement slabs, there are slabs that are similar in structure to plasterboard - they look approximately the same, and are processed in the same way.
But a little harder. And the properties are different. Fiber cement is a mixture of cement, wood fibers, fine sand, mineral additives and water. When such a mixture hardens, it becomes extremely durable and resistant to fire, water, and insects. Fiber cement boards suitable for thermal protection in the home have 3 brands:
The first two (Minerite and Flama) are twin brothers, differing only in color and density. They are produced in Finland and Russia using the same equipment.
Try to guess what is flamma and what is mineralite:
Nichikha is a Japanese brand. It differs from Flama and Minerite in that it has a “brick-like” relief structure and is a little more expensive. It is found very rarely in the European part of the Russian Federation, but often in the Far East. Accordingly, Flama-Minerite is found more often in the west of the Russian Federation than in the east.
Fiber cement boards are easy to install, but they have their own technology: installation through a sleeve
This fiber cement is an excellent material. Not only is it a replacement for brick, but it can also be used where brick does not fit: in ceiling trim.
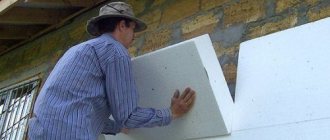
Foam plastic for wall insulation
Polystyrene foam has become widespread as a thermal insulation material due to its insulating properties and low cost; another advantage is its low weight. It tolerates low temperatures well and is not susceptible to mold and mildew. When exposed to high temperatures, the substance is deformed, but does not burn on its own. Professionals in the field of repair work recommend edging door and window openings using mineral wool as a preventative measure.
It is very easy to install such insulation, but the peculiarity of insulating walls with this type of thermal insulation is that you must first carefully level the surface so that the foam sheets fit as tightly as possible. You need to level the walls using plaster; it will be enough to apply it in two thin layers.
Gluing foam to the wall for insulation
The next point that needs to be taken into account is that polystyrene foam requires the creation of a vapor barrier so that moisture and condensation do not accumulate on its surface. The accumulation of moisture on the surface of the insulation is dangerous because it deprives it of its thermal insulation properties, rendering all the insulation work carried out useless.
You can fix thermal insulation on the wall in different ways. Attaching the insulation to a brick wall, with a pre-applied layer of plaster, is done using glue. The adhesive composition is applied on the back side of the foam sheets over the entire sheet area.
Particular attention should be paid to the perimeter. After this, the sheet is pressed as tightly as possible to the surface and fixed.
The insulation is attached to a wooden wall or concrete surface using special dowels that are shaped like mushrooms. To do this, several holes are made in the surface with a piece of foam attached to it. It is necessary to calculate the required depth of the holes so that it is enough to securely fix the material. These holes are designed to strengthen the insulation sheets with fungi. After preliminary fixation of the foam sheet, the remaining holes are completed in the required quantity along the entire perimeter of the attached thermal insulation. The interval should be about 25 centimeters.
Next, a mesh is installed on top of the insulation layer, fixing it with special glue, and work is carried out on plastering the surface.
Attaching mirrors to the wall (mirror installation)
There are 2 main ways to attach mirrors to the wall . This is a glue mount (gluing mirrors) and using various types of fasteners for mounting mirrors. We will tell you about them.
Pasting mirrors
To attach a mirror with glue, you must first level the surface of the wall, because... Unevenness of the wall can affect the evenness of the mirror sheet and the mirror will begin to distort the image. The wall on which the mirror is supposed to be glued must be dry, dust-free and must support the weight of the mirror (for example, a 6 mm mirror measuring 2000 mm x 1000 mm will weigh more than 30 kilograms). At the same time, the coating of the wall itself is important for gluing mirrors. The mirror cannot be glued to some coatings and you will have to use a different mounting method. We recommend that you first consult with our specialist about the possibility of gluing the mirror in your particular case.
If you call a measurer, he will determine on the spot the most suitable method of attaching the mirror to the wall. To glue mirrors to the wall, use a special glue recommended by the manufacturer of the mirror cloth. The adhesive application pattern should be strictly followed, since not only the strength of attaching the mirror to the wall, but also the durability (service life) of the mirror layer . Under no circumstances should acid-containing sealants be used as glue for attaching mirrors - they will “eat through” the protective and mirror silver layers of the mirror.
The adhesive method of attaching mirrors is often used for mounting mirrors in bathrooms, sports and dance halls, and wardrobes.
Mechanical methods of attaching mirrors
The simplest and most common way to hang small mirrors is to mount them on mounting loops.
The hinges are glued to the back of the mirror in our workshop and delivered to the client ready for installation or attached through pre-drilled holes in the mirror. Then, on the wall where the mirror is attached, holes are drilled for dowels into which hook screws are screwed, and the mirror is hung on these hooks. A more reliable method is to fasten the mirror through with decorative screws . To do this, 4-6 holes are drilled along the edges of the mirror with a diamond drill, into which plastic adapters are inserted, through which the mirror is attached with screws to dowels pre-installed in the wall. From the outside, the hole is closed with a decorative cylindrical cap of golden or silver color.
“safety film” on the back of the mirror . If a mirror with such a film cracks or breaks, the fragments will simply remain hanging on the film and will not hurt anyone. If the mirror in the wardrobe, due to the design of the door, is not glued, but is clamped, then here too it is recommended to stick a safety film on the mirror .
In addition to these two methods, there are a large number of other fastening accessories for mirrors and glass shelves , incl. for mounting mirrors at a distance from the wall.
How to install correctly
- a screwdriver (preferably a cordless one, since you will have to move around a lot);
- self-tapping screws with galvanized coating;
- tape measure, building level and various rulers - corners;
- fastenings - umbrellas for insulation;
- jigsaw with wood blade;
- metal profiles and corners.
- It is necessary to attach a frame made of wooden (metal) profiles to wooden walls in increments of at least 50 cm. The distance between the beams is dictated by the width of the insulation - it must fit tightly into the opening. The frame is erected using a building level and attached to metal corners.
- This is followed by the first layer of ecowool or mineral wool. Install the insulation tightly to the base of the frame. Loose insulation materials should be laid in a special way: a special membrane fabric is attached to the finished frame so that a bag is formed. Insulation is placed on top and secured with a construction stapler.
Minslabs or basalt slabs are the second layer after the membrane fabric. Secure the insulation pie with plastic dowels in the form of a fungus for the stability of the structure. Install membrane thermal insulation on the sheathing. Secure it to the wooden frame using construction staples or small self-tapping screws. This substrate prevents excess moisture from entering the insulation, which reduces heat loss. Now you can start finishing: siding, brick or building slabs.
Since siding tends to expand in direct sunlight, do not tighten the screws all the way and leave a small distance between the profiles so that they can “walk” in hot weather. If this is not done, the plastic will begin to bend, which will lead to depressurization of the facade.
Watch the video in which the user demonstrates in detail the process of attaching insulation to a wooden wall:
Project of a stove-fireplace in a house made of laminated veneer lumber
Initially, the following task was posed: it was necessary to install a fireplace stove, line and protect the walls, as well as the corner where the fireplace would be installed, and install a chimney in accordance with all the rules. We present a small photo report of the installation of a small metal stove-fireplace. What we have: Romotop oven, sandwich panels.
The following items of goods were purchased for the installation: mineralite panels, basalt cardboard, porcelain stoneware, special German-made adhesive for porcelain stoneware, pipe with Romotop Romotop metal pipe 1 m long, 4 m sandwich, adapter, interfloor passage, roof passage.
There are two walls directly adjacent to the fireplace; they will be finished as follows:
- basalt cardboard for wall
- then the air gap
- minerite shields
- porcelain stoneware
- on the advice of the store sellers, mineralite panels were purchased in the store, which are installed at a distance of 3 cm from the floor and there will also be a free space 3-5 cm from the ceiling so that the wall can be ventilated without problems. Ventilation gaps will be placed both above and below.
Planning to protect the wall near the fireplace
At the beginning of working out the details, there was only one question: what to glue the basalt cardboard to; sellers advise either liquid nails or PVC. You can strengthen the wall without mineralite. The cardboard should be secured with a stapler. You can also install reflective foil and secure the porcelain tiles with clamps. Ceramic bushings should be used to attach mineralite. According to sellers of fireplace equipment, heat-resistant glue is suitable for wall construction. It is planned that the distance from the fireplace stove to the tiles will be at least 30 centimeters. Suitable adhesive options are Plitonit SuperKamin TermoKladka and heat-resistant tile adhesive for stoves and fireplaces IVSIL TERMIX. Before installation, ceramic bushings will also be purchased; it will be necessary to decide later what to use to glue the basalt cardboard to the wooden wall.
The cardboard will be mounted on the wall using paper clips; a stapler and 12 x 14 mm staples have been purchased. Ceramic bushings, 30 mm long, were also purchased from the construction market. Installation work will begin with mounting the panels on the wall. You will also have to decide whether to use foil or not.
A certain logic is used: basalt cardboard holds up to 900 degrees. It will not burn, and also will not get very hot. If you install the film, the hot air will rise up from below, being reflected and almost without reducing the temperature. Without film, basalt cardboard will absorb heat at least minimally. As a result, two-layer basalt cardboard, foil, guides, mineralite, and ceramic tiles appeared on the wall.
To paint the chimney, a special paint will be sought if expanded clay blocks are not found. In this case, I have a seam roof, dark brown ruukki.
Four years later, the oven is working great. The fire is carried out almost every day, no problems. The wall is well ventilated.