We have repeatedly mentioned the low efficiency and high fuel consumption of conventional direct-burning stoves. The reason for this is the direct access of oxygen and the free release of exhaust gases. The initial stage of solving this problem was given in the latest design - with a chimney heat exchanger. In addition, there are the following problems with fuel combustion:
- Rapid uncontrolled combustion. In this case, the temperature in the area of the source is too high, and the metal quickly loses its properties.
- Incomplete combustion of material. This is especially true when recycling plastic and other polymers (in household waste). Acrid smoke from rubber and PVC, thick car exhaust is the result of incomplete combustion of petroleum products.
- Frequent (up to 1 time per hour) fuel loading and the risk of fire extinguishing. You can’t leave such a stove overnight - it will go out and cool down. It is worth noting here that an important advantage of steel furnaces is their rapid heating.
The main idea that we will develop in this article will be the regulation of the oxygen supply for combustion. This will require more precise execution of shutter (doors, dampers) and adjustment (gates, movable and rotary dampers) devices.
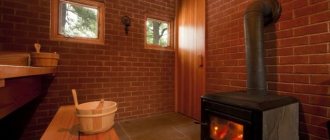
Grateless sauna stoves
A bathhouse is an area where people and buildings are exposed to high temperatures.
In order to correctly develop the design of a sauna stove that meets all standards, as well as the functional and aesthetic needs of consumers, you need a deep understanding of the processes occurring in the sauna stove and steam room, knowledge of the features of the stoves and their installation. Wood-burning sauna stoves from the Sukhovey plant of Feringer are developed on the basis of original design solutions aimed at improving the operational and consumer properties of the products: increasing service life, ease of installation and placement in the steam room, fuel efficiency, versatility and others. When developing stove designs, we take into account the volume of the steam room and adjacent rooms that require heating, the number of people simultaneously taking bath procedures, as well as the presence of a container for heating water or steaming a broom. Many years of experience of the best specialists of our company and an attentive approach to the wishes of customers help improve the designs of sauna stoves and expand their range. Our stoves for the Sukhovey bathhouse are environmentally friendly, hygienic, safe and have certificates of compliance with the requirements of the State Standard of Russia and fire safety. All this makes wood-burning stoves for the Sukhovey bathhouse ideal for connoisseurs and lovers of Russian bathhouses.
It is known that in wood-burning sauna stoves with a grate, air is supplied 10–15 times more than is necessary for the combustion process. Together with excess air, up to a third of the heat leaves the oven. In addition, unburnt fuel (a tenth of the total volume of firewood) falls into the grate holes. And these coals make up 99% of what we call ash. Therefore, every time after using the stove, it must be cleaned to empty the ash pan.
The grateless stoves for the Sukhovey bathhouse do not have all these disadvantages, therefore their efficiency is much higher than in stoves with a grate. The fuel in these stoves burns completely, and so little ash remains that the sauna stove has to be cleaned once every 15–20 burns. For example, in the traditional Russian bell stove, in which cabbage soup was cooked, bread was baked, and steamed, there was never a grate. They appeared when coal began to be used. A wood-burning sauna stove does not need a grate at all. In my own bathhouse I have been using a grateless stove for 3 years. Ash has to be removed only once every six months.
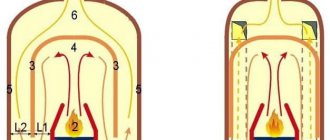
OPERATING DIAGRAM OF A GRITT OVEN
The air supply occurs through the ash pan and cannot ensure smooth adjustment of the combustion mode. The highest temperature is created in the grate zone, which leads to deformation and intense scaling of the grate, bottom and ash pan. The fuel lying on top creates a screen and prevents heat from spreading smoothly throughout the entire volume of the furnace. And excess air flow carries heat into the atmosphere. The tunnel area does not participate in the general air flow, so intense soot deposits on the door glass. After the first fire, the glass becomes opaque. Fuel loss ranges from 5% to 15%. All unburned fuel falls into the grate holes.
After each fire, the ash pan must be emptied
from the ash. However, not all the ash ends up in the ash pan—some of it remains in the firebox—so there is a need to clean the firebox itself.
OPERATING DIAGRAM OF A GATELESS OVEN
The air supply is smoothly regulated by a damper
and allows you to regulate the fuel combustion activity. the fuel burns completely, leaving only the salts contained in the wood, which make up 0.2% -0.3% of the mass of the firewood. ash plays the role of additional protection for the bottom of the sauna stove. Ash removal is carried out only once after 15–20 firings of the furnace.
The air supply through the damper at the top of the door protects the door and glass from overheating and prevents soot from settling on the glass.
The absence of a grate and ash pan allows you to change the shape and size of the firebox, thereby achieving the greatest efficiency of heat extraction.
Advantages of a grateless oven:
— fuel burns completely and evenly; — burnt fuel serves as additional protection for the bottom of the firebox; — using a damper you can smoothly regulate fuel combustion; — the air flow blows across the glass and prevents soot from settling on it; — cleaning the firebox from ash is done once after 15–20 firings of the furnace.
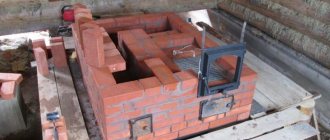
Materials and their quantity
You need to know that the main material is brick, and the design of a stove for a bathhouse with a firebox from a dressing room consists mostly of it. Therefore, choosing a brick should be given the lion’s share of time. In no case should you skimp on this material; the stove needs a high-quality base.
Experts recommend using fire-resistant bricks. It comes in these sizes:
- standard - 23 by 12.5 by 6.5 cm;
- narrowed - 23 by 11.4 by 6.5 cm;
- reduced narrowed - 23 by 11.4 by 4 cm.
Straw-colored fireclay bricks are best suited.
In addition to the brick, you will need to have:
- clay for mortar;
- grate bars of classic sizes – 5-7 pcs;
- a door for a hole with a blower;
- door for the firebox opening – 25 by 28 cm;
- a door for another compartment with stones;
- fireclay products – 7-8 pcs.;
- corners of standard size made of steel – 5-7 pcs.;
- classic size corners for roofing;
- a sufficient amount of sand - both river and quartz.
These materials are enough to get started with confidence.
Without grate stoves for baths
Stoves for the home • Stoves for baths • Fireplaces • Heating • Installation St. Petersburg north: (812) 985-0625 | South: (812) 928-0111 | wholesale: (911) 926-0444
for the first time began producing hearth-burning stoves and fireplaces. Studies have shown that they are much more economical and environmentally friendly than grate-type ones. Air is supplied to them through the combustion door into the combustion chamber. Previously, this principle was used only in stationary brick and Russian kilns.
The main thing with “bottom combustion” is to thoroughly warm up the fuel combustion chamber. As a rule, there are two of them. However, models even with four cameras are presented. These are the ones we will talk about.
What is bottom combustion?
In this context, the term “bottom combustion” is considered only in relation to the combustion of large pieces of wood materials (firewood, briquettes), since for many other types of solid fuel (for example, sawdust, coal, etc.) this process is generally not feasible.
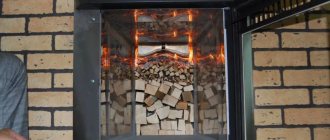
Unlike the traditional grate system, burning wood on a solid hearth (hearth or grateless) has its advantages. The main one is the so-called “top” combustion, when its front spreads from the upper layers of the fill to the lower ones as the fuel burns. In this case, the air supplied through the combustion door penetrates into the combustion zone in a quantity sufficient to completely oxidize the fuel, and the coals formed as a result of combustion heat the lower layers of the fuel and stimulate its thermal decomposition and the release of pyrolysis gases.
Provided the hearth and walls of the furnace are lined with heat-insulating material (for example, fireclay bricks), the latter accumulates heat from fuel combustion and maintains the high temperature in the furnace necessary to ensure an efficient combustion process (especially during loading).
Another advantage of deck ovens is that there is no need to regulate the air supply depending on the fuel combustion phase. During top combustion, the filling participates in the reaction only with its upper part and always contains layers of fuel at different stages of oxidation, i.e. The air demand is approximately constant over time and can be adjusted at a time. In grate furnaces, the entire stack is involved in the reaction, and the combustion phases change over time: in the initial phase (thermal decomposition and combustion of pyrolysis gases) more air is required than at the stage of coal combustion, and if adequate control of the air supply is not ensured during the combustion process , fuel combustion efficiency and furnace efficiency decrease sharply.
In conclusion, it should be noted that in hearth furnaces there are no grates as a structural element and consumable material, as well as the associated loss of fuel as a result of it falling into the ash box (approximately 5%).
Due to the reasons listed above, recently there has been a tendency to return to wood-burning fireboxes with a grateless (hearth) combustion scheme, especially taking into account the centuries-old experience and traditions of constructing classic Russian stoves.
Design features of heating and cooking grateless (hearth) stoves “Ligov”
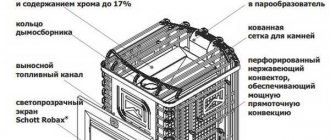
1 – convector casing – shields thermal radiation and actively removes excess heat from the combustion chamber; 2 – furnace body; 3 – “direct stroke” valve – open during heating of the furnace; 4 – hearth-type combustion chamber; 5 – side combustion chambers; 6 – fireclay brick of the side combustion chambers; 7 – “under” – double row of fireclay bricks; 8 – reinforced rear wall made of ShA-94 brick; 9 – fireclay brick in the fourth combustion chamber; 10 – fourth combustion chamber; 11 – exit to the chimney.
Most heating furnaces operate in bottom combustion mode, i.e. They use a scheme for burning wood on a dead hearth. The base of the firebox and all side walls are made of fireproof and heat-intensive fireclay bricks; on top, the combustion chamber is limited by a thick 10mm cast iron plate with ring burners. The burners reduce thermal stress in the stove, allow the use of dishes with a spherical bottom for cooking, and also allow vertical loading of fuel. If the firebox height is at least 600mm, you can burn wood of the appropriate length.
In intensive combustion mode, the temperature on the surface of the stove reaches 420 0 C, while the brick walls, due to their heat-insulating properties, heat up to 700 0 C, guaranteeing stable combustion of fuel under any conditions (wet fuel, low atmospheric pressure, strong wind, etc. ). Despite such an intense thermal operating mode of the firebox, its service life with proper operation is virtually unlimited, since the operating temperatures of the materials used are far from critical (700 0 C for a cast iron slab and 1400 0 C for fireclay masonry).
1 – convector casing – shields thermal radiation and actively removes excess heat from the combustion chamber; 2 – furnace body; 3 – “direct stroke” valve – closed during bottom combustion; 4 – hearth-type combustion chamber; 5 – side combustion chambers; 6 – fireclay brick of the side combustion chambers; 7 – “under” – double row of fireclay bricks; 8 – reinforced rear wall made of ShA-94 brick; 9 – fireclay brick in the fourth combustion chamber; 10 – fourth combustion chamber; 11 – exit to the chimney.
Heating stoves "LIGOV" belong to the "bottom heating" stoves (when hot gases are first directed to the lower part of the stove) and have no analogues in their class in terms of design and length of gas ducts, combining the advantages of metal quick-heating stoves and heat-intensive brick stoves. The total length of the heat exchange path is more than 2 m. All gas ducts are limited on the outside by a heat-exchange metal shell, and on the inside by heat-intensive brickwork, which is washed by hot gases on both sides.
After lighting the stove, the heat flow through the metal wall heated to 250-350 0 C immediately enters the heated room (like a “potbelly stove”), while after the end of the fire the brickwork is heated to 500-700 0 C (85-150 kg in depending on the model) allows you to heat the room for 3-5 hours with the chimney damper closed (as in a heat-intensive stove).
Heating stoves "LIGOV" with a full load of fuel and limited air supply allow you to implement the "long burning" mode. During production tests, it was found that 10 kg of fuel briquettes burn completely in 14 hours to the state of ash, and after loading a new portion of fuel, it spontaneously ignites in a still hot firebox.
The lighting of LIGOV stoves is carried out in two stages:
– heating the chimney to create a stable draft due to the large length of the flue (produced using a “short stroke” by opening the damper in the upper part of the firebox for 5-10 minutes). – switching to heating mode by closing the damper.
In steady state, the temperature of the exhaust gases in the chimney does not exceed 160 0 C, i.e. The heat released during fuel combustion is almost completely utilized in the furnace volume.
Convection lining of "LIGOV" furnaces in metal or ceramic design provides reliable shielding of the hot shell of furnaces and allows you to create free or organized (at the customer's request) convection heat exchange in heated or adjacent rooms. The casing is quick-release and can be dismantled in a matter of seconds. At the same time, the heat exchange mode between the stove and the heated room changes from convection to radiant, turning the stove into a familiar “potbelly stove,” which is convenient for quickly warming up a cold room after a long break. As the furnace body warms up to 350 0 C, the casing can be easily hung back onto the mounting brackets. It is possible to combine both heat transfer modes by hanging the casing on only one side, if touching the hot furnace body during its operation is excluded.
Do they sell ready-made solutions?
In garden tool stores you can find ready-made waste incinerators that provide maximum fire safety. In terms of design and operating principle, all ready-made solutions are similar to homemade barrel stoves. A number of manufacturers install chimneys on their stoves to increase the burning rate of waste. Such containers ensure high intensity of waste combustion even in rain (with the top furnace lid closed). The main advantages of purchased stoves over homemade ones are their fire safety and more aesthetic appearance. One of the disadvantages of store-bought ovens is their high cost.
Burning garbage in a barrel is an easy way to get rid of waste, but it is far from safe. The substances formed during the combustion process pollute the environment. It is for reasons of fire and environmental safety that it is prohibited to light a fire in garden plots (open or in a container). But every summer resident has the right to decide for himself whether to deceive the law or not.
Hearth and grate combustion in a fireplace and stove: what is the difference?
Top combustion is today considered in many European countries to be the most correct way of burning fuel. This is due to strict environmental requirements in Europe regarding emissions levels. A top-burning stove allows for cleaner exhaust from the chimney. The minimum CO emission is 0.17%, which is 4-5 times less than with grate combustion of fuel.
Hearth stoves are designed to be fired exclusively with wood. You cannot burn coal and peat in them.
The most beautiful combustion is in hearth fireplaces.
Main characteristics of the bottom combustion system:
· Firewood is placed on the solid floor of the firebox. The firebox does not have a grate and an ash box.
· The largest firewood is placed on the bottom of the firebox, densely; as the firebox is filled, the size of the firewood decreases and kindling material - wood chips, paper - is placed on the very top. They are ignited from above, air is supplied to the upper part of the firebox, combustion in this case occurs from top to bottom, the fuel burns more slowly, because Only the top layer burns, and not the entire mass, as with grate combustion.
· Firewood burns almost completely, because... temperatures inside the furnace are higher than with grate combustion.
· Primary air is supplied through the firebox door or through a specially constructed channel from the street or from a heated room. Air is supplied to the top of the fuel, rather than passing through its entire volume, this allows for “top combustion of the fuel.” Modern firebox doors (fireplace inserts) have special dampers to regulate the supply of primary air during the combustion process, this allows for high stove efficiency.
· The cold core (air duct under the grate) disappears from the oven.
· The bottom of the furnace is heated not only by flames (dust) but also by smoldering coals (heat).
· Ensures a low level of condensate in the chimney, because there is no initial “volley of water” into the pipe. Tar does not flow.
· Hearth stoves and fireplace inserts burn slowly. But once they have accelerated, they can produce high rates of wood burning. Thus, maximum heat is transferred to the inner surface of the furnace, heating it to the maximum value and creating the opportunity for slow cooling.
· It is convenient to cook and bake on the hearth. Bread ovens are usually hearth ovens.
Little Secrets
How to quickly ignite a hearth-burning stove: pour half a pile of finely chopped wood on top - it will give the initial heat. And then the lower ones, coarsely pinned, will give long-lasting warmth.
How to “recreate” repeated top ignition?... Throw wood onto the coals. If the stove is made correctly, then the flame should run upward on its own. And if the stove is not made correctly, then this must be achieved by stacking firewood and playing with the air supply.
There is no need to throw away any ash or coals - they provide air access. We lay firewood on top of them in a well and set fire to it on top.
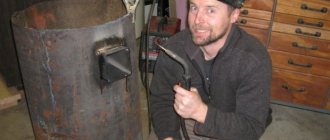
How to make a burning stove from a barrel
If you nevertheless decide, having fulfilled all safety requirements, to get rid of vegetable waste yourself by burning, then for this purpose you can use different designs from a barrel.
How to make a barrel for burning garbage so that it functions as a furnace? For this you will need, of course, a metal barrel and a little engineering skills.
Let's consider several options for fairly simple designs made from barrels used as an oven for burning waste.
- A barrel without a bottom, mounted on bricks. First you need to prepare the site. To do this, pour sand with a layer thickness of approximately 10 - 15 cm onto a plot of land. Then you need to put a sheet of metal on the sand, on which the enclosing brick support is folded in the shape of the letter “P”. A grate should be placed on top of such a support. Then you need to install the barrel itself (after removing its bottom) on a brick base. This design of the barrel allows you to put dacha waste through the top, and ignite the fire below, in the brick fence. At the same time, it is easy and convenient to remove the resulting ash. When it rains, it is better to cover this structure with a lid.
- Barrel for burning waste with a drilled bottom. At the bottom of the barrel you need to drill a large number of holes (more than 10) to allow air to enter. For better oxygen penetration and for ash to fall out of the container, attach 4 metal support legs to the barrel. Install a metal grate inside at a height of 15 cm from the bottom of the barrel. At a distance of approximately 20 cm from the bottom, cut a hole in the container to serve as a blower. Attach metal loops to it and attach it again to the barrel so that you get a door with which you can add firewood and regulate the strength of the fire in the container. For convenience when transferring the structure to the barrel, handles can be welded. To protect from rain you need to use a cover.
The options considered are just some of the barrel designs used to burn accumulated plant waste. The creation of such stoves is limited only by your imagination, and, of course, by safety regulations.
About one of the fairly simple designs of barrel-stoves used for burning leaves, branches, dry grass, etc. at the dacha, they say in the next video
In addition, some craftsmen use barrels to create stoves for heating small spaces. Having at least a little knowledge of physics and the necessary tools, you can build, for example, a stove from a 200-liter barrel (standard volume), which is used to maintain heat in a garage or greenhouse.
Wood-burning sauna stove: how to choose
A person who decides to build a bathhouse will definitely be faced with the question of how to choose a stove and which model to prefer. There are enough characteristics to get confused. Therefore, we will try to systematize the main types and characteristics.
In order for a wood-burning heater to warm up a steam room well, retain heat for a long time and meet your requirements, it is important to know when purchasing it that the heat output of the stove must fully correspond to the volume of the steam room. Installing a wood-burning stove in a bathhouse that has low power and a large room volume will lead to the stove starting to overheat and function at the limit of its capabilities. Consequently, its service life will be significantly reduced, and bath procedures will take place at too low temperatures. If you take a stove that is too powerful than necessary, the room will overheat, which will lead to a reduction in the service life of the device. The finish will begin to crack, building and other materials will deteriorate. The oven will quickly break down when operating in such a confined space.
To calculate the required furnace power, first find out the volume of the steam room. To do this, you need to multiply its length, width and height. Without all the side factors, 1 kW of furnace power warms up a room volume of 1 m³. Further, if the room has non-insulated surfaces: windows, glass doors, ceramic tiles, or a brick wall, this must be taken into account when calculating. It is recommended to add each uninsulated square meter of the steam room to its total volume. Manufacturers usually indicate this in the furnace data sheet on how to make the calculation correctly. It is worth noting separately that when choosing wood-burning stoves, it is extremely important to purchase a unit that has a 20-30% power reserve.
Features of operation and safety precautions
Using hearth-type ovens is not particularly difficult.
Here are instructions for heating the product:
- The wood-burning hearth oven is loaded with pallets. Gas and electric are connected to the network or gas pipeline.
- Electric models require preliminary drying of the heating element after a long period of inactivity. Other types of stoves do not require such an operation.
- The required program modes are installed.
- The chimney is heated to ensure stable draft (this is done by opening the damper for 6-7 minutes).
The temperature in the oven must be maintained automatically using temperature controllers, as evidenced by indicators on the housing panel. If there is no automation on the stove, you will have to independently monitor the thermostat indicators.
If a hearth-type stove is used for cooking, then after heating to the desired temperature, you need to open the lid and load sheets of kitchen utensils into the chambers. After finishing work, you must turn off the device; keeping it running unnecessarily for more than an hour is prohibited.
Expert opinion
Pavel Kruglov
Stove maker with 25 years of experience
It is worth remembering that steel structures become very hot. When loading and unloading baking sheets, be sure to use oven mitts, oven mitts, and a towel. Failure to comply will result in burns.
Wood stoves can be closed or open
According to the location of the stones on the stove, they can be: with a closed heater (not ventilated) and with an open one (ventilated). In the first version, the stones are not visible; they are located in a niche, inside the stove itself. Such units are a very recent development of Finnish manufacturers. It makes it possible to maintain the temperature in the steam room for a longer period of time. In addition, such wood-burning stoves produce so-called “light”, that is, moist and soft steam at comfortably low air temperatures. In the second option, an open heater heats up the steam room faster and provides high temperatures in it, as well as low humidity parameters. The stones lie on top and water must be poured directly on them. It is not recommended to pour a lot of water onto hot stones, as the steam becomes very damp and worsens the microclimate in the steam room. With a closed heater, the steam is softer and more humid at a relatively low temperature in the steam room. Exposed stones create a higher temperature in the steam room with less humidity.
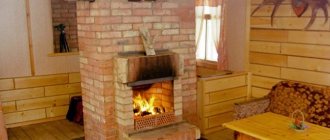
What can you say about brick?
Brick is a good and reliable material for making a stove. But it has a significant disadvantage - it takes a long time to warm up the house in order to achieve a comfortable temperature, since brick has inertial properties.
Therefore, in order to warm up the house well, you will need to consume a large amount of fuel.
From all this, only steel remains. In the next chapter, we will tell you how to make a long-term storage oven with your own hands using a metal barrel.
Wood-burning heaters also differ in the type of firebox, which can be remote or built-in
Remote. They are located separately from the stove in a room next to the steam room. Such placement makes it possible to reduce losses of thermal energy, simplify the process of supplying fuel and heat not only the steam room, but also other rooms in the bathhouse. Installation of a stove with a remote-type firebox in a wooden bathhouse must comply with all fire safety standards; therefore, a partition connecting to it is necessary Be sure to make it out of brick.
Built-in. An ideal option for a small bathhouse. This design ensures the concentration of the released thermal energy within the steam room, but you will also have to add firewood as you take bath procedures without leaving the room.
There are models of wood stoves equipped with a tank for preparing hot water. This is convenient when the steam room does not have hot water supply. The water tank also requires a choice, and this choice affects which stove is right for you. In addition to different volumes, the tanks differ in the method of connection to the furnace.
Useful video
Not just diagrams, but also a description of the advantages and disadvantages of vertical and horizontal structures (not necessarily made of pipes). Plus interesting life hacks.
Even more diagrams, even more explanations about them. However, the main concern of the author of the video is that you get a stove for a real Russian bath. So sauna lovers don’t have to watch it).
+++
We hope that you have received some kind of holistic understanding of what a sauna stove is. Other things can only be learned from practice and experiment. Good luck to you!
There are three types of water tanks
“Samovar” type tank. This is a tank on the chimney pipe. The chimney from the sauna stove passes through the water tank and the hot exhaust gases heat the water. This tank has a filler and drain hole. Typically, it is made of stainless steel.
Mounted tank. Such a tank is located close to or hangs on the furnace body. The water in it is heated by heat from the walls of the furnace body itself.
Remote tank. This is a separately hanging tank, which can even be in another room. It connects to the heat exchanger in the furnace and due to this, the water is heated. But for such a tank, to heat the water you need a special stove with a built-in heat exchanger. If you decide to choose a stove with a heat exchanger, it becomes possible to heat the steam room itself and adjacent rooms: dressing room, locker room, and other rooms
Efficiency of long-burning furnaces
- The stove design consists of 2 combustion chambers. In the first chamber, solid fuel burns with a low proportion of oxygen. In the other chamber, gases released during fuel combustion burn.
- But the whole point is that the fuel combustion process is considered low-calorie, since heat is released in small quantities with a sufficient temperature to heat the required room.
The material from which the heater is made is of great importance.
Most heaters today have a steel or cast iron body. Wood-burning heater stoves made of heat-resistant chromium steel have proven themselves well. The chromium content in it is at least 15%. This stove is good because it does not burn oxygen in the room, thereby creating more comfortable conditions for steam procedures. Almost all industrial wood stoves have a multi-layer metal body. This prevents burns from accidental contact with the heater. This circumstance is especially important for small steam rooms, in which every free centimeter is worth its weight in gold. Models are also produced that are lined with natural stone or ceramic tiles. In this case, the stoves heat the rooms more evenly and remain comfortably warm. However, the cost of such cladding is quite high.
Pay attention to the volume of stones that the stove can accommodate. The more there are, the longer the heat in the steam room will last, which means the fuel consumption will be less. How to place stones in the oven and how many stones are needed is a purely individual matter. On average, you can calculate the number of stones based on the volume of the steam room - for each meter of volume you need approximately 20-30 kg of stones.
Two barrel oven
One of the highest quality barrel stoves, made with our own hands, based on the large containers available to us. The stove for kindling wood consists of two barrels: one for 200 liters, the second for 100 liters. A certain novelty, which not everyone will think of, is the increase in heat transfer due to an additional container, the walls of which are heated by hot air rising up to the pipe. The fuel also burns out in the second barrel.
The stainless steel pipe is made from truck exhaust. The pipe is specially made curved to increase heat transfer into the room. Looking at the previous video, the thought arises: what if you use the second additional barrel as an oven? The next model implements just such an opportunity!
Choosing a sauna stove with or without a grate
In recent years, a persistent stereotype has developed that wood-burning stoves for baths must have a grate in their design. It arose when industrial metal heaters appeared and the grate bars needed in coal-fired steel or cast iron stoves were mechanically transferred to them. Of course, if the heater is heated with coal, this element is needed. However, in traditional wood-burning heaters, a grate was never made. If you are planning to buy a stove that will be fired exclusively with wood, you may well purchase a model that does not have a grate.
To fully steam, you must heat the heater correctly. The best fuel for a wood-burning stove for a sauna is birch logs, as well as wood from some other deciduous varieties. It is undesirable to use coniferous firewood, because the resins in which they are extremely rich contribute to the formation of soot during combustion. When you have no other choice, and you have to heat the heater with pine logs, throw a few aspen dies into the firebox at the end. The flame of this wood will burn out the fumes and soot in the stove.
Stages of heating a house
Fuel is placed in the stove and ignited, while the ash flap remains completely open. This is necessary so that the fuel heats up and begins to release thermal energy to the maximum level in order to heat the room to the desired temperature.
Interesting fact. Thanks to the use of this stove, the house can be warmed up in about thirty minutes.
After the house has warmed up, we move on to the low-calorie process. The blower damper closes, thereby blocking the entry of oxygen into the combustion chamber.
I would like to add that today there is a huge selection of long-burning stoves. Therefore, the buyer can purchase a stove at his own discretion, based on the technical characteristics of the model: power, external data, frequency of fuel loading.
Advantages and disadvantages of wood stoves
Wood-burning heaters have many fans. The first point is that nothing can compare with the peaceful and cozy crackling of wood in the stove, its unique smell and the magic of an open, living fire. A wood-burning sauna stove is preferred by those of us who value traditions and special kindling rituals.
As for the practical considerations that force you to choose such heaters, they are also present. When a steam room is built on an area where gas is not supplied, you have to choose between electricity and firewood. Electricity is much more expensive, firewood is quite affordable and can be prepared in reserve. Another important advantage is that a wood-burning heater makes it possible to quickly achieve the desired temperature in the room and maintain it for a long time. The disadvantages of such stoves include the fact that during bathing procedures it is necessary to regularly throw logs into the firebox so that the flame does not go out. In addition, in the process of burning wood, carbon monoxide and smoke are formed, and it becomes necessary to install a reliable exhaust chimney.
Russian traditional stove - operating principle, pros and cons, construction yourself
From personal experience
The author of this article in childhood and early youth visited his grandmother a lot in the village, in the very Russian outback, in the summer and during the winter holidays. Having warmed his sides to his heart's content on a Russian stove with a stove bench, he became eager to build the same one in a city apartment. This turned out to be completely unfeasible, but quite extensive material was accumulated on Russian stoves of various types, which came in handy when writing the article. Observations were carried out from 1961 to 1972. The furnaces were built after the liberation of those places (Oryol region) from the Nazis, in 1943-45.
Classic Russian stove
The Russian stove turned out to be a very polymorphous design. Only traditional stoves were different even from hut to hut in the same village. And the works of unknown but savvy stove makers and scientists, especially I. S. Podgorodnikov and I. V. Kuznetsov, gave rise to many designs based on general principles. It is impossible to review all of them in one publication, even briefly, so what follows concerns mainly the classic Russian stove (see figure), and the improvements are described in general terms.
Curious: the roof of the furnace of one of the furnaces was made from the cylinder halves of a large internal combustion engine. Tank or aviation, ours or German - it is unknown .
Theory and secrets
The basic structure of the Russian stove is shown in the figure. From a longitudinal section you can understand its main secrets. Having understood them, we will get its advantages/disadvantages, and then move on to a description of the structure. Finally, modern high-performance designs will be described.
Scheme of a Russian stove
A Russian stove rests on a foundation - a stove, wooden, stone, brick or concrete. Podpechek is used to store fuel, which dries there “to gunpowder” and easily flares up when kindled. The top of the heaps is closed by a semicircular vault (vault-trough). A bedding made of heat-intensive material is poured onto the vault: sand, brick chips with clay mortar, and over the bedding onto a dry bedding, without mortar, it is laid out under the cooking chamber that makes up the front part of the firebox.
Important: if you put it under without topping, the baking will never turn out “real”. By the way, to be “authentic,” bread and pies need to be baked on cabbage leaves. With fresh milk – mmm-mmm!!!
The Russian stove is a periodic heating device: during a not very long heating, it accumulates heat, and then simmers for about a day, releasing it and bringing culinary masterpieces to perfection. To understand its operation, let's follow the air flow.
The secrets begin in the bend (somewhere they say “zagnyot” or “zagnetka”) with its top – the overpipe – ending in a tapering nozzle – the heil. On the side of the very walls, recesses are made in the bend - ash pans, for collecting ash and storing smoldering coals for the next kindling.
Notes:
1. Often a hole for ash and coals is made in a hearth - a stone or cast iron slab protruding from the forehead (face) of the furnace. Then it is called the ochelok.
2. In the mansion stoves for the sake of cleanliness, and in the poorest ones, to reduce the cost of work, they did not make a manifold and an ash pit. The ash was raked and the coals were stored in a porsk - a nook on the inside side of the mouth, see below. In this case, the coals kept hot for a day only when fired with birch, oak, elm or maple firewood, on which aspen wood was placed on top. Perhaps because of this, the belief that the Russian stove is finicky has persisted. In fact, it eats any solid fuel: brushwood, dead wood, straw, kurai (dry weeds), dung, anthracite, coal seeds, peat briquettes, peat chips, sawdust. But bread should only be baked using wood or charcoal. Otherwise the taste will be store-bought.
In general, a combustion chamber, scientifically speaking, is a gas-air economizer in which energy recovery occurs: flue gases (smoke circulation) heat the air entering the furnace without taking oxygen away from it. There is no mixing of flows: the paper strip did not detect a turbulence zone. The thermometer above the bottom of the bend showed an increase in temperature from the throat to the mouth from room temperature to more than 76 degrees (the column reached the limit, the alcohol began to boil and the thermometer burst).
Important: so that the stove does not smoke, does not turn out to be voracious and cools down quickly, you need to maintain the dimensions indicated in the figure and, especially, the smoothness of the walls of the heater. It is impossible to plaster the walls, so the bricks of the walls of the heil are hewn and sanded until smooth. In smoking stoves, the paper, especially when fired with smoldering bulk fuel, revealed turbulence in the overtube. In furnaces with smooth heil, the flow of gases has always been laminar. It is not difficult to understand that when there is turbulence in the exhaust air, oxygen-depleted air will enter the furnace.
The heart of the Russian stove is the firebox. It is divided into a cooking chamber (bakery) and a crucible - firebox. In a small stove (2.5 x 1.75 arshins in plan; 1780 x 1240 mm), everything is laid out under the firebox with a uniform rise to the rear by 60-90 mm. In large ones (3.25 x 2.25 arshins; 2310 x 1600 mm) and mostly in medium ones (3 x 2 arshins; 2130 x 1470 mm), experienced stove makers laid it out with a break in the middle (in large ones) or in a third (in medium ones) so that the cast iron stood evenly and steadily . But under the furnace must be inclined, and in the size as indicated, and not at the angle. By the way, the height of the beds (beds) from the floor according to Domostroy is 2.5 arshins.
The indicated dimensions of Russian stoves are approximate. The length of the arshin varied in different regions. Stove makers dance with bricks: a whole number of them must be laid along the length, width and height of the stove, taking into account the layers of masonry mortar.
Hot air is already involved in cooking, heating the dishes from below. It then goes to the fuel; flue gases rise to the roof of the furnace. It is also inclined, but lower than under. The best fired stoves were those in which the firebox, in plan, narrowed towards the mouth by the same 60-90 mm.
A strip of foil on a stick revealed under the roof of the firebox two oppositely directed vortices (circulations) that were stable in any combustion mode. Two vortexes, presumably, are the most important secret of the Russian stove. Their rotational moments compensate each other, and in the bend, despite the presence of a threshold, no noticeable turbulence is formed. In furnaces with too low or high thresholds, the circulation was weak and unstable.
The second purpose of vortices in the furnace is to trap unburned fuel particles. Before leaving the mouth, they make several (maybe many) revolutions and burn completely at a relatively low temperature. The IR emitted in this case uniformly heats the cooking utensils. No strong gas movements were detected at the middle height of the bakery.
Important: food is prepared WITHOUT CONTACT WITH FIRE AND SUPERHEATED GASES, at an optimal temperature, so the pyrolysis of products is suppressed, carcinogens and toxins are not formed in it.
Notes:
1. The ace stove makers make the furnace arch not a semi-circular one, but a three-centered barrel, as shown in the figure with a smoothed dotted line. Also, the crucible in the middle is widened by 90 mm. In such a stove, combustion is 100% complete: it never smokes or produces sparks.
2. IR rays in the crucible are one of the secrets of Russian cuisine. Dishes such as daily cabbage soup or pie with paglia should simmer for a long time in the crucible after boiling and removing the coals. It is impossible to achieve this cooking mode in a gas or electric oven. And you can’t get such a crust with any grill. But the housewife needs to know that the temperature in the furnace varies from 350 to 150 degrees, counting from the fire to the mouth. Depending on the required cooking mode, you need to place the dishes and move them using a grip or a frying pan. So cooking in a Russian oven requires skills and dexterity unknown to city dwellers.
Finally, we return to the shelter. Here we will not only heat the air, but also keep the food prepared for today hot (the housewife can do other things until the next morning), and we will give the remaining heat to the body of the stove in the overpipe with heat. Only a tiny amount of it will go into the chimney (chimney, pipe). Since the temperature of the smoke circulation along its entire length does not drop sharply anywhere, and in the furnace almost everything that can burn burns, soot and soot, even if they settle, are very minimal. There will be no risk of soot fire, and the services of a chimney sweep will not be needed for decades.
The biggest secret
In a Russian stove, without any partitions or nooks that complicate or even make repair or cleaning impossible, a virtual complex smoke channel is formed, superior in efficiency to any labyrinthine one. There is only one thing left to regret: the name or names of the geniuses who created it remain in obscurity.
About mini ovens
Now the Russian stove has confidently emerged from the wilderness. Thanks to high technologies and new materials, a Russian mini-oven appeared, see fig. One person can easily pick it up, put it in the trunk, place it in a gazebo at the dacha or just on the lawn. The mini-oven retains most of its useful qualities. There is one problem with them: there is no prophet in his own country. The model shown is Italian-made, but domestic ones are hard to see on the market.
Russian mini oven
Some features
The next picture shows the same basic oven in isometric view. Here you can see stoves - niches for drying herbs, mushrooms, and berries. The cross-section of the stove is shown in Fig. on right. There is only one brick left between her and the crucible. IR rays dry, and depending on the location of the stove relative to the fire, its mode changes. Also, such a “budget” oven does not have a brick oven; his role is played by guardianship.
Russian stove without baking
Often, especially in outdoor stoves, a small stove is made under the pole - a flood chamber. They heat it black, and catch the smoke with a cap over the stove; the mouth of the cap opens into the chimney above the view. Heating allows you to save fuel in the summer, when heating is not needed, or to quickly cook something without waiting an hour or an hour and a half for the entire oven to warm up.
Sometimes the pads are extended flush with the pole across the entire width of the forehead. Sometimes, on the contrary, the shed with the chimney and the bend is moved back due to the length of the flaps; The depth of the furnace has little effect on the physics of processes in the furnace, and the result is a wide, durable, comfortable hearth. In such a flood chamber, you can make it in the form of a niche and heat it in white, bringing its chimney into the corner.
It is also necessary to mention various kinds of additional materials based on the experience of personal observations. Signs of destruction at the end of the observation period were not noticeable only in Russian whole brick stoves. From the corners of the inserts and beams made of metal and concrete, cracks began to creep from year to year. The wooden inserts on the forehead (for fire safety reasons they can only be made externally) dried out and fell out.
In general, the stoves did not require any repairs, the front layer of the masonry and the floors were laid out with lime mortar; ovens entirely made of clay had to be greased and plastered. But the inside of the furnace, subject to variable thermal deformations, only held up when laid on very rich clay (see below) - the TKR, temperature coefficient of expansion, of such a masonry mortar is exactly equal to that of red brick.
Beds laid on clay never sank if wood flooring was laid on them. They didn’t bake the sides, no matter how hard they “burned” the oven. Vaults made of an even number of bricks began to collapse after 20-25 years. However, builders do not need to explain what a vault lock is.
An interesting fact: a certain Joseph Dzhugashvili, known in history as Stalin, was a devout champion of the Russian stove. To cover the floors of his favorite stove, a solid board of Siberian cedar was hand-hewn, on which the dictator died at the hour allotted to him. No one else in Siberia has ever seen such a huge cedar.
Summary of properties
What's good in the oven?
- Cheap materials - to build a Russian stove, you need red brick, clay and sand.
- Economical - the efficiency of the simplest Russian stove exceeds 60%, and improved designs give up to 80% or more, which is simply incredible for heating appliances.
- Omnivorous - works on any solid fuel without deteriorating parameters.
- Functionality - in addition to heating and cooking, beds are known to be used for sleeping.
- Easy to use - heat it in the morning and it will last for a day. There is no need to poke around in the firebox.
- Healing properties: food has already been mentioned; sleep on the beds is sound and deep. 6 hours is enough to get enough sleep; You always wake up cheerful, with a clear head.
- Safety – the fire is in the very depths of the firebox; spillage of coals is extremely unlikely even with unskilled use; sparks only in exceptional cases from a very intense fire in severe frost. With a three-center arch it never sparks.
Some points will require clarification.
Efficiency
When calculated using ready-made formulas and simplified methods, the efficiency of a Russian stove is somewhere around 25-30%. This value has long been in doubt, and in 1927 the People's Commissariat of Agriculture of the USSR conducted full-scale tests. The result stunned the experts: the accurately measured value turned out to be 68%! This is higher than the efficiency of a large thermal power plant! At the same time, a competition was announced to improve the furnace. Samples developed at VTI (All-Union Thermal Engineering Institute), Grumm-Grzhimailo and Podgorodnikov showed an efficiency of about 80%. Research on Russian stoves continues to this day: it is not yet entirely clear how such efficiency is achieved.
Dream
The indicated properties of sleeping on floors refer to a stove that cools slowly overnight. A similar, but much weaker effect is obtained by using a good branded electric blanket with automatic adjustment according to physical parameters.
Fire safety
A reader who has not delved deeply into the topic may have a question: what about the devastating fires for which wooden Rus' was “famous”? Here it is appropriate to say the following.
At the beginning of the 18th century. Peter I, infuriated by the latest Moscow fire, gave one of his closest associates, the head of the Order of Secret Affairs, boyar Prince Romodanovsky, the task of finding out: “What kind of thing can this accursed city not burn?” The answer was received quickly:
- The inhabitants, even up to the cloth merchants, are drowning in black fashion, because they don’t want to pay house taxes. “They get drunk, the cursed ones, with moonshine vodka, like indecent cattle, and that’s why they burn.”
Peter's reforms also affected the stove industry, and by the end of his reign, massive fires had almost stopped. Catherine II continued to improve fire safety, and during her reign, fires even in chicken huts became extremely rare; in Russia there were now fires no more often than in Europe.
What's bad about it?
- The Russian stove runs only on slow-burning solid fuel. Rapidly burning liquid and gas require a lot of air, the flow of which a Russian stove cannot provide. Putting a fuel oil nozzle or a gas burner into the furnace is not only useless, but also dangerous to life.
- It produces solid waste - ash that needs to be disposed of somewhere.
- It is heavy, gives a large concentrated load on the floor, therefore it is not applicable in multi-storey buildings.
- It is bulky and takes up a lot of living space and volume.
- The heat transfer per unit surface is small: a large Russian stove can heat a room of 45 square meters. m just like a radiator under the window.
- Sluggish smoke circulation (a side consequence of high efficiency) excludes the removal of several chimneys into one chimney: a stove that is heated a little more will displace the smoke of others from the chimney at any draft, and they will begin to smoke. Therefore it is also unsuitable for apartment buildings.
- Takes a long time to warm up; After summer inactivity, daily heating is required.
- If there are flaws in the building, it can smoke.
- Absolutely not amenable to automation.
Note: the original Russian stove also barely heats downwards; A layer of cold air forms above the floor. In modern Russian stoves this drawback has been eliminated; Most of the improved developments are bottom-heated furnaces.
Russian stove in the interior
In general, it must be admitted that the Russian stove is only suitable for one-story individual housing.
What about the interior?
But isn’t the Russian stove archaic in appearance? Can it fit into a modern interior? Quite, because The design of a Russian stove is based on simple forms. They allow both independent aesthetic use and the most elaborate decor. Technically, the design of the Russian stove is quite compatible with modern finishing materials, see fig.
Video: the craft of laying and decorating Russian stoves
SUBSCRIBE to OUR YouTube channel Ekonet.ru, which allows you to watch online, download free videos from YouTube about human health and rejuvenation. Love for others and for yourself, as a feeling of high vibrations, is an important factor in healing - econet.ru.
Building a furnace
The complete diagram of the Russian stove is shown in the figure below, with a list of positions. To what is described above there is an addition - a choke. This is a gas-air heat exchanger: the smoke circulation through the wall heats the air that is taken in below. The vent of the choke opens into the room above, then there is a damper, and behind it the mouth of the choke opens into the chimney above the view.
In summer, the damper is open, and the air flow in the air vent removes excess heat from the flue gases, providing good ventilation of the room. In winter, the damper is closed; heated air enters the room and warms it.
The air vent is the simplest and most reliable way to get bottom heating from the stove without overly complicating its design.
- Podpeche;
- Undercoat;
- Six;
- Dushnik;
- Chelo;
- Gate valve;
- Chimney;
- Roof;
- flap;
- Mouth;
- Cutting;
- Warm stove;
- Hot stoves;
- Threshold;
- Backfill;
- Furnace vault;
- Crucible;
- Under;
- Cheek;
- Porsok;
- Podpechek;
- Arch support;
- Zev;
- Arch of pharynx;
- Hilo;
- Estuary arch;
- Masonry ledge;
- Choke channel;
- The mouth of the chimney.
Note: the cheek (sidewall) of the stove facing the wall is called blind, and the one facing the room is called a mirror.
What is order?
The oven is laid out in horizontal layers of bricks – in rows. A set of instructions for laying each row is the order. Sometimes rows are called orders (first order, lay out orders, etc.). This is, generally speaking, incorrect.
For each type of oven, the order, of course, will be different. Modern orders are accompanied by drawings. You can start building a furnace only if its order is absolutely clear.
Materials
Brick
The masonry of the Russian stove is made of red ceramic brick. The brick must be well fired and of the highest quality - dense, smooth. A burnt brick (with a dark interior if broken) is absolutely unusable. Hollow brick is also not suitable: heat will not spread well throughout the body of the stove, its interior will overheat and the whole stove will soon begin to fall apart.
You need to select the bricks for the hearth especially carefully: they must be even, smooth, and exactly the same height. In the old days, stove makers selected hearth bricks from purchased lots and stored them separately. Nowadays, the underside can be ironed after laying with a grinder with a bowl-shaped circle. In theory, this will not make the oven worse, but there is no experimental data.
The lining of the stove and the top row of the stove bench can be made of face bricks and lime mortar. Then the floors will never fail, and finishing the stove will not cause any difficulties - the clay masonry with widened seams (see below), although heat-resistant, is not very strong and smooth, and the plaster and tiles on it do not hold up well.
Solution
The masonry mortar for a Russian stove is not quite ordinary; What is important here is the combination of heat resistance, high heat capacity and TKR equal to brick. The composition of the solution is as follows:
- Carefully sifted the fattest clay you can find - 3 parts by volume.
- Sifted and calcined river sand – 3-5 parts by volume.
- Pure water – 1 part by volume.
The solution should also be very fatty - thick, viscous. His condition is checked with two boards; A ball of fresh solution the size of a tennis ball is squeezed between them. A thin solution will crack immediately; average at about 1/3 compression, and good at half compression. A solution that is too soft and fluid is also not suitable; sand must be added to it, but not more than 2:1 relative to clay.
Good clay for laying stoves was once a serious problem. Now the structure of the Russian stove is being simplified: ready-made dry mixtures for laying stoves and, separately, fatty clay are on sale.
When drying, the greasy solution often cracks. In this case, the cracks are covered with a medium or thin clay mortar, but in no case with lime, gypsum or cement.
Working methods
Opeche
The wooden guard supports a stove weighing up to 1600 pounds (approximately 750 kg), i.e. small or medium without baking. It is made in the form of a log house with two belts, backfilled with rubble and a flooring made of beams. The flooring is covered with felt, properly soaked in a liquid solution of fatty clay, and roofing iron is applied over it.
Wooden stoves are a fire hazard and are now prohibited. Now Russian stoves are placed on a foundation made of brick or concrete blocks, or simply on a concrete floor. If the stove is on a foundation and it is intended to be lined, the foundation around the perimeter must be additionally extended by half a brick, taking into account the mortar layer.
Arches and vaults
Arches and vaults are laid out from an ODD number of bricks on formwork on wooden templates - circles. First, a life-size cross-sectional drawing of the arch is made, then the castle bricks are hemmed onto the wedge. A do-it-yourselfer need not try to lay out a vault with a direct lock or without a lock; not every experienced mason can do this.
Next, the circles are prepared taking into account the thickness of the formwork boards and the vault is laid on them without a lock. Then you need to thickly lubricate the grooves of the locks with the solution and insert the locks into the groove. The next stage is to gradually hammer the locks into place one by one and in several passes. You can't get by with a mallet; you have to use a log. But you can’t beat like crazy; you need to use the inertia of a heavy log, and not the force of a sharp blow.
The quality of the vault closure is controlled by squeezing out the mortar sausages from the seams: it should be more or less uniform over the entire surface. The thick solution flows slowly, so you need to take breaks between passes. The result is a prestressed structure; Only such a vault will last for many decades.
How to study?
Only from the above it is clear that building a Russian stove is very, very difficult, and we have not yet gotten to the order. According to the book, even an experienced and skilled master will achieve the result colorfully described by Makarenko in his “Pedagogical Poem.” Is it possible to learn how to lay stoves yourself? There is a way.
First, cut foam to scale into small bricks of about 2500 pieces. In order for them to come out identical and even, you need to cut not with a knife, but on a simple machine: a height-adjustable nichrome wire of 0.3-0.4 mm is stretched over a plywood panel. It is heated by low current, 2-12 V, voltage.
Attention! You cannot take current from the LATR - it is an autotransformer and does not isolate from the phase!
Then we take the order and assemble a model of the stove on the table using drops of PVA. It's not so boring in winter. After drying for a week... we dump it on the bare floor. If it doesn't fall apart, you can move on.
And then - build the smallest stove you can find in your dacha or yard. It is very useful, when modeling in winter, to understand how the entire structure works and to develop the order yourself. If after the initial firing the stove does not smoke and at least somehow bakes, you can take on the real one. But strictly follow the rule: measure seven times, cut once.
Material consumption
The classic Russian stove described above, depending on the size, requires approximately the following amount of materials:
1. Small - 1500 bricks and 0.8 cubic meters. m of solution.
2. Medium – 2100 bricks and 1.1 cubic meters. m of solution.
3. Large - 2500 bricks and 1.35 cubic meters. m of solution.
Is it worth it yourself?
Does it make sense to take on such complex work yourself? How much does the work of an experienced and reliable stove-maker cost? If 100% of the cost of materials, as is customary in general construction work, then it is not that expensive.
By no means, not twice as much against the material. You can come across offers to build a stove for 20,000 rubles, but this is obvious nonsense. Let's try to figure it out ourselves.
Russian stove with stove
A stove maker works in mid-latitudes for six months, and always with an apprentice. Considering their employment at 100% of working time, the salary of a master at 25,000 rubles, and an assistant at 15,000, and the work completion time is 7 working days (this is a completely realistic period), we find that a simple stove will cost no less than 45,000 rubles, and a Russian stove with a stove and water heater (see figure) at 55,000-60,000 rubles.
But in a week it will be possible to heat it. There is only one condition: the master must tell where, when and to whom he has already installed the stoves, and they must be inspected personally. Good masters always stock up on recommendations, and if they hesitate and mumble, it’s better to turn to someone else.
To give a more complete idea of the complexity of the work, let's look briefly at how to lay out the simple oven described above. For example only; the detailed order of the Russian stove is a rather voluminous brochure.
Order
Note: on the first three rows (lining) you can use superheated brick (iron ore) with cement mortar. They hardly heat up. But a stove with bottom heating must all be made of high-quality brick.
1-6 rows
We do not use screed to waterproof the foundation; we lay it dry - sweating is excluded. We start from the left front corner (pos. a-1 in the figure). Place a 3/4 brick in the corner with the poke outward. From it there is a row of 12 full-lengths to corner a-2. Seam – widened to 13 mm; This will be everywhere in the first 3 rows, because... in the 4th row a masonry ledge will be formed.
In corner a-2 - two 3/4 pokes and a double row of full-lengths to corner a-3. We arrive at corner a-4 in the same way as a-1 – a-2. Row 1 is completed by two full-length frames, forming an opening of 540 mm. We check the masonry using the rule and diagonals.
In the second row (pos. b) on the sides the pokes of the 1st row are covered with spoons. In the corners there are 2 three-fours, laid in spoons. The full-length frames framing the opening are covered with 3/4 pins with bandaging of the seams. The third row (pos. c) is identical to the first.
Note: Spoon brick has nothing to do with the spoon used to eat. Spoon bricks are laid along the wall with the long horizontal side, and butt bricks are laid perpendicular to it. Both of them can be laid flat, on their sides, on their ends (upright, on their butt).
4th row - according to pos. on the brace. The arrangement of bricks is the same as in row 2. We narrow the seam to 5 mm to get a ledge of 25 mm on the sides. We check the masonry with a level.
5 row - according to pos. d. In d-2 and d-3, two 3/4; between them there are two rows of spoons. The side walls are bonded. We squeeze the walls of the oven opening under the heel of the arch. We place the circles on the supports and lay out the 6th row identical to the 4th.
First arch
When laying out the arch, in addition to the above, you must observe the following; for subsequent arches/vaults too:
- There should not be a single untied seam across the arch from heel to toe (on the left in the figure below).
- The seams from the top to the heels gradually taper from 13 to 5 mm.
- The circles with formwork are removed only after the solution has dried.
Note: a brick arch can be laid directly along the circles without formwork. But only if it does not continue into the arch.
7-10 rows
The 7th row is laid out as the 5th; 8 - like the 6th (on the left in the figure) In the sidewalls from the inside, the pokes are cut to fit the heel of the arch. On the 8th row, we begin to lay out the sub-height: three rows of full-length splice stitches, counting inward from the forehead. The middle poke from below needs to be tucked under the arch of the arch. We place the 9th row as the 7th, but we lay out the 2nd row of the sub-stitch with spoons. We lay out the roof of the baking area.
Row 10 is special, in Fig. on the right: corners from 3/4, sides from spoonfuls; the rear is made of full-length buttocks. From the forehead inwards - 3 rows of full-length buttocks. There are 7 pieces in a row, laid flat. This will be the hearth with the bending hearth.
Bedding
We make the furnace backing from broken bricks and clay mortar. We tamp and stretch as indicated by the arrow. It’s better to do it yourself with a break and not try - not every stove maker can do it.
Rows 11-17
We lay out even rows as the 10th. In the odd numbered ones there are rows of butts on the sides; behind - spoon. The 15th and 16th are tucked under the heels of the arches. Upon completion of the 17th row, the laying of the walls around the furnace is interrupted until the entire front of the furnace is laid out, up to a vertical plane passing along the rear wall of the mouth.
Zev, squeeze, mouth, crucible
Arches and vaults are erected along the circles of the arches with formwork. The side walls of the bend will go into brick; the forehead and mouth are half a brick. The heel of the pharynx arch will be on the 15th row; the heel of the mouth arch is on the 16th. It will be especially difficult for a beginner to smooth the inner walls of the heil: from above you cannot see what you are doing, and from the inside dust and crumbs fly into your eyes. Therefore, the hilo needs to be processed from above, checking with a template.
18 and above
We place odd rows as 1 or 11; even - like 2 or 10, see fig. If the floors are laid on clay, then starting from the 19th row, the bricks from the inside are pressed in place to the roof of the furnace. But this does not always save the clay floors from falling through, so the best craftsmen build a box around the crucible, make a backfill of brick chips on the clay, level it and compact it, and over it they put a continuous lining of spoons, framed with ends with three-quarters at the corners. In order for the flooring to last forever and not push through the vault, what happens next depends on the prosperity and generosity of the customer: either a wooden board-flooring, or a row of facing bricks on mortar with bandaging of the seams.
The last method is not as simple as it seems: the arch is tilted anteriorly. Therefore, a row of bricks are placed flat on its locks lengthwise and with the seams bandaged relative to the key ones. Then they cut it onto a wedge so that the crossbar is flush with the walls.
The backfill will be double-sided, and the floors will lie on the wedge and walls. What's the point here? Let us remember the mechanics of construction: it is much more difficult to crush a vault from above than to break through it from the side. The load from the floors will be transferred to the lock, and from it along the arch to the cheeks of the stove. The arch of the vault will only work in compression and, if the floors fail, they will remain intact, and the floors are not difficult to restore.
If you undercut the bricks of the upper rows, then the load from the floors will give a lateral shear load on the vault. Building materials do not hold up well to shear. If the floors fail, the roof will fail and the stove will need to be rebuilt.
Evolution
Podgorodnikov furnace diagram
The development of the Russian stove followed four intertwining branches: bottom heating, stove, economy, compactness. A huge contribution to it was made by I. S. Podgorodnikov, who developed the “Economka” and “Teplushka” series of stoves, which are still widespread today. The diagram of Podgorodnikov’s “Teplushka” is shown in the figure. It was improved by I.V. Kuznetsov; Kuznetsov furnace - in Fig. below.
The bottom line is that the firebox and cooking chamber are separated, and the oven is sealed. The flue gases are lowered through a hole into the furnace (on which a second low bench is installed, convenient for the old and young, and the firebox works in the most natural way as a stove. The accumulation of soot in the furnace is eliminated thanks to careful design calculations. How much work did this cost in the age of adding machines and slide rules? , it’s better for us not to guess.
Kuznetsov furnace
However, such a stove took up a lot of space and acquired an increased fire hazard: the fire burned close to the mouth of the firebox. Further improvements until the 90s were of little use - the oven became too complicated. The following picture shows a cross-section of a compact housekeeper from the 70s - 80s. Its efficiency is above 80%, but not every stove maker will be able to put together such a labyrinth, and even a heating engineer with a diploma, much less an ordinary housewife, will not be able to immediately figure out the purpose and procedure for using all these doors and dampers. In addition, there are nooks and crannies that are inaccessible for inspection and cleaning.
Compact stove-economer of complex design
Modern Russian stove
With the development of computer modeling, the Russian stove took the path of qualitative improvement: all creative abilities could be turned into ingenuity and ingenuity. The following picture (right) shows a successful modern Russian stove. The “highlight” of the design is that instead of backfilling under the bakery (where, as it turned out, it still does not work as intended), they installed a winter firebox. Increasing the height of the bedding made it possible to bring the volume of bedding under the furnace to optimal.
Such a stove has only one drawback: to switch between winter and summer, you need to move not one, but two dampers, and in addition, install/remove a heavy plate that covers the mouth of the winter firebox. If you do come up with something with this stove, then such a stove can already be automated for the winter: the winter firebox can run on gas.
What's next?
We know how the Russian stove works. But how it works is still a lot of unknowns. And in an era of depleting energy reserves, a heat generator with an efficiency similar to that of electric machines is an invaluable find. And here a vast field of activity opens up for both seasoned specialists and do-it-yourselfers. published
Video: example of building a Russian stove with a stove bench
SUBSCRIBE to OUR YouTube channel Ekonet.ru, which allows you to watch online, download free videos from YouTube about human health and rejuvenation. Love for others and for yourself, as a feeling of high vibrations, is an important factor in healing - econet.ru.
Please LIKE and share with your FRIENDS! https://www.youtube.com/channel/UCXd71u0w04qcwk32c8kY2BA/videos
Subscribe -https://www.facebook.com/econet.ru/
PS And remember, just by changing your consumption, we are changing the world together! © econet
What components do we need?
- Iron sheets (thickness approximately 5 mm.)
- Pipe (diameter 100 mm.)
- Grate.
- Asbestos cord.
Next, we move on to the main stages of creating a long-term storage stove:
- The lid of the barrel is cut out.
- A hole is cut at the bottom of the barrel to fill the fuel.
- A hole for the blower is created even lower.
- 4.Wire guides are welded inside the barrel.
- 5. A hole for the chimney is cut at the top of the barrel on the side.
- 6.Then a pancake is cut out of a metal sheet with a diameter almost like a barrel, a hole is cut in the middle and a pipe is attached.
- 7.Next, we assemble the unit.
Well, everything is done. All that remains is to install the stove at its destination and attach the chimney to it.
To summarize, we can say that today such stoves are becoming more and more popular, since they have more advantages compared to traditional stoves. The main advantages of such a stove are economical fuel consumption and high efficiency.
Do-it-yourself long-burning stove
In this chapter we will look at a homemade version of a long-burning stove. It's called Bubafonya. This stove does not require any special financial costs and is quite easy to make.
Of course, without having basic skills in working with electric welding and a grinder (popularly called a “grinder”), it is better not to make it, in order to avoid injuries and mutilations.