Simply installing a door to make the opening look presentable is not enough. In order for a door - be it an entrance door or an interior door - to look good, it is necessary to decorate it with the help of platbands and extensions. These details will add completeness to the installed structure and make the appearance more neat and respectable. It is about the extras that will be discussed in our article. We will learn what types and sizes of these elements there are, what extensions generally are, how to choose and install them yourself.
Description
In simple terms, extensions are strips of material corresponding to the door that camouflage the wall in the opening. Thus, these parts in a unique way “gain” the missing width of the door frames. Hence, in fact, their name.
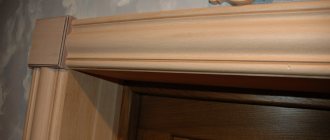
A door panel is a flat wooden or plastic strip that covers door slopes that are too wide. Sometimes, of course, the door frame itself and the trim are enough to cover the entire “filling” of the doorway. But now, when many houses and apartments are built according to individual projects, more and more often these elements are not enough, so the “bare” side walls of the opening remain visible. This is where the additions come to the rescue, completing the installation of the door and giving the whole composition a finished look.
You may also be interested in information about what types of seals there are for interior doors.
Let's find out what parameters of door trims are standard, and whether it is possible to manufacture these parts according to individual standards.
Without a doubt, in addition to the standard parameters of the extensions suitable for standard doors, it is possible to order all the “equipment”: the door itself, the trim, the frame and the extensions according to individual sizes. To do this, you should contact a company in your city that produces these products. But more often, nevertheless, people buy extras of standard sizes. This is understandable - after all, the majority live in standard apartments with a standard thickness of doorways.
Read this article on how to lubricate door hinges to prevent them from squeaking.
So, now the height of a typical door, which is produced en masse, is two meters. Therefore, the accompanying components: platbands and extensions also have a similar length. But the euro version is also in stable demand, when the length of the canvas with components is 2.10 meters.
The situation with the width of the extensions is quite simple: most often, ready-made products with a width of 10 cm to 40 cm are available for sale.
The thickness of the part also matters. It should be identical to the thickness of the door frame groove. It is best to carefully measure everything several times before purchasing. In most cases, this thickness is 10 mm, however, in individually designed apartments and houses it can vary, but only slightly.
Attention: it happens that the purchased door frame does not have a groove for installation. In this case, if you plan to install extensions, you can make the groove yourself by cutting it with a router.
Video
The video will tell you how to correctly measure trims and trim for interior doors.
We looked at the features of door extensions. As you can see, such a simple detail can decorate a door with high quality, make the entrance to the home and the space between rooms more presentable and neat. With the help of our tips, you can easily navigate the sizes and types of these parts, and you can even, with a little effort and diligence, install them yourself. If the width of the trim is smaller than you need, there is an article that describes how to finish door slopes after installing the front door.
Subtleties of choice
It is advisable to buy such fittings immediately, together with the door frame, because after installing the door frame it will be difficult to guess the shade of the frame.
Selection of planks by size
The telescopic extension for the interior door and a similar design for the front door differ only in thickness and material of manufacture. We’ll talk about the material a little later, but now we’ll look at the different sizes of telescopic extensions.
The thickness of the telescopic extension for interior doors starts from 10 mm.
Since the structure is equipped with an end groove, its thickness cannot be less than 10 mm. Although in fairness it should be noted that there are planks in which the main body of the extension has a thickness of about 7 mm, but in such planks there are overlays along the edges that form a groove.
The thickness of the extensions on interior doors ranges from 10 to 14 mm. They can also be used for entrance doors, but still, if conditions permit, then for entrance doorways it is better to take planks thicker than 15 - 25 mm.
Don't miss: Types of interior doors and their designs - tips for choosing
It is advisable to take thicker additional telescopic strips for openings for entrance doors.
In the windows of hardware stores you can now find telescopic additional strips with a width of 90 mm to 400 mm. But the most popular sizes are 90 mm, 130 mm and 170 mm.
The most common telescopic structures have sizes of 90, 130 and 170 mm.
If you need a non-standard, very wide additional strip, you can order it from any workshop specializing in the manufacture of doors or furniture assembly. But you can go the other way and assemble such an array from several planks.
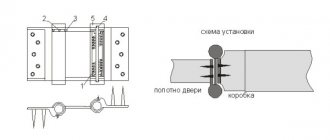
If the smooth joining of straight strips is quite problematic, then telescopic structures are easily joined using thin connecting strips; in the diagram below this structural element is indicated as a “fixing element”.
Assembling a wide extension from several telescopic bars will not be difficult.
As for the length, the dimensions of the telescopic bars vary from 2150 mm to 2500 mm. For narrow interior doors, for example, in services, it is advisable to take long slats, they create less waste.
By the way, stores often have substandard additional trim strips, for example, scratched or chipped, such strips are significantly cheaper. If you have the right color, you can save money by taking 2 normal strips for the side panels and 1 substandard one for the top crossbar, because you still have to cut it and the damaged part will be cut out.
Standard configuration of structures with telescopic extensions.
What are the accessories made of?
In general, additional planks are made from MDF, natural wood, chipboard, plastic and metal. But telescopic structures are only made of wood, MDF and chipboard.
- Natural wood – it makes sense to take natural wood extensions only for a similar door leaf. If you have a hollow door leaf with a laminated coating, then the dissonance between the wooden paneling and the laminate will be very noticeable;
If you are going to make a telescopic extension with your own hands, then the best material for this will be natural wood.
- MDF - this material is now perhaps the most popular in the manufacture of add-ons. MDF is not afraid of moisture, is quite resistant to mechanical damage and has an acceptable cost. Plus, under wooden doors you can use MDF covered with natural veneer, which will be much cheaper than buying wooden panels;
Veneered MDF is visually no different from natural wood.
- Chipboard - this option can be safely called budget. Extension strips made of laminated chipboard are the cheapest of the telescopic structures, but that’s where their advantages end. Chipboard is afraid of moisture, plus thin strips in the grooves break easily, so if there is an alternative, it is better to refuse installing chipboard.
MDF is the optimal material for telescopic extensions.
Installation in non-standard situations
If there is no groove in the box, and the opening is very deep and cannot be covered with a simple addition, you can choose any of the options below:
- Use the telescopic system by placing the first plank behind the box, wedging it and fixing it with polyurethane foam, as is the case with simple extensions. After the foam has dried, add a second row, foam it, and again wait until it dries completely. And so on until the opening closes.
- Shields of the required width are assembled from the extensions, fastening them on the reverse side with transverse slats or overlays every 40-50 cm.
Shield of two armorSource i.ytimg.com
Replace finished products with other materials, selecting them according to color, style, texture and other parameters.
How to decorate a doorway depends on its depth, the material of the door leaf, and the overall design concept of the interior. The easiest way is to use a dry edged board of sufficient width, carefully sanding it and treating it with any protective and decorative composition. This material is also good because the surface can be milled, artificially aged, or given the desired texture and relief in other ways.
An excellent alternative to type-setting planks can be MDF wall panels or wooden lining, especially if the walls are finished with it. Or the laminate left after installing the flooring. The laminate board is also assembled using a locking connection, but since its length is not sufficient for constructing solid planks, boards are first assembled from it.
The very deep opening is trimmed with shields in the same style as the door panels. Source sdelaidver.com
In some cases, it is permissible to make extensions for interior doors from plywood, which has good moisture resistance and mechanical strength. After installation, they must be opened with varnish or impregnated with tinted protective compounds in the chosen color. They can be installed in utility rooms, in the basement or attic.
To frame an opening with a plastic door, plastic lining or seamless plastic panels are perfect. In this case, instead of platbands, plastic corners are used to mask the joint with the wall.
Plastic slopes on the entrance doorSource dvervdome.ru
How to choose
For people who are far from construction and finishing work, the process of choosing accessories in a store or on an Internet site may seem complicated. Therefore, we will give some useful recommendations to make this difficult choice easier.
When purchasing, pay special attention to ensure that the overall appearance of the doorway looks harmonious as a result of the work. This is the main task, so the selected decorative details must match the color and material of the door. In addition, the patterns and texture of the materials must be identical.
We recommend that you familiarize yourself with the standard door frame sizes at this link.
It should be noted that there are no special differences when choosing extensions for metal and wooden interior doors: the principle is the same. The main difference is in the installation, since the metal door frame does not have a groove, so you will have to use joining parts.
Pay attention to the cost of materials. You should not save on additional costs by buying a laminate model if the door itself is made of expensive solid wood. The result will be a clear discrepancy, disharmony, and the overall appearance of the door structure will be reduced in price.
It is possible that you will find the standard dimensions of doorways, which you will learn about here, useful.
Before going to a hardware store or placing an order on the appropriate website, be sure to carefully take measurements and set the exact parameters of the doorway. If the wall where the door is installed is up to 8 cm wide, then you can do without additional additions; the frame and the canvas itself will be quite enough. But if the wall is thicker, even by 5 cm, it makes sense to think about additions.
The best option is to purchase accessories in one store and at the same time that you purchase the door block itself. In this case, you will be able to select decorative details that exactly match the pattern and texture of the door material.
You will probably be interested in learning more about overhead door bolts.
Conclusion
As you can see, the telescopic extension is simply mounted. The main thing is not to forget about the recommendations that we gave when choosing the material and everything will work out for you. Additions to interior doors are installed in no time.
Photo of the assembled telescopic structure.
Source
How to install the add-on
As we have already mentioned, the installation of a telescopic extension is much simpler compared to the installation of its straight counterparts. The main thing here is to choose the right size of the bar, and then everything is elementary simple.
As a rule, all telescopic extensions are initially equipped with grooves on both sides. So you need to cut off or break off the back part of the groove from the side of the door frame and insert the remaining whole tenon into the groove of the door frame.
In order for the extension to fit into the groove on the door frame, part of the groove on it must be removed.
After this, all you have to do is insert the L-shaped trim into the extension groove and adjust so that everything fits evenly. If the platband will be attached to the wall, then there is no point in installing the additional strip with glue, plus the unglued structure can be disassembled if necessary. The video in this article shows the entire installation clearly.
Let's get acquainted with the process of installing door panels. Let's consider the installation of a standard extension for an interior door.
Don't miss: Dimensions of a door frame for an interior door: algorithm and formulas for calculating sizes, requirements for door measurements
Let us immediately note that this type of work is always carried out after installing the door leaf and frame, and after the mounting foam used during the work has hardened.
If the door frame is equipped with a groove, it must be cleaned of dirt, dust and foam residues. If there is no groove, you need to cut it with a router.
First, the top panel is installed - above the doors. Adjust this piece to fit the length, cutting only after careful measurement. The width also needs to be adjusted, but it is better to do this after cutting to length. It is most convenient to carry out work on adjusting the width and length using an electric jigsaw, which will allow you to quickly and accurately cut off unnecessary parts of the material.
To install a part adjusted in size, you must first use wedges to free up space between the frame and the doorway. This is necessary to prevent the appearance of cracks.
The plank is installed, and then the evenness of the installation is checked: the joints must be checked and, if necessary, corrected by wedging. After a control check, making sure that everything is level, the gap between the bar and the opening is blown out with polyurethane foam at low pressure. The platbands are installed only when the foam has completely hardened, that is, not earlier than the next day.
Attention: all work must be done as carefully as possible, since carelessly cut and somehow installed extensions can ruin the appearance of any door, even the most expensive one. Therefore, if you are not confident in your abilities, it is better to invite a specialist for this simple but delicate work so that the door is guaranteed to have the proper appearance.
Door trims are installed using foam, finishing nails or self-tapping screws, depending on the preferences of the installer, since the stability of the fastening of the trims does not depend on the method of installing the trim. Experienced installers recommend installing foam extensions, as this method is the simplest and takes the least amount of time. Adjustable extensions for interior doors are installed only using polyurethane foam.
Installation on mounting studs
Using a drill with a diameter of 1 mm at the end of the additional strip, which will then be adjacent to the box, holes are drilled at a distance of 15-20 cm from each other, the depth of the holes should be 0.3 - 0.5 cm less than the length of the nail. Finishing nails are inserted into the drilled holes until they stop, with the sharp end facing outward. If non-finishing nails are used, the heads must be cut off.
The parts of the frame are individually strung with the tips of nails onto the door frame. Using a rubber hammer or an ordinary metal hammer, hammer the nails into the box through a wooden spacer. Precise dimensions and careful actions minimize the possibility of gaps or cracks, which can be eliminated by dismantling and re-installing the boards or using matching wood plaster. Such corrections worsen the aesthetically pleasing appearance of the installation and indicate amateurishness of the installer.
The additional structure fixed with finishing nails is strengthened with strips of masking tape, cleaned of possible dirt and dust and slightly moistened. Then they start foaming. The additions are not heavy, so the most budget-friendly polyurethane foam is suitable for installation. After the foam has completely dried, its protruding parts are cut off and you can begin installing the platbands. Step-by-step instructions on how to install extensions on an interior door can be found in the video below.
The finishing nails securely press the additional board to the door frame, but do not keep it from being pulled out, which is a significant drawback of this method of installing the additional board.
Installation using self-tapping screws
A hidden hole is cut out from the end side of the plank using a wood drill. The diameter of the drill should be at least 1-2 mm less than the thickness of the additional strip, and also correspond to the size of the screw head. The length of the screws is selected so that when drilling they fit into the door frame by 2-3 turns. A higher number of revolutions can cause cracks and chips in the box.
The hole is drilled at a distance of 1-2 mm from the front side of the panel; drilling through the back side of the plank is allowed. It is recommended to hold the drill at a slight angle when working to prevent the possibility of drilling through the front side of the extension. A sufficient number of self-tapping screws for fixing the side part of the goods is 4 pieces; accordingly, 4 holes for them are pre-drilled.
Installation of door panels begins with partially screwing the screws into the intended holes. The additional strip prepared in this way is pressed against the door frame and screwed with a drill. It is recommended to start installing the extension on interior doors with vertical planks and finish with a horizontal board. If you notice that the screw is difficult to screw in, do not use excessive force. It is recommended to unscrew this screw a couple of turns and then tighten it again.
After screwing the top strip, it is important to check the design of the extension for a loose fit to the door frame, which can be corrected by tightly pressing the strip to the frame using improvised means. For example, construction tape. The entire panel is strengthened with the same tape to avoid deformation when the drying foam swells. For the vertical additional part, 3-4 strips of construction tape are enough, for the horizontal part - 2-3 strips. If it is impossible to stick the tape to an uneven wall surface, use wooden pegs for spacers.
The disadvantages of installing extensions on self-tapping screws are the complexity and duration of the process, the high probability of cracks and chips due to unsuccessful drilling or the wrong choice of tools.
Marking of additional strips and installation using foam
Installing the extension on foam is considered the simplest and fastest way, since you do not need to pre-drill or hammer anything into the planks. How to install extensions using foam on an interior door?
Adjusting the additional board to the dimensions of the doorway begins with the upper horizontal part, which is first cut to length and then to width. The width of the addition is marked with a pencil after fitting the board to the thickness of the opening wall, and then the excess board is sawed off with an electric jigsaw. The side vertical strips are adjusted in a similar way. An important condition is the accuracy of measurements. Preliminary assembly of the extension should not reveal the presence of gaps between the side and top planks.
Dimensional accuracy and aesthetically pleasing appearance after installation depend on measuring tools, such as a ruler or a building square. The second option is more preferable due to greater accuracy and minimal likelihood of marking an uneven line for cutting.
Installation of extensions on interior doors begins after you make sure that all parts fit tightly to each other and to the opening. The upper part of the additional board is fixed using available means between the door frame and the wall of the opening. The best option is masking tape, which is characterized by a high level of tensile strength in the perpendicular direction and easily withstands the forces of foam when swelling. 3-4 stripes on the side panels and 2-3 on the top board are enough. Another good option for fixing the extension is wedging with wooden pegs made by yourself.
Don't miss: How to choose interior doors for an apartment - tips from professionals
Then the vertical planks are installed so that the top plank lies level on them without gaps or cracks. The side parts are also fixed using wedges or masking tape. Then the resulting space between the extension and the walls of the opening is filled with polyurethane foam under low pressure. First, the edges along the width of the opening are filled point by point, and after drying, the remaining void is filled.
Please note that the installation of trims and trims is carried out after the foam has dried on the door blocks. Before the final stage of installation, interior doors should stand for about a day for the polyurethane foam to dry.
The telescopic extension strip is installed according to the same operating principle (adjusting the length of the top and side strips), the difference is the technology of gradually increasing the structure. It is strongly not recommended to pre-assemble the entire structure and then install it in the opening, since filling the empty space with foam increases the likelihood of broken connections and misalignment of the frame. First, the first extension rail is installed along the entire perimeter, after it is fixed, the next one is installed, etc.
Variety of cash for doors in shape and design
Door cashing has a special classification, according to which it is divided into certain types, taking into account a number of characteristics. The main difference criteria are the shape, design and method of installation of these planks. The platbands, which are mounted around the perimeter of the door opening, have the shape of a rectangle, but at the same time they differ in the design of the front side. Due to this feature they are divided into:
- flat;
- curly;
- semicircular.
Flat-shaped entrance door trims are distinguished by a smooth surface, as the name suggests, and in cross section the strip is a rectangle. A semicircular cash coin has a convex surface and, depending on the design idea, can look like a crescent moon or a falling drop. Flat and semicircular platbands are the most common types that are installed on interior doors.
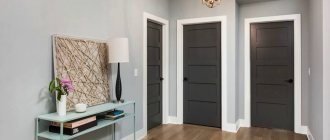
A beautiful platband can act as a decorative element in the interior
Curly trim on the door is a less common option, as it is more expensive to manufacture. The main distinguishing feature of figured platbands is the presence of a certain relief pattern on the surface of the planks. The relief runs along each detail in the form of figured grooves and depressions, which alternate with hills similar to ridges.
Overhead and telescopic door frames
Door casings are also classified according to the installation method. Depending on how and using what materials the planks are attached to the frame or wall, they are divided into overhead and telescopic. Overlay type planks are the most common, as they are easier to manufacture and install. For their fastening, nails, self-tapping screws, liquid nails, sealant or adhesive solution are used. It is not recommended to use glue for installing wooden casings, since the wood itself is heavy and this type of fastener will not be very reliable.
Telescopic strips are attached without the use of glue, nails or screws; they are fixed to the base due to their special shape. L-shaped platbands on one side have a rounded shape, which contributes to their smooth fit directly to the wall, and on the other side they are curved in a certain way. During installation, they fit into the grooves of the box, ensuring a tight connection.
Wooden telescopic frame
Installing doors with telescopic platbands makes it possible to avoid the use of special extensions when the thickness of the frame does not exceed the thickness of the wall by more than 15 mm. If necessary, the telescopic strips can be moved in the range of 1-2 cm. Thus, they will perfectly mask the technical gap between the box and the wall. Telescopic platbands can be attached not only to the box, but also to the extensions. In cases where the distance between the wall and the frame is more than 20 mm, the simultaneous installation of extensions and trim on the front door is inevitable. Most often, this method of fastening with extensions is used when installing entrance doors when the opening has a thickness exceeding the width of the frame.
Classification of door cashers according to the method of joining
Platbands are divided into types depending on the method of their joining. The planks are connected to each other at the top of the opening. The angle of contact is the basis of this type of classification of platbands. The ends of the planks are connected at an angle of 45 or 90 degrees. To connect the ends of the cashing at an angle of 45 degrees, it is necessary to cut each of them at the junction. This method is considered the most common and most suitable for planks with different surface shapes.
Before attaching platbands that are joined at an angle of 90 degrees, you must select one of the joining directions. It can be horizontal or vertical. This joining method is suitable for straight planks with a rectangular cross-section, but is not suitable for shaped or semicircular strips. The peculiarities of their surface when joined will form a hill at the point of contact, creating an unsightly appearance.
Methods for joining wooden platbands
Materials, design features, types of accessories
Additional strips are used to mask slopes in cases where the width of the box is less than the thickness of the wall. Inserts are placed in the space between the trim and the frame. The materials of additional elements are selected in accordance with the canvas. To ensure that the color and texture of the decorative inserts match the doors, it is recommended to purchase the entrance structure as a complete set.
Materials from which the planks are made:
- three-layer plastic panels reinforced with metal;
- from wood species;
- MDF and chipboard panels;
- covered with laminate.
Types of extensions in accordance with installation technology:
- Standard - ordinary slats, often covered with eco-veneer. The edges of the plank can be raw or framed with edge tape. If there is no edge, you will need to perform installation work more carefully. The smallest imperfections are visible at the ends without an edge film. The protective layer also prevents the panel from deforming when exposed to moisture and temperature fluctuations. You can glue the film yourself using an iron.
- Combined - angular-shaped elements that combine extensions and platbands in one piece. Used for narrow floors. They are built into grooves located in the box.
- Telescopic - a complex design that involves fastening using ridges and grooves. The edge of the plank is inserted at different depths and can decorate walls of any width. Installation does not require additional fastening.
Step by step manufacturing instructions
Those who do not know how to make extensions to the front door with their own hands should follow a certain sequence of actions. To calculate the exact width of the future extension to the front door, you need to calculate the thickness of the wall and subtract the width of the frame and the dimensions of the fastenings from it. A simple DIY design can be made from straight planks. Some also choose folded boards for this. But with them you will have to adjust the joints for fastenings, which not everyone can do.
Next, when making a door frame with your own hands, you need to do the following:
- Mark the contours for cutting on a wooden board.
- Cut off excess with a jigsaw or hacksaw.
- Clean the surface of the wood with sandpaper.
- Give the wood the desired shade using stain.
- Coat the surface to be treated with varnish twice.
If the extensions are made for a non-standard design of the front door, the structure can be repainted in the desired shade. Even if everything went smoothly at this stage, it is worth understanding that this is only a small part of a larger task.
After making the additional board, it is very important to install it correctly in the door frame. How to do the installation correctly will be discussed in this material.
Standard sizes of door panels
The dimensions of the door extensions correspond to the average dimensions of the door leaf:
- Standard height is 200-220 cm.
- The approximate thickness of the strip is 10 cm. These dimensions ensure that the insert is tightly fastened into the hole in the box.
- The width of the elements depends on the thickness of the interior partition. In this regard, the parameters of the slats can be different - 3-20 cm or more.
For private homes and individual layouts, ready-made inserts are not always suitable. It is necessary to order the manufacture of the entrance structure with additional components of a suitable size.
Reasons for installing planks
Door extensions are needed in cases where the openings in the room are too wide.
To make it more clear, let's give an example. The width of the wall is 200 mm. 70 mm of them will be covered by the box and 130 mm will be covered with additional panels. We add 20-30 mm for the groove and get the required size of the strip (150-160 mm). An additional element is needed only if the platbands are planned on both sides: internal and external.
Decorating the doorway with extensions is a relatively new trend that is gaining popularity. When thinking about how to expand a door frame, it is better to use specially prepared strips. Since the existing platband will not hide the empty wall. The extensions are available in different widths and lengths, so they will completely cover the space between the slopes and the door leaf.
Rules for calculating the width and length of the extension
The width of the extensions is calculated according to the following principle:
- If there are grooves in the box, it is necessary to take into account the recess into which part of the strip is built.
- The width of the remaining opening is measured from the frame to the edge of the wall.
- Additional parameters are determined based on maximum point measurements.
- If measurements are taken before installation or after dismantling the door structure, the width of the strip is calculated as the difference between the thickness of the wall and the width of the future frame.
Important! Measurements must be taken separately for the top and side panels in at least several places. The surface of the walls is often uneven.
The length of the panel is equal to the height of the side posts of the box. When calculating the dimensions of individual parts of the entrance structure, generally accepted standards must be taken into account.
Basic requirements for the dimensions of the door block, according to GOST:
- the gap between the box and the wall should be 10-15 mm;
- the perimeter distance between the canvas and the loot is 3 mm;
- the gap between the door and the floor in the absence of a threshold is 10 mm;
- To improve sound and heat insulation, sealing strips or sealant are used.
If the parameters of additional inserts do not comply with regulatory requirements, you need to adjust the dimensions manually using tools.
Sources
- https://doorchange.ru/vybor/teleskopicheskie-dobory-na-mezhkomnatnye-dveri-i-na-vhodnye-dveri-kak-luchshij-vyhod-dlya-domashnego-mastera.html
- https://FasDoma.ru/vxodnaya-gruppa/dveri/dvernye-dobory-razmery.html
- https://o-dveryah.ru/mezhkomnatnye/dobor/
- https://VseoDveri.ru/otdelka-i-dekor/razmery-doborov-dlya-mezhkomnatnyh-dverej/
[collapse]
Post Views: 6,696