Sand is a loose mixture of rock grains. Granule sizes range from 0.16 to 5 mm. Often the material consists only of silicon oxide, but includes a variety of impurities. Sand is extracted from quarries, from the bottom of reservoirs and rivers, and is obtained artificially. The properties of materials vary and have different applications. Raw materials are often used to prepare mortar for laying a brick oven.
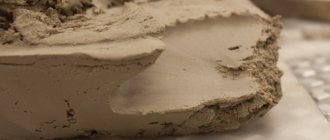
Clay is a fine-grained sedimentary rock. It consists of several minerals: montmorillonite, kaolinite, and other layered aluminosilicates. When dry it resembles dust, when moist it becomes plastic.
Why do cracks appear on the stove?
There are several reasons why a stove may crack:
- Poor quality putty was previously used;
- Violation of finishing technology;
- Improper drying;
- Drawdown.
And if you can deal with the first three reasons yourself by covering the stove, then in the latter case you will have to completely relay it from the foundation to the chimney.
However, cracks are not always the cause of carbon monoxide penetration. The smell of smoke or gas may occur if:
- The chimney is clogged;
- Blockage in the stove riser;
- The inside of the oven is not folded correctly;
- Hypothermia of the riser.
The blockages will need to be removed; the supercooled riser can be warmed up with a burning newspaper. If the stove was built in violation of technology, major repairs will have to be made.
The reasons why they are formed are:
- violation of masonry technology;
- use of low-quality building materials;
- uneven heating of the stove surface.
Causes of cracks
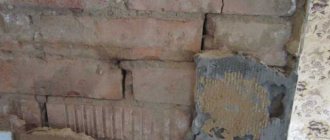
Stove masonry and the layer of plaster on the fireplace tend to crack over time. It is important to distinguish between minor cosmetic defects and real problems that require an immediate call to the stove technician.
- Hair-thin cracks appear on the seams of the stove during heating and disappear when it cools. Such defects are absolutely not dangerous and do not require intervention. If you really don’t like their appearance, just cover the walls with tiles and the problem will be eliminated.
- Cracks of 1 millimeter or more that appear at the seams between the bricks and do not disappear when the stove cools down indicate an incorrectly selected masonry mortar. The different expansion coefficients of brick and clay cause warping and cracking.
- Large cracks and displacement of bricks are most often caused by overheating of the stove or improper air circulation system in the chimney and firebox. If the “overheating” of the stove is the fault of the owner of the house, then improper heat removal, when some areas become hot while others remain slightly warm, is the fault of the stove master.
- Closed, broken cracks that cross the walls horizontally or vertically at the seams are a sign that not everything is in order with the foundation. This problem can affect both new stoves and old ones that have stood for many years. There is no point in covering up these cracks; the stove needs to be urgently rebuilt before it completely collapses.
Next, we’ll figure out how to “treat” stove defects in cases where it is necessary.
As mentioned above, one of the common causes of cracking of masonry is the so-called overheating. This happens when the oven is operated incorrectly, heats up too much or suddenly cools down. The most susceptible to this are stoves in country houses, where the owners come only occasionally in winter.
But you can also reheat the stove of a residential building, which operates throughout the winter. Smooth heating, ignition at full throttle and with the ash pan and damper open, as well as the use of the correct fuel, guarantees a long service life of the stove and no cracks.
- Many minor cracks, which are not visible on a cold stove, are formed due to different thermal expansion of brick and mortar. They do not pose a threat: they can be plastered over.
- If one part heats up more than the other, a gap appears in the masonry at the transition point, which can be repaired with new mortar.
- The reason may be non-compliance with operating rules. Having heated the still wet masonry, cracks cannot be avoided. They can be sealed with new mortar and plastered.
- If the house has not been heated the whole winter, not only the stove, but also the walls will become damp and crack from temperature changes. Then you should thoroughly heat the house, prepare a solution and seal all the cracks.
There are more serious reasons.
Red, refractory, refractory brick and stone expand differently when fired.
Without reserve in thermal seams, the masonry on cast iron appliances will begin to tear. In other cases, the foundation does not match the dimensions of the furnace or has shrinked unevenly. Then the oven will have to be moved over time.
Remedies
This process can be divided into several stages:
- Diagnosis of existing damage.
- Preparation of the solution.
- Plastering the heating structure.
Before coating the stove, you should assess the extent of the existing damage in order to find out the scope of the work to be done. If the cracks are minor, then surface measures will be sufficient. To do this, the bricks are cleaned of finishing materials and plaster, the damage is repaired and the stove is plastered.
Regardless of the size of the damage, you need to prepare a special solution to putty the oven. Depending on financial capabilities and the availability of materials, certain types of mixtures are used when carrying out repairs.
They are:
- from fireclay clay;
- from sand and ordinary clay;
- in the form of grout for the stove - you can make it yourself or buy it ready-made;
- from oven glue.
Stove lined with tiles For cladding, you can use porcelain stoneware, clinker tiles, terracotta, majolica or tiles.
If all the nuances and subtleties are observed, such decor will not require cosmetic repairs for a long time.
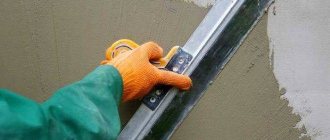
The most budget-friendly finishing option is plaster.
To plaster without cracks, you need to follow a certain sequence of actions, which are the same for both initial application and repair:
- After installing the furnace, time must pass before final shrinkage and drying (from six months or more).
- To coat, the oven must be heated strongly. The masonry will warm up and expand in volume, which will prevent cracks from appearing immediately after coating.
- All surfaces must be thoroughly cleaned: remove the layer of old coating, clear out cracks in depth and widen them, clean off deposits from the masonry.
- Cover with a thin layer of liquid putty and let it dry.
- It is better to lay burlap or fine mesh metal mesh on top of the first layer. This will increase the strength of the plaster. The burlap is soaked in the same solution that is supposed to cover the entire surface. Then it is glued overlapping, starting from the top. The metal mesh is secured to the surface with nails, which are driven into the seams between the bricks.
- If the repair is spot-on, then the cracks are covered very tightly with mortar and also lined with burlap.
- the actual plaster. It is laid in two layers of 5 mm. Large thickness will lead to uneven and unstable coating.
- The dried surface is rubbed to level it.
- The plastered surface, after complete drying, is covered with lime or chalk whitewash. Heat-resistant pigments can be added to the whitewash solution.
You might be interested in an article about
brick ovens for home
.
Read an article on how to build a brick oven with your own hands here.
Work technology
When the material for the restoration of the heating structure has already been selected, it’s time to figure out how to properly seal the stove (so that the lining and the brick itself do not crack).
The method of applying putty is selected depending on the type of solution.
So, if you decide to eliminate cracks using a homemade mixture of clay and sand, the process will not cause you any particular difficulties.
1. First, the brick is cleaned of old finishing material and plaster.
2. Next, the oven should be slightly warmed up and the cracks should be poured with water. This is necessary so that the dry brick does not absorb moisture from the putty, since in this case it will lose all its properties.
3. Now you can start sealing the holes. First, the solution must be firmly pushed into the cracks, and the residue must be spread over the surface in an even layer. The work can be done with bare hands, as this composition is absolutely harmless.
4. The final stage will be plastering the external surfaces.
Please note that you can light the stove only after the solution has completely dried!
Now let's look at how to seal the oven (to prevent it from cracking) with heat-resistant glue. This process is almost identical to the previous one, but differs in that after sealing the cracks with a plastic composition, the entire surface of the furnace is treated with solid varieties of adhesive fire-resistant mixtures.
Since the glue dries in less than 30 minutes, you can begin decorating the stove on the same day.
In this article, we looked at what and how to cover the stove so that neither the structure itself nor the lining cracks. In conclusion, I would like to note that even the best and most expensive refractory compounds are not able to protect your stove from cracks. Here the main role is played not by the quality of the material, but by strict adherence to the technology of construction and repair of the heating structure. Carry out the work thoughtfully and slowly, and then your stove will serve you for many years.
Fireclay clay
Most often, fireclay clay, which has excellent fire resistance, is used to restore a brick structure. Stoves made with this material are reliable and durable. Many people don't know where to get clay. This clay is sold in every hardware store - it is packaged in paper bags weighing 20 kilograms.
Sand and clay
You need to follow the procedure for preparing clay for coating the oven. It is first soaked in water and left for 2 days. The cost of fireclay clay is affordable.
A mortar made from ordinary clay and sand is the most inexpensive solution than covering up cracks in a stove between bricks. It is used quite often, since the mixture is plastic, and after firing it becomes durable and strong.
Determining the extent of damage
Before getting started, you should consider the damage and determine the scope of work. If small cracks appear on the surface of the stove (even if in large numbers), to eliminate them you will need to remove the lining and clean the brick from the plaster.
For these purposes, you can use one of the following mixtures:
• made of clay and sand;
• from special grouts for ovens;
• made of fireclay clay;
• from oven glue.
Can’t decide what to cover the stove with to prevent it from cracking? Consider each option individually.
Metal Furnace Processing
The elimination of cracks in metal furnaces deserves a separate topic. Usually welding is used for this.
However, if welding is unavailable for some reason, there are many recommendations for making heat-resistant putty for metal furnaces.
You can make solutions with water from the following components:
- clay, metal filings, manganese dioxide, salt, borax in a ratio of 30:4:2:1:1;
- magnesite and liquid glass take 10 to 3;
- metal filings, ammonium chloride, colloidal sulfur – 96:2.5:1.5.
On natural drying oil:
- graphite, lead, manganese oxide in a ratio of 5:1:1;
- clay, zinc white, manganese oxide – 4:2:1;
- graphite, lead, chalk – 12:4:3.
On liquid glass - from manganese oxide, zinc white and borax with a specific gravity of each component of 2:1:1. Glass is added to the required consistency. Using dehydrated glycerin or ethylene glycol, the putty is prepared with lead litharge in a ratio of 1:9. Clay and white for heat-resistant putty must be used in dry form, lead - in the form of calcined oxide.
To ensure that the stove does not cause unnecessary trouble, even at the planning stage it is necessary to provide for all design features and select materials that guarantee warmth, peace and security in the house.
Criteria for choosing a solution
Previously, classical solutions were used, taking into account combinations of heat resistance, increased heat capacity and thermal expansion equal to the brick material. To make such solutions, fatty clay was used.
Today you can purchase dry mixtures, certain types of clays and other compositions that simplify construction and repair work. It should be noted that not every such composition has the necessary characteristics - fire resistance, heat resistance, gas tightness.
The solution must be heat resistant, withstand high temperatures and exposure to chemically active substances. In addition, the gas density level must be quite high. The seams do not allow flue gases to pass through, but moisture must pass through the finished mixture for the stove to “breathe.”
How to prepare clay
This solution is prepared in the following sequence:
- The clay is poured with water in a ratio of 1:3 and allowed to brew for 24 hours.
- After a day, it is stirred by adding water. The resulting mixture is filtered through a sieve with a mesh size of 3x3 millimeters and settled.
- The water is drained, after which the thickness of the clay should resemble the consistency of sour cream.
- Sand and clay are mixed in equal proportions.
- The readiness of the solution is determined by stirring it with a stick. If there is a lot of clay left on it, then you need to add sand to the mixture. The solution is ready when small clots stick to the stick.
Usually take 2.5 parts sand to 1 part clay.
Main components
The clay composition varies depending on the components added:
- clay-sand;
- clay-cement;
- clay-lime.
Stove makers, as a rule, choose the first option. The proportions depend on what clay is used for the oven. If it is oily, the sand ratio will be 2:1, if it is medium oily it will be 1:1. Also, if the clay is of good quality, you can do without additives.
If you don’t want to measure out the components, you can take a ready-made composition. A 20 kg bag of clay-chamotte kaolin refractory mixture “Terracotta” costs an average of 250-300 rubles.
Causes and danger of cracks
Violation of the integrity of the top layer or brickwork occurs for several reasons. In general, we can say that this is the result of the master’s mistakes. With proper selection of bricks, mortar, finishing materials and professional performance of the work, the formation of cracks on the stove, and especially cracks, is unlikely.
Most often, cracking occurs due to the influence of the following factors:
- non-use of the fireplace for a long time, especially in winter (due to sudden temperature changes);
- haste, manifested in the heating of a recently made stove;
- performing masonry using a method that creates large temperature differences in different places of the structure;
- inconsistencies in the thermal expansion capacity of bricks and mortar for laying;
- overheating or using fuel that produces significantly more heat than what the stove is designed for (for example, burning a wood stove with coal).
If the stove begins to crack for such reasons, then it is easy to fix the problem with your own hands. You need to properly seal the cracks, coat the surface - and the job is done.
It is much worse if the stove begins to crack due to an incorrectly made foundation or an illiterate choice of refractory materials. In this case, it will not be possible to simply seal the seams; you will need to lay the entire stove again.
Repairs cannot be postponed because smoke and carbon monoxide enters the premises through cracks, which can poison residents. In addition, over time, the cracks increase, the stove can let flames pass through and completely fall apart.
Specifications
Clay-based plaster has very good thermal insulation characteristics. In terms of this property, the mixture is somewhat worse than only clay-sawdust coating. The thermal conductivity of the first is 29 W/(m K). If we compare this characteristic with cement-sand mortar, for clay this indicator is 1.5 times lower.
A fairly important property is also vapor permeability. Since moisture must leave the premises, this characteristic is valued in finishing materials. In this case, it varies from 0.11 to 0.15 mg/(m h Pa). This value in this case is even greater than that of a log, so the composition is also applicable for wooden buildings.
When choosing such a composition, it is also important to take into account the density. This characteristic denotes the ratio of mass to volume. In this case, it is equal to 1700 kg/m3. This indicator is characteristic of brick. To calculate the required amount of material, you need to know its consumption. The material can be laid on walls 1 cm thick. Then about 15 kg will be needed for each square meter.
How to coat a stove with clay
You can buy this mixture for eliminating cracks or make it yourself. Fireproof putty for stoves and fireplaces purchased at a building materials store is ideal for repairs. It perfectly withstands temperatures of 1000 degrees. Before applying it, the stove and cracks should be treated with water.
You can do the grouting yourself, following the instructions:
- Pour clay into a container and break up the lumps.
- Fill it with water and leave for 12 hours.
- Pour sand into the clay and knead the mixture.
- Finely chopped straw is added in small portions.
- Add one pack of salt.
Sand and clay are mixed in a ratio of 1:4. For 4 buckets of clay you will need about 50 kilograms of straw.
The choice of how to seal the stove so as not to crack depends on what mixture you decide to use. But first you need to clean the bricks from the plaster and the layer of finishing material. They are then treated with a solution.
If you decide to use a clay mixture, then you need to follow the instructions on how to properly coat the stove with clay:
- The prepared solution is stirred one more time.
- They check its quality. To do this, roll the mixture into a ball and if it starts to crack, then add water.
- Before coating the stove with clay to prevent it from cracking, the damaged areas are moistened with water.
- The cracks are filled with the solution.
- Then the oven can be plastered.
- Despite the fact that the repair of the brick kiln is completed, you should not rush to heat the unit, since the solution must dry completely.
If you carry out repair work in full accordance with the instructions on how to coat the stove with fireclay clay to eliminate cracks, then you can forget about them for a long time.
Cracks and fissures stretch like cobwebs across the surface of the stove, especially if you heat it up on frosty days. The difficulty is not new, so there are a lot of solutions, but you just need to choose the right one depending on a particular situation. First you need to understand the causes of cracks. According to an impressive count, there can be three of them - poor putty, hasty lining of the furnace without meeting the targets, and subsidence of the furnace itself.
The stove can sag due to an incorrectly laid foundation or low-quality brick. The most effective method to get rid of the problem is to disassemble the stove, secure the foundation and put it back together. However, one should act in a similar spirit if the drawdown is actually significant, smoke is pouring out of the cracks in the combustion chamber, the doors no longer close tightly, and the brick is crumbling in the middle of the stove itself. With such “symptoms” it is necessary not only to disassemble it, but also to assemble it from completely different materials.
However, if we are talking about small cracks, there is still no need to rush - subsidence of the new furnace in the first couple of years is allowed. What you don’t need to do immediately after installing the stove is finishing it with tiles. Of course, this is practical and aesthetically pleasing, but when it starts to fall off as a result of subsidence, you are unlikely to enjoy sweeping up the fragments and gluing everything back on. Thanks to this, there is no need to rush - let your stove heat up properly for a year or two, and if cracks do not appear, then lay the tiles.
Often finishing with tiles is offered instead of solving the problem with cracks. But at the same time, residents of summer cottages forget that the stove can crack even under the help of tiles. And everything may look great, but only through these cracks will smoke enter the room, and this has dangerous results. Thanks to this, the tile is beautiful only if the stove is checked and, moreover, does not crack.
You chose a very expensive fireproof solution from the store, your stove sits on a solid foundation, but new cracks still appear. You should not rush to immediately denounce the manufacturer of the putty - the point is not what to cover the stove with, but how to cover it! Hasty work without completing all the details is the second reason for the formation of cracks.
First of all, you need to putty the stove after heating it a little. Secondly, the cracks that you want to cover up need to be thoroughly wetted with water; without this step, dry installation will suck all the liquid out of the fresh mortar, which is why it will not gain the necessary strength. And thirdly, don’t rush to light the stove - you need to wait for the putty to dry completely! Only following these steps will enable you to completely forget about new cracks.
Grout
To seal a brick oven, you can purchase a special grout. In stores there are various formulations that are produced specifically for these purposes. It’s worth noting right away that this option will cost you quite a lot, however, it is optimal for lining stoves and fireplaces.
If you cannot afford to purchase a specialized composition, prepare it at home. To do this you will need the following components:
The clay needs to be thoroughly kneaded, filled with water and set aside for 12 hours. After the specified time has passed, the required amount of sand should be added to the mixture. In the process of kneading the two components, finely chopped straw and salt are gradually added to them. Clay and sand are taken in a ratio of 4:1, with about 50 kg of straw and a pack of salt added for every 4 buckets of clay.
The resulting composition can withstand temperatures of more than 1000 degrees.
Putty materials
Inventive people are ready to give advice on any matter, including the choice of materials for repairing stoves. Recommendations must be taken carefully, separating the wheat from the chaff.
There are well-known putty compositions that have been tested many times over. You can use them without any doubt.
It is customary to cover stoves with clay. The material definitely inspires confidence, but first you need to check what type and grade of clay is suitable for making mechanically strong, heat-resistant putty. The stove should be sealed so that it does not crack later.
The composition is prepared by mixing equal parts of clay and sand. Both components must first be sifted and separated from large impurities. Due to the fact that the clay composition in different deposits varies greatly, it is advisable to check the strength of the mixture.
It would be advisable to tighten the inspection requirements by throwing dried cakes from a low height. If they did not collapse and successfully passed the tests, the chances of making a high-quality repair of the furnace increase.
When preparing homemade putty, monitor the condition of the wooden mixing spatula. The gruel should not stick to it. If clay adhesion is noticeable, it is better to increase the amount of sand in the mixture.
Of course, if possible, it is advisable to take a special type of clay - fireclay. It is characterized by fire resistance and strength. You can buy it in building materials departments. Before use, fireclay raw materials should be kept in water for a couple of days.
A popular folk method of preparing grout for stoves is to add chopped straw or chaff (husks, chaff) to the mixture of clay and sand. You need a lot of it. So, if 4 buckets were taken of clay, one bucket of sand will be needed, and straw - from 40 kg to 45 kg. You can hear advice about the benefits of adding salt to the grout at the rate of half a regular glass per bucket of the mixture. It is recommended that the quality and quantity of additional components be determined based on the local situation.
In some places, people recommend covering stoves with a mixture containing horse manure. Now it is not so easy to find it, it makes no sense to insist on such technology.
Special formulations
If there are building materials stores nearby and you are willing to spend money, it is better to buy ready-made adhesives: soft or hard. The viscous solution is convenient for covering small cracks. Complete plastering of the stove can be done with solid compounds. Sometimes cracks in the masonry are sealed with a special heat-resistant sealant, and small cracks are filled with asbestos fiber.
If the solution or paste is prepared correctly and the work is done correctly, the result is guaranteed by the manufacturer. What is important is that special putty compounds can be used if the stove is finished with tiles or decorative bricks. They are plastic, prevent the formation of repeated cracks and provide reliable adhesion to the masonry.
Where is the best place to use the mixture?
Clay building mixtures are necessary when the structure is exposed to different temperatures. Also, their plastic properties are in demand when decorating premises. Both materials are actively used in the manufacture of pottery, but here the mixture used is different.
For masonry and repair of stoves - proportions
The ratio of components is chosen taking into account how much the part of the furnace structure heats up:
- Clay mortar is used in the construction of a heat-storing area. It heats up to 550–600 C, does not come into contact with flame, and is not exposed to oxides. The fluff and the source of the chimney also do not heat up very much - up to 400 C, although they cool more strongly. The proportions are determined by the plasticity index: from 2 to 5 parts of sand per 1 part of clay.
- Fireclay solution can be heated to 1200 C and higher. It is needed for laying the combustion chamber. In some cases, the entire stove or fireplace is made of fireclay. The usual ratio is 30% clay and 70% fireclay. But if the clay mixture is oily, the proportions change - 50:50.
- Rows 1 and 2 of the stove can be placed on a lime-sand option.
- Cement is not elastic and breaks down under high heat. Mixtures based on it are only suitable for the foundation and chimney cap.
It is possible to replace the fireclay mortar with a cement-fireclay mixture. It is only slightly inferior to fireclay in terms of fire resistance, but it sets very quickly. After preparing the solution, it must be used within 45 minutes.
For plaster - ratio of materials
For finishing work, white and red clay of different fat contents are used. Only the cleanest sand is taken - river, sea, alluvial quarry, fine or medium fraction. The ratio is standard: for high fat content 1:5, for medium fat content – 1:3, for lean fat content – 1:2. Read about the differences between quarry and river.
The characteristics are selected in accordance with the purpose of the plaster composition. To level the wall and fill defects, you need plaster that fills the unevenness well and sets quickly. It is preferable to take quarry or artificial sand: its grains have an angular shape, are rough and adhere better to the binder component. For decorative finishing, river wood is chosen: its particles have a rounded shape and are more evenly distributed throughout the volume of the material.
For sandblasting work
For sandblasting, only sand or slag is used. The best choice is loose yellow or white quartz. Different jobs require different fractions:
- Dust-like – with grain sizes up to 0.1 mm. They process fragile surfaces in order to create a matte background or pattern.
- Average – 0.1–0.4 mm. This is how complex images are obtained on glass and mirrors with varying degrees of dullness.
- A relatively large fraction with particles up to 1 mm is used to obtain three-dimensional images.
For construction work
Materials are the basis of almost all building mixtures and artificial materials. Red brick is made by firing clay, mortar and concrete contain either sand or kaolin minerals, and the finishing always includes one of the materials. Read about the technical conditions for quicklime lump lime in this article.
The laying mixture is selected based on the properties of the material and the nature of the work. Silicate stone is placed on cement mortar, and red stone is placed on clay-sand mortar. The reason is the correspondence of thermal and strength characteristics.
How to fire a stove correctly to avoid cracks
The experience of repairing furnaces has a long history. Each area has its own characteristics of work. The tools you will need are a trowel and a grater (a grater, as a rule). Some people finish trimming the plaster directly with their hands. In general, the main stages of work are the same:
- First, the surface of the stove must be thoroughly cleaned and swept;
- then it is advisable to heat it; existing cracks can be sprinkled with water to moisten;
- after which a thin layer of putty should be applied. The main thing is not to overdo it;
- after the smeared layer has dried, if necessary, large cracks can be strengthened with reinforcement with a special mesh;
- then the surface is covered with plaster. It is advisable to do this in two stages, each time applying a layer up to 5 mm thick.
If the stove is covered with decorative finishing, then the coating is removed before covering the cracks. If necessary, the doors are reinforced with wire. Special adhesive compositions are prepared in small portions, since they can harden strongly.
Ultimately, by spending a little money, you can get rid of defects on the stove surface. The result will please the appearance and ensure safety for the home owners.
Instructions for applying clay plaster
Before you begin applying the composition, the walls should be prepared. They are cleaned of old finishes, this is especially true when it comes to cement plaster. The area to be trimmed is made rough using a sander. If you have to work with wooden walls, you should install shingles.