How to fold a frame pool for the winter?
When purchasing a frame pool, it is important to familiarize yourself with the characteristics of the product. Manufacturers offer models for seasonal use and universal ones. The first ones definitely need to be dismantled. And as for the second, experienced pool owners recommend folding them too.
Cleaning is not tricky
How to fold a frame pool for the winter? Read detailed instructions on how to roll up a frame pool for the winter.
You've enjoyed using your pool all summer. It served you long and reliably for three whole months. But the time has come for cool days, when enjoying warm water in the pool is no longer relevant. The question arises, how to disassemble a frame pool for the winter? Unfortunately, we do not ask this question when choosing our purchase. In principle, there is nothing difficult in disassembling, but preparing the bowl is necessary. After all, the good future of your pool depends on proper use, care and dismantling. Unfortunately, prefabricated pools have to be assembled in the spring and disassembled in the fall. Moreover, a PVC bowl, after storage, may have cracks and require restoration for the next season or its replacement. But don’t be upset in advance, if you already own such a pool, then follow the rules of care. After all, by caring for any thing, you extend its life by more than one year.
Is it necessary to clean the pool?
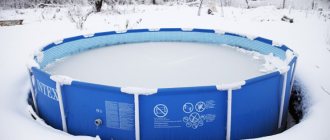
If you do not fold the frame pool for the winter, many factors can lead to damage, among the main ones are the following:
- temperature changes and the threat of cold snap;
- thunderstorms, hail, hurricane;
- extreme weather in the form of heavy snowfalls, frosts;
- damage to the structure by people or animals.
To ensure the protection of the product, there is one correct solution - dismantling. Otherwise, the bowl, which is made of plastic, and other elements will be damaged. As a result, you will not only end up with an unusable pool, but also additional headaches, as well as disassembly and removal costs.
When to start preparing
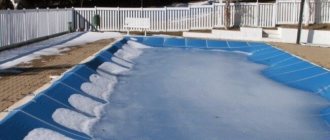
On the eve of winter, in low temperatures or rainy weather, it is necessary to properly prepare the frame pool for storage - its conservation at the dacha. Preserving a frame pool in the open air in winter reduces its service life - when ice gets into the bowl, it expands, puts pressure on the walls of the PVC product, and then melts, which can cause accidental damage. Low temperatures negatively affect the product, the walls become brittle and cracks appear with a slight impact. The paint on the frame tubes peels off, and corrosion processes appear.
Work order
To preserve the product, it is first recommended to perform the following measures:
- drain the water;
- dry the tray;
- collect shelter.
As soon as it’s time for cold weather, and in Russia in some regions the warm period is short-lived, immediately begin the actions described above, otherwise there is a chance of being late: due to a sharp drop in temperature, the water in the pool will freeze. In terms of time, all actions will take two days; in fact, you will be involved in the process for only 2 hours, the rest of the period is devoted to draining the liquid and drying the product.
It is very important to plan everything in advance when no precipitation is expected and the temperature outside is still above zero.
On the first day, the container is cleaned, the bowl is emptied of water, on the second day the structure is dried and dismantled. The disassembly itself also does not take much time, the main thing is that the device is dry, during storage it is necessary to exclude the possibility of mold formation.
Step-by-step manufacturing instructions
The frame preparation algorithm depends on the selected material.
Made of wood
The wooden frame can be anything - at the discretion of the builder. Next, we will consider a very simple version of slats. You can assemble such a pool in 30 minutes.
Materials:
- wooden slats;
- thick flexible wire – 6-7 mm;
- varnish or wax for wood processing;
- support washers (any diameter, thickness 0-15 mm) - the number is equal to the number of frame corners.
Tools:
- drill and drill bits;
- pliers and wire cutters;
- saw, hammer.
The frame can be straight, hexagonal or octagonal. Manufacturing:
- Take slats of the same length.
- A hole is made in each side on both sides - approximately 10 cm from the edge. The wire will be threaded through them (the drill is selected to match the diameter of the wire).
- The slats are impregnated with varnish to prevent rotting.
- Wooden support washers are needed to secure the wire. A hole is also made in them. The part is similarly impregnated with a solution (wax or varnish).
- The wire is wrapped at one end into a ring and turned 90 degrees.
- The washer is put on, then the slats are strung - one is moved to the right, the other to the left.
- At the top, a free piece of wire is bent to secure the height.
- Other sections are assembled in a similar order.
The main thing is that the slats go straight and not downhill. After completing the frame, you can proceed to arranging the bowl. Read more here.
Made of metal
Materials:
- chipboard or fibreboard;
- metal pipes;
- screws and electrodes.
Tools for work:
- drill with screwdriver and drill bits;
- hacksaw;
- welding machine.
Build process:
- The bottom of the required size is cut from a sheet of chipboard (fibreboard).
- Metal pipes are attached to it vertically or at an angle with self-tapping screws - they will become a support for the awning.
- Horizontal ceilings are attached using a welding machine.
- The bowl is lined with PVC film.
For welding work, it is better to contact specialists. This is a dangerous job that requires experience and knowledge.
After assembling the frame, you can begin cutting out the bowl. Read more here.
From plastic pipes
Plastic pipes can be found in any hardware store - they are a cheap and affordable material.
Tools you will need for work:
- pipe cutters;
- roulette.
Materials:
- 15 plastic pipes - 25 mm (each length is about 2 meters);
- several rolls of stretch film;
- technical film;
- fittings for joining pipes.
Manufacturing process:
- 15 pipes are folded into a contour around the perimeter to calculate the approximate size.
- A frame is formed. 2-meter tubes are cut into meter-long ones - 10 squares of 1x1 m are obtained.
- All tubes are joined using a fitting. The elements are connected in a circle with a soldering iron. The result is a frame with a radius of 300 cm and a height of 60 cm.
- It is recommended to cover the bottom with corrugated cardboard (you can take it from old boxes), the joints are taped.
- Cling film is wrapped around the tubes around the entire perimeter. This will strengthen the structure.
After completing the construction of the frame, a bowl is formed from an awning or technical film. More details can be found here.
Made from polypropylene
To create it, you will need to first make a metal frame so that it connects the structure. It would be a good idea to deepen the pool a little into the ground.
Manufacturing:
- Prepare polypropylene sheets and mark the joints according to the pre-drawn drawing.
- Cut out the details. Assembly begins from the bottom, seams are made along the outside.
- First, a sheet for the bottom is placed in the pit. Next, the sides are placed at the edges and soldered on both sides. To connect from the inside, a rod is used; from the outside, nozzles are useful.
- Assembling the descent steps is not necessary, but they will not interfere with the pool.
- Stiffening ribs are installed every 70 cm.
Strengthening the structure with a rigid frame is made of the same polypropylene. They are soldered from the outer surface of the bowl using rods.
You can find out how to make a polycarbonate pool cover here.
Draining
At first, the water will drain faster, and the less it becomes, the slower the drain will go. The process can last 12 hours or more, depending on the size of the pool. When the exhaust hole “sucks in” air, the drainage is complete. Next, you will need a scoop to collect the remaining liquid; be prepared for the fact that you will have to remove several dozen more liters of water, despite the fact that the puddle will not seem that big.
Experienced people make a special depression in the center under the pool bowl, this makes it easier to remove remaining water and dirt. After draining, the bottom is wiped with a rag, and the device is left in the sun to ventilate and dry.
If you are dealing with a small-sized pool, then the bowl can be dried on ropes or other stretched devices.
You can water your garden plot or lawn with recycled water, but only if it contains no chemicals. When purchasing preparations for pool water purification, you should read the instructions; there are compositions that are harmless to seedlings. Otherwise, you cannot drain the liquid where green seedlings grow, then it is better to drain it into the sewer.
Installation
Now let's figure out how to properly assemble a tent. In the classic case, the internal part is installed first. The arcs should be installed in the eyelets located in the corners of the bottom. Moreover, the arcs should be placed crosswise. They should be secured with special plastic clips or other devices, if included. But usually these are clips that are sewn to the bottom of the tent.
Where the arcs intersect, they need to be bandaged using a special device. In a number of designs, the collection is carried out in such a way that the arcs are first threaded into special sleeves of the tent, which are located on the outside, after which the arcs are installed in the pins. And this type of tent rises. Now the arcs are also fixed in a special place where they intersect.
At the next stage, we stretch the bottom, after which we secure the tent with pegs. If it has a so-called exoskeleton, that is, the arcs are attached to the outside of the tent, then it just needs to be stretched on pegs. If you need to assemble a regular tent with a frame, it is better to first secure its awning. To do this, you need to understand where the entrance is and the location of the frame arches. In them you can usually find devices that allow you to attach the awning to the arches. They are usually of two types:
- Velcro fasteners;
- dressings.
After this, the iron tambour arch is threaded into a special sleeve. The tent corners are secured to the inner tent using fastex buckles or hooks. Although in a number of models the corners are not attached, but are simply stretched on special hooks and attached to the ground.
Only after the awning has been attached to the tent, the necessary zippers have been fastened, and the arcs have been straightened, should you deal with the pegs. First, we stretch the places where the arcs are attached - in the corners of the living compartment. After this, the vestibule is fixed and the intermediate points of the awning bottom are tightened. It is best to drive pegs into the ground with an inclination away from the product.
During assembly, a number of people are lost at the stage of tightening guy ropes to create maximum resistance to wind. People pull everything they see because they don’t know the essence. Although, if there is not a lot of wind, and the tent belongs to the middle or expensive price segment, then there is simply no point in pulling guy ropes to make it wind-resistant, and you will waste your time. But if the product is cheap or its design is not very successful, then it makes sense to tighten the guy wires.
Cleaning and assembling the canvas
In parallel with draining the water, you can mechanically clean the walls; this is done with a stiff brush. For a better effect of removing plaque, pour detergent into the tray. Again, before use, read the instructions so that the chemicals do not harm the material from which the pool is made.
Aggressive detergents will damage the protective film and structural elements.
To clean the pool, do not use metal brushes or tools with an excessively hard surface. All actions for cleaning a round swimming tank are carried out carefully so as not to damage the bottom and walls.
There are several general rules for collecting canvas.
- The rectangular bowl is folded like a sheet: without creases or folds.
- Place the walls inside the round tray, then fold the bowl in half twice. When packaging, the resulting triangle is further reduced in size, adjusting it to the storage location.
- If there is a cable at the bottom of the pool, it must be removed from the loops. It will be easier to assemble an inflatable structure if you blow all the air out of it as much as possible.
Before assembling the canvas, they once again pass with sponges in hard-to-reach places and folds, it is necessary to exclude any drop so as not to create conditions for the development of fungus.
Safety is guaranteed only if the pool is assembled in a perfectly dried condition.
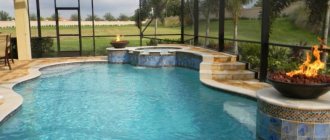
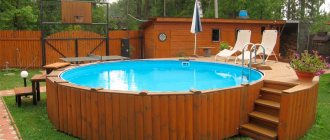
Tips for choosing a location
For a pool that will only be used in summer, any location is suitable. Inflatable pools are a cheap option that does not require major changes to the site.
If you have decided on a stationary pool, before digging it, you need to choose the right location on the site. After all, it will not be possible to move such a structure after completing all the work on its creation.
There are several important points to consider:
Trees. They shouldn't be near the pool for two reasons. The first is the root system, which negatively affects the waterproofing of the pool. The second is foliage that pollutes the water surface. If the leaves are not removed in time, the water “blooms” and the pool loses its attractiveness.
Soil type. Ideal if your site has clay soil
It does not allow water to pass through, which is important if damage to the waterproofing suddenly occurs
- Direction of the wind. The pool will one way or another become clogged with wind-blown debris. It will be nailed to a certain side. Therefore, make sure that this is where cleaning the pool is as convenient as possible and you can quickly remove the brought leaves, blades of grass, etc. This is also where you should place the drainage system.
- Water pipes. By placing the pool close to the water supply, you will ensure that filling the bowl is easy and quick.
If you decide to install a frame pool, try to ensure that the surface allocated for it is absolutely flat. Potholes, irregularities, dents, remains from tree roots - all this should not exist. Ideally, the site is concreted, creating a smooth base for the pool.
Disassembling the frame
The frame is formed by vertical supports and horizontal beams, connected to each other by T-shaped hinges. There are no problems with disassembly, everything is simple, and the instructions are at hand.
- It is necessary to dismantle the beams by unscrewing the pins and disconnecting the hinges on the side and bottom. The beams are extended along the entire perimeter.
- Next, the vertical supports are dismantled; to do this, remove the lower attachments and free the beams from the upper hinges and awning hinges.
- All removed elements are marked with a marker and placed in plastic bags for storage.
When dismantling removable equipment, as well as the pump and filters, strict adherence to safety rules is required.
Do not forget to turn off the power to electrical appliances before disassembling. Install plugs on the holes (these should be included in the kit). And be sure to make sure it is dry when removing the awning.
All elements of the same type are put into one bag and, if necessary, marked, this will help save them for the next assembly. Remember that replacing lost pool parts is a tedious task. It is not so easy to find the right element, which means that next time you may simply not restore the structure.
Before packing the parts of the pool, you should read the instructions on storage rules.
The frame itself and its parts are left in the garage or in the country house; plastic and metal can easily withstand low temperatures. But the bowl can crack from frost; it is stored in a dry, warm place, packed in a box, on which nothing is placed on top to avoid the formation of kinks.
Installation
Installation of a simple frame pool consists of the following steps:
Assembly of the structure
Selection of location and site arrangement. When selecting it, not only the area of the reservoir itself is taken into account, but also the necessary free space around it. Installation of the frame. The algorithm for this action directly depends on its type. For example, sheet metal is assembled from sheets of plastic or metal, fastened with special locks. There are models of round pools in which the modules are already connected to each other with flexible fasteners. It is enough to stretch such a frame, and then stretch the polyvinyl chloride shell on top. All joints are treated with sealant. Connecting the filtration pump. This is done using the hoses that are included in the kit. To purify water, paper filters are used, which will have to be changed 3-4 times a week. More practical are quartz sand filters that can last from 3 to 5 years without replacement.
Please note that the filtration pump must never be turned on without water. Filling the pool with water. At this stage, a ladder and other accessories are installed in the pool, after which the bowl is filled with water
This will require from 1 to 10 tons of water.
It is worth remembering that on a hot day, water evaporates actively, even in cloudy weather. You cannot use oxen from a river or lake for filling. Only water from an artesian well or brought in food barrels can be used. Sometimes they use rainwater passed through a filter.
Flushing the hoses
During dismantling, do not forget to wash the connecting hoses. To do this, make a solution of citric acid with Sorti or Fairi.
It is important that the inside of the hoses get wet, so fill them with the resulting mixture and hang them at both ends.
You can also soak the pump, then everything is thoroughly cleaned with a brush or brush and washed. Do not spare water for rinsing; all acid and detergent particles must be removed. After this procedure, the hoses and pump look like new. Store them in a place inaccessible to rodents.
Video description
The process of preparing the base, as well as installing a frame pool, can be seen in the following video:
Despite the fact that a frame pool at first glance seems to be a simpler and more cost-effective alternative to a permanent structure, its correct installation will require some effort, knowledge and experience. It cannot be installed on the first piece of land that comes along. The finished kit should only be installed on a specially prepared base.
How to store?
Experienced owners advise treating the surface of the walls with talc before storing. It absorbs moisture and will not allow the material of the bowl to stick together when folded. Well, in order for the safety of the pool to be at its best, you should not neglect the rules for assembling the structure.
The sequence of actions during dismantling at each stage will allow you to avoid problematic issues and preserve the integrity of the walls and structural elements for another season.
You can store the folded device in a barn, garage, attic, or any other room where the temperature is above zero.
Small swimming pools can also fit in an apartment; there is a place for them on the balcony or in the closet. There are several ways to store frame pools.
- Simply cover the site where it is deployed with protective material.
- Dismantle the structure and store it in the same place where it is installed.
- Disassemble the pool and put it in a warm room.
In the first case, this can be done when we are talking about all-season models that can withstand frost. You will read about this in the instructions, but this approach is fraught with consequences: the ice that forms when water gets inside freezes can damage the base and walls of the pool. It’s better not to risk it and still dismantle the pool.
When disassembled, there is less opportunity for moisture to get inside and freeze. The assembled structure is covered with a thick film, fixing it with bricks or heavy objects. This storage method has a right to exist, but it is also an unsafe and suboptimal option.
Precipitation can seep under the protective cover and negatively affect the strength of the material. Take every opportunity to find a dry, warm place and store the pool elements there. This is an exact guarantee of reliable protection of the device in winter.
In the next video you will learn how to properly roll up a pool bowl in 5 minutes.
REPAIR
Anything can happen on a hike. Due to careless handling, the arches break and bend; a fellow hiker in the dark can trip over a guy rope and, amid loud unliterary exclamations, fall onto the tent, causing considerable destruction. Awnings are burned and torn, pegs are broken and lost. In order to quickly repair damage, each tourist’s mandatory equipment must include a repair kit. To repair a tent, it is good to include reinforced tape for patching holes in the tent, several plastic zip ties (in non-tourist life they are used to bundle wires) and a repair sleeve, which is a piece of tube into which the ends of a broken arc can fit tightly to repair them. fixation. If there is no protective sleeve, if the tent pole breaks, you will have to be creative and use improvised items, for example, scraps of a tin can, spare pegs, or simply suitable sticks and fix them with tape. For those who do not want to waste time selecting repair materials, our stores sell ready-made kits for repairing not only tents, but also all camping equipment, for example, Nova Tour Conductor and MSR repair kits.
-40%
Nova Tour Guide Repair Kit
894 1 490
Repair kit D/Aug MSR 6602
1 350
Buy
For convenience and speed of work, it is better to use multi-tools from the brands Gerber, Leatherman and Victorinox, proven by time and generations of tourists.
-40%
Multi-tool GERBER essentials suspension multi-plier (box) titanium gray
2 040 3 400
Multitool Leatherman rebar black
7 750
Buy
Well, when you come home from a hike, you can buy new pegs and arches instead of broken or lost ones.
athlete price
Red Fox stand without 9.5 mm adapter
290
Set of MSR cyclone stakes (4 pcs)
2 490
Buy
Cleaning is not tricky
How to fold a frame pool for the winter? Read detailed instructions on how to roll up a frame pool for the winter.
You've enjoyed using your pool all summer. It served you long and reliably for three whole months. But the time has come for cool days, when enjoying warm water in the pool is no longer relevant. The question arises, how to disassemble a frame pool for the winter? Unfortunately, we do not ask this question when choosing our purchase. In principle, there is nothing difficult in disassembling, but preparing the bowl is necessary. After all, the good future of your pool depends on proper use, care and dismantling. Unfortunately, prefabricated pools have to be assembled in the spring and disassembled in the fall. Moreover, a PVC bowl, after storage, may have cracks and require restoration for the next season or its replacement. But don’t be upset in advance, if you already own such a pool, then follow the rules of care. After all, by caring for any thing, you extend its life by more than one year.
Collapse it cannot be expanded. There would be a desire.
Now you are faced with the task of how to roll up a frame pool for the winter:
- it is necessary to lay the fabric sheet on a flat, clean surface and sprinkle it with talcum powder, this will protect the material from sticking together when assembled,
- if the pool is rectangular in shape, then you need to lay out the bowl evenly, smooth out the folds and fold the edges on both sides to make a square,
- then fold the edges of the square towards the middle until the sides come together and lie on top of each other,
- Again we bring the edges of the material to the middle and fold it in half. You should end up with a small square.
- If your pool is round in shape, this makes the task a little more difficult. Since the sides cannot be folded without folds. Initially, the walls of the pool are folded inward towards the center. Then the circle is folded in half. Then the semicircle is folded in half again and again. You should get a triangle. PVC film is stored in a warm, dry place from 0 to + 40 degrees. Do not leave the bowl in the cold under any circumstances. Be sure to remove the material out of the reach of children and animals, especially rodents.