If the size of the summer cottage does not allow the construction of a full-fledged building, then an alternative option is a mini-bath. In terms of functionality, level of comfort and safety, it is absolutely not inferior to traditional steam rooms, but at the same time it requires much less usable space. In addition, even a novice master can build a bathhouse on his own using affordable and safe materials.
Installation of benches and other sauna equipment
A proper sauna should have a room height of 1.9 to 2.1 meters. When installing benches, it is necessary to take into account that the person sitting on the upper tier should feel comfortable without resting the top of their head on the ceiling (for more details: “How to make benches in a bathhouse with your own hands - from drawings to ready-made benches”). Then the bottom strip of benches will have a height of 65 centimeters. If such a design creates discomfort for visitors, then under the bench you can make a step 20-25 centimeters high.
Other conditions for arranging a steam compartment:
to eliminate the effect of a closed space, you can install combined doors with glass or tinting
It is very important that the door is without any locks and opens to the side from the steam compartment; It is worth considering that a wood-burning heater is very difficult to install, and therefore it is best to opt for electric stoves, which can be purchased in many stores. Such a stove is placed with a gap of 20 centimeters from the floor and secured to the wall with screws; To increase safety, the stove must be fenced with a wooden fence at a distance of 5 centimeters
Stones are placed in the voids between tubular electric heaters at a minimum distance; Lastly, lighting fixtures and switches are installed, after installation of which the sauna can be put into operation.
Bathhouse at the dacha: projects
We build a bathhouse with our own hands
A small-sized washroom in the country has always been a favorite object of creativity. Each private owner was looking for his own version of building a small bathhouse at the dacha with his own hands, projects for foundations and finishing of premises. There are many projects, but almost all of them are tied to the specific location of the site and the main building.
Among the universal options, the following schemes are most often used:
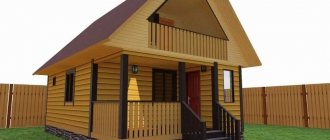
- The most affordable version of the washing department is a compact bathhouse for a summer residence in the form of an extension to the main building;
- The most common frame mini bath with insulation and wall covering with clapboard;
- A full-fledged timber building with a separate washing room;
- The most affordable mini-sauna for a summer residence to build with your own hands from edged boards is forty.
The last option is good because it can be built on almost any plot of a summer cottage in five to seven days. This design will last three to four years without any problems, until the time comes to build a real bathhouse.
Small sauna for a summer house made from roofing boards
The main advantage of such a bath is its low cost and large interior space. Most of the box is allocated to the utility block, where firewood and garden equipment are stored; the steam room and dressing room occupy approximately 2/3 of the room.
The use of plank panels significantly weakens the walls, so according to the project, the bathhouse box at the dacha is supposed to be built on a strip or slab foundation. Such a temporary shed can be built on a purchased plot with an old dacha. While repair work is underway, you can steam in the bathhouse and store the necessary material and tools.
The walls inside the bathhouse are lined with thermal insulation, possibly mineral wool and aluminum foil. To prevent water from flowing inside, you can build a canopy or cover the boards with thick plastic film, at least 0.2 mm thick, on pre-stuffed counter-lattice slats.
The simplest version of a mini bath for a summer residence
Sometimes owners of a summer cottage prefer to build a steam room directly next to the wall of the house. Essentially, this is a universal cabin made of boards and timber, in which you can steam or shower at the same time.
It is clear that it is possible to build a single-seat sauna box only if a brick stove is built in the dacha room, in close proximity to the wall.
To heat up a mini sauna at your dacha, you can use a flame pipe made of thick stainless or alloy steel. The part facing the stove is laid with a bath stone to a depth of at least 40 cm. A water tank with a dropper is installed above the heater; a stream of steam warms up the cabin in 10 minutes.
What is interesting about this bathhouse project for a summer cottage:
- It can be built in a day, and the body of the bathhouse is best made from pine boards - forty;
- The cabin does not require additional foundation or insulation. You only need to build a shower tray with a wooden drain;
- The time to prepare the bath is no more than 10 minutes, during which time the walls and water in the shower tank have time to heat up.
Instead of a fire oven, you can build a steam generator or use an industrial model for apartment saunas. A tank with water for showering is installed in the upper part of the bathhouse cabin. A built-in electric heater is used for heating. It is most convenient to build a room with an exit from the bathhouse to the covered veranda of the dacha, then you can steam in any weather.
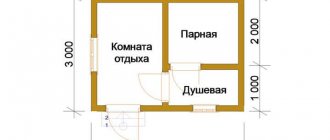
Classic mini bath project
For a dacha with a plot of at least 10-12 acres, standard frame and timber mini-baths designed for two to three people are most often chosen.
One of the options for planning a sauna room for a summer residence is shown in the diagram below.
For your information! A special feature of the layout of such a mini bath is the minimum number of internal partitions.
In small boxes of 2.5x2.5 m, building a rest room is useless and pointless, what kind of rest can there be?
You need to leave a small dressing room of 2 x 0.7 m. This is enough to fold things, sit, here you can store a supply of firewood, from which it is convenient to heat the stove.
Both types of bathhouses are built on a columnar or bored foundation. Building a frame bathhouse with your own hands for a summer residence is much easier and faster, although somewhat more expensive due to the large amount of insulation.
Building a bathhouse in a dacha from timber will cost 20% less, but you will need to build a pile foundation and seriously tinker with the shrinkage of the walls. At least once a season, the intervention seams will need to be stamped with tow. It is possible to build a box with a ventilated facade, but this type of bathhouse cladding is rarely used for a summer residence.
Projects of small-sized baths
Construction work begins with the preparation of the design of the future bathhouse. Here it is important to take into account all the main parameters: dimensions and internal layout, location, construction and finishing materials, furniture and equipment.
The most common sizes of budget baths are:
3×3
Square one-story building of 9 square meters. m - the most affordable option for a small-sized bathhouse. It provides for a steam room and a washing room, located on 4 squares with a minimum set of furniture, as well as a dressing room of 4 square meters. m with a folding table and benches. Here you can also organize a locker room and a relaxation area. A small corridor is intended for convenient storage of bath accessories.
4×3
Bathhouse project for 12 sq. m provides for a budget construction designed for a small company of 2-3 people. The overall space of the bathhouse can be divided into several functional zones by thin partitions made of timber: a steam room, a washing room and a dressing room. A small tray with a drain hole is installed in the washing room. For such a bath, it is recommended to choose a compact metal wood-burning heater or an electric stove.
4×4
Bathhouse project for 16 sq. m is quite in demand due to its spaciousness. A standard building is built on one floor and may include the following premises: a steam room, a washing room, a dressing room, a sanitary unit and a rest room. In some cases, such a project provides for an open terrace. The bathhouse may have a second floor, equipped as a guest room, a playroom or a study. To build such a bathhouse, timber, logs, cinder blocks and bricks are used.
4×5
Budget project for a country bathhouse for 20 square meters. m includes a minimum of structural elements. As a rule, the building is built on one floor and is divided into a steam room, a washing room, a relaxation room and a terrace. Heating equipment and furniture are installed in the steam room, an area with a shower and sanitary facilities is installed in the washing room, and household appliances and furniture are installed in the relaxation room. This project may not include a dressing room, which allows you to get a fairly practical summer version of a bathhouse.
6×4
The most popular project for a small-sized bathhouse of 24 square meters. m, which consists of a steam room and a washing room of the same area, a dressing room, a small relaxation room combined with a terrace. Such dimensions of the building allow it to be used for a company of 4-6 people. To save space, multi-tiered folding shelves can be installed in the steam room. If desired, you can reduce the area of the rest room by allocating a small room for a locker room.
Making the foundation
Mini-bath, do-it-yourself sauna
As soon as you have decided on the plan and dimensions of the mini-bath for your dacha, you need to start considering the foundation. For a small room with frame walls there is no need for a powerful foundation, but its type will depend on the location of the bathhouse and the type of soil on the site.
First, you need to clear and clean the area where construction will take place. We get rid of weeds to facilitate excavation work, after which we carry out markings. By calculation it is necessary to determine the diagonal and check it by measuring the distance between the corners: they must be equal, in which case we will get right angles.
Marking the construction site
Marking the trench for the foundation
We stretch the string between the pegs, then step back a distance the width of the foundation and secure four more pegs in the corners. For sandy soil, take 40 cm, for clayey soil - 25 cm. Next, a trench is dug, the depth of which is approximately 50 cm. If your design includes a partition, you also need to build a foundation under it. Sand is placed at the bottom of the trench in a layer of 10 cm. Sometimes gravel is used, which must be leveled and compacted well.
1 3
Taking a metal rod with a diameter of 10 mm, a lattice is made for a reinforced concrete structure. Using boards or sheets of plywood, we construct formwork, the height of which is about 20 cm. The metal lattice should be 10 centimeters narrower than the width of the trench; it must be laid using special brick linings. The next step will be making the solution. The finished solution is poured into the trench, and the top is leveled with a trowel, after which it is necessary to wait a certain time for the foundation to harden. It is worth placing waterproofing material on top of the reinforced concrete structure.
Grating for reinforced concrete structure
Formwork for pouring the foundation
Strip foundation
Sometimes a columnar foundation is used: in this case, the filling occurs not in a continuous layer, but in segments. Supports are placed every meter. If you plan to use a heavy stove, you also need to pour a foundation under it.
Columnar foundation is suitable for small buildings
Arrangement of communications
Do-it-yourself flowerbeds for a summer residence - types, practical tips for creating, unique photo ideas
The final stage of work on the mini-bath is the arrangement of the necessary communication systems.
Water supply and drainage. Feeding can be done by gravity:
- Prepare two 50 liter tanks, a hose and a pipe with a mixer.
- Install the hot water tank 0.5 m lower than the cold water tank.
- Connect the tanks together with a hose: fix one end in the lower zone of the “cold” tank, the other in the upper zone of the “hot” tank.
- Additionally, connect the tanks with a pipe with a mixer at the end.
To ensure water drainage you will need a drainage system:
- Dig a drainage well near the steam room.
- Make holes in the floor of the bathhouse for drainage.
- Bring the pipes to the holes, installing them with a slight slope.
- Direct the pipe into the drainage well.
Arrangement of a washing room
Water heating system. To heat water, you can use a mini-stove or heating elements. In the first case, you must first install the device, and then in its hottest place, going around the base of the chimney, install a U-shaped metal pipe: the supply end of the pipe should be placed on the body, and the outlet end 5 cm higher. In the second case, it is necessary to install heating elements under the “cold” tank and connect them to the water supply system with hoses and pipes.
Ventilation system. To ensure ventilation in a small bathhouse, it is enough to make holes with a damper in the wall opposite the entrance.
A mini-sauna is the choice of those who do not want to give up a full-fledged steam room due to the modest dimensions of their summer cottage. As you can see, building it with your own hands is not difficult: foundation, frame, communications - you will successfully cope with these tasks if you follow simple recommendations and rules.
Heating and ventilation
To heat a mini-steam room in the house, the easiest way is to use an electric heater. Its power is calculated according to a simple scheme: 1.-1.5 kW per 1 sq.m. area. That is, for a home bathhouse 2x2 m, a device with a power of 4-6 kW will be sufficient. It can even be connected to a standard single-phase power supply.
The electric furnace is placed either on the wall or on the floor, but always near the door - this is necessary so that the cold air coming from outside is immediately captured and warmed up by hot air currents. The stove is equipped with a compartment for stones - when poured with water, they form steam, which increases the humidity in the mini-steam room.
The electric oven is also equipped with a thermostat, thanks to which the required comfortable temperature is maintained in the steam room.
Another mandatory stage in arranging a mini-bath in the house is organizing ventilation:
- At the bottom of the floor near the stove, make a supply hole for air in one of the walls of the steam room.
- Make an exhaust hole in the wall as far as possible from the supply opening and from the door.
Both openings must go into one room, which, in turn, must have a ventilation exhaust duct leading to the street. An electric fan should be installed in the hood.
Mini-sauna in a country house of 6 acres - myth or reality?
What are the usual reasons why a summer resident does not decide to build a bathhouse on his property? Of course, this is the lack of funds for its construction and the necessary space on the site. As for a mini sauna in the country, it can be an ideal solution to these two issues. Let's try to figure out whether it is worth undertaking such construction or whether it might be easier to purchase a ready-made one and install it on the site.
Let's start with the fact that buying a ready-made room for a bathhouse is an easier solution, but at the same time, the summer resident faces another problem - after all, he really needs a budget option. And this cannot in any way include the acquisition of a finished building. It is for this reason that today we will consider the construction of a bathhouse with our own hands. Although we will definitely dwell on the cost of ready-made ones, but a little later.
Everyone puts a different meaning into the concept of “small bathhouse in the country”. After all, for some, even a plot of 20 acres is considered small. But we will consider the average garden plots of 6-8 acres. This means that the bathhouse on them should not occupy more than 4-6 m in length and 2-3 m in width. First of all, we’ll figure out what bathhouses can be like on a summer cottage, what they can be built from, and only after that we’ll decide how to do all the necessary work.
Useful tips
The construction of a small private bathhouse on a personal plot is a complex and responsible undertaking. To get a decent result of your work, experts recommend drawing up a detailed plan for the construction process. This will simplify the passage of the main stages of work and avoid serious mistakes.
Step-by-step instructions for building a mini-bath include the following steps:
- Choosing a location on a building site.
- Construction of a foundation for a bathhouse.
- Construction of walls, partitions and interfloor ceilings.
- Installation of the rafter system.
- Thermal insulation, waterproofing and vapor barrier of walls, ceilings and floors.
- External insulation and cladding.
- Installation of heating equipment and chimney.
- Laying floors, installing door and window structures.
- Communications supply.
- Internal cladding of premises.
- Selection and arrangement of furniture, bath accessories.
Choosing a place to build a bathhouse on a summer cottage
Before starting construction itself, two important tasks must be completed. The first is to choose a location, and the second is the size and material for the bath.
The choice of sizes depends entirely on the place where you want to place it. Agree, if your area for a bathhouse is, say, 2x2, and you want to “cut off” a larger one (for example, 6x6), then nothing will come of it. Therefore, first of all, we choose a place.
Here you need to be guided not only by your preferences, but also by the legal requirements for the placement of certain buildings.
The first thing to consider is the location relative to the residential building. There are two options here: the bathhouse is located separately from it or adjacent to it so that the entrance to it is directly from the house.
If you have your own well or other water intake on your site, then it should be located no further than 20 meters from it.
And, of course, the location of the bathhouse should be such that it does not disturb the comfort of not only yourself, but also your neighbors.
Also, it should not be located in a low-lying area or in a place that is often flooded. This is understandable, your bathhouse will be damp all the time.
In addition, it is worth considering that the bathhouse should be within walking distance from the house if the plot is huge. There is electricity and water supply nearby.
Bathhouse in the country, building codes
If we talk about the law, then there are rules SNiP 30-02-97, which regulate the construction of various structures both in populated areas and in summer cottages.
= The norms for the construction of a bathhouse to the neighboring site take into account: to the beginning of the neighboring site (fence, boundary) - more than 1 m; to a wooden building on a neighboring plot - at least 15 m.
= Construction standards on your site determine the permissible distances to objects on the same territory: to a residential building - more than 8 m; to the “red line” (street, roadway) – more than 5 m; from any buildings made of non-combustible materials - 6-11 m; from wooden buildings with non-combustible cladding - 8-12 m; to wooden outbuildings – 11-15 m.
= Construction of a bathhouse on the site: rules and regulations regarding natural, protected and plant areas provide for minimum distances to the following objects: forest area - 15 m; natural reservoir – 5 m; vegetation: tall trees – 4 m, medium-height trees – 3 m, bushes – 1 m; well with drinking water – 12 m.
So, we have decided on the location, what next? Would you like to run to the store for building materials? It’s too early, because without knowing the size of the bathhouse, you don’t know how much or what to buy.
Timber bath projects
The construction of even a small one-story steam room is always associated with the problem of allocating a free local area. Therefore, we have to look for projects for the smallest bathhouse buildings. The timber has a remarkable property - it can be used to build an arbitrarily small bathhouse, down to the size of a doghouse. One of the options for a 2 by 2 m bath is shown below.
The steam room is assembled from logs, all other parts are from timber. The result is an inexpensive one-story sauna, warm and durable. Walls made of timber do not retain heat very well, so the room is traditionally lined with siding or upholstered with a block house.
A more civilized version of the previous project involves the arrangement of a canopy and a small summer terrace. Such designs are very popular for small country houses and dachas, where most of the site is occupied by beds, fruit trees and shrubs.
Any sauna or steam room in the yard is always fraught with problems with melted snow, the appearance of puddles and, as a result, the need to deal with groundwater. This problem cannot be neglected, otherwise the base part of the timber frame will rot in 3-5 years.
At a minimum, you will need to make a full foundation blind area, lay drainage and cast a concrete walkway. If you have to install a small bathhouse on an unprepared site, then it is best to immediately place the steam room box on a columnar foundation or piles.
Photo examples of ready-made baths in the country
Before starting the construction process, it is necessary to develop a working design and draw up a detailed drawing indicating the technical parameters of the future structure. Original and popular options for budget bathhouses in summer cottages, built with your own hands, in our photo selection.
A functional frame bathhouse on a summer cottage is an accessible and relatively cheap construction option for home use. To reduce construction costs, you can create your own project and use only inexpensive and practical materials. A compact heating stove, made by yourself, will also help to significantly reduce the cost of servicing the finished bath.
Available materials for the construction of a budget bathhouse
Before you build a budget sauna for your dacha, you need to decide on the material for the wall structures. As a rule, natural wood is used to build a private steam room - timber, a simple or rounded log, but increasingly, in order to save money, site owners prefer simpler and cheaper materials. The most popular of them are:
- Brick.
- Foam blocks and gas blocks.
- Wooden beam.
- Edged board.
- Steel frame with wood cladding.
- Plastic corrugated sheet.
Each material has its own strengths and weaknesses, which can be used to advantage when building a compact steam room.
Construction of the foundation
After determining all the basic parameters of the bath premises, you can proceed directly to construction work
When choosing the appropriate type of foundation, pay special attention to the type of soil of the area on which the bathhouse will be built. If the soil is hard enough and the groundwater is deep, then a lightweight foundation will be sufficient
We lay flat stones around the markings of the future building, cover them with a small layer of clay and lightly press them. We lay wooden beams on top. We complete the process by covering the beams with waterproofing bitumen.
If there is soft or wet soil on the site, use a strip foundation. Prepare a trench, fill it with a layer of sand, then crushed stone and compact it tightly. Then place the reinforcing mesh on top. All that remains is to prepare a cement solution with which the pit will need to be filled. Don’t forget about waterproofing: roofing felt sheets can be used for this purpose.
Communications
It is necessary to design the location of communications at the initial stage of developing a mini-bath. The wiring must be hidden under the casing, and it is laid in special metal sleeves. The cable should be taken with double braid. It is also necessary to make grounding. For lighting, choose sealed lamps. They can be mounted both on the ceiling and on the wall.
Ventilation is an important element in the design of every bathhouse.
It is more logical to use a tank in which the water will be heated from the heat of the stove. An important point is the arrangement of ventilation; for this purpose, ventilation grilles are made in the ceiling with exits under the roof slope. Don't forget to build a drainage hole where the water will flow. It should be of unusual size; a porous stone is poured inside, which serves as a certain filter.
Interior arrangement
Finally, the final stage of creating a mini-steam room is its internal filling. To make using the sauna easier, you will need:
- benches;
- footrests;
- headrests;
- shelves.
To decorate a steam room, it is better to choose natural wood.
This is the minimum set, which, if the dimensions are correctly calculated, will fit perfectly in a mini-steam room. In order not to make mistakes with the dimensions, all filling elements must be included in the drawing at the stage of creating the steam room project.
All components of the bath must be made of wood that does not contain resin and is characterized by low thermal conductivity: linden, spruce, aspen. You can make benches and shelves with your own hands, but it is better to buy footrests and headrests in special stores.
Another important component of filling a mini-steam room is lighting fixtures. These should only be heat- and moisture-resistant lamps. To ensure safety, switches should be placed exclusively on the outside of the bathhouse.
Thus, a mini-steam room in a private house or country house is not at all a hard-to-find exotic, but a completely feasible idea. For its successful implementation, you need to think through every moment: design, size, finishing, heating, ventilation, interior arrangement - by paying maximum attention to each of these points, you will get a functional and comfortable mini-bath that will give you a lot of pleasant moments.
Project development
Even if you plan to build a small bathhouse, you cannot do without developing a project. Therefore, before starting work, it is necessary to draw up a plan. It is necessary in order to determine the dimensions of the future structure. And also its presence will allow you to quickly resolve the issue with the location of the rooms. Typically, when constructing such structures, the following functional areas are distinguished:
- Waiting room. An area of 1.5×2 m will be sufficient for it.
- Restroom. Its optimal size is 2x2 m.
- Shower room. This room should have dimensions of 1x1 m.
- Steam room. The dimensions of this zone are 1.5x2 m.
Create a bathhouse of any shape, there are no limits to your imagination
Design and assembly of the steam room
The first stage of installing a mini-steam room in a house or country house is drawing up a project. It will protect you from mistakes at all subsequent stages of construction. The project must necessarily contain:
- general drawing of the steam room;
- frame dimensions;
- location and connection diagram of the heating device and ventilation;
- internal filling of the steam room.
Determine the size of the mini-steam room at your discretion: depending on your needs and the available space. Practice shows that the optimal dimensions for a home bath are 2x2 or 2x1.6 m. As for the location, most often a steam room is installed in the bathroom, since all the necessary communications are already there. Although, if square meters allow, you can allocate a loggia or even a separate room for it.
Steam room in the bathroom
The second stage is the installation of the steam room:
- Pour the floating concrete floor onto the marked work area.
- Assemble the frame of the bathhouse from vertical bars. Install the elements in 60 cm increments and secure them with screws and corners.
- Install a door between a pair of bars: a compartment, a door with hinges or Velcro, a glass structure - whatever your budget and imagination allow.
- Lay ceramic tiles on the concrete floor. Subsequently, it will need to be covered with wooden gratings.
- Cover the outside of the frame with wood panels. These can be boards made of coniferous or hardwood, or lining. Install the panels horizontally and secure them to the frame with screws and dowels.
Advice. To prevent moisture from penetrating into the sheathing, install wooden panels with a slight overlap over each other.
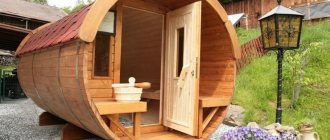
Barrel baths
In recent years, barrel saunas assembled using Finnish technology have been gaining popularity. Baths are barrels lying on their sides and assembled from tongue-and-groove boards. The best material for such structures is cedar.
Due to the metal hoops, just like a regular barrel, the boards are tightly pulled together without leaving any gaps. Therefore, in such baths, thermal insulation is most often not used, although additional insulation is possible.
Such solutions are less demanding on the foundation and can be installed without a foundation at all on their own base legs. It is enough to have a flat area with a hard surface.
Due to the absence of corners, the barrel sauna warms up much faster than a conventional frame sauna, which means it is more economical. The smallest options start with a two-meter length, but in such a design nothing but a steam room will be removed.
To accommodate a dressing room with a dressing room in the barrel, it must be at least 6 meters long.
One of the advantages of a barrel bath is its high mobility: if desired, such a structure can be moved to a new location.
A barrel-shaped bathhouse looks very unusual and colorful. But even more interesting variations on this theme are already appearing, in which the barrels take on new shapes.
Construction of a bath frame
The best method of constructing a mini-bath is frame. It is lightweight, fast and economical. To build the frame you will need:
- bars 5 x 5 cm;
- boards 2.5 cm thick;
- waterproofing film or foil;
- thermal insulation material.
Construction of a bathhouse
First, a frame is assembled from beams, corresponding in its dimensions and configuration to the previously developed project. The inside of the frame is covered with boards. To connect the elements together, use all kinds of anchors and various screws. Insulating materials are mounted on top of the boards: mineral wool, expanded clay or sawdust can be used as thermal insulation, and bitumen or polymer mastics can be used as waterproofing. It is necessary to insulate not only the walls, but also the floor and ceiling.
Advice. It is advisable to additionally cover the thermal and waterproofing of the ceiling with roll-up boards - a row of wooden boards.
After insulation procedures, you need to take care of the roof. You can use corrugated sheeting, slate or metal tiles as a covering: first mount the rafter system on the frame, and then secure the roof to it with self-tapping screws. When constructing the roof, leave an opening for the chimney.
The outside of the mini-bath can be covered with a block house or clapboard - these materials will give the structure an aesthetic appearance.
Thermal insulation of walls
Next you should deal with the thermal insulation of the steam room. For insulation, it is advisable to use mineral wool - it can withstand any temperature influence.
Advice. It is better to avoid foamed polymers - they are very flammable, so at high temperatures they can not only begin to decompose or emit an unpleasant odor, but also catch fire.
The recommended layer of mineral wool is at least 5 cm. It is laid on the inside of the frame between the bars. But the wood cladding sheets are first covered with aluminum foil - it will serve as an intermediate layer between the thermal insulation and the outer cladding and protect the wood from condensation.
Mineral wool is laid overlapping on the foil. A layer of waterproofing is again placed on top of the insulation - aluminum foil can also be used here. In this case, the reflective layer of material should be directed not towards the mineral wool, but towards the steam room. The foil should be fixed with a construction stapler on the frame bars. And the waterproofing sheets need to be connected to each other with tape.
After laying the thermal insulation, sew up the walls of the mini-steam room from the inside. You can use the same wood materials as for the external walls.
Electric stove for mini-bath
Water supply and drainage
The costs of building a miniature bathhouse can be minimized if you arrange a compact and efficient drainage system. To create it, it is necessary to carry out excavation work and dig a small hole with a volume of 100 liters at some distance from the structure. Inside it should be installed a barrel that does not have a bottom. Thanks to it, the walls of the pit will be prevented from collapsing.
The next step is to install a pipeline, which should go directly from the steam compartment. If the bathhouse will be used in winter, then the plastic pipe should be deepened to a depth of 1 m. To ensure that there is always hot water in the bathhouse, you need to spend money on purchasing an electric heating element.
It can be used to easily heat a small volume of water. This will significantly save time on lighting the stove in the mini-bath. The water container should be placed higher. In this case, it will be possible to use it without swapping. Some owners of such structures additionally install a mixer to control water flow.
The drain installed in the mini-bath can, if desired, be connected to the sewer system of the garden house. This option makes it possible to reduce the costs of installing this system. Communications should be located at a slight slope. This will prevent liquid from stagnating in them. At the bottom of the pit into which the used water will flow, it is worth laying a layer of expanded clay or coarse crushed stone. It is necessary to install an insulation structure on top so that the pit does not freeze over in winter. For this, laying a layer of soil and clay will be quite sufficient.
Important points before purchasing
To get a high-quality structure that will not fall apart after a few seasons, you should pay attention to the following points:
- quality of wood, it must be well processed and not have cracks;
- if there are traces of unremoved bark or some dark spots on the boards or bars, such structures should not be taken, they will not be durable;
- excellent vapor barrier, the service life of the mini-bath will depend on this;
- the size of the stove, it should be optimal for a specific project so as not to overheat the room;
- the quality of electrical wiring and its insulation to prevent fire;
- if you plan to build a mini-bath yourself, choose a beam with a square or rectangular cross-section, it is much easier to work with;
- wood treatment with fire retardants and agents against pests and mold must be present;
- only insulation that is resistant to rot and serious climatic changes is required;
- the stove in mini-baths should be located in the dressing room in order to save space and not interfere with the entrance to the steam room and garbage room;
- be sure to pay attention to the quality of the firebox’s protection against spontaneous combustion and the quality of its installation;
- In order for the steam to be retained well in the bathhouse, the doorway in the steam room should be raised as high as possible, and shelves should be placed only on the blank side;
- there should be no locks, latches or latches in the bathhouse, and the doors should only open outwards;
- the type of wood used, it is necessary to take only that which can withstand prolonged exposure to high temperatures.
Attention! Immediately clarify the possibility and necessity of building a foundation. Some mini-bath structures can be built with or without a base.
Frame construction
There are many options for constructing bath walls. We will use the simplest and fastest - frame. For its construction we will need the following materials:
- wooden blocks (5x5 cm);
- boards (minimum thickness – 2.5 cm);
- foil/film for waterproofing;
- thermal insulation.
Frame mini bath: the simplest and fastest construction option
According to a previously prepared project, a frame of beams is assembled. The inside is lined with boards. You can use ordinary screws or anchors as fasteners. Don't forget about heat and waterproofing. The first thing we install is a material that does not allow heat from the bathhouse to pass out. For this purpose, you can use expanded clay, sawdust or mineral wool (rarely used). Bitumen mastic is suitable for creating a waterproofing layer. The final stage of wall construction is the internal board covering (not mandatory, but a desirable element).
All that's left to do is build the roof. First, we prepare the rafter system and mount it on the frame. Then we begin laying the roof: metal tiles, slate, etc. will do. Don't forget about the chimney - you need to leave a free opening on the roof for it.
To complete the appearance of the bathhouse, lining or a block house is used as a protective and at the same time decorative element. Lining is the most common option for finishing the external frame of a bathhouse. This material is cheap, practical and durable. In addition, it is a fairly successful imitation of a wooden beam. The block house is similar in appearance to the lining, but differs in a more presentable appearance and quality of wood.
A mini bathhouse sheathed externally in wood will delight with its aesthetic appearance
What do you need for a bath?
The most necessary component of a sauna holiday is a stove. There are a huge number of mini sauna stoves on the market. But if you have welding skills and an inverter, you can weld a stove yourself.
Stove in a barrel
Typically, mini-ovens for small volumes are metal structures designed to generate steam. As an example, consider the Varvara “Mini” sauna stove.
Wood-burning stove Varvara Mini with a water circuit for a saunaSauna stove Varvara Kamenka mini
This is a wood-burning stove with overall dimensions of 48x66 cm and a height of 88 cm. The steel structure of the firebox itself is covered on top with a casing, inside of which there are convection channels. The air, heating up in the firebox area, escapes into the heater through the holes in the casing, thereby quickly heating the stones. As a result, the oven heats up very quickly, warming up a small room in a very short time.
In addition, there are also simpler stove designs in which the heater is heated directly by exposure to heat from fuel combustion. When using a mini-stove for a wood-burning sauna in a steam room, you need to provide a place for storing fuel, a woodpile or a shed not far from the sauna.
For small steam rooms, in some cases it is advisable to use electric sauna stoves and electric heaters.
Kamenka
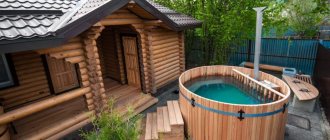
Mini-pools for baths
Additional installation of a swimming pool in the sauna will expand the functionality of the sauna and add comfort. It is worth noting that it is better to initially provide for the installation of a swimming pool in the bathhouse design, since mini-pools for a bathhouse require water supply systems, water drainage, and heating.
Pool
For this reason, embedding a pool into a finished bathhouse is quite troublesome and costly. There are several types of pools designed for installation in a bathhouse:
- Stationary. In this case, the pool is initially included in the bathhouse design, a pit is dug under it, the walls of the pool are concreted and covered with a decorative coating. This type of pool is used mainly for full-size bath buildings.
- Font. A metal or plastic structure designed for installation in a pre-prepared bed. To put it into operation, you only need to connect the font to the water supply system.
- Portable pools. Metal structures with plastic trim. Just like a font, they are installed in a prepared bed, after which they are connected to the water supply system.
Swimming pools can be equipped with water heating systems and hydromassage equipment, but in this case, connecting them requires the help of qualified specialists.
Mini sauna for a summer residence
A sauna is distinguished from a bathhouse by the type of steam and temperature. In order to make a sauna out of a steam room, it is enough to install an electric steam generator, an electric heater or a wood-burning sauna boiler inside the steam room. When using a steam room for a sauna, it is recommended that the interior be made from one type of wood: pine, linden or alder. A mini-sauna in a country house should be as closed as possible, practically airtight
Particular attention should be paid to its thermal insulation. This is necessary to maintain a high temperature inside the sauna for a long time, with minimal energy consumption
Mini sauna and shower in the portable sauna