“Wings, legs, most importantly – the tail!” (from the cartoon of almost the same name). Boards, laminate, parquet - this is all good, but the main thing is the fastening! Like skiing. Skis may be made of unique types of wood, made by the “Stradivarius” of skiing, but if the binding is held on by snot, the legs will not run far. Also with the floor. Incorrect fastening of the floor covering will soon turn a smooth and durable floor into a loose and creaky one, like Gogol’s cart.
Perhaps the most ancient method. The trouble is that the nail tends to become loose and fall out under load. To solve this problem, long nails are driven under the joists and bent. But still, this does little to prevent the flooring from creaking and “walking.” Often the nail method is combined with the adhesive method. Many practitioners even advise, especially in the absence of a waterproofing layer. There is another misfortune: no matter how long the board is left to sit, it still will not get rid of 100% of the moisture, so over time, the mounted boards will dry out and the nail heads will stick out like mushrooms after the rain. The next drawback is that ordinary nails do not undergo galvanizing and, accordingly, rust over time. For flooring in wet rooms, such as bathhouses, since ancient times in Rus' they came up with the idea of keeping nails in drying oil, which protected them from corrosion.
Traditionally, there are several methods of fastening:
- Adhesive;
- Gvozdeva;
- Self-tapping.
Preparing the base
Before laying a wooden floor, you will need to prepare the base. Preparation begins with choosing an installation method. The floorboards are laid in two ways: on logs or plywood. The best option is laying on logs. Situations when this method is not possible:
- the room has a low ceiling;
- after installing the floor on the joists, the door to the room will not open;
- it is necessary to lay a new coating on top of the old one.
In these cases, the floor made of wooden floorboards is laid on plywood.
Do not install on a wet subfloor. To check whether the concrete screed has dried, place a piece of plastic film or a rubber mat on the floor. The film is glued with tape. After 24 hours, the polyethylene or mat is lifted; there should be no condensation below.
Then, regardless of the type of base: concrete, wooden floor or old floor, check the slope level, not higher than 0.2% of the length of the room. To correct the situation, a concrete screed is made. It is enough to pour a self-leveling mixture onto the concrete floor.
With any installation method, on logs or on plywood, a waterproofing layer is created. The material used is plastic film, glassine, roofing felt or special mastic. The film strips are laid with an overlap of 15 - 20 cm and an overlap of 10 - 15 cm on the walls, glued together and to the walls with tape. The surface is coated with mastic, extending onto the walls by several centimeters. Coating waterproofing is used to prepare concrete bases.
Installation of wooden floors on joists
Criterias of choice
When choosing lumber, the following indicators are taken into account:
- wood type;
- size;
- quality category;
- humidity.
The tongue and groove board is made from the following species:
- pine trees, spruce trees;
- larches;
- oak, ash.
Features of pine and spruce
The main advantages of spruce and pine include the following indicators:
- low cost;
- elasticity;
- high heat capacity.
Pine and spruce grow throughout Russia. The pine lumber floor is pleasant to step on with bare feet. It remains warm even in the winter cold.
The disadvantages include the following:
- softness;
- high moisture absorption;
- susceptible to rotting and insect damage.
Such material requires a mandatory multi-layer coating with high-quality varnish that protects the board from moisture and other adverse factors.
Features of larch
Larch is a coniferous species. Unlike previous options, it is characterized by increased hardness. Under the influence of moisture, larch does not collapse or rot, but becomes harder.
Larch flooring does not require varnishing. It is treated with oil impregnation, which preserves the natural texture of the wood. The main disadvantage of this material is its high cost.
Features of oak and ash
Oak and ash are deciduous tree species. The oak floor looks very good. And it can last for several decades. Floorboards made of oak and ash do not require varnish.
Oil impregnation treatment is sufficient. However, laying tongue-and-groove boards made of oak and ash is not affordable for most consumers. The material is highly expensive.
Laying a wood floor from oak will require quite a bit of capital investment.
Size selection
The size of the material is determined by the following indicators:
- width (from 70 mm to 200 mm);
- thickness (from 18 mm to 45 mm);
- length (3-6 m).
The strength and durability of the floor depends on the thickness of the lumber. When laying on joists, it should be taken into account that the thinner the board, the smaller the distance between adjacent joists should be. The joists act as supports, preventing thin floorboards from sagging.
The choice of width depends on consumer preferences. Laying material that is too narrow will take a long time. It is also not recommended to choose floorboards that are too wide. The optimal width is 130-150 mm.
The length of the material should be slightly longer than the length of the room in which it is intended to be laid. If the room is too long, it is possible to join the floorboards on the joists.
Quality categories
There are 4 quality categories for tongue and groove boards:
- extra;
- class A;
- class B;
- class C.
Extra is the highest category of quality, guaranteeing the absence of cracks, knots, and other defects on the surface of the lumber. Floorboards from the same batch have the same structure and shade.
Class A - first-class material. It includes lumber that does not have defects on the surface, but differs in structure and shade. Class B is established if there are small brown spots, knots, and cracks on the surface of the material. All three options can be used to finish the floor.
Class C includes third-grade material that has knots on the surface, a significant number of brown spots, cracks, and through holes. Such boards are suitable for arranging a subfloor.
Humidity
Drying is one of the stages in the production of tongue and groove boards. Wood can be dried in autoclaves (chamber drying) and in natural conditions. Boards dried in autoclaves are of higher quality.
Drying chamber for wood
The optimal moisture content of materials should be 10-16%. This indicator guarantees that the boards will not shrink during operation.
Boards that have been kiln dried are packaged in polyethylene, which protects the material from environmental influences.
During the selection process, you should pay attention to the following:
- when tapping on dried boards, a ringing sound is produced, while on wet boards, a dull sound is produced;
- the plastic packaging must be undamaged and there must be no condensation inside;
- high-quality factory boards have a light glossy shade, while raw floorboards have a dark matte shade.
Tips for laying floorboards
Devices for screeding floor boards
Do not think that devices for screeding plank floors are an invention of recent years. Our grandfathers and great-grandfathers also wanted a flat floor. Old textbooks describe ways to eliminate cracks during installation. For this purpose, metal staples were used - ordinary or of a special design. Modern devices and techniques are just variations of old methods.
You can also tighten the boards using a regular metal bracket. It's the old way
Bowrench and Special Automation
We describe these two devices together, since the Belarusian Spetsavtomatika made some changes to the Bowrench design, which is produced by the Americans. But, in essence, it is also a device.
You can tighten the boards using Bowrench
So, there is a part with two protrusions that is fixed to the joist. A metal stop and a handle are movably connected to it. By pressing the handle, we ensure that the board fits tightly and install the fasteners. The disadvantage of this device is that it blocks access to the end of the board. When laying a tongue and groove board, you will have to move it several times if you need to fix it to each support.
Logs can be of different thicknesses. To be able to “rest” against them, there are replaceable nozzles. The stop can be easily removed: you need to remove the two studs that secure the mounting bolts. However, the set consists of three or four attachments, so there are not many options.
The Belarusians have made some changes to the design: one part of the joist grip is movable and adjustable
In the device produced by Spetsavtomatika, the log grip is adjustable. There is an adjusting bolt at the end that allows you to extend or retract one of the clamps. There are more adjustment options, but there is also a higher chance of damage. In operation, both are quite convenient, although the “American” is more refined. But the difference in price decides the matter - Bowrench costs 3.5-4 times more.
How to tighten floor boards using a clamp and wedges
You can tighten the floor boards using a clamp and two wooden wedges. The clamp is fixed on the joist at some distance from the board being installed. Two wedges are made from a piece of board 40-50 cm long by sawing the piece diagonally.
A device for tightening boards from a clamp attached to a joist and wedges that press the board
The clamp is installed on the joist, turning the arc towards the board. Wedges are installed between the arc of the clamp and the board. They hit the wide side of the wedges with a hammer or sledgehammer until the gap between the two boards disappears. Then you can fix the board. If you need to install fasteners in a tenon or groove, a “window” is made in one of the wedges, which is placed above the joist and through which a self-tapping screw is screwed.
Thrust board and wedges
The previous method is good for everyone, but the board is attracted only in one place. You can, of course, install several clamps, but this is time. And there are usually not many sufficiently powerful vices on the farm. The problem can be solved using boards and similar wedges.
A support board about a meter long is nailed at some distance from those being mounted. They are nailed to the joists above which it is located. It is not necessary to drive the nails all the way to the heads, but the support should hold well. The distance for installing the support is chosen so that three or four boards can be laid without moving it.
Backing board nailed to joists and wedges are another way to hold floor boards together.
A piece of “lining” with a window through which you can tighten the self-tapping screw is attached to the board being installed. In order to be able to tighten the floorboards, scraps are inserted between the support and the wedges. First you need long pieces, then smaller ones. The entire structure is assembled so that the wedges stand in such a way that by knocking them down, the boards can be held together.
How to care for parquet at home
What is Bowrench?
This device can be used for arranging the floor of a car body or the base along the joists.
Bowrench is a special device for tightening floorboards with uneven edges. The tool is made from a profile pipe with a square cross-section. It consists of three main parts:
- metal handle;
- support bar;
- tightening guide.
The support bar and the tension guide are fixed at a short distance from each other. In this case, metal rods are attached perpendicularly to the support bar, thanks to which the tool is securely fastened to the joists. As the handle turns, the tension guide creates pressure on the floorboard. As a result, the board is firmly pressed against the already fixed planks.
Such a device can be used to arrange the floor of a car body or the base along the joists.
Floorboard bonding technology
The floorboard is attached to the joists - a wooden beam that is installed at a certain pitch. The installation pitch of the logs and the thickness of the flooring are selected so that the covering is stable, can withstand the planned load (with a certain margin of safety), does not sag or play underfoot
At the same time, pay attention to the cost. Sometimes it is cheaper to use thicker flooring and install joists less often, sometimes, on the contrary, it is cheaper to install joists more often and lay thinner boards
The floor board can be regular - edged, or it can be tongue and groove. The edged one has the form of a parallelepiped (straight edges); a tongue and groove is formed in the tongue and groove along the long side. And it is the second option that has been used almost everywhere over the past decades. And that's why. The presence of a tenon and groove provides a number of advantages:
Flooring with tongue and groove boards takes longer, but the results are better.
- The result is a single coating that redistributes the point load over large areas.
- There are no through gaps. So a tongue and groove floor holds heat better.
- You can attach it not to the surface, but to a tenon or a groove. That is, the fastener is invisible. From an aesthetic point of view, it is more attractive.
- Hidden fasteners allow you to plan and sand the floor without worry.
There are not many disadvantages of tongue and groove boards. The first is that due to the need to cut out additional “shapes”, the cube costs more. Secondly, you also have to track the parameters of the tenon/groove. In principle, there are no other disadvantages.
Tongue-and-groove board: fastened in a tenon or in a groove?
When laying a floor made of tongue and groove boards, there are two methods of fastening. You can install the fastener in a tenon or in a groove. Installation in a groove is simpler, but then about a third of the thickness of the board is fixed. When drying, this may not be enough, the tenon may crack. This happens quite often. See for yourself when redoing the floor.
You can fasten a tongue and groove board either in a tenon or in a groove
Fastening a tongue and groove board into a tenon is more secure. But it takes more time, since you need to find an angle at which the head of the screw or nail will sink into the wood. Otherwise, you simply won’t get the tenon into the groove. With this installation method, you cannot do without pre-drilling holes, otherwise cracks may occur. But two-thirds of the thickness of the board is “grabbed.” This is certainly more reliable than installing fasteners into a groove.
How many times will you have to tighten the floor?
So, floor bonding is the process of attracting floorboards to each other without cracks or gaps. And you will need to do this at least twice. The first one is during initial installation, the second one is during refurbishment. Why is a bulkhead needed? During use, wood dries out and decreases in size. This leads to the appearance of cracks where there were none before. To eliminate cracks, you must first disassemble the entire floor, then pull the boards together again, and add one or two floorboards at the end. This is called “refinishing a wood floor.” And one bulkhead is not always enough. Depends on the initial moisture content of the wood.
Choosing a tree
Before you begin repairing, replacing, or installing a new floor, you need to select a tree that will meet the necessary operational and financial requirements.
Operational requirements include: climate, expected load, room where they will be installed. For small private houses and premises, it is recommended to choose coniferous wood, for example, pine, spruce, larch, cedar or fir. Coniferous wood has excellent performance characteristics (high strength and wear resistance) combined with an affordable price.
In addition to coniferous species, oak, alder, and aspen wood is used (the last two types are excellent for adults and children's bedrooms). Oak is very popular. It has wood that is more resistant to various negative influences, but it is more expensive. The ideal coating is mahogany wood, although it is very expensive, it is used for finishing rooms.
Key points to consider when purchasing floor boards and joists:
- The most important thing is that the boards must be dry (if the wood is very dry or wet, then during installation there will be severe deformation or cracking of the boards).
- No visible defects on the boards: knots, cracks, resin stains, cracks. You cannot buy such boards under any pretext, no matter how big the discounts are on them.
- Before purchasing, you need to calculate the required number of boards and joists, and buy them with a margin of up to 15%.
- It is best to purchase boards that belong to the same batch, since they do not differ so much in color and quality of processing.
- You need to take a board at least 2 meters.
- For better assembly of a wooden floor, it is better to take a cut or tongue-and-groove board (they do not require additional processing and adjustment).
Types of boards:
- ordinary - the edges of such boards are not processed and each needs to be adjusted separately;
- trimmed - the edges of such boards are processed and slightly trimmed, forming a step with which they are connected to neighboring ones;
- tongue and groove - the edges are processed and tongue-and-groove type locks are cut into them (they allow you to press the boards together as much as possible and hide nails or screws).
After purchasing boards, the price of which for wooden flooring depends on the type of wood, you need to bring them to the installation site. After the purchases are delivered home, they need to be given time to lie down and acclimatize. They usually last for several years, but since there is no such reserve of time, the boards are dried for about six months in a heated and dry room where the flooring is planned to be laid.
The subtleties of flooring with wooden boards
Due to frequently asked questions, today we will look in more detail at the process of screeding floorboards during the installation of wooden floors. Many people have heard that there are special staples that are used specifically for these purposes and ask where they can be bought. Others use “installations” and other improvised materials to compact the boards. And so I decided to show novice craftsmen clearly how they can pull together floors without resorting to special devices, and use only available materials.
The process of laying a floor from wooden planks is described in the article: how to lay a wooden floor. And the process of compacting the boards together is carried out using ordinary wooden wedges, which can be made from any remaining board using an ax. As can be seen in the photo, the wedges are installed towards each other with sharp ends between the boards being compacted and an additional stop.
This stop is made from any board or timber and, at your discretion, is attached to the joist with nails or self-tapping screws or rests against the wall (wherever it is convenient), the main thing is that the stop is fixed firmly enough.
Then, hitting both wedges simultaneously with hammers, the boards are pulled together very well. The tenons fit tightly into the grooves, and there are no gaps left between the boards, which is one of the conditions for the quality of flooring.
This tightening must be done opposite each joist and after tightening, immediately fasten the board to the joist with nails or self-tapping screws. After fastening, we move on to the next joist and opposite it we make a screed using the described technology. This ensures a high-quality installation of the wooden floor, and with subsequent finishing coating of the boards with various varnishes or paints, it will last a long time.
Important: the tighter the boards are pulled together, the less likely it is that cracks will appear in the future, provided that the boards were dry. And good luck to you in your work! And good luck to you in your work!
And good luck to you in your work!
Now smile, construction joke: “Wife to husband: - This painter is strange! I whitewashed my kitchen in one evening, but my neighbor’s couldn’t do it in two weeks... - Don’t you understand? - the husband grins. “You are fifty years old, and your neighbor is twenty!”
Insulation and waterproofing of the floor
Laying stone wool between joists
For wooden floors, film insulators are used, which effectively protect the covering elements from ground moisture. Waterproofing also provides a comfortable environment for people to avoid developing respiratory diseases due to mold and mildew. The film must be attached in accordance with the technology.
Insulation is done in several stages before attaching the floor board to the joists:
- an insulating membrane from the wind is installed on top of the subfloor, the edges of which are placed on the joists and fastened with a stapler;
- insulation is placed between the beams on top of the film;
- A vapor barrier film is placed over the insulation, and the edges are glued to the mounting tape.
Attention is paid to the membrane joints to obtain a complete coating. For insulation, polystyrene foam and polystyrene foam are used, which have zero saturation with moisture and do not violate the protection. Mineral wool requires a ventilated gap. Expanded clay gravel is placed in niches between joists and beams.
Screeding a wooden floor using homemade wooden wedges
This is one of the simplest, yet most effective methods, characterized by its absence of costs and high reliability. To bring it to life, you don’t need to purchase any expensive tools - all you need to do is use a pair of hand-made wooden wedges and a hammer.
Wedges are made using a hacksaw. A floorboard or any other board 15 cm long is sawn in half with a cutting angle of 10 degrees. Pulling together floor boards using this method is done as follows.
Step 1. 8-15 boards are laid on the joists, then the trim is applied to the last of the laid floorboards.
The floorboard cut is applied to the last of the laid floorboards
Step 2. Two wedges are laid on the joist above the previously laid cut floorboard. Wedges can also be used without cutting the floorboards, but in this case the wedge, which is called a “working” wedge, must have a ridge on one side that fits into the groove of the floorboards. The second wedge will be called “intermediate” and there are no grooves on it. It is usually 10-15 mm thicker than the working one.
Laying wedges
Step 3. Use a piece of board to close the excess gap. You can fix the thrust block between the wedges and the space not covered by the floor boards using self-tapping screws. To do this, the stop is screwed to the joists. Instead of a board closing the gap, you can use clamps or staples, which are also secured to the joist.
Fixing the thrust block
Step 4. Next, blows are applied with a hammer to the end part of the intermediate wedge. Thanks to these actions, the boards throughout the flooring are compacted together. In this case, the gap between the floorboards being joined should not be more than 1 mm.
The end part of the intermediate wedge is struck with a hammer
Step 5. After this, the boards are connected to the joists using self-tapping screws, which are screwed into the outer board at an angle of 45 degrees. Nails 75 mm long are also sometimes used.
The boards are connected to the joists using self-tapping screws
Step 6. It is easy to remove the wedges after pulling the boards together - to do this, strike the intermediate wedge from the end part again with a hammer, but from the other side. Klin safely leaves his place.
Wedges are knocked out
The procedure is performed every 8-15 boards, and it is important to ensure that the ridges of the floorboards fit into all grooves if a tongue-and-groove board is laid; 2-4 outer boards are joined together without a board closing the gap. At the floorboard closest to the wall, the lower edge of the groove is removed; a wedge is used for bonding, which is located between the outermost board and plywood, which protects the wall from deformation.
Wedges are the fastest and most convenient method of tightening foundation boards, which does not require the use of any special and expensive equipment. The method has been tested by many generations of experienced builders and is still actively used in work.
Gvozdeva
The nail has been known to mankind for three thousand years, but the product continues to be improved; at least 5 new types of nails are patented every year. Again, a one-piece method, in case of flooding there will be a lot of hassle with raising the floor without damaging the boards.
The main advantage of nails is their low cost. Nailing a floor is cheaper than screwing it. American innovator Ezekiel Reed invented a machine for making nails at the end of the 18th century. And his compatriot Adolph Braun, in the mid-19th century, patented an automatic machine for producing nails from steel wire, which sharply reduced the price of this type of fastener. However, it should be remembered that after some time, cracks appear during nailing, the floor is disassembled, which is associated with new cracks and replacement of boards. Compact and add more boards. In general, the miser pays twice.
And one more drawback. When removing a nail, not only the surface of the board is damaged, but also the nail itself. It is almost impossible to pull it out flat and reusable. On the one hand, a consumable that you don’t feel sorry for, on the other hand, as an experienced foreman would say: “Why create overspending?”
Self-tapping screws for fastening floorboards - features
A self-tapping screw for a floorboard “works” much better than a conventional nail, which tends to slip out of the timber under the influence of operational loads. The self-tapping screw is held almost tightly in the wood.
However, not all screws demonstrate such stability, but only special screws for flooring. The tip of such a hardware product is equipped with a “spatula” - a tip whose shape resembles the cutting edge of a feather drill. Thanks to this tip, the screw is screwed into wood of any density without preliminary drilling at the installation point and gets stuck in it.
Wood fibers are woven into the screw groove on the self-tapping screw and do not allow it to move under the influence of transverse or longitudinal loads. Such a screw can only be removed by turning it by turning the screwdriver in reverse.
Moreover, hardware products with a countersunk head, a core diameter of 3.5 millimeters and a length of 35 to 55 millimeters are used as “sex” self-tapping screws. Such a screw will not “split” a thin floorboard and will pierce a fairly thick coating.
Moreover, the screw thread pitch (1.8 millimeters) and the groove angle (40 degrees) were selected for the most gentle installation mode. Therefore, it is simply impossible to split even the thinnest and most fragile flooring plank with such a self-tapping screw.
The coating of such a self-tapping screw also deserves special attention. It guarantees anti-corrosion protection for both the conventionally visible part - the cap, and the rod hidden in the board. A coating based on copper and zinc is applied to the self-tapping screw with a micron layer (using the electrolysis spraying method), so every square millimeter of the product is covered with such protection.
Scheme for fastening the board with self-tapping screws
We have already figured out what screws to use to secure the floorboard, so let’s move on to a review of the flooring installation technology.
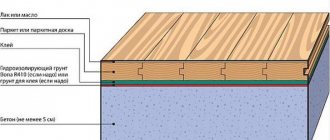
Interfloor and basement floors can be assembled using concrete slabs or beam structures sheathed with a finishing and rough layer of lumber. As the first (rough) layer, a planed board 5 centimeters thick or an oriented strand board about 2 centimeters thick is used.
An additional layer of thermal insulation (polystyrene film 1-1.5 millimeters thick) is rolled out on top of the rough coating, on which laminate, parquet, linoleum or floorboards are laid.
To fasten the finishing coating, as well as to fix the “subfloor” to the sheathing, the “floor” screws we are interested in are used. Moreover, fastening is possible both through a board, when a self-tapping screw pierces the surface of the covering at a pre-drilled point, which is then sealed with a “hatch” made of the same wood, and through the lower edge of a tongue-and-groove lock cut at the side end of the board.
However, the direct fixation method will still be more reliable, and the operation itself will be much faster.
Well, in practice the process looks like this:
- On top of the heat-resistant coating, along the walls, boards are placed, laying them on the end. This creates a gap between the first row of boards and the wall, which will then be closed with a plinth.
- Next, the first row of boards is laid along the wall, which is mounted with emphasis on the masonry located at the end. The second row is laid staggered - the transverse seam should overlap with the entire board from the previous row. And so on.
- After 3-4 rows, the boards are “knocked down” together, moving them towards the wall. After this, you can start drilling secret holes and fixing the board with a self-tapping screw, followed by sealing the fastening with veneer made of the same wood. Self-tapping screws are screwed in in increments of 30-40 centimeters, but at least two pieces per board.
After the operation is completed, the finished surface is shaded with “stain” and opened with varnish, which will fill the gaps between the boards and finally secure the veneer “hatches” over the secret holes.
Important Tips
Scheme for fastening floor boards with screws
Whatever types of fasteners are used to fix the floorboards, during the installation process it is simply necessary to take into account the following points:
- The distance between nails (screws) during fastening of boards should be 25 cm;
- The floorboards should be pulled together as much as possible, but a technological gap of 20 mm should be left between the boards and the walls in case the wood expands;
- When using non-galvanized fasteners, it is advisable to “recess” their heads into the wood, and then lubricate them with silicone or sealant.
Laying technology
Step-by-step installation
The classic version involves fastening the boards along the joists. It needs to be mounted on a beam with a cross-section of 50 x 70 mm, while the load-bearing elements are placed in increments of 70 cm.
Installation instructions:
- lay the boards forward with the protrusion and the ridge towards you;
- the first is fixed with self-tapping screws so that the attachment point is hidden behind the baseboard;
- other elements are fastened with hardware at an angle into the ridge, the joining of short boards is done on the log;
- The surfaces of the fixed strips are sanded and varnished several times.
Sand the area along, across and diagonally. There are wax-based varnishes to reduce hygroscopicity. Skirting boards are stuffed around the perimeter, and wooden or plastic products are used.
Fixing floorboards with nails
In this case, the floorboard is fastened to a wooden base, which can be solid or made of joists.
Next, we will tell you how to lay a floorboard using this fastening method.
The first row of floorboards is secured using nails, which are driven at a 45° angle through the tongue into the base. Then they are driven into place. You should pre-drill holes for fastening elements. This is done so as not to damage the ridges.
When adjusting the next row, the nails must be hidden. All subsequent rows of boards are fixed by driving nails through the surface.
When repairing a plank floor and replacing several floorboards, you need to ensure that all the floorboards end under the center of the crossbar. Otherwise, you may end up with a non-durable coating.
First, let's look at how to fasten floorboards with nails. It should be noted right away that this method can only be used if the flooring is fixed to a solid wooden base or along joists.
So, the installation technology includes the following steps:
- Logs are installed from square timber at a distance of 70 cm, pre-treated with an antiseptic composition. The thickness of the boards should be between 50-70 centimeters.
- Sound and heat insulation is installed. For these purposes, mineral wool or expanded clay can be used.
- They begin to install boards on top of the insulating materials, placing them with the grooved side towards you.
- The first plank is fastened with nails so that their heads do not interfere with the further installation of the plinth.
- All subsequent boards are fixed with nails, which are carefully driven into the groove at an angle of 45 degrees. In cases where the plank is shorter than the length of the room, the joining of the two elements is located on the log.
- After laying the finished floor, you can begin sanding and decorative processing.
In the same way, you can fasten the floorboard with self-tapping screws. For this purpose, special fasteners designed for working with wood are selected.
Laying options
Methods for laying floorboards are divided into the classic one - using logs, as well as the new method - on a prepared surface with glue and self-tapping screws.
Installation on joists
The installation method on logs is suitable for a room with high ceilings or for a house with wooden floors. This is due to the fact that when the coating is installed on the joists, its thickness becomes significant (at least 10 cm). In this case, the board itself must be at least 3 cm thick.
The sequence of work should be as follows:
Scheme of laying on logs
- When installing the floor on the ground floor, the base is first waterproofed. Roofing material is best suited for this. When laying, it is necessary to ensure soldering of joints, as well as overlap on the walls;
- At the next stage, logs are installed. A 60 x 60 mm beam can be attached to the base. If fastening to it is not possible, then a 100 x 100 mm beam should be used. When installing a 35 mm coniferous covering, the distance between the beams should be 6 - 7 cm;
- Adjustable joists can be installed on a rigid concrete base;
- Before laying the floorboard, you need to place soundproofing material in the cavity between the beams. Expanded clay, mineral wool, etc. are suitable for this. To completely eliminate the drum effect, it is necessary to lay a substrate - padding polyester, glassine or laminate;
Insulator between joists
- When installing, the ridge should be placed in front and the groove towards you. The baseboard should overlap the screws that secure the first board. If its length is not enough, then the joints should be placed on the joists;
- After installation, the boards are sanded and varnished. Grinding is carried out three times in different directions - perpendicular to the length, along the length and diagonally; (see also the article Peculiarities of floor scraping)
Floor sanding
Pine floor board
Adhesive installation
The technology for laying floorboards using glue is the same as laying parquet. The main difference is the additional fixation of individual boards with self-tapping screws. In this case, the holes are subsequently sealed with special plugs for the floor covering.
Installation diagram with screws and glue
The cost of laying floorboards in this way is slightly higher, however, it is most suitable for low rooms.
The main requirement for the base with this option is to ensure not only a perfectly flat surface of the base, but also the board itself, with the obligatory use of waterproofing and sheets of moisture-resistant plywood.
At the same time, the choice of glue is no less important than the choice of wood type for the floor.
To install half-meter planks, the following types of adhesives can be used:
- epoxy;
- polyurethane;
- dispersed.
It is better not to use dispersed adhesives for attaching hardwood boards. Long planks should be glued to the base with compounds based on synthetic resins, as well as various two-component adhesives (epoxy and polyurethane).
The main requirement for glue is strength and ductility. Any two-component types, as well as adhesive compositions based on polyurethane or modified synthetic rubbers, meet this requirement. When working with such substances, the instructions for use must be followed.
Characteristics and properties.
Tongue and groove boards, depending on the wood used for their manufacture, have their own characteristics and features, as well as cost.
Spruce or pine.
The wood is soft, moisture resistance is not very high, so additional treatment with varnishes will be required. Boards made from this wood are used mainly for subfloors and require the installation of another floor covering on top of it - carpet, plastic tiles, laminate or linoleum. The cost is relatively low.
Larch.
Larch boards have excellent moisture resistance, have a solid structure, rich color and pleasant structure. Such boards do not even need to be varnished, but coated with it will last longer. Another feature of larch boards is that they do not need to be treated against gnawing insects. The cost of larch boards is much more expensive than pine or spruce boards. Used for finishing coating.
Oak, ash.
Boards made from these species are very hard. Moisture resistance is average, the structure is very beautiful. However, they have one drawback - boards made of this material are susceptible to attacks by gnawing insects. The cost of the boards is very high.
Choice of material.
At the stage of purchasing boards, it is necessary to check their humidity level. It should not exceed 16%. To check this indicator there is a special device - an electric moisture meter.
If you don’t have the device, you can check the boards yourself in the following ways:
• tap the material - the sound should be clear;
• feel the boards with your fingertips - moisture should not be felt;
• visual inspection - a dry board has a shiny tint.
In addition, the geometry of the boards is checked by visual inspection - when examining the board from the end, the plane is assessed along it. If the board is even easily twisted “on the propeller” or is not level enough, then it is better to reject this sample.
When laying the floor, you can use boards of different lengths, but it is highly desirable that the first (starting) and last (finishing) boards have a length equal to the length of the room.
Before laying the boards, let them sit in the room where the floors will be installed for about a week so that the boards acquire the same humidity as will be in the room.
Installing a board over an existing floor
Before laying, check the reliability of fastening of the elements of the old floor covering, duplicate the untrustworthy fasteners, and, if necessary, dismantle worn boards, instead of which inexpensive pine lumber can be laid.
Important. When installing boards over an old plank floor, they must be laid perpendicular to the direction of the worn coating
Installing floorboards using glue:
Finishers strongly recommend dismantling the old boards and making a screed. However, if the reliability of the base is beyond doubt, you can do without it, but with preliminary grinding. There is another way: installing sheets of plywood on old boards.
What is a tongue and groove board and why is it better?
A tongue and groove board is a board that has a groove cut along one side and a tenon along the other. When laying, the tenon fits into the groove, creating a more durable connection, eliminating “blow-in”. And this is a plus compared to edged or deck boards.
This is what a tongue and groove floor board looks like
Another advantage is related to the technological process: the tongue-and-groove board is “adjusted” to its geometry by cutting off the sidewalls, grinding the front side, and cutting longitudinal grooves on the back side for better ventilation. Then a tenon and groove are formed on the treated sidewalls using a milling cutter. After this, the tongue and groove board is ready. With such processing, there is certainly a difference (especially in low-grade goods), but not so great and sanding is needed, but not to the same extent as when using edged lumber.
A little about why it is so much more expensive. There is a lot of work, which is why this material is much more expensive, but the floor is stronger and more reliable.
Floor joists: dimensions, installation
Logs are long bars of a certain cross-section and made of various materials. In construction, you can use a support made of metal, plastic, reinforced concrete or a compound containing synthetic resin. However, most often craftsmen use wood logs due to their reasonable cost and fairly good technical characteristics.
Wooden floor joists can be made from various softwoods or from more moisture-resistant larch. The latter is considered the strongest and most durable material for making timber.
Important: grade 2 or 3 timber can be used as a floor joist. This will not affect the quality of the wood floor lathing in any way.
But you need to pay special attention to the moisture content of the board. Since material with a moisture content above 20% is at risk of shrinking and drying out during its service life
Is it necessary to talk about what will happen to the floor then?
Installation requirements
The floor structure is subject to serious loads more often than others. In this regard, poor-quality fixation of the lamellas leads to their rapid loosening and the appearance of squeaking. Over time, if no measures are taken, the gaps between the boards will increase, and the gradual destruction of the structure will begin.
Wooden floor in the interior
Therefore, when installing a plank floor yourself, special attention should be paid to the choice of fastening method, taking into account the purpose of the room and the upcoming loads. To make the structure rigid, strong and durable, you need to follow some recommendations, which will be discussed below.
When making a plank floor, the following should be considered:
- The flooring is manufactured using the floating method, which means that there must be a gap of at least 1 cm between it and the perimeter walls, as well as protruding structural elements.
- Logs are an important part of the structure, affecting the evenness of the future floor, so special attention is paid to their location in space - the elements must be located in a single horizontal plane.
- When joining lamellas along the length, the joints are placed staggered (in a checkerboard pattern). Each joint should be located in the center of the joist.
- When choosing a board, first of all, take into account its humidity level - high-quality dried material will not bring unpleasant surprises.
Construction of a plank floor on joists
On what basis is it better to lay tongue and groove?
After purchasing tongue and groove boards, you can proceed to laying them. As a base you can use:
- Wooden logs fixed on top of any covering - screed, plywood, wooden floor. Also, logs can be laid on brick supports.
- Concrete floors with screed.
- Moisture-resistant plywood.
- Old wooden floor.
- Subfloor made of tongue-and-groove boards or low grade lumber.
The gold standard in construction is the laying of tongue and groove boards on pre-fixed joists. They allow you to efficiently tighten the boards during installation and prevent further floor deformations. Therefore, we recommend that you choose this option.
Features of screws with a cutter
An example of a wood screw with a drill at the end.
In the process of fixing the floorboards to the base with nails, a hole is first drilled in the wood. This way you can prevent the boards from cracking. The procedure for covering subfloors with wood can be simplified by using special screws with a cutter at the end.
Their advantages include:
- Presence of a protective layer. Fastening elements can be safely used for cladding the car body and open areas. They have a protective layer that prevents the metal from oxidizing even in direct contact with water;
- The presence of a milled tip. The screws are made with a milled edge, which allows them to be easily screwed into wood without first drilling a hole;
- Lack of threads in the area near the “cap”. Self-tapping screws do not have threaded threads near the head, which ensures a more durable tightening of floorboards with joists.
What are they needed for?
Laying wooden beams as lathing under the future floor allows you to strengthen the entire floor structure as a whole. In addition, noise and heat insulation materials are placed in the distance between the joists, which greatly improves the characteristics of the floor.
Properly installed beams and the distance between them ensure sufficient ventilation of the underground space of the house, which means that the wood will not rot over time. Especially if the building is located on an area with high groundwater. How to properly install logs and calculate the optimal distance between the sheathing beams is discussed below.
Why is the floor secured with nails and not self-tapping screws?
Why do you use nails and not self-tapping screws for wooden floors?
It seems that everywhere it goes without saying that the joists are attached to the boards with nails. The old fashioned way IMHO. I'm going to mount it with self-tapping screws (the plank floor in the loggia). If they dry out later, you can sort them out.
sersam wrote: Why do they use nails and not self-tapping screws for wooden floors? It seems that everywhere it goes without saying that the joists are attached to the boards with nails.
Who said that? Self-tapping screws, and it is desirable that the upper part of the body is without threads, i.e. the entire threaded part went into the jog
Like who? Yes, take any book, an article on the internet) So I’m asking - it’s much more convenient to use self-tapping screws)
sersam wrote: Why do they use nails and not self-tapping screws for wooden floors? It seems that everywhere it goes without saying that the joists are attached to the boards with nails.
An old, long-used method is “sloping” nails.
VekRosK wrote: An old, long-used method is nails “at an angle.”
I. Is it better than self-tapping screws or worse? I also need it at an angle, at the end of the board. Are self-tapping screws suitable for this?
2sersam IMHO a nail is several thousand years old, but how long is a self-tapping screw (more precisely, a screw)? Nails are cheaper than self-tapping screws. It is easier to disguise the head of a nail (for example, flatten it on the sides, hammer it along the fibers and drown it with a hammer - the wood will tighten the head). You need to drill a board for a screw, but not for a nail, productivity is many times higher. But from the point of view of disassembly, screws are, of course, more convenient.
sersam wrote: It seems that everywhere it goes without saying that the joists are attached to the boards with nails.
Well, yes. Well. still understood)))
sansan21 wrote: 2sersam IMHO a nail is several thousand years old, but how long is a self-tapping screw (more precisely, a screw)? Nails are cheaper than self-tapping screws. It is easier to disguise the head of a nail (for example, flatten it on the sides, hammer it along the fibers and drown it with a hammer - the wood will tighten the head). You need to drill a board for a screw, but not for a nail, productivity is many times higher. But from the point of view of disassembly, screws are, of course, more convenient. Vice versa