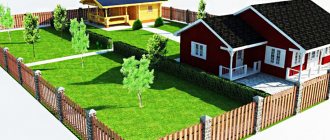
A frame is a protective wooden structure that prevents deformation of windows, doors during shrinkage of a house, bathhouse and any other wooden structure. Another name is house casing. This is an essential element of frame houses made from fresh logs. If you do not install the casing, then this will soon threaten to violate the correct geometry of window and door openings. Therefore, you should not save at this stage of construction.
Purpose of the pigtail
A pigtail in a wooden house allows you to simultaneously solve several problems, including:
- Strengthen the walls in the openings. Correct distortions.
- Protect from moisture, seal window and door openings.
- Thermal insulation. High-quality casing prevents heat from escaping outside and perfectly retains it in the room.
- Protect from shrinkage, squeezing, and deformation.
- Give the structure a beautiful look. Moreover, there are ready-made elements for casing doors and windows on sale.
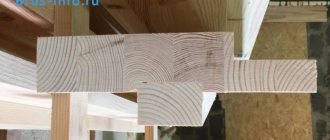
Photo: preparing window openings
In log and frame houses, casing is mandatory. You cannot save on it, otherwise the doors or windows will warp or bend.
What else you need to know:
- How to make a blind area correctly
- Gas holder for a private home
Important nuances
Typically, framing windows in a wooden building is done during the construction phase. However, if the log house is placed “for shrinkage”, only “technological” openings are often made in the walls. They do not match the size of future windows and doors; they are made only to stabilize the temperature and humidity inside the building. In the absence of such openings, the log house shrinks longer and less evenly.
At the same time, homeowners have to make a choice between making casing boxes themselves and ordering finished products. Companies offering such services (usually they build wooden houses and produce products for them - window and door frames, door leaves, window sills, trim, etc.) produce products to order, strictly in accordance with the customer’s dimensions.
If the casing is already installed in the log house, windows and doors can be installed without waiting for the shrinkage to complete. It is only important to make sure that the box is manufactured and installed correctly. In particular, check the size of the gap above the top and the presence of a seal.
Important: custom-made frames are made for window and door openings of any shape - from the simplest rectangular to complex ones, with curved and polygonal arches.
You should not skimp on the quality of the box, since insufficiently dry/substandard/poorly processed lumber will negate the performance characteristics of the product.
Types of casing boxes
The casing material is wood, without defects and dry. Finished elements are treated with antiseptics and fire retardants in accordance with fire safety requirements. This will significantly extend the service life of the structure. The casing can be made from several types of lumber. Let's look at the features of each of them.
From the array
Photo: installation of casing in a house made of hewn logs
The solid is taken dry, without signs of damage by fungus or insects. There are four breeds most commonly available for sale:
- pine;
- Karelian pine;
- larch;
- cedar.
If pine is used, it should only be chamber dried. Profile type – U-shaped, with or without the option of choosing a quarter.
Solid wood frames are made in log houses and gun carriages and fit perfectly into the style of the house.
From laminated veneer lumber
A popular finishing option for casing for windows that does not require finishing of slopes. Obtained using the glue-type method. The basis is dry bars. The elements are glued together into a “layer” or into a “microspike”.
Profile shape – T-shaped or U-shaped. Type – straight or with expansion into the opening. It may be with or without a quarter.
Glued laminated timber casing is an excellent option for frame houses with exterior siding.
From the gun carriage
When building country cottages from logs, beams, large baths, the KELO carriage is often used to frame doorways and windows.
The advantage of the material is that there is no need to install platbands. The resulting seam between the wall and the window frame is caulked and then closed with a special decorative rope.
The outer part of the casing is aged by artificial brushing or firing.
The profile shape is U-shaped. Comes with an extension inside the house. Can be ordered with or without a quarter.
Combined casing
In recent years, a combined type of casing has begun to be supplied to our market, the main part of which is made of solid pine. The top of the frames is a glued board, where lumber from oak, beech, larch, and pine can be used. Does not require finishing. It looks beautiful. The price is affordable. The profile shape can be T- or U-shaped.
Photo report on the production of the finishing pigtail
Carrying out the casing is an important stage in the construction of a wooden house (both a log house and a structure made of profiled or laminated timber), affecting the integrity of the walls and the safety of very expensive window structures. If the builders ignored the intricacies of working with wood and mistakes were made during installation (the frame is missing or done carelessly), you will know about it by the following signs:
- A skewed window (or door) block has appeared.
- The window (door) closes with difficulty or does not close completely.
- Over time, new cracks appear.
Correct installation of the casing of window openings protects the window structure from deformation, guarantees a tight fit of the sashes and trouble-free operation of the fittings. The casing is characterized by several features:
- It consists of four elements: a top (top), two sidewalls (racks, carriages), a window sill (window sill).
- To make the pigtail, lumber (boards, timber) with a moisture content of 10-12% is used.
- When framing window and door openings in a wooden house, the dimensions (width) are selected depending on the thickness of the walls. Violation of this rule leads to the appearance of cracks.
Schematic diagram of the casing
There are three main types of casing. They have their own advantages and disadvantages, differ in appearance and price, and are mounted using different technologies. The pigtail is selected based on its properties and construction characteristics:
- A pigtail with an embedded block. The most economical method for which an edged board is used. Grooves are cut in the vertical openings in which square bars are installed (laid). Finishing boards are attached on top of the bars, the position of which is now independent of the shrinkage of the walls. The method is characterized by speed of execution, which, together with low cost, makes it quite popular. It has one drawback - after installing the window frame, additional finishing of the slopes will be required.
Types of casing
- Thorn socket (T-shaped). Grooves are cut in the side openings, and vertically located tenons are cut in the side elements, which is why the parts acquire a T-shaped cross-section. The box is fixed only by the tongue and groove system; Soft insulation is used to fill gaps. Tenon casing of windows in a wooden house is most often used in the construction of buildings made of corrugated timber. The method is more difficult to implement, but is characterized by durability and better distributes the load from wall shrinkage.
- Piglet in the deck (U-shaped). Not grooves are cut into the side walls, as in the previous method, but tenons. Grooves corresponding in size to the tenon are cut out in the vertical parts of the casing, making their profile look like the letter “P”; the casing is fixed with protruding spikes. This is a classic installation option, suitable for both walls made of rounded logs and laminated veneer lumber. The U-shaped pigtail will cost a little more than the previous options.
Rough casing in a wooden house to a cranial block, which is mounted in a cut (grooved) located in the window opening. Thanks to this sliding type design, the casing fasteners do not break off during the shrinkage process of the building. Standard for all procedures with window and door openings, during their installation and the manufacture of beams for the frame, height measurements are important. The frame of doorways in a wooden house should take into account a difference of up to 7%, depending on the moisture content of the wood.
When the structure shrinks, the insulation that lines the top gap shrinks without causing damage to door and window openings. Carefulness in measuring parameters will allow for correct installation of all window installations. The casing is also convenient in that it acts as a window sill, since it completely hides from prying eyes all the ends of the timber (logs) of the building, regardless of whether they are horizontal or vertical. There is no need to change the platbands several times, since they are attached to the casing on both sides - internal and external.
Thanks to proper installation, door and window openings acquire an aesthetically beautiful, correct and attractive appearance. Blocks of windows and doors are installed regardless of the moment of shrinkage of a wooden building, because the opening is prepared and ready for use.
For windows
With wooden frame:
- Preparing grooves on the sides of the opening.
- Laying inter-crown insulation material in its lower part, with a block on top. Its task is to prevent displacement of the sidewalls.
- The grooves on the left and right sides of the opening are filled in the same way.
- Installation of the upper casing element.
For PVC windows
Experts do not recommend installing such blocks in wooden houses, but if the decision is made, then you need to know some of the nuances of installing the casing.
- Preparing the opening involves changing its geometry. The gaps between its sides and the block are at least 130 mm. A more accurate value is determined by the following indicators: the moisture content of the wood of the house and its service life (which means the degree of probable shrinkage), the thickness of the crown joints.
- Making a threshold. Cuts are made in it to obtain a comb. It is needed as the base of the carriage in which the groove is installed. This element ensures uniform shrinkage of the house without destroying the structure.
- Making a carriage. A beam of 150 x 100, with a length less than the height of the opening by 50 mm, is sufficient. A groove is cut into it and the surface is ground to ensure “sliding”.
- For the top, take a “magpie” board with a width of 120 - 150 (according to the thickness of the walls of a wooden house). It also contains grooves for connecting to the ridge of the opening.
- Installing the sidewalls is the same as for a wooden window.
- After checking the geometry, all casing elements are fastened with self-tapping screws. It must be taken into account that they should not go into the wood of the wall. Otherwise, it will form a “rigid” coupling with the supporting frame, and the pigtail will not fulfill its function.
- Insulation of the opening.
- Treatment of wood with special preparations.
For doors
*The simplest option
- Preparing the opening. If it is not pre-arranged in the wall, it is marked and a rectangular segment is cut out. At this stage, grooves are prepared for connection to the door frame.
- Processing the jamb. This technology implies that he is a door frame. Accordingly, wood is sampled for the grooves.
- Placing the box in the opening.
- Installation of horizontal struts (lower and upper).
- Sealing the casing with soft insulation. Another option is flax fiber. The work is carried out in such a way as to prevent the frame from being fixed in the opening; she must remain free.
- Removing the spacers.
- Treatment of wood with a fire-retardant preparation.
- Fastening platbands.
Other door lining technologies are difficult to implement. Considering the importance of this element for the home, it is better to entrust the work to a professional.
The casing consists of two sidewalls (side posts), a top - the top board and a window sill or threshold (also called a bottom). It must be said that the lower part is not always present: it is often not made in interior doors. In some cases (when installing PVC windows, for example), they do not make a window sill, but simply a lower embedded board, to which a “standard” window sill is then attached.
Also note that the top does not rest against the top edge of the window or door opening. There remains a gap of 5-7 cm between them - for shrinkage of the log house. This gap is then filled with insulation and covered with platbands and finishing materials.
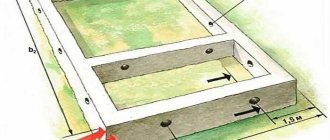
What does a casing box consist of?
Drawings of casing/jamb locks
Before installing the casing, the window/door opening is treated with an antiseptic. Then two layers of insulation are laid. The structure is “dressed” on it. The procedure for assembling the casing on the windows is as follows:
- The lower part is installed.
- Place two side panels and check that the locks match accurately. You hit it well on the sides.
- Place the top. Often it “doesn’t fit” - the racks are closer than necessary. Don't take up the saw right away. Take spacers of the length that the opening should be, and with their help bring the window to the required dimensions. First, place it diagonally, then, knocking it out, straighten it out. The sidewalls crush the insulation and occupy the required position. After which the apex falls into place.
The work was carried out in a log house that had been standing for a year. We used purchased kiln-drying timber and the remnants of profiled construction, which had been drying along with the house for a year. The casing is monolithic U-shaped. The width of the tenon was approximately 45 mm. This distance remains if you make a cut with a circular saw on both sides of the wall.
We start by preparing the openings. First, cuts were made in the side planes of the walls using a circular saw. There were no problems with vertical cutting, but when cutting horizontally, the saw kept trying to go up and down. Be careful in this part.
First, use a circular saw to make cuts on the walls.
Then we take a chain saw and modify the tenon. This is the most responsible and delicate work. We make the first pass from top to bottom. Its depth is only 1-2 cm. All subsequent ones are from bottom to top, gradually increasing the depth. In order not to mess up, we used a step-by-step algorithm: first we made the cut with a circular saw, stepped back 0.5-1 centimeter from the cut, cut it with a chain saw, and brought it to the required depth with a grinder and a plane. Long, but reliable.
Cut carefully so as not to cut off the thorn
Suitable wood species
Photo: box assembly
Only chamber-dried wood with a moisture content of 8 to 10% is suitable for casing. An ordinary board or timber is not suitable - it contains a lot of moisture and will quickly lead.
Suitable breeds:
- pine;
- Karelian pine;
- larch;
- cedar;
- spruce;
- beech or oak.
- KELO cracker.
For a T-shaped casing, a carriage with a thickness of 50 mm or more is used; for a U-shaped casing, a carriage of 90 mm or more is used. The width of the board for the jamb should be equal to the thickness of the wall.
Casing: prices, cost
Manufacturing costs can vary greatly: prices and costs depend on many factors; in every wooden building, the part is not just necessary, but simply irreplaceable!
What determine the prices and cost of casing?
It depends on the quality of the wood, the type of casing, the shape of the casing, the presence of decorative elements, the size of the opening, and also on where the part will be installed - in timber, logs or a log house.
The window frame is made of dry material with a humidity of 8-12%. It consists of a top, risers, an adhesive window sill or a window sill board in cases of installing a plastic window sill.
Several types of work:
Solid: all parts are made by processing solid wood while maintaining the correct wood texture.
Adhesive: parts of such casing are made from glued boards. It is glued into a microspike on all four sides. Knots and resin pockets in this case are completely cut out.
Combined is the most common type of casing. The top and risers are made of solid pine. And the window sill is made of glued boards. All of it has a clean appearance and after installation needs to be treated with paint and varnish.
It is important!
Window frames are made to fit each window or door individually. When placing an order, the customer must know which windows and doors will be installed in the future casing. It can be made either with a sample for a window - this option is used in cases where the house will not have exterior and interior decoration, the walls of timber or rounded logs remain untouched
It can be made as a sample for a window - this option is used in cases where the house will not have exterior or interior decoration; the walls of timber or rounded logs remain intact.
And without sampling - this option is used in cases where the house is planned for interior and exterior decoration in the future. This version of the frame can be finished or rough (if it is completely closed during future finishing).
The pigtail can be either a standard shape - a rectangle, or non-standard shapes. Trapezes, polygons, balcony blocks.
Helpful advice!
Non-standard forms have their disadvantages, but there are ways to avoid them. Such information is discussed with the surveyor at the site.
More about the process
After window openings are cut in a wooden house, the structure of the log house no longer has the same rigidity as if the log house were solid. First, let's answer the question, what is a window frame, or, as it is also called, casing (wooden frame).
After window openings are cut in a wooden house, the structure of the log house no longer has the same rigidity as if the log house were solid. This is especially true for the window opening itself. During the shrinkage process, the logs can move significantly horizontally, which will also lead to deformation of the windows.
All these unpleasant moments are prevented by the frame (casing, wooden frame), which looks like a wooden box. From all of the above, it is clear that installing a socket in a wooden house is a dire necessity. This is true not only for a log house, but also for a timber house.
The process of installing the pigtail is quite simple. Having the necessary tools and materials at hand, you can install the pigtail yourself.
It is assumed that the window opening has already been cut. Now you need to use a chainsaw to select a spike (ridge) on the sides of the opening. This is done so that the pigtail does not move perpendicular to the axis of the walls.
Then the pigtail is made according to the obtained dimensions. Accordingly, in its side racks you need to select grooves for the ridge.
All elements of the pigtail are attached using dowels. Installation of the frame starts from the bottom beam. A layer of linen or jute is first laid under it.
Then vertical bars are installed, into the grooves of which flax or jute is also placed. And lastly, the upper beam of the frame is installed. The shrinkage gap, which must be left above the jamb, is covered with linen fabric.
It is important!
The window frame is a monolithic structure and is absolutely independent of any movements of the frame. Framed with frames, windows and doors will please the eye and will last you indefinitely.
How the casing works
Door or window casing consists of:
- threshold (lower part in the doorway);
- window sill (for a window opening);
- top;
- sidewalls
When constructing the casing, it is important to take into account that the lumber should be slightly smaller than the parameters of the openings. This is especially true for the height, which will decrease as the house shrinks.
It is customary to fasten the elements of the frame using grooves and ridges. Upon completion of installation, all gaps are filled with tow, which will serve as a reliable sealant. As soon as this stage of work is completed, you can begin installing windows, entrance and interior doors.
Photo report on the production of the finishing pigtail
These influxes need to be removed
The opening is ready. Let's start making the casing. The first thing we do is the bottom-window sill. We make a groove in it with a depth of 10*45 mm. Also, do not forget about the protrusions: the window sill must “fit” onto the wall.
We made the groove
Now we make the sides. They are made of 200*100 mm timber. It was adjusted to size and polished. The groove was formed using a milling cutter. It could have been done with a circular saw - it would have been faster, but less accurate.
The groove was cut with a router
After using a circular saw, a quarter is made - its size is 70-30 mm.
Already ready and no quarter yet
Next you need to cut out the locks. On the sides, those that go to the bottom, are simple. All you need to do is cut off 20-40 mm on three sides. If, like me, there is a quarter, then on this side we cut out less to the depth of the quarter, i.e. cut out 10 mm (40 mm - 30 mm = 10 mm). Now the spike is ready.
Lower Castle
Next, we place it on the lower part, trace the outline with a pencil, and remove all excess. The castle is ready. Having installed everything in place, we see quite decent gaps. Now the task is to bring them to a minimum through gradual adjustment. The main thing here is not to cut off the excess, since it is impossible to increase it. Therefore, little by little we polish and try on, polish and try on.
Achieving minimal gaps
When the bottom locks are ready and adjusted, you can cut the sides. They should not reach the top of the opening by 6 cm. This is how we cut it.
We make the top itself in the same way as the side posts, then cut out a quarter of it. You'll have to tinker with the lock. There are two conditions:
- The distance at the top should be the same as at the bottom. We adjust all the dimensions of the spike based on this postulate.
- Then we also outline it, but the shape here is much more complicated. It is advisable to cut it so that there are no through connections, so that air does not have the opportunity to freely enter from the street.
That's why we make stepped cuts.
Shape of tenon and mate at top
When the mold is ready, the fitting begins again by sanding. We work gradually, slowly. When the desired result is achieved, we disassemble the box, sand it, and round the edges. In general, we bring beauty.
Grinding
After sanding, we cover all parts (including openings) with antiseptics. After drying, the casing elements can be painted in the required color. In any case, you can go through the paint once.
While everything is drying, we place jute tape in the opening. There is no tape covering the entire width of the casing; it was laid in two parts with an overlap in the tenon area. Apply a layer of sealant on top of the insulation.
Apply a layer of sealant
First, we laid the bottom (it was never possible to install it on the jute - it was torn off during installation, but the voids were filled later). The sides sat down, but with difficulty. But the top part didn't fit at all.
The top part could not be installed
We take the spacer, first set it obliquely, then use a hammer to make it more horizontal. The sides are moving little by little. As a result of these manipulations, the upper part also fell into place.
After installation, the spacers “settled” and the upper part of the casing
To prevent it from moving, we install wedges. They are removed after installing window or door blocks. This is what happened as a result.
Installed casing
There is no need to decorate the frame of the door or window opening. From the very beginning, the finished casing in a wooden house will have a fairly presentable appearance that fits harmoniously into the overall picture of the building. For this purpose, timber or logs are firmly glued together, which ensures resistance to sudden changes in temperature without leading to damage to the structure as a whole. Installation is similar to the installation of rough casing.
Options for locking connections
Photo: types of box connections
The casing can be made and fastened in several ways. It is impossible to say that one of them is definitely better. Each has its own characteristics, which we will analyze in more detail.
Spike monolith
As soon as profiled timber with ready-made recesses (bowls) began to be sold on the construction market, tenon casing immediately became popular. Since the elements come ready-made and there is no need to cut anything additional.
Its other name is T-shaped. It is used in houses made of timber, where the wall thickness is from 100 to 150 mm, or from rounded logs (small diameter).
Let's take a step-by-step look at how to properly make such a lock:
- Align the opening with a hand or chainsaw.
- Perform markup. Draw vertical lines along the center of the ends. Retreat 3 cm on each side.
- According to the markings, cut niches for the tenon.
- Coat all wooden elements with antiseptic.
- Using a milling cutter, cut out a beam in the shape of the letter T of the required dimensions.
- Treat the side parts of the pigtail with antiseptic again. Secure them with self-tapping screws.
- Secure the top jumper. Leave a gap of up to 5 cm so that the insulation fits well, but there is still free movement during vertical shrinkage.
- Fix the window sill board.
- Caulk all cracks and joints.
- The side parts can be covered with special tape (optional).
In the production of finished elements, there are options when the tenon is simply glued into the body. But it is much better when the tenon and base come together in one piece.
If you are installing the casing yourself, then it is strictly not recommended to use polyurethane foam as a sealant. It prevents normal shrinkage and can cause deformation of openings.
Deck
Another name is U-shaped. Often used in the construction of log houses and rounded logs. The lock in the deck is characterized by increased reliability and durability.
This involves sawing out a tenon at the end of the wall where the vertical elements will be attached.
U-shaped casing helps reduce the load on door and window openings. Often a quarter is selected from the outside for mounting frames (for windows, doors).
Mortgage beam
Considered a quick, inexpensive installation option. Such a casing box can be manufactured and installed on your own.
A box is assembled from boards of small width, mounted in an opening of suitable dimensions, and fixed with self-tapping screws.
Despite the speed of assembly, experienced builders recommend using embedded timber only as a temporary option while the frame is being assembled. Upon completion of construction, an additional wide board should be attached to the beam, to which the frame should then be fixed.
There is no point in reducing costs by using conventional timber. This threatens to bend the pigtail and nullify all efforts to install it. You need to take only chamber-drying timber.
Rough casing or embedded block
One of the varieties of piping, when a groove is cut into the opening, is inserted into an embedded block. It differs from a monolith in that it consists of two parts - the actual embedded block, which is inserted into the tenon, and a separate casing board. The casing board is attached to the embedded beam, and the door frame can already be attached to it (it can also be attached directly to the embedded beam).
Casing in embedded timber
Please note that the embedding block and the tenon under it are made a little larger than in a monolith. This is necessary to make the fastening more reliable.
When fixing windows/doors, fasteners must be chosen so that they do not go into the wall.
Of course, this option is much easier to implement. But they don’t really like it: its reliability is still much lower than that of a monolith. But it can also be used for light doors and any windows. Another possible use is as a temporary option only for the period of shrinkage after the openings have been cut out and the frame has been left to dry. If the openings are not secured, the walls may twist. In this case, embedded timber is an excellent solution.
A groove is cut out into which the timber is driven. It is no longer held in place by anything - no nails, no self-tapping screws.
How to make a casing with your own hands, its dimensions and drawings
The design of door and window casing has similar stages, but there are also differences. Let's look at them in more detail.
Doorways
The casing in wooden houses is assembled not only for entrance or interior doors, but also in any other decorative openings in order to protect the internal parts of timber and logs from temperature changes.
Doorways may not have a threshold. In this situation, the lower part of the supports is bolted to the lower beam.
* the final dimensions of the doors are determined after measuring the finished casing
The top should stand 2-3 cm higher than the top log. Sidewalls ensure vertical sliding of logs. They do not need to be insulated if we are talking about interior doors.
The installation procedure itself is similar to the installation of window openings.
Windows
Installation of plastic windows also involves the installation of a frame. It is important to take the preparation of the opening responsibly. It should be at least 14 cm wider than the future window frame. To choose the right dimensions, you need to take into account the thickness of the frame boards and seams and do not forget about the shrinkage coefficient of the wooden structure.
There is no need to rush to order plastic windows in advance. There is a risk of size mismatch. It is better to do this after finishing the installation of the pigtail.
Photo: installation of a PVC window, opening of a house made of rounded logs
At the end of the opening you need to carefully cut out a ridge, which will serve as the basis for a carriage with a groove. This will relieve the window from additional load when logs and timber shrink. The material used is a timber with a cross section of 100*150 mm, in the middle of which there will be a groove. Its width should be 5 cm larger than the window. It is better to cut it with a chainsaw; if necessary, use a router. This way the accuracy will be at the required level.
It is recommended to take an edged board measuring 150*40 mm for the top. On each side you need to cut out grooves for the comb. As soon as the installation of the carriages is completed, the top is fixed on the sides of the opening with self-tapping screws. After installing the casing, the gaps must be sealed with jute tape and caulked.
Photo caption: lower assembly when installed with a stand-alone profile
In window openings, the lower part of the frame is always present. There are two varieties:
- In the rough cut the bottom is not visible. The window sill is made of plastic to match the color of the window frame.
- In the finishing window, the bottom serves as a window sill. The casing can be extended inside the room or to the sides of the opening.
The decision which option to choose is up to the owner.
This knowledge will definitely come in handy:
- How to properly heat the stove with wood in the house
- What stones are suitable for a steam bath?
In baths made of different materials
The material of the walls is the main factor influencing the choice of method of fastening the window in the opening. Let us remind you that a bathhouse can be built not only from wood (and this is not only timber or a log house, but also a frame structure, because the frame is made of boards), but also from block material - brick or one of the cellular concretes (foam concrete, aerated concrete).
Made of brick
In order to facilitate installation into a brick wall, even at the stage of its construction, so-called “mortgages” are installed in the opening - these are bars between the bricks where the future window will be attached. The openings themselves in brick buildings are completed either with a lintel beam or with a brick “castle”.
ADVICE! There may not be any mortgages. This is not a hindrance to installing a window. If they exist, but the bathhouse is old, then before installation you should check the condition of the bars. To do this, take a regular shoe awl and drive it about a third of the way into the block. It’s good if you didn’t succeed or had to make an effort to both stick the awl in and pull it out. Only in this case is the tree still suitable.
Of the mounting methods described above, dowels or anchors are best suited for brick. Of course, you need to drill the frame first, but if there are no embedded bars in your window opening, you don’t need to drill anything in advance - first try the frame into the opening so that the fastening does not fit into the seam between the bricks, but into the bricks themselves. After this you can remove it and drill it.
Anchor plates are also sometimes used for fastening in brick, but this is difficult even if the brick is not hollow, and in a hollow brick such fastening is not used at all.
ADDITION! Reinforced mounting plates are recommended for use when installing into aerated concrete openings. In order for the window to withstand wind loads, each plate must be secured with at least five self-tapping screws in the concrete. Or use aerated concrete dowels.
In a frame bath
Window openings in frame buildings are created using vertical mullions and horizontal crossbars. These are durable boards that can be used to secure a window. There will be no quarters in them.
Some recommend installing windows on the frame only with the help of plates, while others recommend using long self-tapping screws. See above for plates, and self-tapping screws are installed in the same way as dowels, only without sleeves. The window is placed on blocks, fixed, then holes are drilled in it for self-tapping screws. Then the screws themselves are screwed in. That's all.
From a log house
The most labor-intensive will be the installation of a window in a bathhouse made of logs or timber. Because they are not placed in the opening without a casing (aka a frame). The casing is a movable structure that slides along the tongue-and-groove joint along and across the shrinking logs. Only in this case can we hope that the windows will not undergo deformation during operation. The casing imparts rigidity to the section of the wall where the opening is cut.
The casing can be U- or T-shaped, respectively, either a tenon (T) or a groove (P) is cut into the wall. The height of the opening should be 10 centimeters greater than the inserted window frame. This space is then filled with jute or other heat insulator. It is intended as a reserve for shrinkage of the log house.
The inside of the casing may or may not have a quarter for inserting a window. How to act in such cases is discussed above.
We recommend watching a video that clearly shows the process of creating a casing:
Watch this video on YouTube
Rough and finishing casing: concept, difference
There are basic (rough) and finishing pigtails. They differ in materials and purpose. Various casing boxes are used in the construction of houses.
Rough casing is used in buildings that will undergo external and internal finishing. For example, the outside will be finished with siding, and the inside with plasterboard.
An edged board is suitable as a material. In the future, the slopes can be improved.
The basic pigtail is used in houses made of logs and timber. The casing elements are not polished. The profile shape can be T- or U-shaped.
Plastic windows are mounted on top of the installation profile. The window sill is also made of plastic. The opening can be finished with platbands.
A finishing trim is installed when the building does not require additional finishing, most often in houses made of rounded logs or timber frames. The material for the casing is planed board, which will also become a decoration.
The order of designing tenons and grooves in the opening
Regardless of whether the casing (frame) of window openings is made in a wooden house or a standard door block is mounted in it, the arrangement of the joint tenon can be organized in the following ways:
In the first case, a tenon is first formed in the opening, under which the casing block groove is then adjusted. In the second option for arranging the joint, the contours of the tenon are outlined along the ready-made groove.
However, with any of these methods of preparing joints, first of all, they are marked.
When marking, it should be assumed that the linear dimensions of the tenon should be less than the corresponding dimensions of the groove by approximately 4-5 mm. This gap will subsequently (when the casing is secured) be filled with insulation.
During marking, the width of the tenon is indicated at the end of the beam, while its depth is marked on the side surface of the pier. Upon completion, a circular saw is taken and the corresponding cuts are made according to the marks.
Important! Cuts on the side surfaces of the opening should be made very carefully and constantly monitor the depth of the cut (otherwise you can simply cut off the tenon).
The groove in this sense is made much simpler, since when making a very deep cut it is not necessary to remove the entire core of the notch. But even if it is too deep, you shouldn’t be upset, because in this case you can simply make the tenon on the casing a little larger.
It is most convenient to remove the core of the recess with an ordinary carpenter's axe, after which it should be further worked with a chisel.
Installation of a pigtail in a wooden house
The general step-by-step instructions for installing the casing are as follows:
- The opening is cut 80-90 cm from the floor, taking into account the height of the residents of the house.
- It is important to leave a shrinkage gap of 35-60 mm between the opening and the door and window structure.
- Depending on the type of pigtail, a chainsaw is used to cut a ridge or groove in the opening.
- The wooden elements of the casing are treated with an antiseptic. Insulation is placed in the remaining gaps. It is prohibited to use polyurethane foam to fill voids.
- The sidewalls, top, and window sill are being installed.
The width of the casing elements can reach 26 cm. The use of large parts entails the risk of cracks forming throughout the entire structure.
The recommended moisture content of the lumber used is 10-12%. It is also not worth taking wood with lower humidity, since it may have cracks inside.
Particular attention is paid to the choice of raw materials when creating frames for metal doors.
Let us examine in more detail the manufacture of casing depending on the material of the house.
From a log (log house)
For standard wooden windows, grooves are cut into the logs near the openings so that one part of the casing fits perfectly.
A slightly different type is used for plastic windows in log houses. The trick is that you need to cut a ridge at the ends of the logs, onto which a carriage with a groove is then placed. As shrinkage occurs, the comb will gradually squeeze into the groove of the carriage. At the same time, the geometry and integrity of the window is preserved.
In different bath rooms
Yes, there is a point that windows need to be installed differently in different rooms of the bathhouse.
Installation in a steam room
The steam room is a hot room; many people prefer sauna conditions, plus high humidity. All chemistry, if it stands here, will definitely emit volatile organic matter. On the other hand, polyurethane foam is polyurethane, and it is not recommended for use in a steam room. In general, you just need to remember that it is better not to fix the window in the steam room with polyurethane foam.
It is best to fix the window in the opening using dowels, dowels, and anchors.
In other rooms
In all other rooms of the bath there is neither such humidity nor temperature. Therefore, the use of polyurethane foam can be considered justified. Just don't rely on foam alone - it's a bad idea. And when choosing plates, do not take those that bend like paper in your hands. Take stiff, reinforced ones.
Installing plastic windows in an old frame. On a note
If you transport a PVC window yourself, know that it is not advisable to turn it upside down. The fact is that some manufacturers of PVC windows do not install spacers at the top of the double-glazed windows, violating the assembly technology. In the inverted position of the window, the glass unit can move and rest at an angle against the metal part of the impost fastening, which is why chips form on the glass at the point of contact, which can cause cracks in the glass - if not immediately, then later: for example, in severe frost.
When installing window sills, they are usually loaded with weights while the foam dries. Cans of water are often used as cargo. There is nothing special about this, except for one small trifle: according to a well-known law of physics, a spherical glass shape (in this case a jar) filled with water turns into a magnifying glass, which can easily focus the sun's rays onto the surface of the plastic and burn a large hole in it. If you are not happy with this outcome, simply cover the jars from the sun with cloth or paper.
In winter, in severe frosts, an ordinary soft toy, fur hat, pillow, etc. may cause damage to the glass unit of the window. Such a nuisance can occur if any of these harmless objects are placed on the windowsill and leaned against the glass. A section of glass, closed from the influx of warm air, will after some time cool to a temperature much lower than the temperature of the adjacent surface, and the glass will burst. By the way, you can also accidentally damage the windshield of a car!
To care for PVC windows, it is recommended to purchase first aid kits with a set of special products, of which oil for lubricating fittings and silicone grease for rubber seals are most often used. They end the fastest. In order not to spend extra money on buying a first aid kit, use alternative means: for accessories - oil for sewing machines (any housewife can find it), and for rubber bands - liquid (not spray) silicone grease for rubber car seals. The effect is the same and will last longer.
In some panel houses, heating radiators are hidden in the wall. If you have to install a plastic window in an apartment of just such a house, be extremely careful when dismantling the old block and especially the window sill! The fact is that the window sills are secured from below with metal corners, which are aimed at the concrete wall with dowels using a special gun. Do not try to pull these dowels out of the slab: they may become driven into the heating pipe. It’s better to cut the corners with a grinder or just bend them under the windowsill if a huge flood is not in your plans.
Installation of plastic windows in a frame house. How to install a window in a frame
When installing plastic windows in a frame house begins, you should make sure that they are completed. Window profiles are installed after completion of the construction of the frame and insulation of the frame house. A roof must be installed and thermal insulation, vapor barrier and windproof layers must be installed.
If you plan to install PVC windows in a frame house with your own hands, remember that the vapor barrier material in the area of future window openings must have a reserve in order to overlap in the future. After completing the preparatory stage, you can begin the actual installation of the window profile.
Installation of ceilings in the structure, installation of flooring and interior finishing of a frame house are carried out after the installation of windows and doors.
Since there is no floor covering in the house yet, be sure to take care of purchasing scaffolding, which will help facilitate the installation of the structure. Installation of PVC windows in a frame house is done using small aluminum stepladders. Construction stepladders fold up conveniently and when assembled do not take up much space; in addition, the stepladder will always be useful on the farm in the future.
Before installation, windows are pre-prepared. Special mounting tapes are glued to the end: moisture-proofing protection is installed from the outer profile, and vapor insulation is installed from the inside. This is done in order to avoid excessive moisture in the assembly seam.
What is a wooden window casing?
In the modern construction market lately, houses made of logs, panels or timber have often been found. These include bathhouses, country houses, and country houses. Despite the fact that new technologies make it possible to create innovative building materials, environmentally friendly wood remains in demand. In addition, such structures have a beautiful appearance.
A feature of wooden buildings, which is called shrinkage, occurs under the influence of temperature factors. Wood can absorb water and dry out over time. The most vulnerable modules of the house are windows and doors, or rather, their openings. Such building movements can impair their functionality or lead to complete destruction. To avoid this, a special technology for their installation is used, in which a window frame is inserted into the opening . It is a wooden box made in a special way.
The casing includes: a window sill board, a top and two sidewalls. The boards used for its manufacture are about 25 cm in size. Choose a material that has a moisture content of approximately 10%. You should not take drier wood, as it may have cracks invisible to the eye, as a result of which it will begin to collapse as the building shrinks.
How to avoid getting into this unpleasant situation?
Take the issue of installing windows, like all construction, seriously and creatively. Usually, if you don’t voice what you need, then no one will tell you how to do it right. Finding out how to do it right with the Internet is not a problem now.
Collection of information
We Googled and collected information. We separated the wheat from the chaff. Forums are often a collection of incompetent people putting together a mosaic from the fragments of truth. The best source of information is the manufacturer of the product you are looking for. These include articles, videos, and reviews.
A terribly cheap or insanely expensive joint
7. The guys did not dry out, but overcoming the power of hops they worked tirelessly.
I sawed the opening half-sawed
What happened is a masterpiece of folk art.
Drunk splurge
I can't say it any other way.
Pigtail as a gift
Why cheap? Because it came complete with the assembly of the log house. As a gift, so to speak.
What is not nice to the priest is in the censer for the deacon
And it’s expensive because the nerves are damaged, the material is lost, time is lost, and plus a new joint.
Terribly cheap joint
Classification of types of casing for wooden structures
Experts classify structures into several types, taking into account different characteristics.
Depending on the shape of the casing, they are divided into:
- Casing "mortgage block". This is the most inexpensive type of pigtail. A box is made from an ordinary board, the thickness of which is 30-50 mm. A groove for the beam is cut from inside the opening. This simple design is very quickly assembled, but it is worth remembering that, having chosen it, you will have to finish the slopes after installing the window.
- U-shaped, they are also called “in the deck”. This classic look is made by cutting a tenon into the end of the wall onto which the vertical elements of the frame are installed. The frame moves along them as it shrinks. This design allows you to relieve the load on window and door openings and allows the frames inserted into them to function correctly. The pigtail is impregnated with an antiseptic solution and insulated between the tenon and groove. To prevent drafts, a wind lock is made under the window sill. Soft insulation is laid over the upper part of the casing.
- T-shaped casing or, as it is also called, “into the tenon”. A groove is cut in the end part of the opening, the side parts of the box are made with a T-shaped profile. On the casing risers, you need to glue bars that provide stiffening ribs that hold the casing in a certain shape. When making this type of box, you must strictly adhere to the technology. Do not fasten the bars with nails or self-tapping screws, this will affect the freezing of the opening. Be sure to treat the wood with an antiseptic and insulate the seams with a special material.
The type of casing is chosen depending on the structure. A professional will tell you which one is best to do in a particular case.
In addition to the listed types, builders distinguish the following types of casing:
- Chernovaya. This type is inexpensive and suitable for buildings whose openings will be finished in the future.
- Finishing. If you choose this option, you will not have to finish the slopes in the future.
- Eurocasing. This type will require additional finishing of the slopes. A special feature is the use of adhesive material made from solid pine slats.
- Power. Experts recommend using this option in an arched opening, as well as for panoramic windows and balcony blocks.
- Arched. This option is used to strengthen arches. They are made from either solid wood or glued timber. The cost will depend on the type of material from which the casing is made.
- Combined. When using this type of frame, you need to know that the base of the box is made of coniferous wood, and the top layer is made of oak, pine or beech board. This casing option is more expensive.