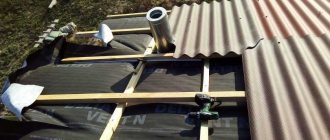
- How the cutting is built
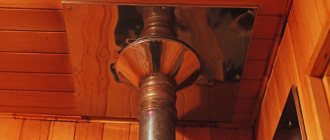
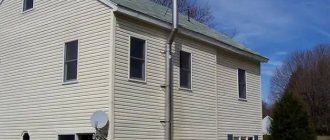
- How to install a sandwich pipe
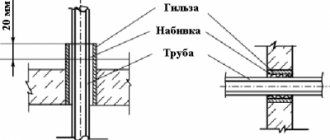
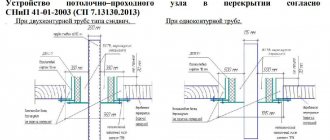
- Passage of a brick chimney through a wooden ceiling
The use of solid fuel for heating in the private sector or country houses significantly increases the likelihood of a fire. The extremely hot fume exhaust system poses a hazard if it comes into contact with flammable materials as it passes through the ceiling and roof or wall. The most important element of the fire protection system is the use of a ceiling-pass assembly (CPU) of a chimney for a bathhouse, the installation of which must be done by hand in strict accordance with the instructions.
What is it used for?
PPU is designed for pipe passage through wall and ceiling ceilings; it is a round or square box with a hole. The main task is to ensure the protection of wooden floors from overheating, since during operation the temperature of the external contour of the chimney increases and heats objects in the immediate vicinity.
Such a device can be purchased in specialized stores or assembled with your own hands. When choosing a finished product, it is necessary to take into account the diameter of the chimney, as well as the location of the stove and ceilings.
For thermal insulation of the unit, basalt cotton wool rolls with a foil screen, which can be used at high temperatures, are perfect.
Types of chimneys for baths
There are two fundamentally different types of chimney:
- Internal (classic). The pipe is routed through the ceiling of the room and the roof.
- External, which became widespread in our country not too long ago. When installing this type of chimney, the pipe is routed through the wall, the main part of it is routed along the street.
Internal chimney
The internal smoke exhaust device in the bathhouse is traditionally used for brick stoves. In this case, the pipe is also made of brick. Install a classic traction control valve. The channel is led vertically from the stove through the ceiling covering, then to the street through the roof.
We recommend that you read: How to properly replace pipes in a sewer system
This type of smoke exhaust device involves two technological openings that require thermal insulation and high-quality waterproofing. Not every person who likes their own steam room can do complex work on their own. The disadvantages of a budget bath include the bulkiness of the brick stove and pipe design. In small steam rooms, such a structure can occupy up to half the area.
An internal chimney with wells and a stove bench can also be made in a bathhouse. A warm wall will allow you to retain maximum heat, which will be useful in northern latitudes. Here it is better to hire a professional and arrange the crossings according to the requirements. At the same time, the internal chimney in the bathhouse will save money on heating.
It is much easier to install a ready-made solid fuel stove in the bathhouse and run the pipe through the wall in the bathhouse with your own hands.
Passage through a wooden floor
As a rule, the most common material when building a bathhouse is wood. Therefore, when passing a chimney through a ceiling, it is necessary to use a passage unit.
Below we will look at the main options for the passage duct, based on the material of the chimney itself.
Use of brick structures
If you have a brick chimney in your bathhouse, then the cutting of the chimney on the ceiling is made of brick by thickening it at the passage points. The height of this section of the masonry must be at least three rows of bricks.
Laying out a stove chimney is a complex process, since errors during construction can lead to poor draft and a fire. Therefore, it is better to entrust this matter to specialists.
Plasterboard box
The passage box can be made from heat-resistant plasterboard. To do this, you will need to prepare insulation from mineral wool or asbestos. This option is made in the same way as in the case of a metal box. The first step is to install plasterboard walls, and fill the space between them with insulation.
Expanded clay can be poured on top of the cotton wool or even instead of it, which gets clogged into all pores and provides additional insulation.
Metal box
A more popular alternative to passing through wooden floors has become the use of a stainless steel ceiling-pass assembly. It is a box made of several steel plates; a hole is made in one of the walls based on the diameter of the outer contour of the sandwich. The void between the pipe and the box is filled with heat-insulating material.
Ceiling cutting for sandwich pipes is found in GOST and conventional. They differ in the size of the hole. According to GOST, it is necessary to cut a square measuring 1.0 by 1.0 m in the ceiling or wall, into which the polyurethane foam will be directly inserted. However, this size is not particularly popular, since then it is necessary that the distance between the logs in the bathhouse be 1.0 x 1.0 m, otherwise it is very difficult to insert such a unit.
A regular knot is a square measuring 48-50cm. To determine the size of the cut, you need to start from the diameter of the sandwich:
- if more than 200mm, then the correct size is 1.0x1.0m;
- if 200 mm – 48-50cm.
Important information: if the chimney is for a fireplace, then the size of the cut must be 1.0 x 1.0 m.
When installing the box, foil insulation is glued to all points of contact with wooden surfaces.
What is it and why is it needed?
Ceiling-through unit (CPU) is a special box that is mounted in ceiling or roof structures. In the box itself there is a mandatory hole for the chimney channel to pass through it. The main task of the ceiling assembly is to ensure the safe operation of the chimney due to its thermal insulation from roofing and other combustible materials.
The ceiling-passage assembly can either be purchased or made independently, while strictly taking into account all the standards of domestic SNiP in the field of heating and fire safety.
Requirements and standards
The basic rule of fire safety during the installation of polyurethane foam units: the smoke channel passing near building structures made of flammable materials should not heat them above 50°C. You can read the conditions in more detail in SNiP 41-01-2003.
These standards cannot be met if you use direct pipe passage through the ceilings without the use of protective structures. Therefore, a pass-through ceiling assembly for the chimney is required, providing high-quality insulation.
Even if your pipe does not come into contact with wooden floors, the temperature of the external contour of the pipe is enough for charring and gradual smoldering to begin, so all sections of the passage are sealed with NG class insulation. When purchasing factory products, it is recommended to carefully study the instructions and comply with them when installing the protective unit.
How the cutting is built
The ceiling cutout for a sandwich pipe is a box for passing the chimney through the ceiling or other obstacle. To protect adjacent materials from fire, it is important to adhere to the following rules:
- it must be at least 50 cm wide;
- with a wide layer of plaster between the chimney and hazardous components, the area can be reduced to 35 cm.
- its height must be at least 7 cm greater than the thickness of the material.
Indentation size
It is the distance from the outer surface of the stove or smoke duct and a wall or partition made of flammable or low-combustible materials protected or unprotected from fire.
It ranges from 20 to 50 cm. Thicker walls heat surrounding objects to a lesser extent, so the amount of indentation can be reduced. The most appropriate materials from a fire safety point of view are:
- brick;
- stainless steel sheet with basalt cardboard;
- Flamm or mineralite slabs.
Please note that when protecting the wall with non-combustible materials, it is necessary to leave a gap of 7-10mm between the wall and the sheathing.
How to calculate a chimney duct system?
When drawing up a project, they are guided by the requirements for such systems, since there are mandatory regulatory documents, and compliance with them is monitored by the technical supervision service.
- Dimensions. The total height of the chimney must be at least 5000 m, otherwise normal draft cannot be ensured. Horizontal sections exceeding 1000 mm are prohibited for the same reason. The diameter of all chimney elements is equal to this size of the heating device pipe. The total number of turns is no more than three.
- Mandatory additional protection, components. In unheated rooms and in those areas that are outside the walls of the building, chimney pipes must be properly insulated. Flammable roofing materials are a good reason to install a special “fuse” - a spark arrestor.
- The section of the chimney above the roof. If the roof is flat, the length of the top part should be at least 500 mm. For a gable structure, the same requirements, but with one condition: the distance from the ridge to the pipe is less than 1500 mm. Exceeding this figure means the need to mount the chimney flush with the ridge beam.
- Passage through building elements. The minimum gap between the pipe and the ceiling is 200 mm. When a chimney passes through a non-combustible roof, the distance between it and the pipe must be at least 130 mm. Joints of modules at the floor level and in the thickness of walls are prohibited. 700 mm - minimum distance of seams from walls, floor, ceiling.
If the chimney will pass through the premises of the building, then modules with thermal insulation are purchased for its installation. Any other option requires covering the structure with brickwork.
Since sandwich pipes are now becoming increasingly popular, chimneys are often installed outside buildings. In this case, the systems are mounted on the outside of the wall with brackets. The second method is to use a metal profile to construct a vertical supporting structure. It is difficult to argue with the feasibility of such solutions, because there is no need for passages through the ceiling and roof. The safety of the structure taken outside the house is another big plus.
Types of polyurethane foam
On the modern market you can find various chimney passages. The most common forms are:
- square,
- round.
It is easy to make such a device yourself if you have the skills to work with simple tools. The material can be stainless steel sheet, and basalt or expanded clay can be used as thermal insulation.
Our production
Single wall chimneys
Double wall chimneys
Mounting elements
If you decide to use a homemade pass-through unit, you should strictly adhere to the established rules to simplify further installation and ensure all standards. Below in the section we will tell you how to install it yourself.
Make it yourself or buy it?
You can make a ceiling assembly at home, and it can be no worse than a ready-made store-bought version. But this will require time, skill and a special tool:
- metal scissors;
- Bulgarian;
- riveter;
- manual bender, etc.
In addition, do not forget that you will not only have to watch the video or read the SNiP yourself: you will also need to find time to go to the hardware store. There is no talk yet about the assembly and installation itself. But if you still decide to play “crazy hands”, then especially for you I have prepared step-by-step instructions for assembling the ceiling-passage assembly.
approximate price
For those who do not have time and prefer to spend their weekends with family or friends, I have collected current and inexpensive offers of ceiling units on the market.
Preparation for installation work
Installation may vary depending on the chosen design, the diameter of the pipe and the material from which it is made.
Before you begin installation, you must complete the following work:
- Cut a square measuring 1.0 x 1.0 m or 0.5 x 0.5 m in the ceiling or wall (if the rafters run close to the planned pipe, you can make an additional box from wood, sheathe the inside with mineralite. Attach the box itself to the joists and then attach polyurethane foam to it ).
- Line the inside of the passage with mineralite slabs.
- Prepare a diameter hole in the ceiling. All flammable roof elements located in close proximity to the furnace equipment are insulated using non-combustible objects.
Often wooden surfaces are coated with special compounds that prevent ignition. However, no heat-resistant paint will protect wooden floors from fire; the service life of such paint is a maximum of 1 year.
Installation of a chimney through the wall
- Mark where exactly the chimney will go, this place will have to be dismantled, do everything carefully and slowly so that the wall does not collapse. If the building is old and is literally falling apart before our eyes, with cracks creeping across it, the structure must first be strengthened, otherwise it will not withstand the load of the chimney.
- If the wall is monolithic and strong, the area near the transition still needs to be strengthened so that nothing crumbles around the edges. Negligent attitude towards this stage of installation in the future will lead to the gradual destruction of the wall. Most often, at the strengthening stage, bars or special components are used, which are sold in stores that sell building materials.
- Next, attach a bracket to the hole on which the runners are fixed, allowing the parts to easily pass through the wall.
- The wall near the chimney passage area should be covered with a plywood sheet. A sheet of asbestos is laid on top, one more layer remains to be laid - galvanized metal, at which point the wall treatment can be considered complete.
- You can protect fastening components from corrosive processes with a varnish; its label should indicate that the varnish is intended for use with metal.
Installation of PPU
How to install a sandwich pipe
Important information: only by using a sandwich can the temperature of the upper pipe circuit be reduced from 450° to 200°. The sandwich also helps avoid the formation of excessive condensation.
- A single-wall module, at least one meter deep, or a pipe heat exchanger is first installed on a sauna stove. Next, an adapter from a single-walled to a double-walled pipe is installed, then the use of a sandwich structure is recommended. This will reduce overheating of pipes coming from the furnace and increase their service life
- Joining pipes in interfloor and attic floors is strictly prohibited.
- The pipe can only be routed through the ceiling through polyurethane foam. After assembling the chimney, fill the free space between the side walls of the ceiling passage and the pipe with heat-resistant and non-flammable material. A material based on basalt rocks (MPB, BSTV) is recommended.
- Horizontal sections worsen traction, so we avoid them if possible. If this is impossible to do for some reason, then you should try not to make horizontal positions longer than 1 meter.
- Do not use more than three elbows in the system. Exceeding this amount reduces traction performance.
- It should be remembered that any material changes its dimensions when heated, so the pipe should not be rigidly fixed at the exit point.
After all the preparatory work, you can begin the installation of the ceiling-passage device. The chimney assembly goes from the heating unit upwards, after which it is discharged into the attic, and then through the roofing pie.
If the passage unit passes dangerously close to the joists and rafters, you need to make it yourself and install a box made of wooden blocks lined with mineralite plates on the inside. And the PPU is already installed there.
If you purchased a ready-made unit, you must follow the instructions. Factory-made polyurethane foam can be of various configurations: “empty” or with additional insulation. In the first case, it is necessary to cover the base of the unit (stainless steel sheet) with basalt cardboard from the inside, and install the polyurethane foam itself in a box protected by mineralite sheets. We leave the distance between the pipe and the sheet empty. But the assembly itself must be covered with kaolin wool to a depth of 5-7 cm from the attic side; no more is needed to avoid overheating of the pipe.
If you purchased polyurethane foam with mineralite from the Ferrum company, then this unit can be installed without an additional insulated box, as in the first option. In this case, it is also necessary to fill the void inside the unit by 5-7 cm with kaolin wool. This additional insulation increases the fire safety of the passage unit.
The assembly is fastened with self-tapping screws or with a standard fastener if you purchased a factory product. Fixation is carried out to the ceiling from above. The stainless steel platform (the base of the unit) is attached with self-tapping screws to the lining after finishing.
When installing, you need to make sure that the hole coincides with the pipe, since tilting the system is prohibited, the maximum permissible error is 1 mm.
Roof passage for round shape
At the next stage, you need to protect the attic space from moisture that gets into the gap formed between the roof. It is most convenient to use special purchased products for waterproofing this area, which are selected according to dimensions. These penetrations come in a variety of colors and are suitable for any roof. They are installed with bolts or special glue.
For better protection against leakage, you can additionally buy a sealant that carefully treats all joints. This will help ensure dryness in any climate.
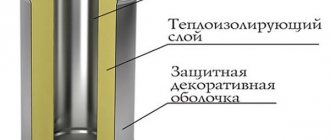
Organization of passage
In most cases, a special sandwich pipe is used to construct chimneys. It is a structure of two pipes of different diameters, nested one inside the other. Between them, non-flammable heat-insulating material is laid. The outer shell is made of thin metal, and the inner part is made of thicker steel.
The passage through the ceiling of such a sandwich chimney is carried out in the same way as a regular pipe. Perhaps there will be a little less work on arranging the passageway. You can use either a ready-made solution already made at the factory or assemble the required unit yourself.
In any case, it is necessary to first prepare the place where the entire device will be installed. A square hole is cut in the ceiling, with a side of about 45 centimeters. This size is large enough to fit a standard chimney through.
The ceiling assembly itself for the passage must be lined outside and inside with a heat insulator capable of withstanding high temperatures. The most popular for such purposes is special basalt wool.
According to the size of the square part of the assembly, approximate lines are drawn on the ceiling. The opening should be located strictly above the stove pipe. The hole itself is cut out slightly smaller than the connecting square plate. It is necessary to leave such a gap so that it is possible to attach it to the ceiling with self-tapping screws. The finished opening is lined with the same heat-insulating material as the passage unit.
The finished assembly must be inserted into this hole to check all connections. Before bringing the chimney through the ceiling and finally securing it, you need to make sure that the pipe is vertical and that it is located exactly in the center of the opening.
If you look from the top floor or attic, you can see that there are voids in the passageway. They are filled with non-flammable heat insulator. You can use expanded clay, clay or leftover basalt wool. The main thing is to fill the void very tightly.
To have a more complete idea of what the entire assembly looks like in section and what the passage for the chimney through the ceiling looks like, you can look at the drawing below.
The diagram shows the main elements of the chimney and passage unit, as well as parts of the ceiling through which the passage was made. The pipe is passed through the roof in a similar way. The only difference will be the hole in the square metal plate - it will not be round, but oval, since it will be located at an angle.
Do-it-yourself installation of polyurethane foam
The hole should be approximately 0.5 mm larger than the thickness of the channel diameter. This will ensure ease of insertion. Thermal insulation is packed along the outer and inner walls. The distance between them is 1-2 cm.
If you do not have a ready-made kit, you can perform high-quality stove heating in your home without it. To do this, the free space in the ceiling is sealed with fire-resistant thermal insulation, on top of which steel strips are installed. A plate made of heat-resistant metals is installed on it, in which a suitable hole is cut. This plate is secured with a bolted connection. It is most convenient to make it from metal.
When installing it, we comply with all requirements and maintain the established distances to fire hazardous objects. The resulting voids on the side of the second floor or attic should be filled with expanded clay or other non-flammable insulation.
Passage of a brick chimney through a wooden ceiling
Laying out a stove chimney is a complex process where many nuances must be observed. Therefore, it is better to entrust this matter to specialists. In addition, errors during construction can lead to poor draft and fire.
An important point: simple building bricks are not suitable for laying individual parts and the entire chimney. A prerequisite for long-lasting and trouble-free operation of a brick pipe is the use of a ceramic heat-resistant type of brick.
When building structures, it is necessary to lay them out in a special way in the places where the floors pass. The ideal option would be to cut the chimney on the ceiling. The height of this section of the masonry must be at least three rows of bricks. The thickness of the chimney walls when passing through the roof or wall (partition) should be greater than along the main height. The distance to flammable materials must be at least 25 cm.
Two passages of a brick chimney are possible. In the first option, the passage unit is mounted by increasing the thickness of the masonry, the so-called “fluff”. The second option for passing a brick pipe through the attic floor without laying out the “fluff” is carried out in almost the same way as for a metal pipe. In this case, the chimney along its entire height has the same cross-sectional size, without increasing the thickness of the walls.
The hole in the ceiling is secured with a stainless steel sheet or mineralite slab. A window is cut out in the center of the sheet through which the chimney will pass. The length and width of this opening should exceed the similar parameters of the pipe by literally 3–5 mm. When laying a chimney, approximately three or four rows up to the ceiling, a sheet with a prepared opening is placed on it, and then the laying is carried out further up to the height of the finished attic floor. Wooden floors are laid with mineral wool to reduce heat transfer from the pipe. But a more reliable way would be a stainless steel box into which a brick chimney will pass; the distance from the pipe to the walls is also laid with mineral or kaolin wool at 5-7 cm.
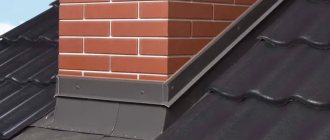
Sealing joints
This stage is considered the most difficult when removing through the roof. To do this, install a lower apron made of tin.
A “tie” made of metal is placed under it, the purpose of which is to drain liquid into the drain. Outside, you can install a decorative apron, the purpose of which is to create an aesthetic appearance.
When using a flexible coating, the task of waterproofing is greatly simplified. It is quite easy to bend such material onto a pipe that has been pre-coated with impregnation to create a better fit. It is also recommended to treat the joints of the wall and roof with sealant.
Video tip - assembly of a chimney pipe passing through a wooden ceiling
From the following video you can learn how to properly lay the structure without spending extra effort.
Stages of installation of a finished pass-through unit
Today, there are pass-through units with a round or rectangular cross-section on sale. Installation of such a unit is carried out in stages. Let's consider the main stages of arranging the ceiling trim:
- First of all, the ends of the holes made in the ceiling are covered with a layer of heat-insulating material.
- Next, you need to cover the bottom sheet of the passage box with insulation, as well as all places that come into contact with the ceiling. The insulator can be foiled basalt cardboard or mineralite.
- Then a pipe is passed into the passage unit, and the structure is brought to the hole made in the ceiling. The structure is fixed with special screws in the right places. As a rule, units are sold with ready-made holes for self-tapping screws, which simplifies installation.
- The cross-sectional indicator of the opening of the passage unit must be larger than that of the sandwich chimney. A tight fit of the pipe to the passage unit is not recommended. It is desirable that there is a gap of at least 5 mm from the wall of the unit pipe to the wall of the sandwich chimney. If necessary, you can insulate the gap using a special asbestos cord.
- The insulation is then carried out from the attic side. After this, the box is filled with expanded clay or any other heat-insulating material.
- After the pipe has been installed, you can decorate the cutting unit in the attic (if necessary).
The cutting unit in the attic is arranged in the same way as on the ceiling
Features of ceiling cutting for a bath
To install wiring from the bathhouse, it is necessary to ensure not only the required level of safety, but also to carefully protect the steam room from heat escape.
Here the cutting is carried out in three stages:
- Preparing the site.
- Installation of a protective box.
- Careful insulation of all joints.
How to make a chimney: choosing insulation
Fireproof plate
We believe that special attention should be paid to the choice of insulation. We repeat: most will put expanded clay or mineral wool inside the box, and cover it on the outside with mineralite (its analogue is Flamma sheets) or basalt cardboard. This is a valid solution. It is doubtful to use asbestos instead of mineralite.
asbestos cardboard (asbestos cardboard)
ADVICE! Do not make an internal backfill of sand, because it transfers heat perfectly, and when the chimney heats up to 400 degrees, even this is a guaranteed fire. Because wood lights up at 330 degrees, but if you heat it for a long time, it will light up at 150-170 degrees. Sand will do a very bad job.
However, in our time, other refractories have appeared - the same calcium silicate, known commercially as superisol or Silca slabs. But it is a slab material.
The chimney in the ceiling of the bathhouse in the area of the polyurethane foam can be lined with other materials, such as cotton wool or felt. If we talk about stone derivatives, these are basaltine and Basfiber, which are technologically more advanced modifications of mineral wool.
But now you can buy not only them, but also ceramic fibers, in particular, Supersilica, which is a silica fiber from which either cotton wool or mats are made. It has no binding substances at all, which in mineral wool burn out over time, causing it to crumble. The manufacturer's website directly states that this fiber is suitable for insulating the ceiling passage in a bathhouse.
Below is a video that shows a funny stress test of everything that can be stuffed into a PU foam assembly:
There is also mullite-silica wool, but this is a real refractory that can withstand temperatures twice as high as the maximum for a chimney.
The procedure for installing the passage unit through the ceiling
The process of attaching the protective box itself is usually not difficult. To do this, we perform a simple sequence of actions:
- the ends are covered with thermal insulation material;
- in the passage box for the chimney, all parts in contact with the ceiling elements, as well as its bottom, are insulated;
- the pipe is carefully inserted, but it should not fit tightly to the walls;
- we secure the assembly using self-tapping screws or other fasteners;
- insulation is carried out in the attic, and the voids are filled with loose mass;
- If desired, you can decorate the structure.
Factors influencing chimney cutting
The shape of the chimney cut is primarily influenced by the type of roof: flat or pitched. A flat roof does not accept the techniques inherent in a pitched roof. Typically, cutting on a flat roof is made of concrete, while materials for cutting a pitched roof vary, but most often it is made of metal.
The shape of the chimney is of particular importance, since the shape of the passage opening depends on it. The round shape is better for the chimney itself, but if we talk about passage holes, then it is much easier to make a rectangular chimney. For a round cross-section you will have to make the correct cut in the roofing pie; for a rectangular chimney this is much easier to do.
The choice of installation technology is also influenced by the presence of cladding and the shape of the roofing. The lining makes cutting much more difficult. The fact is that the cladding can allow moisture to penetrate inside the roofing pie, which is unacceptable. Therefore, it would be logical to make the groove wider using cladding, but the groove itself also needs to be hidden somehow. Therefore, structures under cladding remain the domain of professionals. You need to have too many specific skills to do everything unnoticed and really beautiful.
If we talk about the type of coating, then it is better to use corrugated sheets for cutting. Other types are associated with certain difficulties. You have to calculate the coverage. Since the apron is supposed to be tucked under the finishing roof covering element, and because of this, some types may sit on the roof at an angle or become bristling, which makes the coating leaky.
Selection of material for thermal insulation
There are several types of thermal insulation materials for any occasion. Let's look at the most popular of them.
- Technical basalt wool is used most often. Obtained by melting certain rocks. In addition to low thermal conductivity, it also retains moisture and can withstand high temperatures from 700° to 900°.
- Kaolin wool is produced by melting silicon oxide materials at a temperature of 1750°. It has a low thermal conductivity coefficient and does not melt or crumble at high temperatures. Maximum temperature of use is 1100-1250°. It has a long service life and can withstand many starts and cool-downs without losing its qualities.
- Construction basalt wool is obtained by melting mica. The operating temperature of such thermal insulation is 400-450°.
If you find it difficult to choose, it is recommended to order mineral wool. Since such a product is time-tested, universal in use and widely available on sale.
In this article we looked at how to make a passage unit for a chimney through the roof and other slabs. Any person skilled in handling hand tools can do this. To do this, take the time to familiarize yourself with all the rules and strictly follow all the points specified in the instructions.
If you are not confident in your abilities or want to save time, then it is better for you to seek help from a professional who has extensive experience in this field.
Selection of thermal insulation material
Today, the building materials market is distinguished by a variety of thermal insulators, which have different technical characteristics and may differ in price. Let's consider the main materials that are used for thermal insulation purposes when laying sandwich pipes through the ceiling and roof:
Basalt or mineral wool. Such materials are used quite often when constructing sandwich pipes. The temperature that these insulation materials can withstand reaches up to 600 °C. Let's consider the main disadvantages of basalt and mineral wool:
- Such materials are not environmentally friendly and may cause harm to human health. When heated, such cotton wool releases harmful substances - formaldehyde;
- mineral and basalt wool have a rather poor coefficient of water resistance. When wet, they lose their protective qualities.
- Over time, wool can cake and lose its thermal insulation characteristics.
Expanded clay. It has high insulating characteristics. When condensation forms, followed by wetting, expanded clay, unlike mineral wool, quickly restores its protective properties. The disadvantage of this material is that when installing pass-through units, special containers are required for it.
You can insulate cuttings with different materials, but it is better to choose those that will not harm human health
Minerite. The composition of such insulating material includes: cement, cellulose and various mineral additives. Minerite is resistant to temperatures up to 600 °C. When wet, it does not lose its insulating properties, and when heated, it does not emit carcinogens harmful to human health.
Asbestos. Asbestos itself has fairly good thermal insulation properties, but when heated it releases carcinogens. The use of asbestos as insulation is recommended by experts only as a last resort.
Sand or clay . Such materials were used long before modern thermal insulators appeared. The thermal insulation properties of these natural products are inferior to specially developed modern insulation materials, however, some owners prefer to use natural ones as thermal insulation.
Purpose and design features
The chimney pipe box provides thermal and waterproofing of the chimney section on the roof.
The presence of a protective and decorative casing helps to level out the risk of destruction of a brick or asbestos flue under the influence of atmospheric loads. This eliminates the possibility of roof elements catching fire due to high surface temperatures of the chimney. The functionality is also designed to provide an aesthetic appearance of the chimney section protruding on the roof to support the façade and architectural style of the house. Structurally, the box follows the shape of the chimney, can be square, rectangular or round in configuration, and is made of various materials. The finished casing is placed on the chimney and securely fixed to the base.
The chimney box is an additional thermal protection for the pipe
Advantages and disadvantages
The use of a chimney pipe box helps improve the operational and decorative characteristics of the device:
- the formation of condensate on the walls of the gas outlet is leveled out;
- the intensity of soot and soot deposits is reduced;
- the possibility of large thermal differences between the temperature of the flow of combustion products and the internal surfaces of the flue is neutralized, since the heat capacity coefficient of the smoke channel material is improved;
- deterioration of traction is eliminated;
- provides reliable protection from aggressive atmospheric influences;
- the fire hazard level of the chimney structure is reduced.
A big plus is the presentable appearance of the chimney on the roof, which is equipped with a protective and decorative box in the same style of the facade.
The disadvantages of the device include the need for drawing work when making the box with your own hands and serious safety requirements for installation on the roof.
Step by step installation guide
If you do not have enough skills in this area, then it is better to choose a strictly vertical chimney with a pipe cut on the ceiling of the bathhouse. Installation is carried out according to the following algorithm:
- The first step is to purchase the materials that will be needed in the process. These include: directly pipes of the correct diameter, clamps, rubber gaskets for waterproofing, expanded clay, umbrella, fire-resistant asbestos;
- Before installing the stove, the surface behind it is polished using fire-resistant asbestos;
After installing the stove structure, we proceed to installing the chimney in the bathhouse. To do this, a damper is installed on the stove pipe, which is the primary part of the chimney, equipped with a special valve. It serves to regulate the draft force in the chimney. If the valve is half closed, the flow of passing air will be reduced, and therefore the heat in the bath will remain longer; A drawing of the future hole is made in a predetermined place on the ceiling. Its diameter must exceed the diameter of the chimney. Next, according to the finished drawing, an opening for the pipe is cut out. We strongly recommend that you install a metal box with which the chimney will cut into the ceilings. After the pipe is passed through this unit, it is tightly covered with expanded clay or laid with basalt wool. The part of the ceiling closest to the pipe is cleaned with fire-resistant asbestos; Next, using the same principle as in the case of the ceiling, a hole is cut in the roof. In order to carefully guide the pipe through the rafters, bends are used
It is important to remember safety, so if the material with which the roof is covered is flammable, the outlet location is protected with a metal or asbestos sheet; When the pipe is removed through the roof, it is necessary to attach a thick rubber seal on top of it, which serves as waterproofing for the chimney. The seal is treated with a fire-resistant sealant to completely prevent moisture from getting inside; The chimney components must be installed until you reach the desired height of the structure
After this, a special umbrella, called a “fungus”, is attached to the top of the pipe to protect it from various atmospheric precipitation, debris and tree branches.
Information. The key feature of a well-equipped chimney is that even 7-8 hours after heating the bathhouse, heat remains in the room.
Exiting the pipe through the roof
When equipping a pipe passage through the roof, care must be taken to ensure that two conditions are met:
- passages through the roofing pie must be fireproof;
- the under-roof space should be protected as much as possible from moisture penetration.
Exiting the chimney through the ridge makes all the work quite simple. Due to the fact that the formation of snow pockets on the ridge is impossible, it is possible to achieve better protection against leaks. But at the same time, this method of installing a roof passage means that in the design of the rafter system the ridge beam will not have load-bearing functions. And this requires additional strengthening of the rafters themselves. If there is an attic, installing additional rafter supports may be undesirable or simply impossible.
That is why developers prefer installing a chimney passage on the slope, directly at the ridge. A snow pocket also does not form in this place, and besides, the rafter system does not need additional strengthening. But besides this, the choice of location for the roof chimney is also influenced by the location of the heating equipment. It should be remembered that the horizontal sections of the chimney should not be more than 1 meter in length. In some cases, it is the location of the boiler that becomes the reason for choosing the method of passing the chimney pipe through the ridge.
Professionals recommend avoiding installing a passage element in the valley (the point where two slopes meet an internal corner), since it is especially difficult to install a roof passage at this point. As a result of rain and snowfall, the junction may not be able to cope with moisture and, as a result, the roof will leak.
It is important to maintain a distance between the rafters and the roof in the range of 25-30 cm. If the roof is made of combustible materials (various types of roofing felt, soft roofing), then a gap of 13-25 cm must be maintained between the material and the chimney wall. If the material is resistant to high temperatures, then this gap can be left minimal, and the pipe on the roof of the house is removed only from the sheathing
If the material is resistant to high temperatures, then this gap can be left minimal, and the pipe on the roof of the house is removed only from the sheathing.
If the roof is a “pie” consisting of hydro-, steam- and thermal insulation, then when installing the passage element, some difficulties may arise due to the violation of the integrity of this layer. As a result of an error, the protective properties of the roof can be significantly reduced. In this case, the chimney can be installed in a separate box, which will isolate the roofing materials from the hot walls. The distance between the inner wall of the box and the chimney should be about 15 cm, while the free space is filled with non-flammable heat-insulating material. It is recommended to use mineral or basalt wool, as it is resistant to moisture.
The waterproofing and vapor barrier is applied to the box using the standard method: the “pie” is cut in the shape of an envelope. The film sheet is brought to the rafters and cross beams, where they are fixed with nails or staples. Then the waterproofing layer is pressed on top with bars, and the vapor barrier is pressed with the base frame under the finishing materials of the attic or attic. After this, the joints of the films and the box are treated with sealant and glued with a special tape.
Common installation errors
As experts note, the main mistake is the incorrect installation of the casing in the ceiling opening, bypassing the standard dimensions of the placement, which is fraught with dangerous consequences in the form of a fire. Also among the common violations is the excessively large size of the umbrella on the head of the chimney.
The following errors are also common:
- the penetration is used without filling with thermal insulation material, which eliminates the protective capabilities of the structure;
- a wide gap is left between the penetration and the chimney pipe, as a result of which the filler in the form of fine expanded clay falls down.
Experts recommend equipping the passage box on top with a metal sheet with a hole for the chimney.
A chimney protective casing installed according to standards can significantly increase the safety of the chimney and the heating system as a whole. Also, this measure determines the high potential of the heat generator, its operating efficiency at low fuel costs. If during the construction of the structure the work on equipping the duct for the chimney pipe was not completed, it is worth choosing a ready-made model or making the structure yourself and installing it taking into account regulatory requirements.
Tags: chimney, duct, passage
« Previous entry
Device for passing a round pipe through the ceiling of a bathhouse with different types of polyurethane foam
The most convenient option for installing a chimney for a wooden bath is a ready-made factory-made polyurethane foam for the chimney, taking into account the diameter of the pipe. Before installing the unit, time is devoted to preparing the surfaces in contact with the wood finish of the ceiling, as well as the inside of the box surface, which needs proper thermal insulation.
When it is necessary to install factory-type polyurethane foam, before starting work, it is covered with a heat insulator on all sides except the front. The optimal solution is practical and environmentally friendly basalt wool with increased resistance to high temperatures. This heat insulator contains binders that can withstand temperatures up to 1000 degrees. An additional advantage will be the insulation of the pipe with foiled wool to improve the safety of the structure during operation.
As soon as the ceiling passage of the chimney is correctly and reliably insulated, we begin to prepare the site for installation:
- To do this, markings are made on the surface of the ceiling - at the location of the chimney.
- The contours of the hole should be slightly inferior to the parameters of the front panel of the assembly so that there are no difficulties with fixing it to the casing with self-tapping screws.
- A hole is cut along the contours, the edges are insulated with the same insulator that was used to protect the pass-through assembly.
- To increase the level of safety, sheets of thin but durable metal are additionally used.
- A ceiling-passage assembly for the bathhouse is installed in the prepared hole; for convenience, it is initially placed on the pipe, after which the structure is secured in full assembly.
The finished passage with the pipe is secured with self-tapping screws using pre-prepared holes.