A bathhouse is a great place to relax, so you need to think through its equipment first.
To make spending time in the steam room comfortable, it is important to install all communications there and organize a washing compartment.
When organizing a shower, you should choose a bath tray that will not only save space, but will also be convenient to use.
Shower tray for bath
This type of equipment for the washing compartment is an excellent alternative to ready-made shower cabins, the cost of which is too high.
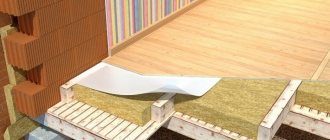
Waterproofing
For waterproofing, mastics of various types and impregnations are used.
The first name causes rejection among untrained users. According to the majority, mastic is something soft that is used to rub school parquet. So that it looks beautiful and the bug doesn’t eat it. Therefore, constructing a foundation on mastic is impossible. Much depends on what the floor material in the house is. Is it concrete, brick, wood or metal. In each case, the types of waterproofing measures will be different. And a tile shower tray is not always appropriate.
This is a fundamentally wrong opinion - what was voiced above. There are different types of mastic, but construction mastic is specially made to withstand mechanical deformation. Most of these building mixtures are used for external waterproofing of building foundations. You can imagine the stress there in winter.
- The formation time of the primary film is 1 hour.
- Flammability group B3 (highly flammable, but why exactly would it burn on the bathroom floor?).
- Flammability group G4 (the substance is flammable).
- The acidity of the environment is from 2 to 12. The normal level is in the area from 5 to 7. The mastic is completely suitable for waterproofing a bathroom floor.
- Consumption 2.78 kg/sq.m. That is, a bucket for 1,500 rubles is enough for about 3.5 square meters of surface. I must say that this is a fairly high price.
Shower tray filled with mastic
- Tensile strength 2.9 MPa. It must be said that for brick this parameter is not standardized. But the bending strength, depending on the design, can vary from 2.9 to 4.4 MPa.
- Adhesion strength to concrete 0.4 MPa. This parameter is important if the bathroom floor is completely bare.
- The adhesion strength to cement-based adhesive is 0.7 MPa. It is better to lay a tiled apron on top of the mastic rather than a brick.
- Adhesion strength to metal 1 MPa. This mastic can be used as glue for a metal siphon.
- Adhesion strength with polyurethane foam 0.4 MPa. This means that, if necessary, the bottom can be filled with heat insulator without losing the strength of the structure.
- Resistance to electric current up to 10 kV. This is an additional plus in the bathroom, which can be put to good use by heating the floor with an ohmic cable.
- Water resistance grade 0.01 MPa (1 meter water column, bathtub flood 1 meter deep).
What can we say? We would also be interested in the adhesion strength to acrylic polymers and paint. For the reasons that many will not want to tile the pallet, but will prefer to buy it ready-made. In this case, waterproofing of the foundation is carried out only in the area of the siphon and along the path of the sewer pipe.
Many people do not quite understand what tensile strength is. This parameter characterizes the ability of the coating to withstand mechanical pull-out loads. Surely the given values should be enough for a home shower tray, but you can do some calculations. Let's say the lowest adhesive strength is 0.4 MPa or 400 thousand Pa, which corresponds to 400 thousand newtons per square meter. The area of the average pallet ranges from 80x80 to 90x90 cm. Let's take the smallest of these parameters.
Homemade shower tray
If the side of the tray is 80x80 cm, its area is 0.64 square meters. That is, the peel strength of the entire surface will be 256,000 N or approximately 25.6 tons. We believe that it is not a fact that even an elephant will be able to roll our pallet on the bathroom floor if it is glued with such mastic. Thus, all concerns regarding the softness of the mastic are completely unfounded. Ahead of the readers' train of thought, we note that there are not only bitumen mixtures, but also cement ones. And their characteristics are no worse.
Penetrating waterproofing works on a completely different principle. The substance penetrates deep into the concrete, forming insoluble crystals with the hardening products of the cement stone. This type of waterproofing is designed specifically for walls and floors. We stated above that Slavyanka mastic is not the most economical material for waterproofing walls.
With specialized compounds for pools and containers, everything is completely different. Calmatron manufacturers claim that a bathroom floor coated with their composition increases the water resistance rating by 2-4 units. For convenience, let’s convert this to MPa to compare with bitumen mastic. Each unit corresponds to 0.1 MPa, which is an order of magnitude (10 times) higher than the parameter given above.
What's the catch here? It is necessary to check with the manufacturer the applicability of the building mixture. Judging by the description, it only works for concrete. And even more precisely - for cement. That is, you cannot strengthen brick and wood with it. What is needed is a concrete base (the floor screed in the apartment meets this condition). All other things being equal, Kalmatron's consumption is lower (1.6 kg per square meter), and the operating temperature range is much wider. It remains to clarify the price.
Waterproofing coating
On average in Russia, Kalmatron is sold at 75 rubles per 1 kg. For 1,500 rubles you can take a whole bag and treat approximately 12 square meters of surface with it. It turns out cheaper than bitumen mastic. Because the specialization of the material is completely different. There are other mixtures on the market that operate on a similar principle.
What's the salt?
The essence of the idea is that the waterproofing layer can be made using different materials. The base plays a big role. Calmatron is not suitable for a wooden base (judging by the description), but bitumen mastic will generally be suitable. Because the operating principle is different. Penetrating waterproofing reacts with the products of hardened cement stone, and the mastic forms a surface layer, the main thing for it is to cling to the base.
The catch is that manufacturers of penetrating waterproofing do not provide tensile strength characteristics. Of course, they should be acceptable, but I would like to see specific numbers. In this case, the compressive strength is given and amounts to 25 MPa. This is less than most bricks and corresponds approximately to concrete grade M250.
We suggest you familiarize yourself with: Plastic panels for baths
Based on the cost of materials, we can conclude that you should work economically. You can often see a scheme in which the floor is first covered with mastic, then it is applied on top under the tiles. There is no logical explanation for this. Except that the bathroom floor is completely damp. This doesn't happen in the average home. Moisture rises through the capillaries of the brick, which affects the durability of the structure. This is why the base is processed.
Some advice from experts
To ensure that the device brings exceptionally pleasant emotions, pay attention to the recommendations of professionals:
- if your goal is to take a shower after a steam room, take a closer look at open models, since there is no point in purchasing expensive products with a number of functions that will not be in demand;
- if you are an admirer of water procedures and a healthy lifestyle, buy a combined product that harmoniously combines the benefits of both a bath and a shower;
- if you want to relax in comfort after the steam room, give preference to closed products;
- if the room in which you want to install the cabin cannot boast of impressive dimensions, purchase a device with a corner tray and folding or rotating doors;
- if the room has a large area, take a closer look at products with a geometrically correct tray shape and sliding or hinged doors;
- if you have children, then buy a device with a deep base;
- If there are elderly people, purchase equipment with a flat or low base.
To implement your ideas, it is quite reasonable to use the services of professionals. They will competently and quickly establish communications, and also put everything in its place...
In general, be guided by personal preferences, but take into account the recommendations of experts. Whatever they say, a shower stall is very appropriate in a bathhouse, as it gives comfort, benefit and beauty! Good luck with your choice, dear readers! Bye.
Wisdom Quote: It doesn’t matter how hard you work, the main thing is the result.
Do-it-yourself shower in the bathhouse
Organizing a shower in a bathhouse is not that difficult. Depending on the complexity of the design, there are 2 types:
- summer or seasonal shower - installed in summer cottages and in those country houses that are used only in the summer, such a shower does not have a heating element, since the water tank is located directly on the roof of the building and during the day it heats up perfectly in the sun;
- winter or stationary - the shower is installed in a bathhouse building, here a heating tank is mandatory, since the shower is used not only for contrast dousing, but also for hygiene procedures.
In any case, a shower in a bathhouse involves organizing a water supply system and a drainage system.
The choice of location for the shower is determined by its design and the characteristics of the bath. Several factors are taken into account:
- a stationary shower can be placed in any area except for the steam room; in fact, the shower room should be located as close as possible to the water intake points, in this case there will be no need to pull pipes over a long distance and thus you can save on construction;
- if the bathhouse has a concrete floor with finishing, then you can install any options: a shower stall, a do-it-yourself pallet, and so on; if the floor in the building is made of wood, then only a metal pallet is installed: the concrete base does not have sufficient support and cracks quite quickly;
- when organizing a summer shower, if there is no heating tank, it is enough to use a “bucket-waterfall”; here you only need to provide for the installation of a tap in order to fill the bucket with water.
Important! The location for the shower in the bathhouse is chosen during planning, since during construction it is necessary to lay a sewer system and a foundation for the pallet.
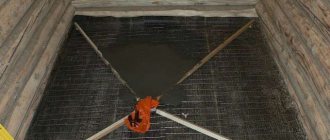
Floors and water drainage
A washing room in a bathhouse with a shower should be provided and organized during the laying of the foundation. In order for the shower to function fully, it is necessary to create an inlet and outlet, and this is much easier to do at the installation stage.
- First of all, they dig a cesspool where the used water is disposed of. The trench must be at least 3 m deep and up to 1 m wide. It is allowed to place the pit no closer than 3–5 m to the foundation of the bathhouse.
- The trench is reinforced with formwork and filled with cement. You can also use ready-made reinforced concrete rings.
- Then choose a place for the shower.
From this area to the drainage hole, a trench is dug at an angle of 20 degrees. A polypropylene sewer pipe is laid here - from the shower drain to the pit. Since the drains flow out by gravity, it is highly undesirable for there to be turns or connections in this area: this increases the risk of blockages. The trench is filled with concrete screed. It is imperative to ensure that the slope of 20 degrees is maintained. Important! If the soil freezes to a depth of more than 1 m, the sewer pipe is thermally insulated with glass wool or expanded clay. - In the future shower room, a metal sheet with a drain hole is installed so that the latter coincides with the end of the drain pipe. A drain is installed at its end: it prevents unpleasant odors from entering the washing room, and also does not allow the drainage system to become clogged. The sheet should lie with a slope. All joints are sealed with sealants, reinforced to strengthen the structure and filled with concrete. This is how you get a concrete shower tray. You can install it ready-made.
- The floor in the shower is tiled. This material perfectly withstands the test of water and steam and is quite easy to install.
If a shower is organized after the construction of the bathhouse, the floors in the future shower room will have to be dismantled. If the floor is wooden, then it is worth installing a ready-made pallet.
The necessary communications in the bathhouse that ensure the functioning of the shower include not only water drainage, but also supply. This is a little more difficult to do.
There are 2 main options for supplying the shower:
- connection to the central water supply - if there is such a possibility, then the water supply is organized by laying an additional branch from the main pipe; a shower requires both cold water for mixing and water for heating;
- supply from a well or lake - a pump is placed in the well, a water pipeline is laid from the well to the shower in the bathhouse, and the wiring is done here.
Heating is also possible in two ways. You can install a heating tank in the shower room. If the heating of the bath is carried out only with the help of a stove, then the device for heating water is located on the stove itself. This option is more economical.
The actual scheme is simple: a common water pipeline is run from the pump in the well to a storage tank in the bathhouse. There are 2 pipes leading from the tank: the top one supplies hot water, passing through the heating tank, and the one located just below supplies cold water. The pipes are brought to the shower head, connected and valves are installed.
When installing the system, several rules must be followed:
- pipes with hot water should always be located above the drains with cold water, otherwise the heated air rises up to the cold pipes, cools down and provides condensation on the water supply itself and on the walls of the bathhouse;
- all cables are placed at least 10 cm above the water supply;
- if hidden communications are installed under the shower finishing, then the water pipes are insulated, this is done in order to prevent condensation from settling.
Important! For good pressure, sometimes an additional pump is needed.
It is preferable to have not only cold, but also hot water in the shower. For this purpose, a water heating tank is installed. You can use a variety of options.
- Instantaneous water heater - water heats up as it passes through the device. To ensure such rapid heating, the tank must have high power - from 2 to 7 kW, and, accordingly, consume a lot of electricity. At the same time, the device is compact, fireproof and highly reliable. Installation of the product is extremely simple: the tank is placed on the wall, connected to a pipe supplying water on one side, and to a watering can on the other.
- Cumulative. It has a much larger volume - from 10 to 200 liters. Since the water here is heated gradually, it should be collected first. The water heats up to 55–80 degrees, so you should install a mixer in the shower. Heating takes time: 100 liters of liquid will warm up in 3 hours. Installation of the device is somewhat more difficult due to its large weight and volume. The device may only be mounted on a solid load-bearing wall.
- Heating stove tank - such a device is fixed directly to the chimney. While the oven is operating, it becomes very hot and this heat can be used. No additional heating costs are needed. Installing the system is more complicated: firstly, you must achieve the correct ratio of the volume of the tank relative to the volume of the chimney in the bathhouse. Secondly, water can only be supplied to the tank from above, that is, the water storage tank must be located above the installation level.
We suggest you read: How to insulate a bathhouse from the inside
The choice is made taking into account financial capabilities and the need for the amount of hot water.
Construction of a bathhouse with shower and toilet requires appropriate materials and tools.
First of all, you should select pipes:
- metal - very durable, but have considerable weight, installation will require at least a welding machine, in addition, the products are susceptible to corrosion and require constant care;
- polyethylene - very easy to install - you can equip a shower in a couple of hours, the products are lightweight, insensitive to corrosion, but can withstand heating only up to 60 degrees; if the tank heats the water to a higher temperature, it is worth installing more reliable drainage systems in this area;
- polypropylene - very light, durable and easy to install, can withstand heating up to 80 degrees, especially those reinforced with aluminum foil, this is the best option for a shower.
Shut-off valves – for hot and cold water. Metal parts are used.
You will need special fittings for polypropylene pipes: couplings, adapters, angles, clamps, and so on. The quantity depends on the length of the system.
Heat exchanger for a bath - flow-through, storage or titanium type.
Shower accessories – mixer, watering can, flexible hose, valves, holder.
A storage tank is required if a storage heater is installed rather than a flow-through heater.
A soldering iron for plastic pipes or a welding machine for metal ones, as well as other tools necessary for measuring and cutting pipes, hoses, thermal insulation, and so on.
In addition, you will need materials for finishing the shower, in accordance with the chosen style of the bath.
You can make a shower stall in a bathhouse yourself. This will require not so much special skills as competent calculation of communication and equipment power. The only exception is a gas heater. To install and connect the latter in the shower, you should call a special service.
Important! If you do not have the engineering skills to do the calculations, especially in a large bathhouse, it is better to contact a specialist.
Installation of a stationary shower includes several stages:
- arrangement of water drainage - as already mentioned, the sewerage system should be laid during the construction of the foundation of the bathhouse, it is very important to observe the slope of the pipe and the concrete base of the pan itself, since the water flows by gravity;
- choice of heating method - each option requires its own method of water supply, so this issue is first decided, depending on the selected installation and its power, the water supply system is calculated;
- water supply - pipes of a suitable type are selected, cut to length, installed using fittings and laid in accordance with the diagram; it is necessary to provide for the installation of a storage tank if the water supply pressure is low and if a storage or furnace tank is installed;
- fastening the heating tank - usually it is placed on the wall, if it is a stove tank, then it is mounted on the chimney pipe;
- system assembly - pipes are connected to the rest of the shower elements, including a watering can and mixer;
- finishing work - depends on the method of installation of communications, if the installation is open, the walls and floor of the shower can be finished immediately after laying the finished pallet; if a hidden method is used, then the pipes are fixed to the rough wall or into the wall in special boxes, and then the frame is mounted and completed finishing of the bath.
Important! When arranging a shower in a bathhouse, elements should be provided to limit the splashing of water. As a rule, the shower is installed behind a partition; the latter can be made of concrete, wood or even plastic.
Additional device features
Closed and combination cabins boast a huge number of amazing features. Control is performed by pressing the console buttons.
There are models:
- with water tank and heating device;
- with Turkish bath;
- with a Finnish sauna;
- with hydromassage;
- with open bathroom;
- with closed bathroom;
- with cascade shower;
- with rain shower;
- with Charcot shower;
- with chromotherapy;
- with ozone therapy;
- with aromatherapy;
- with built-in receiver;
- with built-in DVD player;
- with a radiotelephone.
Models with additional functions are in great demand, however, devices with a steam generator, which creates the microclimate of a wonderful Finnish or Turkish bath, hold the palm. A shower cabin with a sauna is pleasure combined with health! Such equipment will certainly appeal to all family members. But that, as they say, is another story, we already have our own bathhouse...
Masonry or concrete?
Generally speaking, a homemade concrete pallet can be poured in one piece. Weight is calculated using typical formulas (depending on the brand). This works especially well on a vibration stand. The only problem here is that you need a powerful machine to shake such a huge thing. After installing and covering the pallet with a layer of waterproofing, it is faced with mosaics or other types of ceramic tiles.
You see that the question of what to make a pallet from in the house is not as simple as it seems at first glance. On the one hand, brick structures have proven themselves well. On the other hand, their correct assembly is very difficult. This does not mean masonry with bandaging of seams, but the complexity of waterproofing work.
Pallet 1500*1500
The 1500*1500 pallet is very popular for the bathhouse (bath, sauna), it is installed to protect the base made of various deteriorating materials, the most common being wood.
The product is 5 mm thick, and this thickness is 2 times stronger than the Chinese acrylic ones that so often fail. To install this pallet , no auxiliary tools are required; you just need to place it on a flat base, you don’t even need to pull it in or shoot it.
Characteristics of a plastic bath tray:
- Has a large non-standard size (which are not available in stores)
- Pallet weight does not exceed 3-20 kg
- Any plastic pipe of any diameter can be installed in the pallet
- The pallet is very easy to install
- Maintenance free
- The plastic is completely hygienic (polypropylene)
- Withstands heavy loads for a large person
- Frost and heat do not harm him
- UV protected
- Increased pallet strength
- Doesn't crack, doesn't burst
- Maintains appearance after extensive use
The washing tray will not move anywhere and will perform its functions for many years. It is very easy to use, since it does not require much attention; you can wash it at the end of all procedures and that will be enough.
Due to its size, a 1500*1500*100 pallet is problematic to transport, since the average diagonal of a car door opening does not exceed 1200 mm; it also hardly fits on the roof of a car; a light commercial vehicle is required for its delivery.
To order a washing tray , call our manager to discuss all the details, questions and installation details, etc.
How to make a shower in a bathhouse
The strength of the board is not very high, and the wood will not escape the process of rotting. That is why installing a pallet in this case has its own characteristics. In a private house, it is better to choose a structure that is as light as possible, and make the foundation in such a way as to provide a dry bathroom floor using simple means. At first glance, it does not seem possible to fulfill these requirements.
We suggest you read: Choosing insulation for a bathhouse, features of organic and inorganic types
In fact, it is still possible to install a cabin in a wooden house with an underground floor and other delights of village life. In this case, the main tasks are as follows:
- Minimize the weight of the entire structure.
- Provide a ventilated foundation.
Amateur craftsmen offer the following non-standard solution to install a shower cabin in a wooden house. The pallet is bought ready-made in the store, but without legs, or the legs are not involved in its installation. Instead, a frame is assembled from polypropylene pipes. It consists of two frames running along the perimeter (top and bottom). Installing a shower tray on such a foundation means solving several problems in the bathroom at once:
- Easy access to the compartment with sewer pipe and drain.
- It is possible to integrate a 12 V exhaust fan into the decorative plinth panel to keep the house dry and to block the growth of mold on the bathroom floor.
- If necessary, the pallet can be easily relocated to a new location.
Polypropylene pipes are very simply attached to the floor and serve as the basis for hanging a decorative base. The corner can be bought in a store made of polycarbonate, which will further reduce the weight of the entire structure. You can harp on for a long time about the fact that the fan is supposedly difficult to install, but readers should also be aware that special ventilation (supply) valves are sold for wooden houses for installation in walls, including those with controlled flaps and other features. It doesn't cost anything to set this up to track humidity levels.
In a wooden house, a tiled shower does not always look its best. At least due to its large mass. Of course, no one forbids covering the base with mosaics. Finally, we note that when making a foundation from a polypropylene pipe, you need to provide some kind of support for the center of the pallet.
If you have your own plot, one of the first thoughts that comes to mind is building your own bathhouse. What then is it better to build it from? What material to choose for building walls?
We will try to answer these questions in this article.
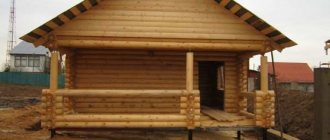
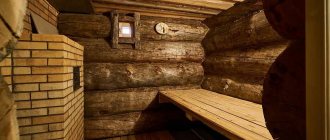
Photo of a sauna made of rounded logs
Tree
Traditionally, bathhouses have been made of wood for centuries. Environmental friendliness, low thermal conductivity and aesthetics made this choice the most suitable for the construction of this building.
But there are also many tree species. So which wood is better to build a bathhouse from? Let's figure it out.
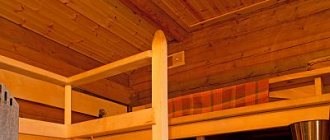
Floor layout and basic requirements
Every little detail in arranging a shower room should be carefully considered. There is even a whole set of requirements for this bath area, where, as already mentioned, special attention is paid to the floor. Therefore, floors must meet the following requirements: 1. Dry quickly.2. Be resistant to “thermal shocks”. 3. Ventilate.4. Avoid drafts.5. Maintain and maintain optimal temperature.
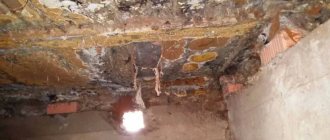
The main thing in organizing a wooden floor with a drain is, oddly enough, not the technology for making the finished floor layer, but the proper preparation of the underground space. It is errors in the organization of the underground that become the most common reason that the tree begins to rot ahead of time. Particular attention should also be paid to ventilation of the space under the floorboards; there must be either special holes for ventilation, or the possibility of raising the boards in order to dry them faster.
In addition to the fact that a wooden floor is not as cold to the touch as a tiled floor, it is also noticeably cheaper and easier to organize than a tiled floor, which requires the obligatory arrangement of a layer of concrete screed at least 5-7 cm thick. If necessary, construction the most budget-friendly construction, it is wooden floors that are laid most often, and a small drainage hole is installed directly under the bathhouse as a space for water drainage.
Next, we will look at examples of various schemes for installing a wooden floor in a bathhouse with water draining through the cracks between the floorboards, the so-called “flow floor”. Also, using the example of finished structures, you will be able to see different approaches to the implementation of the three basic principles of durable wooden floors with a drain:
- The presence of a slope at the surface of the underground so that the water does not linger anywhere, but completely flows into the drain hole.
- A properly organized sewer system that ensures the flow of water without its accumulation in places not intended for this purpose.
- Take measures to ensure ventilation in the underground space in order to effectively dry out the floor wood and support beams.
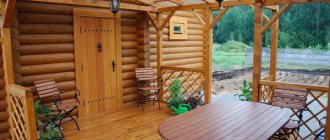
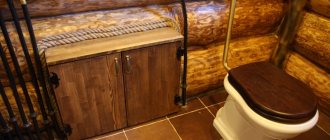
Shower in the bath: design
The design of the shower is determined by the style of the bath itself. In fact, there is not too much choice here.
The simplest option is a ready-made shower stall. Despite the utilitarian “technical” appearance, such a product looks equally good in a tiled room, a wooden one or a log house.
Russian - most often does not involve a shower, but a “bucket-waterfall” - necessarily wooden and voluminous. However, the latter can serve an exclusively decorative role. In such cases, it is better to hide communications and the shower itself as much as possible: only the watering can, holder and valves remain visible on the wooden walls.
Finishing with tiles allows you to get a shower in any style except rustic. To do this, just select the appropriate type of ceramic tile. If a techno or hi-tech style is implemented, communications along with shower accessories can be safely left in sight. However, in this case, metal pipes must be used or at least given that appearance.
Loft and even modern modern assume one brick wall next to tiled walls.
Cladding with artificial stone turns the shower into an accessory from an oriental fairy tale. This is the most expensive and most effective option.
Conclusion
You can arrange a shower in the bathhouse with your own hands. Moreover, it is possible to use several installation schemes, different water heating tanks and even different methods of water supply. However, some work - for example, connecting a gas heater for a warm shower - should only be carried out by specialists.
The washing room in the bathhouse can be equipped with a swimming pool, a plunge pool or a regular shower stall, which is installed on a pallet. It is easy to build a durable and strong foundation yourself by properly waterproofing it and making a slope towards the drain channel. Not a single bathhouse is complete without a washing department. In the old days it was combined with a steam room.
In the designs of modern steam rooms, these rooms are separated. Depending on the size of the washroom and the number of guests, it can accommodate either a large swimming pool or a compact shower stall - one or several. As for the equipment of the cabin itself, due attention must be paid to the shower tray.
You can purchase a production booth with an already assembled base. Ready-made pallets are made from various materials:
- Enameled steel. Such designs are characterized by strength and lightness. Disadvantages include the appearance of rust and the unpleasant noise produced by water pressure.
- Faience or ceramics. Such products are distinguished by originality, exquisite design and high cost.
- Marble. Durable and durable pallets. The most expensive.
- Enameled cast iron. They are very heavy, but will last a long time.
- Acrylic. A tray made of this material must be installed on special supporting supports, since it can be deformed under the weight of a person taking a shower. It deteriorates quickly, gets scratched and turns yellow over time.
To save on the purchase of a manufactured product, you can build a shower tray with your own hands. In this case, you will be able to implement a personal design project and make an arbitrary shape in accordance with personal preferences.
The process includes proper installation of sewer system elements, filling the bottom with a slope and thorough waterproofing of the base. First you need to decide on the location of the booth in the washing room. The pallet is made of concrete, and therefore it is important to calculate the maximum permissible load on the floor. It is advisable to take this into account at the stage of building a steam room.
Tags: bath, pallet, make
« Previous entry
Features of operation
The main nuances of the construction and use of a bathhouse are:
- the building is usually heated by wood-burning stoves, which are not intended for connecting the contours of a warm water floor;
- sewerage is necessary in the washing room, less often in the steam room;
- with periodic heating, wood on floors heats up faster than a concrete screed or slab;
- maximum heat loss is traditionally present in the floors of the lower floor, so they need to be insulated;
- a budget option for a bathhouse on an MZLF, columnar or pile grillage is a floor on the ground without overlap;
- Overlapping with beams, which has a shorter lifespan compared to a concrete structure, is a little more expensive.
Important! For bathhouses, the regulation SP 29.13330 (Floors) remains relevant, according to which the finishing coating in the washing room should be 1.5 - 2 cm lower than the lining in other rooms.
Adjusting the height
Since the weather was hot, a light awning appeared over the construction site to protect from direct sunlight.
The man didn't want the barn to be too tall, so he shortened the top pallets by half. In his case, this was also convenient because the neighbors would not unwittingly “look” into the storage room.
At first it was planned that the floor of the barn would be level with the ground, but given that rain is rare in this area and there is no fear of flooding, the decision was made to deepen the lower part of the room. Thus, the internal space has become more voluminous.
Photos taken by the Hubble telescope: truly mesmerizing
Make eye contact: how to become interesting when meeting people in 90 seconds
A woman has been criticized online for treating her son like a “servant”
Original creation ideas
The kitchen set consists of at least seven items:
- table for cutting meat, fish and preparing vegetables;
- stools;
- cupboard or shelves;
- sinks;
- bar counter for receiving guests;
- dining table;
- soft corner.
The easiest way to assemble a soft corner will be.
- You need to take 4 pallets and prepare them: wash, sand and prime with stain, and then varnish or paint.
- Place one on top of the other, place the third edge-on on the floor, with the main surface facing the side of the “sofa”, so that the back matches the length of the sofa.
- Fix the resulting structure with corners or self-tapping screws - you get the simplest sofa. You need to put specially made foam cushions on it on the seats and under the backrest.
Making a dining table from pallets looks a little more complicated.
- For two pallets, you need to cut off the checkers with a hacksaw at an angle of 90° to the boards near the middle row of checkers, practically divide the pallet in half so that one side has two rows of checkers, and the other has one. In one pallet the cut should be on the right side, in the other - on the left.
- A wide 14.5 cm board is placed on the resulting cut and secured with self-tapping screws.
- We install a third, completely intact pallet on the resulting cabinets; they can be secured using corners, glue and self-tapping screws.
- For convenience, wheels can be attached to the bottom board (leg). It is recommended to cover the upper surface of the table with glass or tightly fill the boards and put oilcloth on top.
To make a bar counter in a summer cottage set, you will need only two prepared pallets. You need to fold them with the bottom sides facing each other, fasten them with the corners and place them on the edge. Sew up the upper part with a wooden board to create a tabletop - to do this, you need to cut the boards of the same length and stuff them onto the crossbars, secured to the checkered pieces of the resulting cabinet. In the cabinet itself, you can cut a couple of boards, the second and third from the top, and attach a shelf of the appropriate size to the edge of the fourth board, where you can store some small things: cups, spoons, napkins.
For a sink, it will be enough to assemble the same structure as a dining table, cut a round hole for the sink and install it. If there is no sink yet, a metal basin can be inserted into the resulting hole. If there is no sewer drain, the “legs” of the cabinet are connected along the lower boards with jumpers, where a bucket is installed to drain dirty water.
The cupboard can be assembled from pallets using only the top side.
- Using a nail puller, remove the fasteners that hold the pallet checkers in place.
- Disassemble the top surface into individual boards.
- From the obtained materials, assemble a frame for the cabinet, connecting four planks alternately at an angle of 90°. Two rectangles for the frame are connected by transverse strips of equal length.
- The sides of the resulting cabinet frame are covered with boards.
The simplest shelves can be made by placing pallets one on top of the other, 3 or 4 pieces. Then cut boards between the second and third pallets (this will increase the area for storing dishes) or hang half of the pallet on the wall with the top side facing the wall, and line the bottom with a board. A small side is formed, behind which you can store cups, jars of spices and bottles of liquids.
Stools for a kitchen set for a summer house can be perfectly made from checkered pallets. You need to connect 4 checkers with transverse plank jumpers. In this case, the checker should be turned with a chamfer outward. By placing 3 such squares one on top of the other, you get 4 checkered cabinets, with a chamfer outward from the center of the stool, connected by plank jumpers. The top edge should be covered with boards and a foam cushion should be placed on top.
When all the details of the headset are ready, arrange them as you wish.
To learn how to make a kitchen out of pallets, watch the following video.
Garden decoration
Pallets are also suitable for creating garden paths. And here, too, you are allowed to safely experiment. The photo shows what an unusual parapet is made from boards stacked close to each other.
Beautiful wooden parapet Source yandex.net
Pallet boards can be used to cover the shoreline of artificial ponds. Wood combines beautifully with stone. Such an ensemble can decorate any landscape module and add a special mood to the overall design of the garden. Wooden paths from pallets in the country are created in different ways.
It all starts with digging a trench. A layer of top soil is removed to a depth of 15 cm. All debris (pebbles, plant roots) is removed. Geotextiles, roofing felt or any other similar material are laid at the bottom. It will help protect the wood from moisture that accumulates in the soil and prevent grass from sprouting.
The basis for the future path Source goodshomedesign.com
A layer of sand or crushed stone is placed on top of the geotextile, then it is carefully compacted. And the paving is assembled onto the finished pad. If the pallet is disassembled into boards and paths are formed by installing each individual element closely, logs are used to form paths. Ordinary boards are quite suitable for them. All parts are fastened together with self-tapping screws
To protect against moisture and mold, the wood is pre-treated with special compounds. They are applied in several layers. Each new layer is applied after the first one is completely dry.
To protect against moisture, any wood is treated with an antiseptic Source bazazakonov.ru
Separately, it is worth noting the need to process all internal elements of the pallet. Experts advise treating the part that will then be in direct contact with sand or crushed stone with protective mastic.
Path made from solid pallets Source dekormyhome.ru
You don’t have to disassemble the pallets and stack them entirely. To make such garden paths made from pallets more stable when walking, the inside of the cargo container is filled with crushed stone or sand.
To create paths, it is important to initially select whole pallets, those that have no cracks or signs of rot. To enhance the decorative properties of the material, the wood is additionally painted
Wooden paths made from pallets at the dacha are capable of connecting all household objects. They can be laid between the beds, then caring for the garden will be much easier. A large amount of dirt will not stick to your feet in wet weather. This will make harvesting easier.