how to build a bathhouse yourself from logs from an old house
Is it possible to use logs from an old log house for a bathhouse if you throw out the bottom row?
1 Igor Bugankov Pro ⇒ 753 2015-12-09 at 01:14:03
Of course it is possible, but when dismantling the log house, it will be necessary to number the logs so that the new log house is folded in the same sequence as the old one. You also need to remember that if you remove the lower crown, then the bathhouse room will be low, and it should be 2.2 - 2.5 m high. In addition, window and door openings will be lower, and one log above the doorway will have to cut out. It is not yet clear what the internal layout of the log house was and where the internal walls were located. It is difficult to adapt one room to accommodate another. Therefore, a steam room, furnace and shower room will have to be arranged in the existing areas of the house.
Your answer, Guest (LOG IN or REGISTER):
Prevention of rotting of the lower crowns
Before laying, the logs are treated with antiseptics.
In order for the logs of the lower trim to serve for a long time, the following recommendations should be followed.
- For the lower crown, choose hardwood that is resistant to rot and water - larch, oak.
- Before laying, the logs are treated with antiseptics. They use both folk remedies and special ones.
- It is also recommended to treat the base of the bathhouse with an antiseptic.
- The joints between the foundation and the logs must be carefully waterproofed - at least 2-3 layers of roofing material.
- The lower crown can be protected with a visor. Zinc strips are used for this purpose.
Often used motor oil is used as an antiseptic. However, this product has a strong smell and is only used underground.
I made a bathhouse from an old, 20-year-old log house. Photos before and after.
Channel subscriber Rinat, from the Komi Republic, shared an interesting story and material with us. He bought a plot of land on which there was a log bathhouse, assembled in 2002, according to the seller. That is, the log house is almost 20 years old. Rinat completely repaired the log house and made a completely new bathhouse, which you will see in this article. At the end of the post you will find before and after photos.
Repair of a bathhouse from an old, 20-year-old log house.
The first thing Rinat started with was dismantling the roof with the rafter system, since there was nothing to repair there. The bathhouse frame was built by good architects, there were no cracks in it, and he decided not to demolish it but to make a new bathhouse based on it. The foundation is also of relatively normal quality (without large cracks or chips)
Additionally, Rinat began construction of a terrace located on foam blocks (see photo above). The general idea is to cover the log house of the bathhouse with siding on the sides, and the front side with imitation timber. But first you need to install the roof (2 photos):
General information
Following the traditions of their ancestors, a Russian bathhouse is usually built from logs or timber. The peculiarity of such construction is that after the construction of the box, the structure must “settle” for some time. This is due to the fact that the tree needs a certain time to shrink, and this takes a year, or even a year and a half.
We suggest you familiarize yourself with: Thermal insulation of the wall from the furnace
And only after this shrinkage can you begin finishing, not only the exterior, but also the interior. For exterior work, wooden finishing materials are most often used. However, in our time it is quite acceptable to use artificial finishing materials, moreover, many of them very plausibly imitate the structure of wood.
Country bathhouse from an old log house
Good afternoon, forum users! I decided to put my bathhouse on display for you to see. In itself, it is not unique (except maybe the oven?). But in our eternal crisis, perhaps it will encourage someone to take a fresh look at their time, labor and material resources. So: In 2004, I purchased a dacha in a deplorable condition (the slate roof was cracked, the fence rotted and fell, the toilet too, etc., etc.). The log house of the bathhouse stood with uncleaned scaffolding. This caused the logs along the flooring to rot. There was no money for a new log house. Everything that accumulated over the winter period was spent in the summer on the purchase of material for repairs and restoration of the above. Finally, in 2013, the turn came to the log house. 1. This is how it was: 2. Having picked out the rot, I decided to cut out the rotten logs and see the real extent of the damage. 3. Having assessed the situation, I decided that I could try inserting other logs in place of the cut ones. If I'm lucky, I get a log house with rafters and sheathing. In case of failure, I will lose only a few additional logs and 3-4 days of work. 4. The insertion of logs was considered successful. In order to better hide the traces of insertion and renovation of the log house, I decided to strip the entire frame. I tried different abrasive materials, but settled on an angle grinder with a metal brush.5. After painting the walls with a protective decorative coating (Snowfall, it seems), I decided that the money saved on the log house could be used to buy metal tiles and extend the roof both on the side of the porch and on the other side 6. Until the fall of 2014, I was engaged in installing the ceiling and floor , electricity, insertion of windows and doors, water supply. 7. In the fall of 2014, I began manufacturing a sauna stove (according to a long-standing idea of my own). I graduated in the spring of next year. 8. After installing the stove and chimney, I made partitions and built shelves in the steam room, a lounger in the locker room, and made three benches. 9. By the fall, I covered the bottom of the porch with used metal (this provided additional storage space for various equipment) and the porch itself with wooden planks. 10. Next year I plan to make a decorative lattice from slats on the porch, like those installed in gazebos, to arrange a rainwater drain, a bench on the porch and two small tables (on the porch and in the dressing room).
17
- Shribikus
- 6 January 2021, 19:13
done right! You could even not want the inner lining, but carefully plan it with a planer (electric) and carefully caulk it... but because... done - even better. I made this myself... a black sauna. ))
- Sergi42
- January 6, 2021, 07:22 pm responded to comment by Shraybikus
Thank you! And inside there is not cladding, but partitions between the steam room, the locker room (a place to relax) and the washing compartment. And I didn’t cover the inside of the logs with anything around the perimeter. Hello, how much did you spend on the material? The bathhouse also needs to be reconstructed, but it will be built under the same canopy as the barn, i.e. two walls go outside, the foundation has crumbled in places, the ceiling and door and window openings need to be redone, as well as the stove. Heated from the inside, chimney, cast iron blanks and damper, almost black
- Sergi42
- January 6, 2021, 07:34 pm responded to comment by routE6672
Hello! Unfortunately, I can’t answer anything about money, since I didn’t take notes. And over the course of three years, I slowly bought something. I tried to save money somehow. I bought more in the winter and stored it in the garage until spring. In winter, prices are a little lower and there is time to travel, look, choose, bring. Used metal for the stove. Used larch floor. I did all the work myself, including delivery (it took longer than usual). Despite this, I think I spent 200-250 thousand. And you, too, don’t have to do everything at once: first, put the foundation in order, then the stove with the chimney and all the fire safety matters, and then, depending on the availability of resources. And once you start work, it will be easier to navigate by volumes, capabilities, and desires. I sincerely wish you a successful reconstruction and a good bathhouse! :) Thank you for your wishes and you did a great job with the revival of your backyard building. There is no material available, except for a bunch of different-sized boards, so I asked. To begin with, the cold outbuilding should be removed from the end of the barn so that there is access to one of the walls, the bathhouse itself, along with the rest, which is a little over 30 years old. There is a layer of expanded clay on top of the ceiling, you need to look at the frame, it can simply be sheathed on the inside with boards. The door and window frames definitely need to be replaced, the dressing room can be left cold. And the foundation, yes, the formwork and restoration. It’s probably cheaper to order a ready-made oven; cooking it yourself is not an option, no iron, no welding, no skills. In principle, I thought about that amount, but you still had to replace the roof
- Sergi42
- January 6, 2021, 20:26 responded to comment by routE6672
On the roof I only changed the slate to metal tiles. I ordered the latter where there is a cutting. Everything turns out cheaper. Firstly, you buy non-standardized sheets, but they cut them exactly to your size. Let's say 4180 mm. There is no overpayment for excess area, which still needs to be measured and sawed off during installation. Secondly, they had their own transport and loading and unloading and even delivery (about 18 km) were carried out free of charge. Thirdly, the installation of such sheets is much simpler, despite the danger of breaking a long sheet somewhere in the middle part in the initial part of lifting the sheet. Of course, it’s better to order a stove. Factory stoves costing up to 30 thousand rubles. they don't praise. An inexpensive stainless steel pipe (99% of sales) is only suitable for firewood, and even then not birch (it burns out quickly).
- matroskin
- January 7, 2021, 10:48 am responded to comment by Sergi42
It turned out great. Dimensions with layout can you bake?
- Sergi42
- January 7, 2021, 16:47 responded to comment by matroskin
Thank you! The dimensions of the bathhouse are 4500x3500 cm. At the same time, the dressing room for the entire width of the bathhouse is 3500 by 2000 cm. The remaining part is divided almost equally into the washing compartment and the steam room: 2500 by 1850 (steam room) and 2500 by 1650 for the washing room. Stove without a tank: Width - 620, Depth - 640, height - 1200 or 1400 mm, I don’t remember (sketches at the dacha, if preserved).
- matroskin
- January 7, 2021, 10:38 pm responded to comment by Sergi42
If it’s not difficult, sketch out the stoves as well.
- Sergi42
- January 20, 2021, 07:32 replied to comment by matroskin
Hello! I'm sincerely sorry, but... 1) I don’t have time now. 2) I don’t know how to draw at all (no one can tell a cow from a dog :) I drew doodles for myself :). 3) I don’t remember all the sizes either. I could look in the spring, but it will not be earlier than April 25-May 5 (depending on spring). Siberia, the lowlands, the northern slope make it difficult for the snow to melt :( I can say that I first bought grates (cast iron) and doors for the firebox and ash pan (blower, in our opinion:), and was guided by their sizes.
- matroskin
- January 20, 2021, 18:51 responded to comment by Sergi42
Don't forget, I'll wait until spring.
- Sergi42
- January 20, 2021, 07:46 pm responded to comment by matroskin
Agreed :) It would be nice if you remind me :)
- Sergi42
- January 20, 2021, 07:23 replied to comment by routE6672
Hundreds of times I have already heard (read) about this crap (no offense), which is served with “real Russian bathhouse” sauce. In such a bath, people are supposed to slowly freeze until they faint, and then lie for a long time in cool rooms with a feeling of great joy that they are alive. Otherwise... A bathhouse with a temperature of 55-65 degrees and high humidity is only a special case of the “Russian bathhouse”. Just like a bathhouse made of larch or fir. Just like a bathhouse in a dugout or hut. Just like a wood- or coal-fired sauna; in black or white; with or without partitions; with stones or cast iron balls; with birch brooms or hundreds of other brooms, etc., etc. It’s really a little dry in my steam room. When throwing water on the stones, the humidity rises to the desired level. Steaming becomes very comfortable, but... I’m thinking about how to make the humidity initially higher? When heating a bathhouse, should I place a bowl of water on the stove for evaporation? Or just get used to it: before entering the bathhouse for the first time, first apply steam and wait a few minutes (you can, for example, steam a broom at this time)? I think I’ll figure it out this year :)
- matroskin
- January 20, 2021, 18:50 responded to comment by Sergi42
Sketches, drawings, maybe?
- Andy_Ju
- 27 February 2021, 21:51
Why didn’t they treat the logs inside the bathhouse, because the outside turned out very cool. There are no visible vents in the foundation; if there are none, the floor will rot.
- Sergi42
- February 28, 2021, 07:43 replied to comment by Andy_Ju
The vents are made: small rectangular holes are left near each side of the beam (channel) in the upper part.
In addition, in the middle side part of the foundation there is a hole with a lid (in the penultimate photo you can see a little opposite the stairs), which allows you to penetrate into the underground part of the bathhouse for inspection and troubleshooting. I also often leave this hole open for better ventilation. The inside of the bathhouse was treated with a colorless compound, which is why it feels untreated. And in the steam room I applied something for elevated temperatures. The first few runs, there was some kind of foreign smell. Now it is felt only when the temperature reaches 40-50 degrees C. A little higher, the smell is gone. Well, as soon as you start to steam, there are only smells from a broom (or from any purchased compounds: tincture of eucalyptus, pine oils.) No matter how rich the experience of a specialist, and no matter how self-confident he is, sometimes he needs advice with somebody. Communication on the Internet has long become familiar to us. Various network users - whether a professional or a knowledgeable amateur - can post life hacks (simple useful tips on various topics) online that can be usefully applied to your home.
What are the advantages of using forum resources?
- A constant flow of interesting information about new building ideas.
- Simple and useful tips for construction.
- The opportunity to communicate with interesting people, experienced professionals in their field.
- Recommendations for choosing tools or materials.
- Also a pleasant plus is the lack of advertising, because users are consumers just like you.
DIY kitchen renovation ideas
How to breathe new life into old kitchen furniture? There are quite a few ways:
- Decorating with stickers will help hide minor scratches and chips.
- Covering with film will hide more serious damage.
- Painting gives a completely different look to the facades of kitchen units.
- Applying varnish is usually used to restore and protect furniture made from natural wood.
- Decoupage is the application of appliqués or raised patterns.
- The use of moldings and decorative overlays made of wood or plastic.
To achieve better results, these methods are combined. Let's take a closer look at restoration methods and features of restoration of different types of facades.
Old log house What to do with him? Reconstruction or demolition?
Thanks to the new trim, we straightened out all the sides and corners of the house. The sunken logs and distortions disappeared. The old log house was treated with antiseptics. We installed additional communications into the house. Due to the lathing on which the house block was mounted, the walls were strengthened, placing the house, as it were, in a frame. The updated façade has sparkled with new colors, and the owners of the house can still live for a long time in such a home without investing in new construction.
And it seems like there is a house, “No breaking, no building,” but finances still may not allow it. Is the game worth the candle?
The photo below shows our customer's house.
Is he thinking about reconstructing or demolishing?
old log house of our customer old log house of our customer
Here the question arises in this way. If the existing quadrature is enough for you and you have no desire to increase the height of the log house or add an attic floor, then you will not have to strengthen the foundation or definitely change the lower crowns, but it will be enough to make cosmetic repairs inside and out.
Quick installation and a presentable appearance for the facade can be achieved by covering it with wooden siding
Using our work as an example, we show how beautifully and adequately you can transform an old log house.
Customers contacted us with possible options for updating the log house. At the beginning, the option of resurfacing and repainting the log house was discussed. And having considered the option of finishing the facade with a new block house and painting it on site in the desired color, it turned out to be about the same. But! There are many more benefits.
The block house allowed us to keep the appearance option - a house made of logs.
Coniferous wood (pine with Christmas tree Kirov Forest). We chose the largest profile diameter. This makes him look more massive.
pine siding pine siding finishing with wood siding finishing with wood siding
We left the work of caulking the log house. And for example, the price for such a service starts from 80 rubles per linear meter. We cleaned and refinished all the trim around the windows with white paint. We also installed new trim and decorated the corners of the house.
The new façade provided additional insulation for the house
Thanks to the new trim, we straightened out all the sides and corners of the house. The sunken logs and distortions disappeared. The old log house was treated with antiseptics. We installed additional communications into the house. Due to the lathing on which the house block was mounted, the walls were strengthened, placing the house, as it were, in a frame. The updated façade has sparkled with new colors, and the owners of the house can still live for a long time in such a home without investing in new construction.
The benefits of upgrading your furniture yourself
Most people who own old furniture do not want to get rid of good, durable products; they prefer to restore them, change the color, and fit them into the style of the existing interior. Some people want to add value to an item before selling it. Whatever the motives, to save money, both on repairs and on the purchase of new things, many prefer to do restoration work with their own hands. Such actions have a number of significant advantages, namely:
- Minor cosmetic repairs can be done using improvised means, using leftover wallpaper, textiles, leather, and other materials.
- After a high-quality update, the products will last for a long time and will not be inferior in appearance to new models.
- During the restoration process, owners can show their creativity and create an item that will complement any interior.
- With independent recovery, a person gains experience, masters interesting techniques and methods, and later will be able to use them and perform similar actions more efficiently.
It is necessary to convert an old wooden house into a modern bathhouse
The house is completely disassembled for transportation "bowl" - the log house itself and the rafter system are in excellent condition. The project should not affect the “bowl” rafter system itself, it can be converted into an attic floor, you need to add additional elements, reduce the number or size of windows, add a veranda, stairs to the second floor, and so on
Email Save Comment 19 Subscribe Suitable answer
Laboratorio Creativo di Vladimir Lamfadel
Year(s)/Years ago: 4
Easier to demolish and redesign. There are 70-80 percent of alterations, there will be nothing left of this shed. The foundation, if alive, and the supporting structures, also if alive...
- Like | 2
- Save
Sort by: Oldest first
- New ones first
- Old ones first
Water supply
An old bathhouse, which has been on the site for a long time and is not used, is unlikely to have a water supply. To steam and wash comfortably, you need to correct this misunderstanding.
The bathhouse can be connected to any water source, from a well to a central water supply system. The main thing is to lay the pipeline correctly. Pipes should be installed in the ground no higher than the soil freezing level. In the underground area they must be carefully insulated. If the steam room is not heated in winter, care should be taken to install a device that allows water to be drained from the system. Otherwise, the pipeline will defrost.
If the water comes from a well or well located on the site, then this problem can be solved quite simply. All that is needed is to install the pipeline with a slope towards the water source. We should not forget about the tap for draining water from the heat exchange and heating system.
Comments: 19
oooh ksm
Year(s)/Years ago: 4
- Like | 1
- Save
Denis Abrarov thanked: ooo ksm
zamolotskikh
Year(s)/Years ago: 4
Good afternoon, Denis.
I partly agree with Vladimir.
It is necessary to conduct an examination of the object’s structures in order to understand whether reconstruction makes sense or not.
Best regards, Stanislav.
- Like | 1
- Save
Denis Abrarov thanked: zamolotskikh
Denis Abrarov
Year(s)/Years ago: 4
The house was completely dismantled, the “bowl” frame itself and the entire rafter system are in excellent condition.
- Like | 1
- Save
Laboratorio Creativo di Vladimir Lamfadel
Year(s)/Years ago: 4
So it was necessary to post a real photo... now everything is clear)
- Like | 2
- Save
oooh ksm
Year(s)/Years ago: 4
If you want to get a modern bathhouse, then timber 150x150 or 200x200 will suit you
- Like | 1
- Save
Design studio "Strekoza Design"
Year(s)/Years ago: 4
Denis, hello! Please tell me where the object is located?
- Like | 1
- Save
Denis Abrarov
Year(s)/Years ago: 4
50 km from the Moscow Ring Road along Leningradka
- Like | 1
- Save
Design studio "Strekoza Design"
Year(s)/Years ago: 4 Last changes: Year(s)/Years ago: 4
Denis Abrarov, excellent, Denis, we will be happy to cooperate with you, we specialize in turnkey projects, until the end of May when ordering repairs, a design project in The gift comes very handy for you since you just need a full cycle of work.
We have been on the market for 11 years already, we have all our own suppliers of materials, and as a result, the project comes out several times cheaper than the average market cost. We work officially, we conclude an agreement, we are financially responsible for the deadlines. For any questions, you can contact us by phone or you can leave us your contact information, the designer will contact you personally. ____________ Strekoza Design +
- Like | 1
- Save
Laboratorio Creativo di Vladimir Lamfadel
Year(s)/Years ago: 4
The main thing, Denis, is not to be fooled by the “gifted design”! Professional designers never give away their work.
- Like | 1
- Save
Design studio "Strekoza Design"
Year(s)/Years ago: 4 Last changes: Year(s)/Years ago: 4
Laboratorio Creativo di Vladimir Lamfadel, professional designers make a name for themselves with their work, and not with gossip about other designers on forums)
- Like | 2
- Save
Hildebrandt group
Year(s)/Years ago: 4
Good afternoon, Denis!
Ready to take on your project.
The cost of the project with 3D and a full set of drawings will be 1000 rubles/sq.m. We can carry out turnkey implementation without any problems; we have our own teams of builders and finishers. The project duration is from 10 to 20 days depending on the terms of reference. The implementation time and cost will depend on the materials.
I will be glad to cooperate!
Best regards, Andrey Hildebrandt.
- Like | 1
- Save
zamolotskikh
Year(s)/Years ago: 4
Good afternoon, Denis.
The cost of the project is 1,050 rubles. / sq. m.
You can see examples of work and contacts in our profile.
Best regards, Stanislav, ZS-ARCH.
- Like | 1
- Save
Denis Abrarov
Year(s)/Years ago: 4
The composition of the drawings of the project documentation section of the AR is needed: 1. General data sheet 2. Floor plans of the building and structure 3. Marking floor plans of the building and structure 4. Facades of the building and structure 5. Sections of the building and structure 6. Roof plan of a building and structure 7. Specification for filling window and door openings of a building and structure. 8. General plan for the development of a land plot for the placement of buildings and structures.
Builders are already there
- Like
- Save
zamolotskikh
Year(s)/Years ago: 4
Good evening, Denis.
The above price includes everything you listed (even a little more).
Floor repair
The old floor of a log house, even one that is expertly made using high-quality materials, will also need to be replaced. Creaky floorboards are less of an evil that can lurk in an old wooden building. Moisture over many years of use has taken its toll; the boards are probably rotten and could break at any moment. The old floor will need to be completely removed. This applies not only to the floorboards, but also to the entire system that supports them.
Before making a new floor, you need to provide maximum protection from moisture. A wooden house is very demanding on waterproofing
In addition, it is important not to forget to treat the joists and floorboards with an antiseptic during repairs; this will ensure the longevity of the building and protect it from pests
Converting a house into a bathhouse
Before handing over the house to the bathhouse, draw up a project and estimate, estimate the cost of the work and you can begin to realize your dream. If the old building is made of timber or logs, insulate the building, and also convert the room into a washing room and steam room. As a result, you will be able to convert the log house into a bathhouse.
Plan for converting a house into a bathhouse
The minimum area of the steam room should be at least 6 square meters - for a family of 3-4 people. If you plan to receive income from renting out a bathhouse, you should think about doubling the area.
Plan the premises in advance, or better yet, order an estimate from the company. You will also need to consider the number of shelves and the location of the stove. To determine the exact scope of work and the price of converting a house into a bathhouse, we recommend consulting with a manager. We have been working in the market for providing services for remodeling buildings for more than 15 years.
Arrangement of the foundation and installation of formwork
During construction, formwork is used. To prepare the building element, it is necessary to pour the concrete mixture and separate it with boards. After a certain period of time, the concrete mixture will take the desired shape. Formwork panels are made of wood or metal, polystyrene foam. In this case, the removable type of formwork is used repeatedly.
See also: Features of manufacturing a strip foundation for a bathhouse
If you are converting a one-story house into a bathhouse, a wooden type of formwork is used. The system includes panels that are fastened together by connecting elements - struts, spacers, pegs. Guides and boards allow you to hold the boards in the required position. During the installation process, the following points should be taken into account:
- Fastening of elements is carried out using a level. This prevents the foundation from tilting.
- Any gaps on the panels or minor defects should be corrected before use.
- The minimum thickness of the board is 0.5 cm. Due to this, rigidity and strength of the form can be ensured. Pegs and beams are 5 cm thick.
- Pegs and struts are fixed at a short distance from each other.
The ideal cost option is wooden boards and beams with dimensions of 50 by 50 mm or 50 by 200 mm. First, the pegs are installed in the ground along the entire perimeter of the future structure. The boards are fixed on the other side of the pegs. When attaching the boards, the main side must be flat and without distortions.
See also: Foundation slab for a bathhouse
The evenness of the fastening and the location of the elements is checked with a level. The next stage is pouring the concrete mixture between the boards. The formwork is removed only after the concrete solution has completely hardened. The recommended curing time for the concrete mixture is 28 days. In some cases, it is possible to remove the formwork system earlier. But you should make sure that the concrete has hardened.
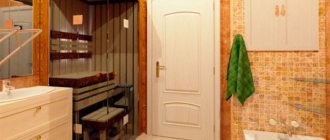
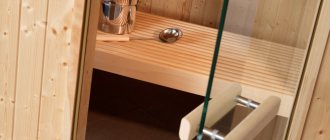
Choosing material for the steam room
For the steam room, it is advisable to choose aspen boards, the thickness of which is at least 6 cm. It is also possible to use spruce bars, but keep in mind that the wood must be well dried, since such wood retains its shape well. You can use beams for the frame of the building.
When arranging walls in a steam room, hydro and vapor barrier slabs are required, which are covered with boards on top. Make grooves in the aspen boards, which makes it easier to connect them together. Nails are suitable for fixing elements. Try to drive them into the material as deep as possible, so that when using a pair you do not get burned if you accidentally touch the metal.
See also: Interior finishing of a turnkey bath
They always try to place the stove near the door on refractory bricks. Be sure to lay a brick between the wall and the stove, and then take the pipe outside. Experts from Artel and S also recommend enclosing the structure with wooden structures so as not to accidentally get burned during operation.
Conducting electricity
To connect the sauna to electricity, use a special double-insulated cable. Remember that the lamp must be selected with resistance to high temperatures. As for switches, they must be moisture resistant. The switch is always installed at the entrance to the steam room. Be sure to place the wiring deep into the wall so that the wires do not create inconvenience or get in the way.
Let us highlight the main points during the conduction of electricity:
- do not skimp on lamps and cables;
- purchase lamps with heat-resistant glass;
- insert the wires well into the casing.
Remodeling the roof for a bathhouse
The steam in the bath will constantly penetrate into the attic, which will lead to moisture settling on the roof elements. Be sure to inspect the roof of the building and strengthen damaged areas of the rafters. This does not mean that you need to completely change the rafter system. It is enough to find the rotten beams and replace them.
If you still decide to change the rafters, then use boards with parameters 150 by 150 mm. During installation, take a step of 100 cm between the boards and do not forget about the slope of about 30 degrees. First, the outer boards are installed, between which you need to stretch the rope along the ridge. This rope will serve as a guide for the installation of subsequent boards.
See also: Remodeling the roof of a house
The final stage is the installation of sheathing and finishing roofing material.
How to redo walls
The walls in the room must retain heat. The formation of so-called “cold bridges” is not allowed. That is why pay attention to the cracks that must be sealed. To seal cracks in timber houses, use tow, polyurethane foam or moss.
If there are no visible defects, insulate the walls not only inside, but also outside the house. The stages of work to remodel the walls inside the bathhouse are as follows:
- dismantling the casing;
- installation of bars in a vertical position;
- fixation of vapor barrier;
- laying polystyrene foam or mineral wool;
- foil insulation;
- finishing.
The exterior walls of the bathhouse are finished in a similar manner. But the difference is that the insulation needs to be laid overlapping, and not end-to-end. Due to this, it will be possible to avoid the appearance of cracks.
See also: Bathhouse reconstruction, prices and stages of work
As for windows and doors, it is also advisable to redo them, or better yet replace them with new ones.
FAQ
The walls of the bathhouse are constantly losing heat, what should I do?
Conduct an internal inspection. Seal all visible cracks and defects. Additionally, insulate the walls using 5 x 5 cm bars. The step between the bars is 2 cm. Place the insulation in the sheathing and cover it with a vapor barrier film. After this, you will level the walls and be able to lay the finishing material or secure the old one.
How to seal cracks in slate on bathhouse roofs?
It is not necessary to buy new roofing material. If the holes are small, they can be sealed using a special solution. To do this, mix asbestos, water, cement and add PVA glue. Apply the composition in 2 layers, first waiting for the first one to dry.
What kind of shelves should there be in a bathhouse?
Try to make the shelves wide. The optimal width is 65-70 cm, of course, if the size of the room allows. Be sure to treat the surface of each shelf to avoid splinters.
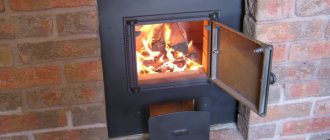
Furnace and ventilation
I placed a stove-stove on fire bricks near the door. He also placed bricks between the stove and the wall. The pipe was taken outside. The stove was fenced with wooden railings so as not to accidentally touch the hot metal.
I drilled a small hole in the wall next to the stove to allow air flow into the stove. I also made a ventilation hole under the ceiling. Both openings were equipped with valves that allow you to regulate the inflow and outflow of air.
Link on topic: Do-it-yourself bathhouse - several options for building a bathhouse
Types of jobs
Repairs can be of two types:
- capital;
- cosmetic.
Capital
Features of the overhaul:
- Performed in cases of severe damage.
- All decorative coatings must be replaced.
- Old walls and partitions are dismantled and new ones are erected.
- The stove equipment and chimney are completely replaced.
- New communications are being laid - wiring, water supply pipeline, sewer drain.
- Windows and doors are being replaced with new ones.
After a major overhaul, the appearance of the building and rooms will be different from the old decoration. Requires significant financial and labor investments.
Cosmetic
Features of cosmetic repairs:
- The lining on the ceiling is being replaced, and simple hanging structures are being assembled.
- The walls are painted, the wallpaper is changed, new putty is applied.
- The floors are replaced with boards, laminate or linoleum.
- Switches, sockets, lighting fixtures are replaced.
- Damaged chimney elements are being dismantled.
- Old doors and window frames are painted and restored with wooden putty.