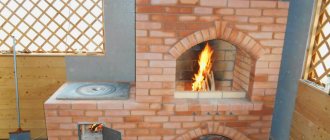
A stove or fireplace can become a real decoration of any interior. In addition to warmth and home comfort, they can also carry aesthetic qualities.
Each owner wants such things not to be purely functional, but to fit into the interior with their appearance.
This result can be achieved by decorating the stove with stone or tiles. Before you start finishing, you can get inspired and get ideas by looking at a photo of the stove lining. Next, an action plan is drawn up and the necessary measures are taken.
Cladding methods for stoves made of bricks
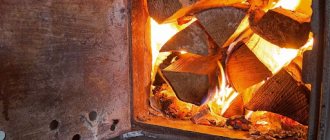
Even if there are modern heating systems, as before, many homeowners of private houses prefer to keep classic wood-burning stoves in the house.
They are erected even in new buildings - fuel regularly rises in price, and the situation with firewood is somewhat easier. A wood-burning stove will always remain a very profitable option for heating your cottage.
And since an attractive interior in a house is very important for the excellent mood of those living in it, many homeowners are also interested in lining for the stove.
How and with what is it possible to decorate the stove? In most cases, cladding is a necessity. Often stoves are made of bricks with good performance properties, but completely unsightly. Over a certain period of time, ovens without lining become covered with layers of dust, and it is very difficult to remove it from a rough surface. Also, due to the additional mass formed by the lining, the heat capacity of the furnace increases. Methods of implementation are selected depending on the owners’ own desires.
Preparing for decoration
Before starting work, it is advisable to completely remove the old layer of finishing and remove all dust and other particles, deepening the joints between the bricks.
After which it is better to prime the surface twice with a heat-resistant compound and let it dry.
Next, the above mesh is stretched and strengthened. You can use metal elements at the corners.
What is the best way to line a brick stove?
In private households and dachas that want to be habitable all year round, but there is no possibility of central heating, stoves are installed. Modern developments make it possible to create stoves not only for wood heating. But the main material, even now, is brick.
Often such an object occupies a fairly significant area of the house. Accordingly, you want everything to look as attractive as possible. Therefore, a logical question arises: how to reliably line a brick stove? This is not an idle situation that requires a balanced and serious approach.
Wood is not only heating fuel, but also a beautiful finish
Wood has never been excluded from the category of finishing materials for fireplaces. This material conducts heat poorly, so it should be used sparingly and wisely, using it as an accent to façade decor.
The wood heating stove also has its own corner. Here it can be used to decorate shelves, decorate corners, beds and benches.
Why is tiling a stove wall useful, and how can it be done without high costs?
Every day, economically, life becomes more and more difficult, so not everyone can afford to line the walls of a heating unit with clinker tiles, majolica or tiles. In most cases, the average person is inclined to use ordinary ceramic tiles to perform this task, the installation of which does not require special construction skills or (as in the case of tiles) artistic perception, and its price is not as “biting” as the cost of the facing materials listed above. In any case, the costs will be justified, because finishing the stove with ceramic tiles will allow you to:
- Improve those parts of the house that are connected to the heating device.
- Spend less effort on cleaning the room, since tiles are much easier to clean from dust than plaster.
- Reduce the risk of dangerous gases entering the living rooms from the firebox, which can leak through cracks.
- Make the heat exchange process more rational.
Of course, by hiring professionals to do the work, you can save yourself from unnecessary worries, but in this case it is unlikely that you will be able to avoid large waste, since the workers will have to pay almost the same amount as they paid for the building materials. On the other hand, professionalism does not always mean integrity. Therefore, if you are eager to acquire construction skills, then you can do without the help of specialists. There are certain advantages to this, since tiling a stove with your own hands can be safer than getting the same effect and paying twice as much.
Cladding materials
In general, the stove is considered the most important object in the house, rightfully occupying a special place. Being a source of warmth, it serves as a keeper of traditions and creates indescribable comfort. That is why you need to make every effort to ensure that the stove acquires an attractive appearance and is not subject to destruction.
The finishing material must be selected with many positive qualities. First of all, it must be heat-resistant and heat-intensive. That is, to keep the surface from heating, but at the same time, to evenly distribute the heat inside the room.
The walls of the stove can be decorated with various types of materials. These can also be coating elements known from ancient times made of special types of clay, which undergo long processing. As well as more modern materials, which are made on the basis of previously used components, but subject to more significant preparation. Let's take a closer look.
A natural stone
It has been known for a long time and has proven itself as a finishing element for brick stoves. The stone has good performance properties, many of its types are quite cheap. The most commonly used are shell rock and sandstone. Finishing the stove with decorative stone allows you to refine the heat source. The decorative component is very original. The walls of the stove have a very natural look.
In addition to cheap materials, others are also used. Among them is marble. Lined walls, thanks to its external properties, acquire an individual and quite respectable appearance.
Soapstone chlorite
It has several other names (soap stone, pot stone, stove stone). It is a natural material that is formed from a combination of magnesite and talc, subjected to long-term exposure to high temperatures and pressure.
In terms of its appearance, soapstone chlorite is very attractive. The stone does not require additional finishing.
Ceramic tile
This material is a certain type of clay that is processed.
It acquires the following qualities:
- density;
- durability and strength;
- heat resistance.
Ceramic tiles have a significant thickness, reaching eight millimeters. The most commonly used variety is the terracotta variety. It is preferable to choose one that has not been covered with glaze.
Tiles
Covering the stove with tiles has been used for quite some time, in many countries around the world. Tiles can be classified as ceramic tiles, but they have a significant difference. The fact is that on the reverse side of such material there is a bowl (rumpa). It is due to this that it is possible to obtain a kind of thermal pillow. It is attached to special points reserved for this purpose. The appearance of stove tiles varies greatly.
Clinker tiles
It consists of fireclay, clay and various natural dyes. This tile is characterized by:
- absence of numerous pores;
- fortress;
- good heat dissipation.
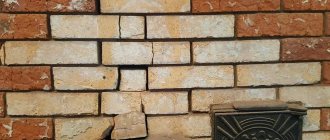
Painted brick
Another option is not to plaster the stove or varnish the bricks, but to paint them. This is what our user with the nickname adi-vrn did, and many, having seen such a successful example, wanted to try painting the bricks of their stoves.
adi-vrn
I removed all the plaster, opened the seams, grouted it with terracotta grout and painted it with lime with the addition of black tint and salt. It turned out to be a great gray color.
How to choose the right material for your stove?
An amateur craftsman should immediately stop buying tiles. This is an expensive material that not even every stove maker knows about. The secrets of such cladding are available only to real professionals. The fact is that the laying of the tiles must be done at the time of construction of the stove, and each part is attached to the masonry using staples and wire.
Tile tiles are also not suitable for tiling work. The expansion coefficient of this material differs significantly from that of the brick from which the furnace is made. In practice, this leads to the fact that during operation of the heating device, parts of the cladding will simply fall off.
Ceramic finishing materials for stoves
Rice. 1
You can imitate tiled masonry with various types of terracotta (Fig. 1) or majolica (Fig. 2). Glazed tiles with a convex pattern, flat with or without painting, are an excellent replacement for expensive tiles. A stove lined with them will look aesthetically pleasing, but such material costs much less.
Rice. 2
A type of building ceramic used in finishing brick stoves is clinker (Fig. 3). This is a special heat-resistant tile, most often it imitates the same brickwork. The color range of clinker is very diverse: from white to shades of fired clay (terracotta, brown, chocolate, etc.).
Rice. 3
Modern material - porcelain stoneware - is also ceramic. Its slabs can be similar to valuable types of natural stone, terracotta and clinker. Low porosity makes porcelain tiles resistant to high temperatures.
When choosing ceramics to decorate the stove in your home, you need to pay attention to the back side of the tiles.
The material intended for decorating the stove must have a well-defined notch.
It is better to purchase such cladding in specialized departments of construction stores.
Natural and artificial stone
If stone is preferable for finishing a brick stove in a country house or in a country mansion (for interiors in the style of a castle, chalet or hunting lodge), then in stores you can choose a variety of finishes of this type.
Rice. 4
Decorative stone (Fig. 4) is a molded tile obtained by cold pressing a mixture of filler (sand, stone chips) and various binders. To make the wall lined with it appear to be finished with natural stone, manufacturers include in the kit several types of surface patterns that replicate the appearance of the simulated mineral (slate, sandstone, etc.). A special coating makes the tile moisture resistant and makes caring for it quite simple: you just need to wipe the dirty surface with a damp cloth. Thin cladding plates are very light, which can be considered an undeniable advantage over natural stone.
Real rock fragments can be purchased from quarries, crushed stone factories or construction companies. When using them to finish a brick stove, it is important to remember that this heavy material must be properly secured to the wall. To preserve the natural beauty of the material and make it easier to care for the stone, it is best to coat the finished cladding with varnish.
Preparatory stage
To ensure that the ceramic tiles used for tiling do not fall off and serve for a long time and with high quality, the working surface must be prepared. The preliminary stage consists of removing any old coating of the stove - whitewash, plaster, varnish, etc.
If the stove masonry is old, then it is worth carefully inspecting it and eliminating possible defects. All cracks, holes, and crevices must be covered, wait until completely dry, and then sand the surface. You will have to resort to leveling the walls if the device is askew. A curved surface is unlikely to serve as a good “platform” for strengthening the cladding. For leveling, it is necessary to use a sand-cement mixture (at a ratio of 3:1), cement with a grade of at least M400 is suitable. To keep the walls smooth and beautiful, do not forget to pick up a plumb line or building level more often.
In the process of leveling furnace walls, you cannot do without special equipment.
The seams between bricks should not be thick or protruding. It is best to deepen them using a grinder with a special attachment. 10 mm will be quite enough. If there are no such devices, then you will have to use the “old-fashioned” method - a chisel with a hammer. After this procedure, use a wire brush to clean the edges of the recesses.
A chain-link mesh placed between the brickwork and the ceramic surface will help avoid various troubles that appear from temperature changes (cracks, chips, distortions, voids, etc.). To ensure that the metal mesh holds firmly on the brickwork, use dowels (or nails 70–100 mm) in brick joints with a fastening pitch of 50 cm. The caps of the fasteners should protrude from the surface to a height of ten millimeters.
To give the working surface greater adhesion (adhesive properties), a deep penetration primer layer is applied over the chain-link. Wait for the layer to dry completely, clean it and start laying ceramic tiles.
The stage of attaching the chain-link mesh will help in the future to better join the ceramic plates
Cladding with metal sheets
Galvanized steel and aluminum sheets are used for cladding.
The decision to cover the stove with metal sheets is used not only for decoration purposes, but also as a way to reduce the consumption of masonry material. In the second case, a box is made, inside which a quarter-stone body is folded. The gaps are filled with shungesite sand, which has a high heat capacity. This design heats up quickly and is practically impervious to external factors. The work uses blued, galvanized steel, copper and aluminum.
Advantages of using metal:
- affordable price;
- representative appearance;
- short terms of arrangement;
- ease of assembly;
- ease of cleaning and maintenance;
- possibility of dismantling and improvement.
Disadvantages of technology:
- the likelihood of overheating when the lining comes into contact with the door;
- susceptibility to corrosion by the creosote produced by the stove;
- inability to eliminate mechanical damage - dents, holes, deep scratches.
The stove can be finished completely or partially; the use of ribbed slabs increases the heat transfer of the hearth.
To decorate the stove in the house in an interesting and unusual way, several types of material are often used. This approach is used not only for aesthetic, but also for purely practical purposes. You can decorate the base and sunbed with cheaper tiles, line the firebox level with tiles, and put a stone on top. There are many options, the main thing is to maintain harmony and follow the instructions for using the finish.
Adhesive materials
A mixture of cement, clay, chalk and sand
To prevent the facing coating from falling off in the first days of using the stove, you need to select an adhesive composition that matches the operating conditions of the device. You need to focus on criteria such as strong heating, thermal expansion, temperature differences, and shrinkage of the structure.
List of possible compositions:
- Clay with polymer and natural fillers in the form of sand, sawdust, sawdust. Depending on the fat content of the clay, 2.5-4 parts of additives are taken per 1 part of it.
- Cement with additives. The solution has high strength and adhesion. The mixture is made from cement, clay, chalk and sand in a ratio of 1:1:1:3.
- Ready-made mixtures. The basis is purified quarry sand and fireclay kaolin clay. Polymer additives ensure that the adhesive adapts to thermal expansion.
When choosing a material, you should give preference to proven products. It's better to overpay a little than to constantly redo the work.
Clay mortar for oven
How to prepare: clay, sand and water are mixed in certain proportions, which depend on the type of clay:
- for oily clay the ratio will be 1 part clay, 4 parts sand, 1 part water. The fat content of clay can be determined in the laboratory or in a traditional way - you don’t feel sand in it, and a ball rolled out of it cracks badly when it dries;
- for normal – 1:3:1
- for skinny people – 1:2.5:1
Cement mortar for furnace
How to prepare: cement and sand are mixed in a ratio of 1:3 and brought to the desired consistency with water. In this case, the cement must be grade M 400 or higher. To improve the properties of the solution, it is recommended to add PVA and asbestos to it. Stove makers advise adding 1 kg of salt. onto a bucket of mixture;
Dry mixture mortar or special adhesives (cement, dispersion, epoxy)
They are ready-to-use mixtures intended for a specific type of tile. They are good because the proportions in them are carefully adjusted, and in addition, various plasticizers are added that improve the properties of the adhesive solution. Such adhesives have proven themselves well: SCANMIX Skanfixsuper (Finland), Plitonit-SuperKamin (Russia-Germany). Budget options: SILTEK T-84 (Ukraine), “Pechnik” (Belarus) and “Plitonit W” (Russia).
Ready-made adhesive solution - adhesive mastic
When choosing this type of glue, you need to pay attention to the markings. It should be intended for lining stoves and fireplaces. Good user reviews for NEOMID SUPERCONTACT (Russia), Terracotta (Russia), “Parad-77” (Belarus). But, in general, the quality of adhesion of the mastic to the surface leaves much to be desired.
In any case, the solution must meet the requirements for heat resistance and coefficient of thermal expansion. Ideally, laying tiles on the stove should be done using the same mortar that was used to level its surface.
All professionals and users agree that it is not worth saving on materials.
Whitewash and paint
The most inexpensive option to make a work of art out of an old stove is to whitewash it and draw some simple ornament on the whitewash.
FORUMHOUSE memberBeatrice
I think it will be very stylish.
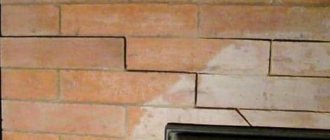
Pech owners sometimes do not decide on this option because they are afraid of cracks in the whitewash: the beauty will immediately end. But in general, these cracks are easy to overcome. Here is a life hack from our user with the nickname Vladi Mir:
- If a crack appears, eliminate it completely: pick out the plaster right down to the bricks, clean out the remaining crumbling clay from the brick seams, hammer new mortar into the crack as tightly as possible;
- Plaster the stove with reinforcement (burlap, mesh, gauze).
- Unreinforced plaster on a stove will always crack because the brickwork will expand and contract during heating and cooling cycles. Therefore, you just need to knock off the old plaster, put a new one through the reinforcing layer, whitewash it and paint it. There will be no cracks.
Plaster will not crack if applied to a hot stove.
Vladi Mir
There are no other budget options. Finishing with stone and tiles costs a lot of money, where special heat-resistant mastics alone already cost a lot of money.
Alternative finishing methods
The stove can be painted
If you lack money and resources, you can choose inexpensive but effective finishing methods.
The options are as follows:
- Coating with paint or varnish. Heat-resistant solutions that are resistant to temperature changes are used.
- Upholstery with slats. The lamellas are located on insulators 10-15 mm from the walls and at intervals of 3-5 cm. This way the surface is masked, heat transfer is not disturbed.
In past times, stoves were whitewashed with lime, but this method is rarely used now, as there are many more practical and effective options.
Varnish on brick
Our user with the nickname Lokos spent a long time thinking about how to improve an old stove.
I found very expensive imported terracotta tiles and was prepared to buy them, but then I cleaned the old whitewash from the stove and was simply amazed at how old brick looked. What did he do:
- crashed into a glass door;
- re-saved the seams with masonry mixture;
- cleaned off all excess with a wire brush;
- primed;
- covered the seams with heat-resistant red-brown enamel;
- covered the doors with black enamel;
- I applied two layers of heat-resistant varnish to the bricks.
Finishing a stove in a private house: choosing material for finishing and stages of work
More and more families are thinking about moving permanently to their own private house with a plot of land. And what can warm you up and restore your vigor after working in the garden, if not a heater like a stove.
Since ancient times, the Russian hut has been heated by these sources of warmth and comfort, be it a huge, half-yazha-sized Russian stove with a stove bench (or a rough one) or a small “Dutch oven”.
Of course, they are being improved, new technologies and materials are being used. The ancient mud stove is a thing of the distant past, but even now the stove is a symbol of the hearth.
Currently, depending on the preferences of the owners, they install stoves and fireplaces of various types and try to decorate them in accordance with their taste.
This gives the entire appearance of the premises a special zest, unique flavor and comfort. People have long tried to decorate the stove. Or paint it with patterns on the plaster or, in rich houses, decorate it with tiles.
This tradition has not died out even today. Even in a small country house, they try to give the stove a presentable appearance.
Finishing materials
To decorate a brick oven, they mainly use different types of tiles, but you can paint the plaster with bright colors, considering it as the most budget option.
Expert advice: if you decide to give your stove sophistication and uniqueness, then the best choice would be to use tiles.
It is necessary to understand what types of finishing materials there are for this:
- natural stone (sandstone, shell rock, serpentine);
- bright painted majolica;
- ancient unglazed terracotta
- heat-resistant clinker tiles;
- the latest novelty is porcelain stoneware;
- exquisite tiles.
All these facing materials for stoves meet the necessary characteristics:
- sufficient thickness (6-9 mm);
- withstand high temperatures;
- increased strength under mechanical stress;
- the structure is quite low-porosity.
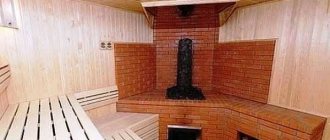
If when tiling a sauna or stoves in a bathhouse, only heat retention is important, then when decorating a home stove, you need to think about the design of the entire room.
Sandstone and shell rock
Natural stone will not add sophistication to the room; most likely it will look somewhat primitive or return it to the scenery of the Middle Ages. But it will add originality to the room.
Please note: sandstone and shell rock have excellent heat resistance and retain heat well.
Beauty majolica
The tiles, painted with bright fiery colors and covered with a durable layer of glaze, came from the Mediterranean. Ancient Roman traders brought it from Mallorca.
The area was famous for its tin-lead painting on ceramic tiles and pottery.
Glazing serves as another layer that retains heat inside the finishing material, so majolica was in demand as an excellent type of cladding.
Only wealthy people could decorate their stoves with such beauty.
The oldest type of ceramics
Terracotta is a special type of clay with a porous structure. In fact, it is the same majolica, but not glazed. It is considered the most ancient type of cladding. It has high strength and bright color.
Pressed clay of a certain grade is first pressed and then fired in special kilns. It turns out to be an excellent decor for cladding.
Terracotta was used in construction for roofing, various types of cladding, and to decorate stoves and hearths.
Stove in the country: plaster or tile?
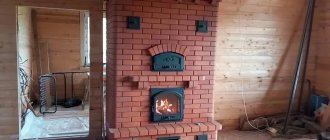
Hi all. Yesterday they built a stove for me at the dacha. Uncomplicated and simple. In terms of evenness, small deviations are visible, but the stove is heated, everything seems to be normal. I thought about plastering it, but there is an opinion that when the stove is heated intermittently, the plaster falls off. However, I also heard about tiles that burst and fall off. Your experience in the studio!
The stove can be plastered and lined with ceramic tiles, it can be whitewashed, painted, decorated with tiles or natural stone. It is important to follow technology when working. The easiest way to finish a stove is plastering. The modern market offers a huge variety of heat-resistant dry mixtures for plastering stoves and fireplaces. A metal mesh with 10-20 mm cells must be attached. Can be tiled. The most durable option can be called clinker, because highly plastic grades of clay are used for its production. Can you recommend stone finishing - soapstone (from Karelia). It belongs to the volcanic rocks and has the highest heat capacity. Having heated a stove lined with soapstone for a couple of hours, the heat will be enough for a whole day. Or from soapstone, which comes to us from Finland, which is stronger and more durable thanks to the magnesite in its composition. Less fuel is consumed and savings are evident. The texture, of course, is beautiful and no amount of heat will destroy it. A special glue made from soapstone powder and liquid glass is required. This is still a fairly expensive option. But it's worth thinking about. You can veneer some part of the stove, combining it with another material, and give it an unusual and sophisticated look (see figure).
bake
The metal mesh is attached to the base of the stove with nails, which are driven into the cracks between the bricks and then bent. Their caps should protrude about 10 mm above the surface. You can also add washers (“pancakes”) for more secure fixation. see diagram. Like that. Before doing this, the seams are cleaned and slightly deepened. Hot-melt adhesive will not be able to withstand such a load, and over time it will “creep”. Instead of mortar, you can use hot-melt adhesive, or you can add it to the plaster mortar.
net
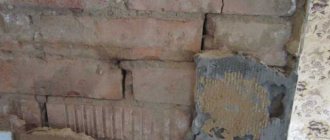
Comment from our subscriber Nikolai: Try terracotta tiles, I’ve been using them for two years, both in winter and summer at the dacha. In winter, we heat immediately upon arrival. Nothing fell off, before this it was a simple tiled one - also without problems, it stood for several years. The photo shows the remains below, glued with heat-resistant glue, the same tiles in the sauna.
Search Google for tiled stove tiles, you can make this work of art! A little expensive, but crazy how beautiful!
I remember tiling the stoves, the tiles were special, but not tiles (to be honest, I didn’t work with tiles, I didn’t have them). It was like tile, glazed, and not cement itself, but made of baked clay, the consistency of a good brick, only a little denser (apparently, this clay was pressed at the factory before firing). The same story - nails between bricks and gluing tiles. The solution was a mixture of ordinary cement, refractory clay and fine sifted sand. You just shouldn’t use cement under any circumstances, it will definitely Crack from heating. It will crack itself, and the tile will also tear. I don’t remember the exact proportion, I just remember that I put a little more clay than cement, and cement is usually put on top of good plaster. The main thing is to mix everything well, both clay and cement, so that it doesn’t turn out that in one place there is a lot of cement but no clay and vice versa.
Do-it-yourself finishing of stoves in a private house: materials, tools and technologies
Where can I find information about stove finishing? You can use your imagination or use examples of work from construction catalogs and photos from interiors magazines; another option is to consult with a designer who specializes in the design of residential premises. There are many videos on YouTube devoted to this issue, where craftsmen tell how to finish a stove using available materials. In any case, it is worth studying all the nuances in detail.
Plastering: simple and durable
First, you will need to prepare a solution for the plaster.
- Sift cement and sand through a sieve.
- Mix these ingredients with clay diluted in water.
- In a separate container, prepare a mixture of water and plaster, which you then add to the plaster solution.
Important: due to the fact that plaster sets quickly, it must be diluted in small portions in order to be used within 5 minutes.
Finishing the stove with plaster occurs as follows.
- Clean the brickwork of the stove with a wire brush to remove dust, cobwebs, and clay. It needs to be carefully treated with the surface for plaster.
- Clear the joints between the bricks to a depth of approximately 5 mm.
- Install a reinforced mesh on the wall, which will serve as a fastener for the plaster.
- Heat the oven and cool.
- Apply the first layer of plaster approximately 5 mm thick.
- Follow this with a second layer of plaster. It should be thicker than the previous one.
- Rub the dried plaster until a smooth surface appears.
The surface of the oven prepared in this way can be painted or whitened.
Whitewashing - economical and environmentally friendly
Important: metal doors should not be treated with whitewash, but with black paint, which should be resistant to high temperatures.
How to tile a stove in a bathhouse
If the question “How to improve the stove?” you answer: “Tiles”, it is recommended that you familiarize yourself with the expert advice below.
When selecting tiles, it is recommended to choose glazed floor tiles. It is important that its thickness is at least 6 mm. The shape can be either square or rectangular. When buying or ordering tiles for a stove in a bathhouse (or sauna), pay attention to its reverse side. It should be covered with special notches that would guarantee better adhesion to the solution.
As a decoration for a stove in a bathhouse, a special tile with ridges and grooves along the edges is ideal, which provides a smooth finish without noticeable joints and seams.
How to decorate a stove is more or less clear, but what solution is best to use to make the decoration durable? Masters advise using a clay or clay-cement composition. As you know, with increasing temperature, clay only becomes stronger, unlike cement.
Important: lining the stove with any decorative material should be carried out at the last stage - when all construction work is completed.
Types of facing tiles
Finishing the stove with plaster is gradually becoming a thing of the past, and lining various types of stoves with tiles is becoming increasingly popular. Manufacturers offer various types of facing tiles. They differ in composition, production technology and design ideas.
- Clay based tiles . The most common type. It includes classic tiles, durable fireclay, exquisite terracotta and other types of tiles.
- Tiles based on natural stone . Marble tiles take pride of place in this category. Even the most severe critic will appreciate the marble-lined stove.
- Tiles based on artificial stone . The main component of the sample is cement. On its basis, with the help of various additives, a durable facing material is formed.
Variety of cladding Source kamin-spb.ru
When determining the type of tile for finishing a stove, it is necessary to consider the requirements for it. Let's take a closer look.
Specification of masonry and finishing
As you already understand, experts recommend that any stone buildings that will subsequently be exposed to high temperatures be built from fireclay bricks using a special refractory mixture. Select bricks for the fireplace of the same dimensions, so as not to later compensate for the distance between them with mortar.
It is necessary to use a mixture that is close to the composition of the material itself. The solution is created directly at the construction site using: dry refractory powder, liquid glass and water, mixing thoroughly. To make the mixture more plastic, add clay or soda with a high calcium content. The intensity of the kneading will directly affect the masonry and the height of the seam.
If all the rules are followed and the masonry is done correctly, then such a stove will last a long time. All that remains is to decorate it to match the interior of the house, using cladding. And this is not so difficult to do; the materials you will need are:
- the brick you decide to use;
- mixture;
- asbestos cardboard;
- steel corner.
Tools: trowel, spatula, plumb line and level.
First you need to make a base for the cladding - a supporting surface, which is needed with a huge mass of brick finishing. Some craftsmen manage to finish the fireplace in such a way that its weight increases to half a ton. Therefore, make sure that the floor can withstand the construction work you have in mind. If your flooring is made of concrete, then to strengthen it you will need a sheet of metal on which asbestos cardboard, approximately 5-10 mm thick, is laid. Then you need to prepare a solution, it is advisable to use tips for strengthening: add a little clay or soda. The mixture should not be greasy or liquid. When you finish mixing, be sure to check it the old way: roll the mortar into a cord and roll it into a ring; if the clay does not fall apart and does not give strong cracks, the mixed mortar is excellent for finishing a brick oven with your own hands.
When everything is ready, you can start. The cladding begins with fitting, lay the first row in half a brick, leaving two holes on three sides for air intake, the width should be the same, half a brick. On the free upper part of the building material it is necessary to lay a couple of metal corners, which will create support for the upper rows of bricks. You can also hang a door on them, but this is more an aesthetic issue than a necessary one.
Then you need to bring the height of the finishing masonry to the level of your fireplace so that the gap left between it and the lining guarantees good ventilation. If, due to the small size of the room or some other reason, this gap cannot be achieved, you need to install an outlet hole in the top row, the same as in the lower parts of the stove.
We have described the most reliable and budget-friendly type of facing work for a fireplace. In general, there are a large number of methods on how to decorate a brick oven with your own hands.
Finishing the wall behind the stove
Many people pay attention only to what to cover the stove with, but completely forget about protecting the wall behind it. It is not right. There are several options, each of which is suitable in certain conditions:
Advice! It is better to take care of the wall behind the stove in advance, then you will not have to perform unnecessary manipulations.
- To protect this area of the house, it can be lined with red brick. This is the most common option. This material is not afraid of constant thermal exposure.
- You can use foil. A sheet of such material is attached directly to the wall. It successfully reflects most of the thermal radiation. This method cannot be used when the heat source is very close to the wall.
- Instead of a sheet of foil, use stainless steel. This is a durable material that is not subject to severe destruction.
On a note! If you decide to line the wall behind the stove with bricks, then you don’t have to do it completely. The main thing is to lay the masonry according to the dimensions of the heat source itself.
Any work in a house with a stove requires compliance with numerous rules and precautions. You cannot use materials that are not intended for such work. It should be remembered that nearby surfaces that are exposed to thermal effects need protection. It is better to cover them with bricks, which are covered with a stainless steel sheet. Then you can be sure that living in the house will be comfortable and safe.
Rules for installing facing elements on a stove wall
According to the technology, it is better to start gluing tiles on vertical surfaces from the bottom, and it is necessary to lay out the first row and allow the adhesive mixture to harden. This will allow you to set guides along which you can navigate when installing the next rows. Therefore, when installing the first row of facing elements, you need to be especially careful. The tile installation process is carried out in the following order:
A sufficient layer of adhesive is applied to the underside of the tile with a regular spatula.
The facing element is pressed against the base surface, first with the lower part, and then with the upper, after which it is installed in the desired position with light blows.
When installing each tile, it is imperative to check the correctness of its spatial location with a small level.
As you fill the row with facing elements, you need to periodically make sure that you have not deviated from the specified parameters, using a longer level for this.
After the adhesive mixture of the first row has hardened, you can begin further installation of tiles, filling the next rows. The procedure for performing this task is the same as for the first row.
But now a long level will also be needed to check the vertical plane of the plane being created, which is advisable to do during the installation of each of its next elements.
A stove wall usually has certain places in its structure that should not be covered with a tiled covering, for example, firebox and ash doors, well windows for removing accumulated soot, and so on. In order to beautifully decorate such areas when installing tiles on the wall of the stove, it is necessary to change the format of the ceramic tiles, which means removing any of its fragments and, quite often, the figured ones. Tile is a rather fragile material, so if the cut line is not straight, but has any angles or turns, then you should use a grinder to form a non-standard element, after which it is mounted on the wall in the prepared space.
It is also often necessary to cut tiles when completing a row, since it is rare that there will be an even amount of tiles on the wall. Therefore, you need to measure the width of the missing piece with a tape measure, taking into account the size of the seam.
After this, you need to make an insert of the required size, separating the excess part from the whole tile using a tile cutter.
The finished part should be installed in its place using the same adhesive.
As can be seen in the photographs presented above, in order to achieve as much symmetry as possible when installing elements of the tiled covering, it is important to use limiting crosses, which are inserted into the seams between the tiles, two on each side.
This will ensure uniform spacing between the installed elements and keep them in this position until the installation mixture hardens. When the surface of the stove wall is completely covered with tiles, you will need to wait a day or two so that the hydration of the cement included in the installation mixture occurs to a sufficient extent, when you no longer need to be afraid that the stability of the elements of the tile covering will be disrupted.
Algorithm for finishing work
Tools for work
- Measuring devices: tape measure, plumb line, level.
- Hand tools: trowel, spatula, mallet and hammer.
- Cutting tool.
- Brushes: paint brushes, metal brushes.
- Containers.
- Consumables: nails, screws, etc.
The plaster is applied to a pre-fixed mesh.
At the beginning of work, the surface is cleaned of dirt and dust. Make indentations in the masonry seams and wipe with a wet rag. To eliminate deformation, a power frame is formed. A reinforced mesh is attached to the surface of the stove with nails, and a metal profile is placed on the corners. Apply a layer of plaster and allow it to dry. After this, it is recommended to heat the stove. This will give the plaster the necessary strength. After this, you can cover the prepared oven with ceramics. This should only be done by a trained specialist.
The tiles begin to be fixed from the bottom row from the corners in different directions. The distances between the seams are maintained using a template (tile cross). When the tiles have been laid and the mortar has dried, they begin to process the joints using special grouts and impregnation solutions. At the end of the work, remove traces of the solution and wipe the surface with a dry cloth.
Filling the seams with a special mixture
The final stage of facing the heating block is grouting the joints. For this construction operation, a special composition is used, which, when hardened, has good resistance to aggressive substances, such as water or household detergents. After pouring a certain amount of powder into water, it should be mixed manually to the desired consistency.
Using a rubber spatula, push the finished mixture into the space between the tiles (before this, the crosses must be removed), after which, by running the corner of the tool along the seam, they give it a beautiful shape, distributing the working mass evenly.
Particular attention must be paid to places such as the windows of stove wells, having beautifully framed them using a grout mixture.
Having wiped all the seams, you should wait until the substance filling them becomes solid, after which all that remains is to remove its remains from the tile with a rag and enjoy the new beautiful look of your heating structure.
As can be seen from the above description of the work process, tiling a stove yourself with ceramic tiles is not a difficult task. It is only important to strictly adhere to the technological sequence. Of course, when performing such work for the first time, you should not expect ideal results. Still, you don’t need to worry too much about something that didn’t work out the way you would like, because, most likely, only you see these shortcomings, and to those around you, your heating structure looks very elegant.
Perhaps one of your friends will even ask you to help with renovations in their home, and over time, your new specialty will turn out to be a good help, providing you with an additional source of income.
Requirements for facing materials
The facing tiles for the stove will be used in difficult temperature conditions, so the following requirements must be met:
- Naturalness . The tiles should not contain toxic substances; as a rule, when heated, they are released into the environment, which is unacceptable from an environmental point of view.
- Fire resistance . The material must work at temperatures up to 10000C.
- Good thermal conductivity . The material should not interfere with the heating of the room, but prolong it.
- Moisture resistance . With low water resistance of the tiles, the oven may become damp.
- Durability . The thickness of the sample is assumed to be at least 6-8 cm.
- Attractiveness . The appearance of the lined stove should match the interior, be attractive and elegant.
Attractiveness of cladding Source tulikivi72.ru
How can you line a brick oven?
- Choosing a finish
- Natural stone
- Ceramic tiles
- Majolica and tiles
- Facade tiles for brick and ceramic granite
- Material and tools for lining the furnace
- Brick stove finishing
Most owners of private houses and summer cottages install wood-burning stoves in order to spend the winter comfortably. Having completed the work, the owners think about how to line the brick oven. After all, it occupies a significant place in the very center of the house, and therefore must have a beautiful appearance and fit the image of the room. But decoration is needed not only as interior decoration. Brick, as is clear from practice, cools quickly. Thus, so that the expensive heat from the stove is not lost very quickly, this layer of insulation is needed. Let's consider several options for insulating and decorating a brick stove using different cladding materials.
Furnace finishing is often done using tiles, real stone or tiles.
Soapstone chlorite sounds nice, but is it profitable?
A well-organized marketing campaign works wonders. Therefore, today there are rave reviews about soapstone chlorite everywhere. It is a common volcanic rock, heavy, strong and heat resistant. No one can clearly answer why it is better than basalt, granite or sandstone. But in cost it is not inferior to elite marble delivered from Italy (from 7,000 rubles per 1 m2).
So far, soapstone chlorite has “taken root” only in baths and saunas, where heaters are lined with it. You can use it to decorate the fireplace and stove, but there are also more economical options.
The color range of this stone is quite poor. It is dominated by pale gray and greenish shades.