Private low-rise construction has become increasingly popular in recent years.
Country houses and country houses built with their own hands are occupying an increasingly large share of the total volume of housing put into operation.
The most popular material in private construction is wood, due to its affordable cost and ease of processing. But not all individual developers have sufficient experience and knowledge to independently carry out the entire range of construction work. So, the question often arises of how to properly lay the floor of the second floor in compliance with all building regulations and technologies.
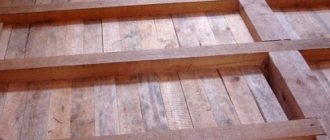
Beams and floor
The construction of the second floor floor on wooden beams has its own technological features.
- Beams are part of the structure of a house, making it stronger. The beams are securely attached to the load-bearing walls, which makes the floor just as reliable.
- Light weight of building materials used to cover the lower part of the floor.
- Low costs for the construction of such floors. Despite this, the second floor floor with wooden beams has its drawbacks. Based on load-bearing walls, it has increased noise transmission, which negatively affects living in such a home. If you think about this and install the second floor floor joists on soundproofing pads, the problem will be solved. Unfortunately, this approach reduces the load-bearing characteristics of the structure as a whole.
Requirements for the floors of rooms in a multi-level house
The floor of the second floor must meet the following requirements:
- Have maximum rigidity and minimum deflection. The ceiling must withstand its own weight and the load from furniture, household appliances, people, etc.
- The design is simple and corresponds to construction technologies.
- The materials used are not afraid of moisture, have a long service life, and are resistant to abrasion.
- The flooring is made in a fireproof design, and its fire resistance limit corresponds to the permissible values for this material. For wooden floors without a protective coating, this value is less than 15 minutes.
- The ceiling has good sound insulation and complies with special standards for residential premises.
- If the temperature difference on different floors is greater than 10 degrees, the floor must be insulated.
- The load-bearing capacity of the deck corresponds to the operational load of the entire building.
- The appearance of the floor should be attractive and not differ from the style of the room.
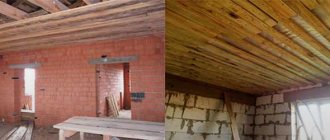
Independent installation of a wooden floor on the second floor
Wooden houses were very popular at one time, but then with the development of modern building materials they faded into the background. But today, wooden buildings are regaining their former glory. This is due to the fact that only in a wooden house the atmosphere is filled with harmony and tranquility. The decoration in such a house can be made of any material. But this is not very advisable, since walls made of logs look much more attractive and natural than paint or wallpaper.
Scheme of interfloor slabs in a wooden house.
But the question of surface finishing will depend only on personal taste preferences. As for the construction of the wooden floor of the second floor, it is also made from beams. There can be no other option. Reinforced concrete slabs cannot be laid on wooden walls. When finished, the entire structure is made of natural material – wood.
Installation of logs on the ground
This method of installing beams is used not only in a wooden house, but also in brick structures. It differs from the previous one in the treatment of the soil and the laying of beams on it. To do this, you need to remove the top layer of soil and let the base dry. The soil is covered with a layer of gravel or crushed stone. The layer is carefully compacted.
Installation of logs, as in the previous method, requires laying support pillars. They can be made using the same principle, using bricks. The logs are attached to the grillage, all connecting nodes are laid with roofing felt. The connection points between the lag and the support are also insulated with rolled material.
It should be remembered that the beams should not simply lie on a layer of crushed stone, they are attached to an insulated grillage. The choice of method for laying the logs depends on the structure itself and the wishes of the owner.
What if it's a bathroom?
If a bathroom and toilet are planned to be installed on the second floor, it is necessary to provide space for communications, in particular a sewer drain and water pipes, before pouring the concrete floor. If the floor of the second floor is wooden, it is necessary to take into account the loads that will act at the location of the bathroom.
The bath weighs about 200 kg, and the weight will double when filled with water. Accordingly, the normal load acting on wooden floors must be doubled. One way out is to increase the cross-sectional size of the beams and reduce the distance between them in the location of the proposed bathroom
Particular attention should be paid to moisture removal and additional protection of wood to prevent the formation of mold and, as a result, rotting of wooden structures
It is better to use a board for the floor from larch, elm or alder, since these types of wood, being in a humid environment, only become stronger and more durable. If the bathroom has a shower, it will be necessary to drain the water; as a rule, in this case a drain with a dry locking element is used. Installation must be carried out in such a way that all water that ends up on the floor of the shower room goes through the drain. Waterproofing materials must have high adhesion and sufficient elasticity.
Sand as a soundproofing layer
Soundproofing with sand has been used for a long time because the material has the ability to absorb both low and high sounds. In its mass it is porous with small cells inside between the particles. It is there, reflected from the walls of the air chamber, that sound waves are damped.
But sand has several negative characteristics:
- high specific gravity, which requires the construction of floors using powerful beams and a rough foundation (ceiling);
- high thermal conductivity, it is impossible to insulate floors with sand, you will have to add an additional layer of thermal insulation material;
- If you do not assemble a sealed structure, sealing all the cracks and holes, then sand will penetrate into the premises of the house.
Sand is used as a soundproofing layer in wooden floors
Device for protecting wooden floors between floors
The types of private houses are very different, just like their internal composition. However, in order to build it and live without problems, you need to carefully take care of the choice of materials, installation of floors, and proper protection of materials.
At the design stage, a diagram of the future structure is drawn up, as well as a plan, which should take into account not only the size of the building, but also how it will be protected from various types of consequences. Protection is required from fire and biological influences of the external environment.
As for flammability, each canvas has its own degree of fire resistance, however, when choosing such banal materials as OSB boards, OSB boards or laminated veneer lumber, you need a special deep penetration antiseptic that will prevent not only rot and mold, but also flammability.
It is better to decorate the room in which the stove or fireplace will be installed with a metal sheet, thus preventing the spread of fire.
You can protect wooden floors between floors from the negative effects of moisture using oilcloth
A wide variety of compositions that can prevent wood fires are available for sale, and you need to choose them based on:
- Penetration depth;
- Service life;
- Fire resistance.
Impregnation is carried out at the stage when rough repairs are carried out, and it is better to carry out the treatment at least twice, after each layer has thoroughly dried. At the design stage, it is also necessary to take into account how much a certain type of wood can withstand exposure to fire.
Materials with a cross section of 11x24 cm are best resistant to fire if the span width is 5.8-5.85 m.
It is equally important to protect the tree from the effects of biological influences, for example, water, due to which the destruction of wood begins, the formation of mold and the formation of microorganisms such as fungus. It is very rare, but possible to find insects in houses made of wooden beams, which are formed, first of all, in the canvases, which were not treated during construction and gradually began to become moistened
Materials used for work
You should stock up on everything you need in advance so that there is no downtime during the work. The list may vary, but the main components remain the same:
| Beams | The strength and reliability of the partition directly depends on these elements, so you should choose products with a cross-section that provides the required load-bearing capacity. Universal options are 150x150 and 200x200, this is usually enough to provide rigidity in most buildings, most often the material used is pine. It is important that the wood is dry, otherwise there is a risk that the elements will begin to deform after installation |
| Flooring materials | The top and bottom of the beams are covered with rough flooring, which can be done in different ways; we will look at them in more detail below. There is no fundamental difference, and you just need to choose the option that is best suited for certain conditions |
| Waterproofing material | In order for the tree to serve as long as possible and not be subject to negative impacts that occur due to changes in temperature and humidity, it must be protected. There are several options, we will also consider them below |
| Heat and sound insulation | To keep the noise level as low as possible and to retain heat in the rooms as best as possible, special materials must be laid between the beams. Otherwise, any movement from above will be heard from below, and warm air will freely escape through a poorly insulated partition |
Important! The quality of all materials must meet the highest standards, this guarantees excellent results and ensures the reliability and safety of the entire structure.
There is no point in saving on floors
Floor frame
Basic elements of a wooden floor
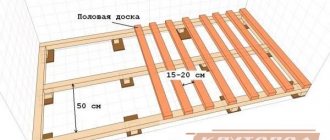
First, let's study the main constituent elements and main rules:
- The underground space from the pads to the floorboard must be at least 1 cm (and no more than 25 cm for floors on the ground). This is necessary for good ventilation inside the frame.
- Logs are transverse bars that serve as the basis for further cladding with boards. They can rest on beams, a concrete slab, posts, and even on the ground (when using pads).
- The width of the logs when laid on a slab should be in the range of 80-100 mm and 100-120 mm when laid on posts or beams. The thickness when laid on a slab should be 25-40 mm, and when laid on posts - 40-50 mm.
- Beams are horizontally laid structural elements that perform load-bearing functions. They are supported at least at two points on load-bearing walls.
- Columns (linings) are used to level the base. For logs with a thickness of 40-50 mm, linings are installed every 80-110 cm.
- The pitch of laying the logs depends on the thickness of the sheathing. For example, if you use the thinnest floorboard 21 mm, then the step of laying the logs should not exceed 30 cm.
- It is best to use a thicker floorboard 35 mm, and make a standard laying step of 60 cm, especially if you are going to insulate the base. This way you won't have to cut the insulation to width.
Additional work during installation
A common problem is squeaking wood floors. As a rule, this happens because the boards are attached to nails, and they weaken over time, thereby forming gaps between the boards and joists, which is the cause of creaking. To avoid this in the future, it is recommended to use screws instead of nails when installing floor parts.
Creaking can also occur on a concrete base. In this case, the cause may be gaps between the joists and the concrete base. There is no need to rush or be lazy; you need to install the logs in such a way that they lie tightly on the concrete. If you ignore the recommendations, in the future you will need complex modifications to the floor, which is not always possible.
Another nuance that must be considered during installation is the staircase opening to the second floor. In this case, it all depends on how the second floor room will be used. If it is just an attic space, a small hatch is enough. If the room is residential, the staircase opening should be large, and the parameters depend on the interior and the type of staircase itself. But in both cases, the size should be convenient for use, regardless of whether it will be used often or not.
Another of the openings that must be provided when installing the interfloor ceiling is the opening for the chimney. If the ceiling is concrete, it will be enough to install an opening to suit the size of the chimney. Wood flooring has its own nuances. The stove and, accordingly, the chimney is a source of possible fire, and for this reason it is necessary to worry about fire safety. The opening in this case should be larger than the size of the chimney itself.
So, as is clear in the end, in any case, strict adherence to all technical recommendations will make it possible to create a high-quality and durable floor on the second floor.
Subfloor on the attic floor
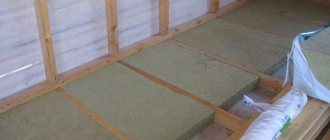
It has several options; for example, we will consider the most complex of them. It is better to file the ceiling before installing the subfloor, but this condition is not necessary. When working with mineral wool insulation, it is recommended to use a respirator or mask to protect the respiratory system, and wear rubberized gloves on your hands.
Installation of wooden interfloor slabs
Since there is no ceiling covering, nail a vapor barrier membrane underneath. Attach it securely; at first it will support the weight of the insulation.
For safer movement, you can build a small ladder from boards
Step 1: Begin laying insulation into the space between the attic floor joists
We have already mentioned that when calculating the distance between beams, you need to take into account the standard width of materials for thermal insulation. Lay as tightly as possible; if there are two layers, their joints should be offset
Laying insulation
The process of laying insulation
Another photo of the process
Step 2: Lay down a wind and vapor barrier membrane. Rolled mineral wool is easily blown through by drafts, and heat is removed along with the intake of fresh air. The membranes are fixed to the beams with a stapler. Professional builders do not recommend stretching the membranes too much; it is advisable that they lie loosely on top of the insulation. In case of leaks, water will not get onto the insulation through the holes made by the stapler staples.
When working, use a protective mask
Gloves will also be required
Laying moisture and wind protection
The membrane must lie freely
Step 3. Secure the membrane to the beams with thin slats. Lay subfloor boards on the slats. They can be screwed on with self-tapping screws or nailed.
Laying slats on joists
The boards are screwed to the joists through slats
Installation of OSB
Laying lag along the bottom trim
Before installing logs, the wood must be treated with special coating materials. The logs are primed and coated with antiseptics in several layers. Each layer must dry thoroughly. If the joists have an uneven shape with protruding bumps, they should be processed. The horizontality of the bars will subsequently affect the installation of the flooring. It depends on this whether the coating will be smooth or with differences. Having prepared the logs, you can begin their installation.
Installing floor joists involves cutting grooves in the bottom frame of the building structure. The bottom frame is a layer of beams that lie on the foundation and serve as the basis of the entire room. This is a kind of frame on which the house stands. It is in this frame that the grooves for the joists should be cut.
The ends of the treated beams are inserted into the prepared recesses. Many craftsmen advise rubberizing the joints of the joists and grooves to prevent the accumulation of moisture and the appearance of microorganisms. Of course, a heavy long beam will bend without any support along its length. In this regard, it is necessary to prepare pillars for the logs.
It is recommended to make support posts from brick. To do this, you need to dig a recess, the base of which is carefully compacted. Either gravel or crushed stone is poured into the hole. The topping layer should also be compacted. Then sand of any type is poured. All layers are compressed. Next, the cement-sand mixture is poured, the base should dry well. This stage is similar to laying the base of a concrete floor.
A construction cushion is created and cement is poured onto it. If desired, the filling can be accompanied by the installation of reinforced mesh. As soon as the cement has dried, a layer of rolled material is laid on it. It can be roofing felt or other material, it all depends on the preferences of the owner. The support pillar is laid on the insulation layer. The attachment point for the support and joist is waterproofed. This measure is necessary to prevent moisture from entering the wood structure.
Thus, the service life of the structure will increase significantly, the logs will not rot or collapse. The distance between the beams is calculated based on the thickness of the plank base. The thinner the board, the more frequent the step between the lags and, vice versa. This nuance should be taken into account at the planning stage of laying the rough structure. After completing the installation of the beams, it is necessary to secure them together. This measure helps to secure the frame; if this is not done, the logs will begin to “walk.”
Fastening process
To fasten the rafters and beams together, you can use bolted connections with a sealing washer.
This fastening is performed on the protruding part of the beam, on its inner side. At this point, a cutout in the shape of an isosceles triangle is preliminarily prepared. In this case, the hypotenuse of this triangle should be located at an angle equal to the inclination of the rafters. The rafter leg in its lower part should also be sawn at the same angle.
The cut part of the truss is installed on the beam and pre-fixed with nails. Then a hole is drilled in a plane perpendicular to the rafter leg. It must be through and have a diameter equal to the diameter of the bolt. The bolt should be inserted from below, and the thrust washer should be installed under the nut.
Scheme for attaching the Mauerlat to the wall.
Making a through hole with a bolted connection weakens the strength of the roof. Therefore, to avoid this, you can use other rafter installation options.
A very popular method is single tooth fastening. When using it, it is necessary to prepare additional spikes that will prevent the lateral shift of the rafter system under the influence of various loads. With this installation method, a socket is prepared in the beam, the depth of which should not exceed 1/3 of its thickness.
In cases where heavy loads will be placed on the roof, it is better to use double tooth fastening. In this case, the depth of the first nest should be 1/3, and the second – 1/2 of the thickness of the beam.
Such grooves must be reinforced with metal corners and nails. To improve the quality of the connection, clamps and various metal linings are used. In addition, the rafter connection is fixed with elastic steel wire, which is wound around an anchor bolt installed in the wall.
What about attic insulation?
Different types of attic insulation
When you take on a new attic lining job, it is important to make sure that everything is fine with the existing attic insulation. Recommended minimum thickness is 270mm
Cold or warm attic
- If you're just using the attic for general storage, a "cold attic" is fine.
- If you store temperature-sensitive items or plan to spend time upstairs, you'll need a warm attic.
Basic attic insulation, required for both warm and cold rooms, is inserted between the joists or rafters. The floor is installed on top in a cold attic.
It can then be planked, but over joists, which would likely raise the height to 270mm
Therefore, it is important to raise the boards to prevent restriction of ventilation and overheating of electrical cables
Leaving a gap between the top of the insulation and the underside of the sheathing is important to maintain air flow and prevent condensation. For a warm attic you will also need insulation from the underside of the roof
It is subsequently sewn up with a beautiful finishing finish.
For a warm attic you will also need insulation from the underside of the roof. It is subsequently sewn up with a beautiful finishing finish.
Does insulating the attic help?
No, only in combination with lining of a quality insulating material such as mineral wool will you get proper insulation in your attic.
Additionally, there must be a gap between the sheathing and the insulation to allow proper air flow, otherwise condensation and related problems may occur.
Advantages of wooden floors
Installation of wooden building elements does not require the use of special construction equipment and hired labor. This compares favorably with laying heavy concrete slabs. Moreover, such an interfloor ceiling in a wooden house with a second floor or attic is the only correct solution.
An important quality parameter for the wooden elements of a building is the absence of cold bridges. If sheet materials (foam plastic, mineral wool boards) are used for insulation, the sheets are cut strictly to the size of the openings between the beams. If the construction of a wooden floor between floors involves the use of bulk or fibrous materials, it is necessary to ensure that all cracks are filled.
Making a subfloor is not as technically complex a process as it might initially seem, and is quite feasible for almost every man with basic carpentry skills. The design of the subfloor must be designed for long-term operation, which is facilitated by compliance with technological conditions.
Insulation materials
Various thermal insulation materials can be used as interfloor insulation for a wooden house:
- glass wool;
- basalt wool;
- slag;
- Styrofoam;
- penoplex;
- expanded clay;
- foamed polyurethane;
- shavings, sawdust.
The choice is based on the availability of the material, its cost, and characteristics. Thus, mineral wool and expanded clay are the most acceptable from the point of view of fire safety. At the same time, penoplex does not absorb moisture, does not cake, and has high thermal insulation properties. Sometimes materials are combined to increase thermal protection.
Various types of cotton wool
Most often, various types of construction thermal insulating mineral wool are used to insulate interfloor ceilings. They are made by melting and drawing fibers from raw materials. These fibers are then intertwined on special machines and formed into mats or rolls. In some cases, such mats or rolls are stitched with synthetic threads to increase the strength of the products.
For glass wool, the raw materials are waste and waste from glass production; for mineral wool and basalt wool, igneous rock melts are used. Slag is produced by melting blast furnace slag.
Different types of cotton wool have different properties. They have different densities and different thermal conductivities. These characteristics depend not only on the type of feedstock, but also on the specified production parameters.
Foam plastic and penoplex
These are two similar materials in properties and production method. The starting materials for their production are plastics of various compositions. During the production process, they foam and, when hardened, are formed into sheets of the correct geometric shape. The difference lies in the fact that during formation, penoplex is extruded through a special device - an extruder.
Both foam plastic and penoplex have closed pores filled with gas in their volume. Only in polystyrene foam it is ordinary air, and when foaming polystyrene foam, carbon dioxide is usually used. In terms of thermal conductivity, both materials are almost identical. But due to the fact that the pores in the penoplex mass are distributed more evenly and they themselves have almost the same size, its strength is much higher.
Very often, when forming sheets of penoplex, their ends are not made even, but in the form of two or more ledges. When insulating, two adjacent sheets, connecting to each other during installation, provide better insulation, since the joints are not blown through and retain heat well.
Expanded clay
Expanded clay is a building material that consists of many oval granules - pellets with an average diameter of 10 to 20 mm. The material of these granules is clay and shale sand. The pellets themselves are obtained by firing pre-prepared semi-finished products in special ovens. When heated, pores of different sizes appear in the volume of expanded clay, as a result of which it has a very low density. One cubic meter of bulk expanded clay can weigh only 300 kg. For comparison, it can be noted that one cubic meter of pine wood weighs 500-550 kg at natural humidity.
Note! Expanded clay is an environmentally friendly material. It is durable and will not rot or decompose.
Polyurethane
Foamed polyurethane is used, as a rule, for insulating basement and attic floors. It is simply applied using special equipment, and later it foams in air and takes on a three-dimensional shape. The advantage of using such material is that it fills all the leaks and cracks in the ceiling structure, allowing you to create a sealed water- and windproof thermal protection.
Sawdust
Wood shavings and sawdust have recently been used much less frequently, but more recently they have also been used to insulate interfloor ceilings, filling the cavity between the beams. To prevent such insulation from rotting inside the ceilings, it is treated with special compounds that kill putrefactive bacteria and woodworms. When laying, shavings or sawdust are mixed with lime.
Vapor barrier
To properly insulate interfloor ceilings, it is not enough to use only materials with thermal insulation properties. If you do not protect the insulation from the action of moisture located in the interior of the premises, various microorganisms will multiply in the material, which can subsequently lead to mold or mildew. To avoid this phenomenon, it is necessary to make the correct vapor barrier for the insulation.
Any of the many options produced by industry can be used as a vapor barrier. Ready-made protective membranes are very widely represented on the building materials market. When building and insulating a private house with your own hands, you can use available materials if you know their strength and vapor barrier properties and use them correctly.
As the main layer, the coefficient of vapor permeability of which should be minimal, you can use ordinary polyethylene film or foil. This layer is laid below the insulation, preventing moisture vapor from the basement or lower floor from penetrating into it.
As the second layer, which will be on top of the insulation, you can use wax paper or glassine. These materials have greater vapor permeability than foil or polyethylene. They will facilitate the free release of vapors from the thickness of the insulation upwards.
Extruded polystyrene foam
Most often it is called penoplex, and is also confused with polystyrene foam (they are similar in appearance). What they have in common is only the raw materials, but the production methods are fundamentally different. As a result, this insulation is very dense, so it can be immediately plastered or used as a subfloor. Features are as follows:
- High density.
- Lowest thermal conductivity (best in class). This indicates maximum efficiency.
- Convenient to use (easy to cut).
- Harmless to humans.
- Very light weight, so there is no need to create a strong structure between floors.
- Lights up (class G4). Apart from the high cost, this is the only drawback.
Foil polyethylene foam
Despite its thinness, it is a very effective insulation material (second only to penoplex). It can be recommended in cases where the space between floors is not enough to insert a thicker mat. However, such material is often used for other reasons.
It is sold in the form of rolls 100-120 cm wide, and the thickness can reach 2 cm. It almost completely reflects heat, preventing it from escaping. The main feature is that it is not at all “afraid” of moisture, which is why it is often used to create a moisture-proofing layer. For houses located in the far north, we can recommend the combined use of penoplex and foil polyethylene (laid as a vapor barrier film).
Installation of wooden floors
Perhaps this is the best type of flooring; it is distinguished by its ease of manufacture and availability of materials. In addition, only wood is used to create it, which ensures environmental friendliness with sufficient reliability. The installation of floors using wooden beams is not particularly complicated; its main components are:
- load-bearing beams;
- guide bars;
- rough ceiling;
- base of the upper floor floor;
- insulation;
- waterproofing;
- decorative coating.
The timber will provide the necessary strength and reliability to the entire structure. It can be solid or glued together from several layers. A good replacement for timber is solid logs of small diameter. Also, boards can serve as the basis for the structure, but such floors have significant limitations in terms of span length and load.
In principle, the beam can be made of any wood, but it is better to choose larch or pine. Hardwood has a slightly different structure and less bending resistance. Such an overlap may not withstand constant load.
The base of the future floor and ceiling, respectively, is mounted on a supporting structure of parallel beams. This can be a prepared board or wood-based sheet material. The flooring is laid on the finished base (on the second floor), and a full ceiling is made below.
A feature of this design is the free internal space that must be used. It is filled with any material with heat-insulating or sound-absorbing properties. This will help keep the rooms warm and provide a sufficient level of sound insulation.
Strengthening the structure with additional lags
This method is applicable for strengthening the floor structure of the second floor, when the beams do not have a deflection, and the logs themselves, based on calculations, can withstand the design load. The essence of this method is to install additional logs in the central part of the room, thus ensuring the distribution of the load more evenly, over a larger number of supports.
Installation of an additional beam to strengthen the second floor floor
Most often, installation of additional logs is carried out in the center of the room by reducing the distance between the logs by 25-30%. So, if it is necessary to install logs every 0.5 meters, in the central part the distance is reduced to 0.4 - 0.35 meters.
For reinforcement, standard logs used in the structure are used. For strength, additional spacers are installed between the lags from solid sections of boards or metal rod prostheses installed crosswise.
Rod metal prostheses for strengthening joists
Cold attic design
When building the roof of a house, many people think about making a cold attic or attic underneath it? The easiest way to organize a roof is with a cold attic space. Construction of an attic will cost several times more and require more labor.
. Although, it is undeniable that the attic will significantly expand the living space.
Cold attic roofs have the following main components in their pie:
:
- roofing;
- attic external walls (applicable for gable roofs with gables);
- insulated ceiling between the living space and the attic.
Ventilation is provided by eaves and ridge vents. The air passing through the eaves openings is called supply air, and the air leaving through the ridge is called exhaust air. Additionally, ventilation can be done through dormer windows on the gables or roof slopes. The windows are equipped with louvered grilles to allow the ventilation intensity to be adjusted.
Dormer windows are located on opposite slopes of the roof so that there are no unventilated areas.
Dormer windows can be rectangular, triangular and semicircular in shape. Their lower part should be at a height of no more than 0.8-1.0 m from the floor of the attic, and the upper part should not be lower than 1.75 m from the floor in the attic. They can also serve as an exit to the roof of the house to inspect the roof, ventilation and chimney elements.
Consider your roof design
The choice of usable area to be covered with flooring can largely be dictated by the design of the roof structure of your home or cottage. It can also indicate what needs to be done to complete the job.
Beam and rafter roofs
Beam and rafter or "split" roof design
Older homes with beam and rafter roofs usually allow for greater flexibility. These are usually large open spaces with few obstructions (other than chimneys) and diagonal roof braces.
- These features allow the use of larger floorboards (2500 mm x 20 mm thick), which significantly reduces the amount of cutting required. The attic floors are laid on wooden beams.
- The only problem you may encounter with large lofts is moving them. You can't do it without outside help.
Truss Roofs
Attic flooring is more difficult on a truss roof.
Homes built in later years usually have a truss roof structure. They tend to limit the usable floor area and require a lot more work cutting the boards to fit neatly around the center points of the roof structure.
In such designs, floor materials have to be cut and adjusted more
How many attic floors do I need?
This is a good question to ask yourself before you start! Deciding how much floor area in the attic to cover depends on several factors.
Firstly, how much are you going to store in there, and please take into account how much more stuff might end up in there compared to what you have now. The installation of floorboards in the attic should only be carried out in the space being used
The installation of floorboards in the attic should only be carried out in the space being used
Second, use areas of the attic near the edge where the roof meets the wall. Since you won’t be physically moving there, it makes sense to cover the floor with a less expensive material. For example, chipboard or thin plywood, thereby saving on materials.
How to lay the floor in the attic of a house under an overhang
Some people sew up a small area around the perimeter of the attic hatch. This allows them to climb stairs and retrieve their items without going into the attic.
The next factor when deciding how much attic area to line is what will be in your attic. All you have to do is measure how much you need to sheath and leave the rest of the space empty.
Decide in advance what and where exactly you will storeFirst floor in a private house
Floor pie on the first floor
Consider the following example of a design for the first floor in a wooden house. It does not use logs, and the sheathing is installed directly on the floor beams. This allows you to save ceiling height, makes the scheme simpler and cheaper.
The floor pie of the first floor in a wooden house is shown in the photo.
This scheme is suitable for the first floor above a warm basement, and for floors between the 1st and 2nd floors.
- At the very bottom there are cranial blocks made of 100*25 mm boards. They are screwed to the beams from the bottom. They are needed to construct a subfloor for laying insulation.
- Then there are load-bearing beams 200*50 mm.
- The subfloor made of 100*25 mm boards is laid on cranial blocks.
- A windproof film (vapor barrier membrane) is laid on the subfloor.
- Then insulation is placed between the joists. In a specific example, 2 layers of Rockwool Light Butts mineral wool are used, laid staggered, with a total layer thickness of 20 cm.
- The top of the insulation is covered with a vapor barrier.
- Then the sheathing of the joists is done. In this case, FSF plywood with a thickness of 21 mm is used. It is laid with offset joints.
- Additionally, it is recommended to add counter battens to this scheme to create a gap under the plywood.
Ventilation
When constructing the foundation, you should remember about the general ventilation of the structure. Experts recommend making small holes at the base. From the outside, the ventilation is covered with a steel mesh. If the house is located in a region with frequent natural precipitation in the form of heavy snowfalls and rains, ventilation of the room is done using special pipes that extend above the level of the possible precipitation layer.
Ventilation of the base plays a big role in the viability of the entire structure. Lack of air can lead to the formation of mold and destruction of the main components of the base in a wooden house. In this regard, ventilation of the base is mandatory. The ventilation scheme should be constructed at the very beginning, before laying the logs. After this, the main work begins - laying the base and the floor itself.
Making a rough coating with your own hands is not that difficult. The need for double sex is obvious. It will make the room warmer, more comfortable and cozy. A hand-made floor will provide warmth during the winter cold and help save the family budget. The presence of a rough foundation in a wooden house is mandatory; it strengthens the entire building structure and makes it reliable. Thus, the service life of the house will increase significantly.
Selection of soundproofing material
When choosing sound insulation to fully cut off vibration and acoustic noise between floors in a private house, the main criterion remains the sound absorption coefficient.
The highest coefficient has:
- mineral, eco-, basalt wool;
- felt;
- foil insulators;
- cork.
A subfloor made of chipboard or OSB serves as additional sound insulation, but only if installed correctly. The correct construction of the subfloor is sheets of plywood or other material that do not have a tight junction with the joists. The panels are fastened together, the connection to the wall occurs through felt insulation. Skirting boards in this design are not installed on the main floor, but are mounted into the wall.
Foil backing, cork is used as an insulator for the ceiling between the first and second floors of the house, as well as when arranging the attic floor. The material reduces structural noise and additionally retains heat.
Standards for the thickness of the insulating layer when installing interfloor ceilings in a private house:
- For attic floors, the thickness of the sound insulation is from 10 cm, the density of the material is from 50 kg/cub.m.
- For the interfloor ceiling of a residential premises, the thickness of the sound insulator is from 20 cm with a material density of 50 kg/cubic meter. If the density of the material is higher, then the thickness of the insulating layer is reduced proportionally.
For the ceiling
In order to soundproof the ceiling in a private house, a membrane sound absorber is used when it is not possible to dismantle the interfloor ceiling and carry out complete insulation. The membrane is laid on a layer of mineral wool, basalt fiber or mineral slab, to choose from, and is mounted on the ceiling, suspended supports, which are installed in the wall supporting the ceiling beam.
The membrane is installed along the perimeter to the walls; they prevent the spread of structural noise by 90%. To install a ceiling membrane, use mineral wool or slabs:
- ISOVER;
- TechnoNikol;
- Technofas.
The optimal thickness for installing a noise-absorbing membrane is 150 mm, average density 100 kg/cub.m.
For floor
Soundproofing the floor between the first and second floors helps achieve silence in the house. The work is carried out on the second floor; porous and fibrous materials are used that prevent the spread of impact and acoustic noise:
- glass wool;
- basalt fiber;
- cork;
- cellulose, mineral wool;
- BTP – basalt thermal insulation boards.
To soundproof the floor, slabs and wool are used, with a material density of 55 kg/cub.m. When insulating wooden interfloor partitions, cork and felt are more often used, the thickness of which is 4 cm or more.
Design features of the room
This indicator plays a decisive role in determining the work plan for thermal insulation of the second floor in a private house. Structurally, the room can be:
- A full second floor, above which there is an unheated attic or living room.
- The attic, which is located directly under the roof.
In each case, the principle of insulation will be different. The main difference between an attic and a full floor is the proximity of the roof, so the main task of insulation is to preserve heat in the room.
It should be emphasized that thermal insulation of the second floor must be done not only inside, but also outside the house. When insulating a full floor, you don’t have to install a vapor barrier layer; for the attic, vapor barrier is mandatory. Expanded polystyrene, mineral wool or expanded clay are most often used as insulation.
Flooring of the second floor on a concrete floor
The work is performed in the following sequence:
- Clean the stove from dirt.
- Seal deep cracks with cement screed and knock down protruding elements.
- Using a hydrostatic level, mark horizontal marks on the walls of the room, which will serve as guidelines for maximum floor filling.
- Prepare a sand-cement mortar and fill the floor to the level of the marks on the wall.
- After drying, check the horizontal surface.
- Before installing the logs, waterproof the base, because Concrete absorbs moisture well. The operation is allowed not to be carried out if the first floor is heated and the building is dry.
- Decide on the orientation of the boards (and, accordingly, the joists) in the room. Unlike wooden floors, on which the beams are placed perpendicular to the load-bearing elements, beams on a concrete slab can be mounted in any position. In hallways, corridors and other rooms with heavy operational load, floorboards are placed along the direction of movement. In living rooms, boards are placed parallel to the light from the window.
- Place the logs on the film and secure them to the base with anchors.
Kinds
The most common option for a subfloor in a frame or wooden house (or “black”) is to create a durable flooring supported by beams. But for the first floor it is also possible when the logs are installed on a reinforced concrete slab floor on a strip foundation, on a shallow foundation slab or on a concrete floor on the ground. The last three options are not fundamentally different from each other, although in all cases the methods of fastening and leveling the logs horizontally are different.
Since the concrete base itself is strong and reliable, it can be considered as the “underlying” part of the floor of the lower floor (according to the regulatory terminology SNiP 2.03.13-88). In this case, it remains to equip only the “leveling” part (wet, dry or prefabricated screed) and the “intermediate” part (heat, vapor and waterproofing). And lay the finishing coating over the leveling part.
Concrete floors laid on the ground are another common option Source remontik.org
The subfloor is only part of the wooden floor. It is made from edged boards and sheets of moisture-resistant wood materials. The thickness of the flooring (board or sheet) and the layout of the logs have a “direct” relationship: less thickness means less interval between runs.
Important! If we are talking about boards, then when laying diagonally (for example, in rooms with complex geometry), the pitch of the lag should be even smaller. Moreover, the angle between the board and the purlin must be greater than 45°.
Wood flooring is the top layer of the cake. Layer by layer the entire structure looks like this:
- Lining . It does not affect the load-bearing properties of the ceiling, but acts as a support for insulating materials.
The thickness of the lining must be sufficient to support the weight of the insulation Source doma-na-veka.ru
- Waterproofing . Membrane type materials are used. They do not allow water to pass through, but allow water vapor to erode from the insulation, which then exits through the vents in the basement (plinth) of the foundation.
- Thermal insulation . Usually these are mineral wool mats, which, unlike polystyrene foam, are non-flammable materials.
- Vapor barrier . There are three types in total. Films with limited vapor permeability that maintain a “balance” between moisture transfer from the room into the insulation and from the insulation to the outside. Vapor-tight films are a vapor barrier that almost completely excludes the penetration of warm air with water vapor into the insulation. Foil materials (reflex films) are a vapor barrier that returns some of the heat back into the room. All three types, as befits a vapor barrier, have waterproof properties that protect the insulation from above, from the side of the room, from water ingress.
- Flooring.
A multilayer sheet of plywood for the subfloor will withstand heavy loads Source yug-energo.ru
See also: Catalog of companies that specialize in the design and construction of turnkey country houses.
Construction material
Before you begin installing the floor on the second floor using wooden beams, you should make a list of all the necessary materials. This will allow you to avoid unexpected downtime and delays during work caused by the need to purchase additional building materials.
Beams
A beam section of 15 x 15 will be sufficient
The basis of the entire structure of interfloor wooden floors is beams. They act as load-bearing elements, and the strength of the structure depends on them. For them, a beam or carriage with a section of 15 x 15 cm or 18 x 18 cm is usually taken.
This cross-section is usually enough to provide sufficient rigidity for a specific load of 400 kg per sq.m. In this case, it is necessary to comply with the parameters recommended by construction standards: the span length is 4 m, and the step between the beams is 60 cm. Based on these parameters, you can also calculate the required amount of timber.
The table shows the recommended cross-sectional dimensions of the load-bearing beam for a certain span length.
| № | Span length (mm) | Beam cross section (mm) |
| 1 | 2000 | 75×150 |
| 2 | 2500 | 100×150 |
| 3 | 3000 | 100×175 |
| 4 | 3500 | 125×175 |
| 5 | 4000 | 125×200 |
| 6 | 4500 | 150×200 |
| 7 | 5000 | 150×225 |
Beams made from wood of stronger species (larch, oak) can rarely be found on the open market, and their price is incomparably higher, and pine wood, after appropriate treatment with antiseptics, will be little inferior in durability to the same larch.
Flooring
Wooden flooring laid on the beams will serve as a rough foundation for the floor covering
Typically, the flooring of interfloor floors is two-tiered: below are subfloors, on which insulation is laid, and on top is a pre-finish flooring mounted on top of the load-bearing beams. Decorative flooring is laid directly on it.
To determine the nature and amount of material for the flooring, you should clearly think through the design of the floors.
When constructing a subfloor, either 5 x 6 cm bars, packed onto load-bearing beams, or grooves made in the beams can be used as support for the flooring boards. The latter option is quite labor-intensive, so most often 5 x 6 cm bars are used to create support.
To calculate the required number of bars, it is enough to count the number of beams and multiply them by the length of each of them. We multiply the resulting footage (the total length of all beams) by two more (since the bars will be packed on both sides of each beam).
A wide range of materials can be used for finishing flooring. This can be plank flooring, plywood, chipboard panels, MDF, OSB, etc. Each of these materials has its own advantages and disadvantages, after reading which you can choose one of them. To calculate the required amount of material, simply calculate the area of the room.
This will save you from having to interrupt your work and buy the missing part.
Impregnations
Antiseptic will extend the life of wood
To maximize the service life of wooden structures, they must be treated with antiseptic materials.
It would also be useful to treat the wood with fire retardants, which increase its fire safety.
To calculate the required amount of impregnation, you should read the instructions for its use - the approximate consumption of the mixture per sq.m. is always indicated there.
Waterproofing
Since wood is afraid of moisture, waterproofing materials are always used during construction.
This can be a roll waterproofing used to create a water-repellent layer between wooden floor structures and the finishing coating, or between wood and brick (stone, cinder block, etc.).
Heat and sound insulation
If it is necessary to create a barrier to noise or cold, insulating materials are used in the construction of floors. Most often, mini-slabs or polystyrene foam are used for these purposes. Their total number in area should be approximately equal to the area of the room. For more information about floor insulation, watch this video:
Fastening materials
To fasten wooden floor elements, you should purchase screws, nails, steel angles, anchor bolts and other consumables
When purchasing screws and nails, you should pay attention to their length
Those. To securely attach a magpie board to a beam, you will need 120 mm nails or 80 mm long self-tapping screws.
Floor installation
After all the necessary materials have been purchased and all preparations have been completed, you can begin construction work directly. The construction of interfloor slabs can be divided into several main stages.
Installation of beams
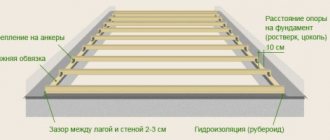
The part of the beam inserted into the wall is wrapped in three layers of waterproofing material.
The installation of load-bearing beams is most often carried out at the stage of erecting the walls of the building. Before laying the load-bearing beams, their surface is treated with all necessary impregnations.
Then their ends are cut at an angle of 60° and the part that will be walled up in the wall is wrapped in 2-3 layers of rolled waterproofing.
The ends of the beams are usually also coated with waterproofing compounds, but some experts advise leaving them open to allow the moisture contained in the wood to freely escape.
The depth of the beams inserted deep into the wall should be at least 15 cm. The laying step of the beams is usually taken at 0.6 m, but depending on the expected load on the floors, as well as on the thickness of the beam section, this figure can be reduced or increased.
The choice of interval between beams is also influenced by the technical characteristics of the material used for the finished floor.
If the top flooring is supposed to be made of inch boards, plywood or chipboard, then the distance between the beams should not exceed half a meter, otherwise the floors will sag when walking. For more information about installing beams, watch this video:
Floor joists must lie in the same plane
The installation of load-bearing beams begins from the two outer walls, while the beams should be located at a distance of 5 - 10 cm. After installing the two outer beams, we install the rest, observing the required interval.
When laying beams, special attention should be paid to the horizontal slope: all floor beams must lie in the same plane. To do this, place an edged board between the two outer beams, or pull the twine tightly.
If the base on which the beams are laid is uneven, then mortgages should be installed under the ends of the beams to level the horizontal level. For mortgages, a material is used that is resistant to rotting and physical stress - metal plates, pieces of tile, etc.
It is not recommended to use wooden wedges to adjust the level of beams, as they can rot quite quickly, which will cause individual floor beams to lower and bend the floor line.
The load-bearing beams are attached to the wall using anchor bolts and steel corners.
Fastening the support bars
After all the floor beams have been exposed, bars with a cross section of 5 x 6 cm (the so-called “cranial” bars) are attached to them. They serve as a support for laying the subfloor and are attached along the entire length of the supporting beam, on both sides.
They should be nailed in such a way that their lower part is flush with the lower part of the beams.
Installation of subfloor
Most often, the subfloor is made from inch boards.
To construct the subfloor, edged boards are taken and laid across the beams on support bars. Since the distance between the beams usually does not exceed 0.6 - 0.8 m, then an inch or thirty board is quite suitable for subfloors: the pressure on them will be limited only by the weight of the insulation.
You can also use a trimmed slab for these purposes. You can also combine the subfloors of the second floor with the finished ceilings of the first floor or basement. In this case, the edged boards are hemmed from below, from the side of the first floor to the beams. For more information about the draft field, watch this video:
Thermal insulation flooring
After installing the subfloors, compartments are formed between the beams, which, if necessary, can be filled with thermal insulation materials.
To do this, a hydro- or vapor barrier (roofing felt, isospan, etc.) is laid on top of the subfloor boards, and then mineral wool, polystyrene foam, slag with sawdust, etc. are laid.
In this case, the entire space between the bars must be densely filled. We fill the gaps between the beams and the foam sheets with sealant.
It is also advisable to lay waterproofing on top of the insulation, which will protect it from moisture leaks from above.
Installation of wooden beams and floor joists of the house.
Installation of a floor made of wooden beams for the floor of a house consists of the following steps:
1. First of all, it is necessary to calculate the cross section of the beam
2. Purchase of material
3. Treatment of materials with protective agents
4. Select the most suitable means of fastening
5. Installation of beams and joists
Beams and logs of a certain size are prepared in advance. They begin to be laid from the outermost ones. Then the outer beams are checked using a level. Afterwards, ropes are pulled between them along the edges and along them, and using a level, the horizontality is checked so that one beam or joist does not lie higher than the other in order to avoid the slope of future floors. Next, the floor beams of the house are installed in the gaps, determining the height of their installation using the same stretched ropes. The distance between beams and floor joists of the house should not be different.
It is necessary to place wooden beams and floor joists of the house at a distance of 50-100 cm. When installing wooden floors, beams and joists of a larger section are located at a greater distance from each other, and a smaller one, respectively, at a smaller one.
After all the beams or floor joists of the house have been checked for level and evenness, you can begin installing subfloors and laying boards.
Watch the video: Making posts for floor beams
Reinforcing joists using plywood or OSB boards
For logs made of glued material or structural wooden I-beams, overlays made of plywood or OSB boards are most often used. Such overlays are also installed in the form of double-sided overlays or one-sided lag reinforcement. This connection is fixed using self-tapping screws. The thickness of the plywood element or OSB board element should be no less than 10-12 mm. The size of the overlay for a structural I-beam must correspond to the height of the central part.
Reinforcing joists with plywood
Fixation with self-tapping screws is done on both sides of the linings. It is important that the screws pass through the thickness of all elements being fastened.
Basic methods of arranging floors
Sometimes monolithic floors are installed in country houses. They are mounted from ready-made reinforced concrete slabs. Such designs are characterized by a high degree of reliability and long service life. But at the same time, assembling them is quite expensive. After all, such slabs weigh a lot. Therefore, they have to be lifted onto the walls using a truck crane.
There is another type of ceiling for the second floor - filler. This structure is made of concrete mixture in formwork assembled on racks. This is also a fairly reliable type of flooring. You can also assemble it yourself. However, the technology for its manufacture is still very complex. Mistakes should not be made when pouring a monolithic slab.
The ceiling of the second floor with wooden beams serves less than a slab or poured one, but at the same time it is completely devoid of their disadvantages. The assembly technology for this design is extremely simple. At the same time, this type of flooring is inexpensive. These structures, as the name suggests, are built on cobblestone or log beams. It is allowed to collect them both in brick or block houses, and in log or panel houses. These are the types of floors that are most often installed in country buildings.
Main workflow steps
The instructions for carrying out the work will be divided into several stages so that you can understand all the features as best as possible. And we will start by laying out the main supporting elements.
Fastening beams
Work in wooden buildings can be carried out in several ways; consider the sequence of required operations:
- First of all, you should prepare the products - clean them of dirt and bark residues, if any, and also coat them with a special fire-retardant composition. This will protect the wood from fire and damage from woodworms and will significantly extend the life of the structure.
It is most convenient to carry out the treatment before attaching the elements; if you have a sprayer, the work can be done with your own hands very quickly
- Next, all the necessary measurements are taken; if cutting of beams is required, then it is better to double-check all the dimensions, since cutting off the excess will simply ruin the product, the price of which is quite high. Cutting is easiest done with a chainsaw or other special woodworking device.
Fastening is carried out in three main ways:
- The first is cutting out recesses to fit the ends of the beams and securing each element in special recesses. This option has been very widely used for several centuries. It is important to cut the material carefully so that the laying level of all elements is the same, the joints are sealed and thermally insulated using tow, this helps protect all cutouts from the penetration of cold air.
Laying in recesses is convenient because each element is located in its place, which is prepared in advance
- The second solution is laying on the ends of the walls, with each of them fixed in a stationary position using staples or special screws. This option is applicable if cutting the recesses would be too time-consuming and complex, and the configuration of the building allows the beams to be laid with sufficient overlap on the walls so that they rest securely and provide high load-bearing capacity.
- The newest option - the use of special supports for timber - is used if it is necessary to make a partition anywhere on the wall surface without cutting out recesses or where the beams extend into the walls only a few centimeters. The work is simple: the fastening element is fixed to the base, after which the element is inserted into it and fixed using self-tapping screws.
The supports are highly durable and provide the necessary load-bearing capacity
Ring fastening, waterproofing and insulation
After the beams are installed, you can begin covering the structure with rough flooring, the work is carried out in different ways, we will consider the simplest and most cost-effective option:
- The underside is filled with rough flooring, which is most often made from inexpensive unedged boards of the same thickness. The optimal solution is a 20-25 mm pine board. Its cost is low, and for this type of work it is ideally suited.
Important! Be sure to remove the bark from the ends if there is any, as it may contain pest larvae, which can greatly harm your home in the future. Also, do not forget about treating all elements with a fire-retardant composition.
- The boards can be laid on a cranial block specially fixed at the lower level of the beams (50x50 mm in size) or screwed directly to the beams. We strongly recommend using self-tapping screws for these purposes; they are much more reliable than nails and will hold all the elements much better.
This is what the construction of the second floor floor in a wooden house using a cranial block looks like
- Next, the surface must be waterproofed, and if previously various options were used for this - from clay-based putty to roofing felt, then in our time special materials have appeared that release moisture from the wood, but prevent its penetration from the outside. These are so-called membranes, and we recommend using them.
Special membrane materials are an excellent solution for floors
- Now let's look at how to insulate the floor of the second floor of a wooden house. Previously, different options were used - from sawdust and slag to expanded clay and various mixtures. With the advent of mineral wool, all work has been simplified - this type of material is characterized by high performance properties and excellent heat retention. In addition, mineral wool is an excellent sound insulator.
Insulating the floor of the second floor in a wooden house using mineral wool is a quick and simple process; it is important to lay the material as tightly as possible
- From the outside, the surface is covered with another layer of waterproofing material, at which point this stage of work can be considered complete.
Floor construction
The floor of the second floor on wooden beams can be laid in two main ways:
- Directly along the surface of the structure, this option is applicable if the thickness of the insulation inside the structure is less than the height of the beams and there is a small cavity below for ventilation. If the mineral wool is located flush with the top edge of the beams, then it is better to use the second option.
- Logs are laid on the beams, which makes it possible to create a so-called “floating floor”, since it is not rigidly connected to the walls and can move slightly due to temperature changes. This option allows you to improve sound insulation in a wooden house.
The work also varies depending on the material used:
- If you decide to make a wooden floor, then purchase a special board 32 mm thick or more with a special tongue-and-groove fastening system. The work is simple: the board is secured with screws or nails through the recess, i.e. groove, then the next element is inserted so that the connection is tight; if necessary, you can tap the end with a mallet. This results in a smooth surface without nail heads or screws.
- If you decide to lay laminate, parquet or other covering, the easiest way to cover the surface is with sheet materials: plywood or oriented strand board. The second option has high moisture resistance, so it is used more often. The work is simple: the sheets are combined so that the connections go along the beams and are screwed with self-tapping screws.
How to assemble floating floors
After installing the beams, in this case the ceiling boards of the first floor are also first filled. Next, a vapor barrier is installed. Rigid slabs of mineral wool or expanded polystyrene are installed between the beams. Next, another layer of sound insulation is installed. In this case, the slabs will lie above the beams, and the floor will be completely covered with them.
You can soundproof the interfloor ceiling using wooden beams in a slightly different way. In this case, wool slabs are also used. But they are not installed between the beams. They lay a continuous carpet on top of them. The material will be slightly pressed between the beams without touching the boards of the first floor ceiling. Next, several slabs are cut into strips. They are necessary for laying out the perimeter of the premises on the second floor. Later they can be covered with a plinth.
A concrete screed approximately 5 cm thick is poured on top of the slabs. For strength, it must be reinforced with a stack of 10 mm rods. Concrete should be poured in such a way that it touches the cut strips of cotton wool and not the walls of the house. Sheets of plywood need to be laid on top of the concrete, and then finishing material.
Installation of wooden floors with electric heating
Electric underfloor heating in a house can be installed in two ways:
- install heating mats;
- Place a heating cable on the floor.
In the first case, you can do the work yourself; installing a heated floor is easier and faster.
The floor rises no more than 3 mm. This means it is ideal for rooms with low ceilings. However, such a heated floor system is characterized by low power, so it is used only as an additional source of heat. When laying the heating cable, the floors are raised by more than 30 mm. It is not recommended to install them yourself under a wooden floor. It is advisable to consult a specialist.
Both types of heating can be done under any floor covering.
To install infrared mats, take the following steps:
- prepare a wooden base: eliminate floor unevenness, significant defects, prime;
- lay a layer of heat-insulating material;
- spread strips with heating elements evenly;
- install a heated floor temperature sensor;
- fix the cable;
- spread a thin layer of leveling mortar over the mats;
- then lay the flooring or lay tiles;
- Be sure to install a floor heating thermostat.
If you plan to lay tiles on boards with warm electric heating, it is recommended to apply leveler in 2 layers.
The heating cable is usually laid on a concrete screed made on a reinforcing mesh. It can be done over wooden floors. It should be taken into account that the floors will become higher by about 30 mm or more.
- a thermal insulation sheet or a heat-reflecting substrate is placed on tightly lying boards without obvious defects;
- then they throw the reinforcing mesh;
- a heating cable is attached to it with plastic stitches;
- concrete solution is poured on top and distributed in an even layer;
- after it hardens, waterproofing is spread;
- Next, they place a layer under a certain floor covering: under the tiles - glue, under the laminate - underlay.
In addition, you should install a temperature sensor in the corrugated tube and a thermostat.
There is another option for laying a warm electric floor on a wooden base: in a concrete screed created on top of the boards, on a mounting tape.
During installation and subsequent operation, it is important to follow safety rules, since electricity can harm people’s health and property.
Follow the instructions. Do not change the length of the cables on your own. Observe the temperature in the room: it should not be lower than -5 degrees. Before turning on the system, it is important to ensure that the screed is completely dry. The underfloor heating cable should not be located under heavy furniture.
Among the many advantages of an electrically heated floor, there are disadvantages of such a device. The main thing is high energy consumption during operation. If there is a need to create warm floors in the house, it is worth calculating everything several times and determining the possible benefits
It is important to find out the total cost of the system and electricity costs
Embedding a beam in a brick wall
If the house is built from brick, or the upper part of the foundation is built on from this material, the beam is tightly embedded in such walls. Therefore, in the process of bricklaying, nests (openings) must be provided into which the ends of the beams will subsequently be laid. It is necessary to observe safety measures that will prevent rotting of the ends of the beams that will be placed in the nests. For this purpose, the opening cavity in the brickwork is lined with a double layer of roofing felt, and the beam itself, at a distance of at least 3/4 meter, is treated at both ends with a fire-retardant compound. It is highly desirable for them to cover all wooden parts of the house frame. An important point: in order for the wood to be able to “breathe,” which prevents condensation from accumulating, the ends of the beams themselves cannot be treated with a compound that prevents this process. For example, resin. It is quite possible that the beam socket will be significantly larger than its cross-section.
In this case, the resulting cavity is insulated with mineral wool or polystyrene foam, or sealed with cement mortar.
Noise Characteristics
Noise easily overcomes partitions and spreads both through the air and through the ceiling, creating sound vibrations in the walls. When designing wooden transitions between floors, it is necessary to soundproof the main structures (joists and beams) and install an insulator between all surfaces. Each type of insulation reduces sound waves over a specific range and physical characteristics. To choose the right sound insulation, you need to understand the nature of noise and how it spreads.
- Acoustic noise. Transmitted through the air: this is a conversation, sounds from operating appliances, penetration of sounds from the street into the house, determined by the Rw index. Noise insulation, which prevents the spread of interfloor airborne noise, has a protection index of at least 47 dB.
- Impact or structural noise is determined by the Lmw index and is transmitted through walls, floors, and ceilings. Noise insulation to prevent shock wave has protection characteristics of up to 66 dB.
Calculation of the amount of material and its cost
Calculation of sound insulation between floors is made based on the following parameters:
- Sound insulation thickness, number of layers of base material.
- Installation technologies. If a roll sound insulator is used under the subfloor, then the size will be equal to the area of the interfloor floor. When felt is used on logs or beams, footage is added taking into account bends.
Installation of the ceiling at the construction stage requires one roll of roofing felt. When purchasing layers of mineral or basalt wool, the area for insulation is first calculated without taking into account the beam exits. The foil material, which is spread under the subfloor, is taken with a reserve, taking into account that the flooring must be carried out with the smell of the sheet.
Properly installed sound insulation between floors will ensure silence in the house and enhance heat conservation. The market offers a range of building materials for insulating floors during the construction stage and for finishing old interfloor floors, without dismantling the latter.
How is thermal insulation protected?
Various insulation and ventilation schemes may require limited air circulation in the space under the floor. This is especially true for houses on a pile-grillage foundation, where the insulation is in contact with street air and must be protected from getting wet.
To prevent mineral wool from losing its heat-saving properties when saturated with moisture, it is covered with a vapor barrier on top. The protective membrane is spread over the joists and insulation, then fixed to the wooden blocks with small nails or staples. The joints must be carefully glued on both sides; it is better if they are located exactly on the edges of the supporting floor system.
In those rare cases when the dew point may move above the insulation with the formation of condensation on the vapor barrier, it is necessary to provide ventilation under the board flooring. It is necessary to fill on top of the frame logs, covered with a vapor barrier, a counter-lattice made of boards of the same width as the logs themselves. The thickness of the vent usually does not exceed 20-25 mm, and the counter-latt itself does not in any way affect the quality of fastening of the board flooring.
What are the varieties?
There are three types of wooden floors. The basement and attic may experience temperature changes if these rooms are not heated. In this case, a reinforced thermal protection layer with a thickness of at least 150 mm will be required. The interfloor ceiling is in almost equal temperature conditions on both sides, if, of course, the developer has installed the heating system correctly.
For this design, a thermal protection layer of 100 mm can be installed, but sound absorption testing from impact, air and system sound will be required. If this coating thickness is not enough, an additional sound-absorbing membrane is installed or the layer of acoustic insulation is increased. The choice of protection is made at the design stage, with an economic comparison of the most acceptable options.
First floor of a private house
It is considered one of the most important in the design of a house, since it operates in particularly stressful conditions, on the border of the influence of aggressive subsurface moisture on the structure of the house and must create a reliable barrier to protect the interior rooms from the penetration of moisture and cold.
The basement floor also bears significant loads, since it serves as a floor. In this connection, special requirements are placed on its design and installation.
Second
The partition that is installed between the first and 2nd floors is called an interfloor partition; it has two working surfaces - the floor for the higher floor and the ceiling for the lower one. It is subject to quite high stresses, so reinforced load-bearing beams with a span of no more than 6 m and a deflection of no more than 1/300 of the length are installed in this place.
The center-to-center beam distance is taken from 0.6 to 1.0 m, depending on the calculation results; as a rule, the smaller the beam span, the larger the step allowed. The beams are fixed perpendicular to the longest wall of the building.
The forming layers of the interfloor ceiling: beams, insulation and sound protection as inter-beam filler, 2 layers of vapor barrier on top and bottom of the insulation, ventilation gap, rough and finishing floor, as well as ceiling finishing.