Do-it-yourself sauna in the garage: step-by-step instructions
The bathhouse is an integral part of Slavic culture; moreover, when used in moderation, bathing procedures improve immunity and improve health.
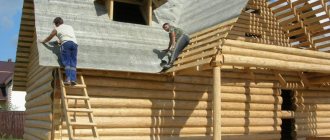
In a private house, such premises are found very often. They can be installed in the basement, on sites in the form of a separate building, or use an unused garage for this purpose. If the garage is used for a car and is located next to the living space, then you can make an extension for a bathhouse by connecting the house with the garage. A garage connected by a bathhouse to a residential building can be used to store bath accessories and supplies of firewood for kindling.
However, adding a bathhouse to a garage will take a lot of time and will require installing a foundation, erecting walls and a roof, which will entail significant financial costs.
Creating a project for a future bathhouse
Having an unused garage on your site, you can equip a bathhouse in two ways:
- Divide the garage into two parts , one of which will be occupied by the bathhouse itself, the second will be used to store a car or household utensils. Such a bathhouse with a garage is quite common.
- Use the entire garage space for a bathhouse . This room will be enough not only for the steam room itself, but also for a shower and a relaxation room.
Next, we will consider the option of creating a bathhouse in an unused brick garage.
Important. When arranging a bathhouse in a brick garage, it is important to consider that brick is capable of absorbing moisture. Under the influence of moisture and temperature, the bricks will gain dampness and crack, so the interior of the bathhouse must be insulated and waterproofing installed, which will not only protect the brick, but will also prevent heat from escaping outside.
Peculiarities
Many people want to build a basement in the garage, as this place is optimal for storing vegetables and fruits. You can also equip the basement with shelving for conservation or install a workbench and shelves for tools, turning the room into a comfortable workshop. But the basement is suitable not only for economic purposes - you can arrange a recreation area in it by adding a bar or billiards to the interior.
When building a basement room in a garage, you should familiarize yourself with some features:
- You will need to consider high-quality insulation of the basement from moisture. Groundwater should not penetrate into the room, so care should be taken to purchase waterproofing materials.
- In some cases, a waterproofing layer will not be enough, so you need to be prepared to install a drainage system.
- There must be ventilation in the basement. It allows you to maintain the required temperature and creates an optimal microclimate in the room. If you abandon the ventilation system, mold and mildew will appear during further operation of the cellar. It is not allowed to store preserved vegetables in such conditions.
- If you plan to use the basement in the garage as a workshop or recreation room, you need to insulate the walls, ceiling and floor. This solution eliminates dampness and prevents fungus from appearing. Only fire-resistant materials should be used as finishing.
To get rid of mold, you will need not only to create the right climate, but also to disinfect the room. This will require the following steps:
- The basement must be cleared of all pieces of furniture and jars of pickles.
- The walls should be cleaned with a wire brush.
- Shelves and other furniture need to be dried in the fresh air and treated with special preparations. The best results are shown by the sulfur bomb. The room itself can be disinfected with slaked lime.
- To prevent mold from reappearing, you need to create a high-quality waterproofing layer in the room, as well as prevent fungus every year.
The basement in the garage has the following positive qualities:
- The structure can become an ideal place for storing food. With its help, you can unload the free space in the garage. The microclimate of the basement is considered optimal for the preservation of preserved vegetables and fruits throughout the winter season.
- Using special finishing materials, you can create a relaxation area in the basement.
- To equip the basement, there will be no need to allocate additional space on the territory, since the room will be the zero level in the garage itself.
- A garage equipped with a cellar has a higher cost compared to buildings without a basement.
- The basement is reliably protected by the garage from bad weather conditions and temperature changes.
Disadvantages include:
- If you choose the wrong construction or waterproofing material, your basement can become a breeding ground for mold and dampness. In worst cases, this room can turn into a well with water accumulation.
- A basement in a garage can only be created manually. Therefore, you will need the help of friends or additional costs for the services of specialists.
- If the site has a high groundwater level, a large amount of materials will be required to create a waterproofing layer, which means additional costs.
Preparing the premises
Before you begin preparing the premises, you need to develop a detailed plan for the garage with a sauna.
This plan should indicate all the rooms of the bathhouse, such as:
- Steam room.
- Restroom.
- Shower.
- Toilet and changing room, if space allows.
After the plan has been drawn up with all the necessary dimensions of the premises, you need to think about the supply of communications, such as electricity (see Electrical supply to the garage according to all the rules) and water. If the bathhouse is adjacent to the house, then cold and hot water can be removed from the home plumbing system, but this is often a complex procedure. It is much easier to supply only cold water to the bathhouse and install your own boiler indoors.
Creating ventilation
Important. Before you build a garage with a sauna and begin interior arrangement of the room, think in advance about the ventilation system according to one of the schemes shown in the figure above. Equip the ventilation with the necessary air ducts before you begin interior and exterior decoration of the room.
Arranging a shower drain
The next step before building a sauna in the garage is to equip a drainage hole for the drainage of water after a shower. To do this, it is necessary to install a drain at the site of the future shower and remove the waste pipe outside the garage.
The pipe must be inclined to allow liquid to drain independently, as shown in the photo above.
Creating such a septic tank is quite simple using a regular plastic barrel with a volume of 200 liters:
- Dig a pit one and a half meters deep.
- Place coarse crushed stone with a layer thickness of 20 cm at the bottom of the pit.
- Install a plastic barrel with pre-drilled holes in the bottom.
The inspection hole of the barrel should go to the surface and be closed with a hatch. Upon completion of installation, the excess voids around the barrel are filled with soil and the drain can be considered ready.
External insulation of the garage
A combined garage with a bathhouse needs additional insulation of the room both from the inside (see How to insulate a garage quickly and efficiently from the inside) and from the outside. Foam plastic is usually used for external insulation of a brick wall, since this is the fastest method of insulation and the price of the material is quite low.
The insulation process is carried out as follows:
- The garage walls are cleaned of dirt and dust, then covered with a deep penetration primer in several layers.
- A longitudinal support rail is fixed at the bottom of the wall, as shown in the photo above. It will serve as a support for the first row of foam.
- Then the adhesive mass is applied to the surface of the foam using a notched trowel and pressed against the wall with little force. The foam is laid from the bottom up.
Important. When carrying out insulation with your own hands, use polystyrene foam with a thickness of 8-10 cm and lay it in a checkerboard pattern. If the thickness of the foam is more than 10 cm or it is not possible to install a longitudinal support rail, then special dowels are used as an additional fastening for the foam, as shown in the photo below.
After laying the foam plastic, a leveling layer of plaster is applied to its surface and a serpyanka mesh is installed, which serves as additional reinforcement for the layer of decorative plaster. At the final stage, a decorative layer is applied, and this completes the external insulation of the walls.
Adviсe
To simplify the process of building a basement in a garage, you should familiarize yourself with the recommendations of experts:
Before building a cellar, you need to study the procedure for selecting materials that are suitable for the job. You should also consider the size of the future structure and familiarize yourself with the standard requirements for the dimensions of basements. Work begins with the development of a small diagram, which should include not only the location of the object, but also the dimensions
Using the sketch, you can calculate the required amount of materials. When constructing a basement yourself, you need to pay attention to choosing a place for constructing a pit. The pit should be located at a sufficient distance from the supporting structures of the building. The basement must have high-quality waterproofing and ventilation. The most optimal option for descending into the cellar is an extension ladder that will be lowered through a hatch. A staircase equipped with concrete steps is suitable for a large basement. The hatch cover should be made of lightweight materials so that no special effort is applied when opening it.
To learn how to build a garage with a basement, see the following video.
Interior arrangement of the bathhouse
A self-equipped bathhouse in a garage should have good thermal insulation from the inside; the ceiling deserves special attention, since hot air and steam rise upward. Arrangement of the garage from the inside begins with insulating the walls.
The main materials for insulation are mineral wool and penotherm. Penotherm is a foil insulation based on polypropylene. This material is produced in rolls and is intended not only for insulation, but also for waterproofing the room.
An insulated sauna in a garage begins with creating a wooden frame for laying mineral wool. The frame is made of wooden slats, which are attached to the wall with dowels. Then mineral wool is placed tightly between the frame beams, as shown in the photo below.
Important. The thickness of the timber used for the wooden frame should be equal to the thickness of the mineral wool. When working with mineral wool, you must use safety glasses, a respirator and thick gloves. The frame and mineral insulation are installed on the walls and ceiling.
If the bathhouse is a garage under the same roof, which is made with the attic, then insulation of the ceiling must also be done from the attic side, using the same mineral wool. After arranging the frame and laying mineral wool, the surface of the walls is insulated with foil penotherm, which is placed inside with foil, as shown in the photo below.
The insulation is secured to the wooden frame using a construction stapler; you can use wood screws. The insulation sheets are laid overlapping, and the joints are sealed with double-sided tape.
For your information. The bathhouse in the garage is decorated with clapboards made of natural wood or polished boards. For cladding, a sheathing of wooden slats is installed on top of the insulation, which is positioned perpendicular to the wooden frame. Thus, an air space is formed between the insulation and the cladding, which promotes ventilation of the wood and rapid drying after exposure to water vapor. After installing the sheathing, the facing material is installed. As a result, you will get multi-layer insulation, the diagram of which is shown in the photo below.
Important. To install lighting lamps, the electrical cable is laid even before laying the mineral wool. All cables are laid in special corrugated tubes, which not only protect the cable, but also make it possible to conveniently replace it if necessary.
At the final stage, the floor is insulated. If the base in the garage is made of concrete, then the floor is cleaned of dust and debris, then several layers of deep penetration primer are applied.
After this, the same steps are repeated as when insulating the walls. Only in the case of the floor, foil insulation is not installed, but instead a dense construction film is used to protect the mineral wool from moisture.
Important. In order to build a sauna in a garage, only natural wood is used, which cannot be coated with various chemical antiseptics or other types of chemical impregnations, since when exposed to temperature they will begin to release toxic substances. To protect wood from moisture, only natural antiseptics are used.
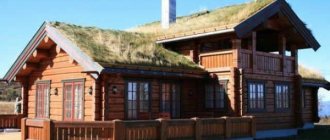
If you are building a garage and a bathhouse under one roof, try to use the strongest and most durable types of wood, which include:
It is not recommended to use species such as alder, birch or linden for interior cladding. These types of wood do not tolerate moisture well; when exposed to it, the material begins to warp.
At the final stage, the installation of an electric oven, benches and improvement of the ventilation holes is carried out. If you plan to install a wood-burning stove, then you need to think about the arrangement of the chimney in advance.
Basic work on the device
During construction, a bathhouse on the ground floor will require serious insulation, from all sides. Since the bathhouse is a very humid room, steam will penetrate inside the walls, very deeply into the structure of the material, which is why the material will become excessively wet. And this, in turn, will lead to the destruction of the insulating layer. Therefore, it is recommended to create an air corridor between the wall and the thermal insulation layer, which will allow the air to dry. The width of the air corridor should not be too large. 10-20 cm is enough. In addition, many basements are not large, so the owners are often limited in space.
Scheme of wall insulation in a bathhouse.
Insulating a room with polystyrene foam is a bad idea, because this heat insulator will emit harmful fumes when exposed to severe temperatures. It is better to buy a special thermal insulation material designed for such work.
The best material for cladding a bathhouse on the ground floor is natural wood. You should not varnish the wood, because any paints at high temperatures will also emit harmful fumes.
If a wood or coal stove is to be installed in the basement of a private house, then installing a chimney is a mandatory step. It’s good if its installation is included in the house design, because adding such a solution to an already finished building is an extremely difficult task.
How to make a bathhouse in a garage - arrangement options and finishing rules
Many steam lovers would like to have their own sauna, but not everyone has the opportunity to build one. A possible solution to this problem is to arrange a bathhouse in the garage with your own hands; how to do this and what questions you will have to face will be discussed in this article.
First choice
The first decision that the future owner will need to make is whether to completely convert the garage into a bathhouse or arrange a combined version. If the garage has not been used for its intended purpose for a long time (the car is parked near the house or in the parking lot), there is nothing more logical than to build a bathhouse in the garage, occupying its entire volume. It is also possible to combine a garage and a sauna or bathhouse.
Solid or metal?
Fundamentally, all types of garages in which you can build a bathhouse or sauna can be divided into:
Of course, when wondering how to make a bathhouse in a garage with your own hands, this difference should be taken into account based on two considerations:
- for a bathhouse or sauna in the garage of a permanent building, less thermal insulation costs are required;
- permanent garages are usually larger, which means you can divide the building into several rooms (for example, adding a recreation room or leaving space for a car).
But, if the work is carried out correctly and conscientiously, a bathhouse from an iron garage will turn out no worse than from a permanent one.
Selection of materials for cellar construction
The selection of materials for construction is determined mainly by the budget, but if you save and use second-rate materials, this can subsequently result in double the cost of a complete remodel. For the base cushion you will need sand, crushed stone or broken brick; to fill the slab, in addition to sand, you also need M500 Portland cement.
For waterproofing, you can use roofing felt as the most budget-friendly option for a hydrophobic coating; clay is also suitable if the soil was clayey when digging the hole, and the insulating material was obtained completely free of charge. For sealing the junction of different layers and seams, the best material is bitumen mastic or epoxy polymer, although the latter is much more expensive.
The most reliable, but also quite labor-intensive material for building walls is, of course, concrete. It is optimal to order ready-made concrete at the factory, then you can guarantee the brand strength of the finished composition. In practice, concrete is most often mixed during work directly on site. In this case, the budget is significantly reduced.
The second option is to lay brick walls. It is not advisable to use wooden materials for an underground cellar - even seasoned wood with high-quality impregnation will not be able to withstand soil moisture for long.
Thermal insulation of garage
The garage should be insulated both outside and inside. One way to insulate a garage quickly, with the least amount of effort and minimal financial losses, is to use polystyrene foam.
Insulation from outside
There are several rules for insulating a building with foam sheets:
- The thickness of the foam must be greater than or equal to 50 mm;
- Sheets of foam plastic must be installed in a checkerboard pattern (with a shift along the seam in each subsequent row);
- Polystyrene foam is a soft and crumbly material, so a reinforced mesh should be glued on top of it;
- The installed mesh must be puttied with a cement-sand mixture; it is better to choose a ratio of components of about 1:3 (one part cement to three parts sand);
- The facade should be painted with water-based paint to protect it from external humidity.
Insulation from the inside
The inside of the future bathhouse can be insulated, as well as the outside, with polystyrene foam or use mineral wool, which is used for thermal insulation of conventional baths. It is better to insulate metal garages from the inside in two layers: this will significantly reduce heat transfer in the cold season.
Insulation of external walls
To reliably retain heat, you should additionally insulate the garage from the outside. This rule is especially relevant for structures made of metal. In this case, special panels are used for external insulation. A brick garage can be insulated with polystyrene foam. Foam panels are mounted from bottom to top. Procedure:
- A special strip is attached to the bottom of the brick, from which further installation will be carried out, glue is applied to the brick and foam is laid.
- The foam is secured with long dowels.
- A reinforcing mesh and a layer of plaster are applied to hold the mesh in place.
- Finish plaster is applied on top, which can be painted.
If a brick garage has a solid foundation, then the building will support a steam room in the form of an additional extension on top. An externally and internally insulated building will allow you to combine a garage space with a bathhouse.
Water disposal
When planning how to make a bathhouse in the garage, you need to take care of drainage. If the garage is located in a garage cooperative (usually such cooperatives do not solve the sewage problem), you will have to choose from two options:
- dig a drainage hole with drainage into the ground;
- dig a sealed container into the ground to receive waste water.
Both solutions have disadvantages. In the first case, this is the energy consumption of the operation, in the second, the need to pump water out of the container from time to time - independently or using the appropriate paid services.
Steam room arrangement
Having resolved the main issues of the preparatory stage, you can move on to arranging the steam room. Depending on the size of the garage, the bathhouse can be included as a separate room (which is much more convenient in terms of thermal insulation and drainage); It is possible to combine a bathhouse with a garage, but then the installation of a heat-insulating screen is necessary.
If the size of the garage allows, you can divide the bathhouse itself into three sections: the steam room itself, the shower room and the relaxation room.
The main thing in a bathhouse is, of course, the stove. In humid conditions, it is best to use a traditional wood stove, either homemade or purchased. Using an electric oven is more dangerous due to the possibility of electric shock; however, with proper insulation of the wires, this danger can be reduced to a minimum.
With proper planning of the building, a stove can be used to heat not only the bathhouse, but also the adjacent rooms.
When placing a bathhouse or sauna in a separate room, the benches can be arranged as desired (about
Ventilation system installation
A bathhouse is not only a room for steaming, but also a place of increased danger, since high humidity, accumulating gases, and rotting products can harm health and provoke corrosion. To avoid negative consequences, it is necessary to create a ventilation system that ensures the penetration of fresh air.
It should be taken into account that a bathhouse built in an ordinary garage needs to draw up a diagram (path) for the passage of air masses into the premises, ensuring the interaction of heating with ventilation. For uniform heating of bath rooms, it is better to install exhaust ventilation from below, so that hot air circulates not only at the top.
Bathhouse (sauna) in the garage: preparation, insulation and finishing of the room with your own hands
The bathhouse is considered an important part of Slavic culture; at the same time, frequent bathing procedures can improve health and boost immunity. In suburban areas, many private houses are supplemented with these premises. They can be placed as a finished building on the site, in the basement floors of the house, as well as inside the unused space of the garage.
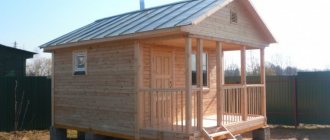
When a garage located near a residential building is used for its intended purpose, and there is a car inside it, in most cases an additional extension is made between it and the dwelling. In this case, the bathhouse next to the garage will serve as an additional storage room where you can store firewood for lighting the stove, as well as other bath accessories.
However, building an additional structure at the dacha with your own hands will take a lot of time, effort and money, because you will need to dig a trench for the foundation, pour cement, wait for it to harden, build walls and erect a cover. It’s much easier and faster to allocate extra and unused space in the garage for this, or the entire room if it’s sitting empty!
Often, when deciding to build any additional structure on your own territory, it is necessary to calculate the future foundation. It can be difficult to do this yourself if you don’t know the theory. We have collected the basic rules and nuances that are important to consider when calculating the foundation here!
Features of the construction of a bathhouse under a residential building
- The basement itself does not have good air exchange, and the placement of a bathhouse also adds humidity. To avoid stagnant odors and stuffiness, it is important to provide air circulation in the bathhouse - install special fans or deflectors.
- The basement is the basis of the entire house, so it is especially important to ensure compliance with fire safety measures. Experts even recommend installing a separate exit from the bathhouse to the street, which, of course, is expensive and troublesome during construction, but can save lives if there is a threat of fire.
Sewage and ventilation systems for a bathhouse in the basement
Using a bathhouse requires a large consumption of water, which requires proper operation of the sewer systems. A well-organized water drainage system is the key to stable operation of the entire bathhouse. It’s not difficult to organize it with your own hands - you need a trench with a slope from the bathhouse towards the site.
The width of such a ditch is slightly more than 500 mm, the depth is below the freezing level of the soil. Metal pipes are laid in the trench and connected to the bathhouse with a septic tank or taken outside the site. Above the shaft, a mesh is attached with double corners to purify water, and covered with sheets of iron. With this design, the floor in the bathhouse should be sloped towards the shaft.
If the sewer channels are located below the level of the main sewer system of the house and natural drainage of water is not possible, then a pumping station will be a convenient alternative.
To take healthy procedures in the steam room, it is necessary not only to organize the drainage of water, but also the flow of fresh air. In a bathhouse, ventilation is one of the most important factors. Proper room ventilation is easy to do with your own hands without the involvement of specialists. A ventilation shaft is placed near the stove, from which fresh air from the street will flow inside, and an exhaust hood is made on the opposite wall to remove moist air into the general ventilation system of the house.
There are special systems with a fan, which, when turned on, draws outside air into the steam room.
Conducting electricity inside the bathhouse
Due to frequent high temperatures, it is necessary to lay electrical wiring at a small height from the floor, since all the hot air rises to the top.
Bathhouse project
Having an empty or partially empty garage on your site, you can arrange a bathhouse or sauna there using two methods:
- Allocate all available space in the garage for the new premises. When choosing this option, it makes sense, in addition to the steam room, to organize an additional rest room and shower inside, because there will be plenty of space for all this.
- Divide the garage into a couple of compartments: in one there will be a car or household utensils, in the other there will be a sauna. This option is the most common.
Next we will analyze in detail the process of how to make a sauna in the garage with your own hands.
Important nuance ! If you are planning to set up a sauna inside a brick garage, you should know that brick absorbs moisture well. Along with this and the influence of temperature, the brick will begin to accumulate more and more dampness over time, beginning to crack. Therefore, inside a brick bath it is always necessary, in addition to insulation, to also lay a layer of waterproofing, which will protect the brick from the negative effects of dampness and retain heat inside the room.
Preparatory work
Immediately before starting preparatory work, you should thoroughly work out the plan for the garage with a sauna.
The plan should show all rooms and premises, namely:
- Shower;
- Steam room;
- Changing room and toilet (if there is enough space);
- Rest room.
After preparing a plan with all the resulting dimensions and dimensions, the laying of communications is thought out, namely the connection and wiring of water and electricity. If the bathhouse is located in a garage attached to the house, then hot and cold water can be supplied directly from the home plumbing system. However, as practice shows, this is quite difficult to implement; it is much easier to supply only cold water to the bathhouse by installing an additional boiler inside the room.
DIY ventilation
Below are the most popular ventilation schemes.
Before organizing a bathhouse in the garage and starting interior decoration, carefully consider the ventilation system. Install the air ducts before you start finishing work!
How to make a shower drain?
The next step in the garage is a drain hole , which is necessary for the outflow of water. For this purpose, the waste pipe is led outside the garage, and a drain is created in place of the shower.
Similar to the one shown in the photo below, the drain pipe is placed at a slight angle, thus ensuring independent flow of water.
Making such a septic tank with your own hands is quite simple, because for the work you only need a plastic barrel with a capacity of about 200 liters:
- First, a 1.5-meter hole is dug;
- A 20-centimeter cushion of coarse crushed stone is placed at its bottom;
- Holes are made in the bottom of the plastic barrel, after which it is placed in the pit.
Upon completion of installation, the barrels are filled with soil, leaving only an inspection hole on the surface, covered by a hatch. The drain is ready!
In addition to draining, summer residents often decide to install a gas tank on the territory of the house for independent heating of the home. Such an installation can save a lot of money in the future, but for successful use it is worth knowing exactly how to install this equipment. You can find out about this and many other nuances here.
Insulating the garage from the outside
Since the bathhouse is located in a garage, the latter must be additionally insulated, both inside and outside! In most cases, many summer residents decide to insulate brick walls using polystyrene foam, since the material is inexpensive and the work is carried out very quickly.
The procedure for insulating a brick wall:
- The external surfaces of the garage walls are thoroughly cleaned of dust and dirt, and then treated with a primer;
It is best to use a deep penetration primer , applying the composition to the wall in several layers!
- At the bottom of the wall (as in the photo) a support oblong strip is fixed, which will hold the first row of polystyrene foam;
- Next, using a notched trowel, the adhesive mass is applied to the foam plastic, after which it is pressed against the wall with weak force. Laying foam should be done from bottom to top .
To insulate garage walls, it is best to use foam plastic with a thickness of no more than 8-10 centimeters, laying the sheets in a checkerboard pattern. If it is not possible to place a support rail or the thickness of the existing foam is more than the required 10 centimeters, then you should use a special dowel as an additional fastener, as in the photo below.
A leveling layer with a sickle mesh is applied on top of the foam, the latter is required for additional reinforcement before applying decorative plaster. Finally, the wall is treated with a decorative layer, after which the wall insulation can be considered ready!
Sauna in the garage: insulation inside
A self-built bathhouse in a garage should be equipped with high-quality internal thermal insulation, especially on the ceiling, because hot air vapors first rush upward. Thus, insulating the sauna from the inside begins with the walls!
In most cases, wall insulation is carried out using penotherm or mineral wool. Penotherm is a foil insulating material based on polypropylene. It is produced in rolls and is suitable both for thermal insulation work and for creating waterproofing.
An insulated bathhouse in a garage begins with the assembly of a wooden frame , into which sheets of mineral wool will subsequently be laid. Dowels are used to attach wooden slats to the wall. Mineral wool should be placed tightly between the frame slats, leaving no empty spaces.
It is important to note that the thickness of the slats in a wooden frame should not be greater than the thickness of the mineral wool . During the insulation process, it is worth equipping yourself with thick gloves, a respirator and safety glasses. Mineral wool with frame is used on the ceiling and walls!
If the bathhouse is organized in a garage with an attic space, then the ceiling on the attic side is also insulated using mineral wool. Upon completion of the installation of the insulation with the frame, foil penotherm is laid on the surface of the walls, and the side with the foil should face inside the bathhouse, as in the photo.
The organization of lighting in the bathhouse should be thought through even before the walls are insulated, since the electric cable is routed to the location of the future lamp before installing the mineral wool. All wiring is placed inside corrugated tubes, which, in addition to their protective function, allow you to quickly and conveniently replace a damaged cable if necessary.
The insulating material itself is fixed to the wooden frame with screws or a construction stapler. Sheets of insulation are installed overlapping, where the joint areas are additionally sealed using double-sided tape.
It is important to know ! A bathhouse in a garage is sheathed only with natural finishing materials , for example, sanded boards or clapboard. For this purpose, a wooden sheathing made of slats is placed perpendicular to the main frame on top of the insulation. Thanks to this solution, a small gap remains between the cladding and the insulating material, which not only improves ventilation, but also helps the wood dry out faster from water vapor. After installing the wooden sheathing, cladding is performed. As a result, you get a high-quality multi-layer insulating coating, a visual diagram of which is shown in the photo below.
Finally, the floor is insulated. In the case of a concrete floor, the first step is to clean the surface of debris and dust, and then treat the floor a couple of times with a deep penetration primer.
Next, all the same steps are performed as when insulating the walls. The only thing is that instead of foil insulation in this case, a dense construction film will be used, which will protect the mineral wool from the negative effects of moisture.
All the secrets of how to achieve a warm steam room are described in our special material. The article provides useful tips and recommendations for choosing and installing insulating and finishing materials.
Insulation of the interior
When building a garage steam room, you need to take care of additional insulation of the room. The bathhouse cannot be warm enough only due to the walls of the garage. Therefore, you need to create a sealed “thermos” that guarantees heat retention in the bathhouse (up to two days). The insulation consists of several layers:
- foam plastic or mineral wool
- vapor barriers;
- foil cardboard;
- strips to secure the structure (it is necessary to leave a 5 mm wide gap between the trim and the foil cardboard).
The insulation is secured with a construction stapler or overlapping wood screws. The joints are sealed with double-sided adhesive tape. After insulating the walls, you need to take care of the floors. After cleaning and repeated application of penetrating primer, they are insulated in the same way as the entire structure, only instead of foil cardboard, construction film is used to prevent rotting of the insulation.
The gate or common entrance door also needs to be insulated or replaced if it is not airtight.
Finishing work
The sauna in the garage is equipped only with the use of natural wood, which has not been treated with any chemical impregnations or antiseptics, since under prolonged exposure to high temperatures they begin to release various toxic substances. Based on this, protecting wood from moisture is carried out only with the use of natural antiseptics !
To build a bathhouse in a garage under a single roof, it is recommended to use durable and strong wood species. These include:
We do not recommend finishing the interior of a bathhouse using wood species such as linden, birch and alder - moisture has a strong effect on them, and over time the material will begin to warp.
Finally, the ventilation holes are improved, benches and an electric stove are placed. If you are going to use a wood-burning stove for combustion, then before starting work it is recommended to think through the location of the chimney in detail.
Selecting materials
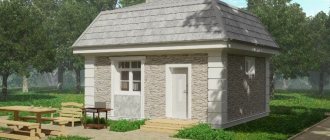
Of course, to ensure optimal results, it is necessary to use only natural materials during the finishing process. The ideal structural design is buildings made of red brick or foam concrete. Sand-lime brick, however, is not much worse. But garage baths made of metal containers are not very practical.
roof for a house with a garage photo
It's not just a matter of moisture damage to steel structures. This problem can be solved, but maintaining an optimal microclimate inside becomes very difficult. For internal cladding, clapboard or sanded boards are used. A sheathing made of wood, or less often steel, is mounted above the insulation layer.
In the vast majority of cases, mineral wool is used. It is necessary to select other insulation materials only when their advantages and disadvantages are clearly clear.
For decorative reasons, brick is often chosen. It is used both in its pure form and in combination with dark wood and metal. However, all these materials require careful protection from moisture. As a roof, tiles are usually used, which repeat the layout of the main part of the building.
Important: if there are other buildings nearby, you should adhere to the same style as them.