Furniture for a bathhouse differs from any other not only in its purpose, but also
in the materials used. A bathhouse needs a certain set of furniture, which should include a table, shelves, and wooden benches. When choosing pieces of furniture for a bath, its specific features, such as a high degree of humidity, should be taken into account. The heat and moisture inherent in a bathhouse impose special requirements on the choice of material for furniture:
- good humidity tolerance;
- the ability of furniture to withstand high temperatures;
- low heat conductivity;
- the material should not emit toxic compounds hazardous to health.
The most suitable materials for bath furniture
Based on the above requirements, the most suitable material for a bathhouse is wood.
- Conifers.
Pine and spruce are not suitable, since their wood is resinous, and the resin softens when the temperature rises and heats up. Hot resin can cause burns and also stain the body. There is an option when resins are removed from pine, but as a result of this process there is a significant increase in the cost of the wooden material. Independent de-resining is a long and rather difficult process, so it would be more correct to choose wooden furniture pieces made from deciduous trees for the bathhouse.
If you really want it and have the means, then the ideal furniture option for a bathhouse is a luxurious cedar interior. Cedar wood is not rich in resin, the texture is most suitable, but the cost is quite high. The advantages of bathhouse furniture made from Canadian cedar include the provision of a significant healing effect on the body through the release of essential oils from the wood as a result of its heating. Such oils perfectly disinfect, deodorize and have a beneficial effect on the skin and respiratory system.
Furniture made from Canadian cedar has a beautiful texture, high strength, a very pleasant aroma and has a beneficial effect on the human body.
- Hardwood.
With all the variety of deciduous species, preference as a material for furniture should be given to aspen and linden. These species have wood of a pleasant light shade, which can withstand changes in temperature and humidity well, without losing its original shape. In addition, linden has a pleasant smell and is easy to process due to its softness. Among the disadvantages of linden, there is susceptibility to infection by fungus and rot, to combat which chemical compounds are used, which are very undesirable in a steam room.
Linden furniture has a pleasant aroma, has a healing effect, is easy to process and does not heat up.
Aspen wood is also light at first, but after some time it begins to darken. Aspen was previously used to make the top of wells, as it is well preserved in high humidity and does not rot. The downside is that wood fibers wear out, leading to dents and abrasions. The cost of aspen lumber is very low.
Aspen furniture is easy to process and is highly moisture resistant
- Exotic breeds.
As an exotic material option, you can use abashi wood, which grows in Africa. Its color shade changes as the temperature around it rises: from milky or light yellow to dark brown. At the hottest temperatures in the steam room, this wood does not heat up above body temperature, so there will be no burn from it. The downside is that this material is not cheap.
Abasha furniture is ideal for a steam room, does not heat up and does not accumulate moisture
If we talk about wood species for other rooms, then for the washing room you need species that respond well to humidity, for the locker room and rest room - any.
How to protect wood from moisture and rot
If such a bench is intended for a steam room (although this is rare), then we recommend treating it from waterlogging (and subsequent cracking when drying) with those impregnations that contain oils and wax. In particular, you can purchase products from Tikkurila for this - they have developed compositions specifically for furniture in the steam room (we gave the names in the article about benches).
ADVICE! It’s still not worth covering the furniture in the steam room with an antiseptic. All antiseptics are poisonous to humans. There are heat-resistant varnishes that are marketed for the steam room and even for the stones in it. It's up to you to choose. We remain of the opinion that polishes have no place in the steam room.
We recommend making washroom benches from coniferous wood and covering them with moisture-repellent compounds. In principle, here you can already use an antiseptic under a layer of water-repellent impregnation or varnish.
In all other rooms it is not so humid, but still the humidity is higher than in the home. Therefore, impregnations and varnishes are recommended for use. There are no restrictions.
What items should a bath furniture set consist of?
You need to focus on individual tastes and financial capabilities, but there is a certain standard minimum.
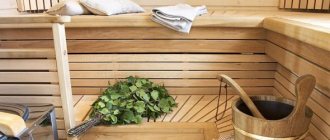
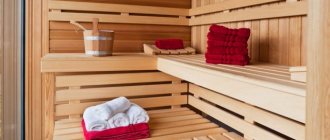
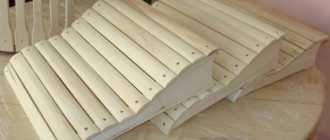
- Shelves must be made in the steam room of the bath. They can have different shapes and sizes: single-stage or have several steps; located along the walls of the bathhouse or be in the shape of “G”, “P”. Wooden headrests and footrests are often placed in the steam room. Due to the fact that the place where they steam is small, it does not need to be cluttered with unnecessary objects, as they will serve as an obstacle to the movement of air. For convenience, you can add a small bench to place basins and ladles and attach hooks.
Shelves are the most important component of a bathhouse interior and making them yourself is absolutely simple and inexpensive.
Types and shapes of shelves for baths - The washing compartment of the bathhouse should be equipped with a shelf, and benches of various configurations and sizes can be made.
Details such as stools for tubs, buckets and other bath utensils would be useful here. Place a hanger away from possible splashes. Scheme and drawing of a bench for a wooden bath
Types of steam room shelf designs
Depends on the area and height of the room.
The standard placement of benches is along one or two walls, parallel, perpendicular to each other.
Stepped
They are of the stationary type. They are more common than other species.
The shelves are fixed to one wall where there is no window. A multi-tiered structure is created according to the principle of steps.
This arrangement is convenient because with each tier the degree of heating increases.
It is important to take into account that the distance from the ceiling to the top shelf must be at least 1.2 m. This distance will be comfortable for a person to sit or hover
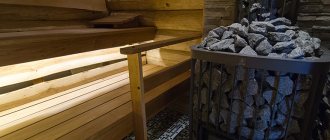
In addition, the upper tier is attached above the line of the heating boiler or stove.
Folding
Another name is a compartment shelf. The principle of arrangement and operation is reminiscent of wall shelves on a train, which can be folded down when necessary.
Suitable for a steam room with a small area. The shelves are fixed on two opposite walls parallel to each other. The upper shelves fold down, the frame of which is formed from support legs with transverse crosspieces.
There is an option for fixing without racks, as if in a hanging position. Used for light weight loads. Requires competent calculations. Not suitable for DIY production.
To remove the pull-out bench, it is lifted towards the wall and lowered to its original position to open it.
Removable
They are also called collapsible, folding. This mobile design is convenient in steam rooms with a small area. Simplifies the process of drying the flooring.
The upper and lower benches are completely removable.
Corner (L-shaped)
For small steam rooms, corner benches are often installed.
They take up little space, but are not inferior in comfort to other types.
The upper and lower elements are adjacent to one partition along the longest wall, the middle ones along the short one, which is located nearby.
There can be 2-3 steps along each partition.
Making bath furniture yourself
Basic drawing of a table for a bathhouse: all dimensions can be changed and adjusted according to individual needs
You can make simple bath furniture with your own hands if you follow the tips. Self-production will allow you to realize all your wildest fantasies and optimally use the space of the bathhouse, maximally designed for comfortable relaxation, following your tastes and preferences.
Bath shelf drawing
First you need to decide on the design and construction. To do this, depending on the size of the bath room, a plan must be drawn up for the location of furniture inside, their sizes and shapes must be determined. It’s good if everything in the bathhouse is done in the same style and selected in accordance with the expected number of people.
Bath flooring installation diagram
When making furniture with your own hands, it is important to process the parts well: round the edges, sand the surfaces until they are absolutely smooth. To avoid burns from the metal heads of the screws, they are recessed 5 mm deep and covered with wood putty on top. No part of the bath furniture should be varnished.
Chair in the rest room or locker room
You can make your own bath chair using exactly the same principle as making a sofa. It's even a little easier because you don't need to make a box. A frame is simply made from beams onto which the seat and backrest are attached. In this case, the back does not have to be tilted - it can be straight.
If you use your imagination, you can make a chair with your own hands from a thick and fairly tall stump.
In order to make such a chair yourself, you just need to saw off part of the stump horizontally. Then, using a wide chisel, level the unsawed part, turning it into a backrest. Finally, the surface of the seat and back is treated. It’s very easy to make such a chair with your own hands, and it will look very unusual.
From a fairly thick branch, sawing it in half and installing several thinner pieces of the branch, you can easily make a hanger for a changing room. You just need to process them accordingly.
When the bathhouse is furnished with furniture made by yourself, it will be pleasant not only to take a steam bath, but also to relax with friends.
Making a wooden bench
Bath bench assembly diagram
This part is necessary for use as a replacement for the lower part of the shelf, footrests, basins and buckets.
To make a bench with your own hands you need:
- cut the block into several 40 cm pieces (future supports);
- transverse posts 60 cm long are cut out from another block;
- nail the supports from below, and attach the base for the seat on top, formed from boards 1 m long;
- cover the base of the bench with wooden boards, leaving 1 cm gaps;
- coat the finished furniture with an antiseptic containing vegetable oils.
Drawing of a simple bathhouse bench to make yourself
Types and purposes
The type of benches and benches in the bathhouse is determined by the purpose of the room where this furniture is used. The steam room can be equipped with single-tier or multi-tier structures, this directly depends on the size of the room. The steam room is characterized by a stepped variety of benches. Simple bench-type seating designs are relevant for a steam room, if there is a need to increase the number of seats - in this case, lightweight portable options are used.
Single-tier
The simplest solution for arranging very compact rooms. A portable or stationary bench in small steam rooms is often designed for sitting. But the individual dimensions of the developer decide everything: if the steam room is at the disposal of one person, then he only needs to increase the width of the bench from 40 cm to 90 to warm up while lying down.
A single-tier bench in a stationary design can be easily built between two walls “by surprise”. If the room allows, an L-shaped version of a single-tier bench in a bathhouse is possible.
Bunk
The larger the volume of the steam room, the wider the arrangement possibilities: you can increase the tiered structure of the bench structure. The lower tier is seated, so the width is about 40 cm, and you can lie down on the upper tier. But then its width must be at least 60 cm.
Access to the second “floor” is possible from the lower bench or a ladder is attached to one edge. A two-tier bench layout is usually stationary, but there are often options when the lower bench is taken out to dry after a bath day. This makes it easier to clean up, ventilate and dry the steam compartment.
Three-tier
A three-level bench model is the best option for large steam rooms. Each participant in the bath ceremony chooses an appropriate level. On the lower bench sit those who do not like or cannot handle overheating. The second and third levels are occupied by those who like to steam while lying down. The third tier is the hottest, and the bench is the widest - up to 90 cm. The length of the upper benches must be at least 180 cm.
The standard scheme of three-tier structures assumes that each upper level will be wider and longer than the lower one. But nothing limits the imagination of the bathhouse owner, so the choice of bench options for the steam room is almost limitless.
Stepped
System for arranging small steam rooms. Usually there are two benches-steps. The upper one, which is longer and wider, is easily accessible by using the lower bench as a step. That is why the model is called stepwise.
Simple shop
An ordinary bench consists of two or three boards on supports, which are made from boards (a lightweight, portable option) or chocks (stationary due to the heaviness). The latter option is preferable for rooms with less humidity, since the base of the seat takes a long time to dry out.
No backrest. Simple Russian-style benches on powerful logs line the walls of the dressing room, where coupled owners and their guests gather for intimate conversation.
Between two benches against the wall there are small tables of the same style. A samovar and honey or beer with fish is a matter of taste. The atmosphere is conducive to complete relaxation, so the wall paneling should be comfortable for you to lean your back on if necessary. This option is more suitable for small baths with a small number of steamers.
With a backrest. If the premises are being prepared to receive a large company, the dressing room is designed as a comfortable rest room, where the table occupies the central part. Benches around the table with comfortable backs so that the body, relaxed in the steam, does not strain in search of support.
Tips for choosing
When choosing sofas for a dressing room or rest room, you should take into account a number of important parameters.
- Frame. The most suitable bases are those made of spruce, larch, pine, oak, linden, cedar and other wood species.
- Upholstery. The most suitable solution is made from genuine leather. If your budget is limited, it is recommended to take a closer look at the variations made from high-quality leatherette. These 2 materials have similar characteristics and similar external presentation. However, products made from genuine leather will last much longer.
- Softness. Spring blocks, holofiber or padding polyester can be used as filler. These materials provide optimal softness to the product, and dry quickly if wet.
- Dimensions . In order for the furniture to fit in the space allocated for it, it is important to first measure the free area. For small rooms it is advisable to choose compact mini-sofas or corner solutions, and for spacious rooms any options are suitable.
- Additional functionality. Before purchasing, it is important to decide whether additional seating is needed or not. If you need a place to sleep, you should give preference to models with a transformation system. The most reliable and durable mechanisms are “click-clack”, “book”, “eurobook”.
- Manufacturer. Bath sofas are produced by domestic and imported companies. Foreign-made furniture in most cases is more expensive. To save money, you can take a closer look at sofas from domestic brands. However, it is not recommended to give preference to too cheap products of dubious production.
- When choosing sofas for a bath, you need to pay attention to the style and design of the items.
It is important that the products are simple, without excessive decoration.
Decorative pillows would be appropriate, especially if the models are deep, as they will add additional comfort when relaxing. You should also take into account the overall style of the room - the sofa should be in harmony in color and design with the interior of the space.
How to do it yourself?
Even if you don’t have much experience, you can make simple bath furniture with your own hands.
Tools that will be needed along the way:
- hammer;
- plane;
- drill;
- a circular saw;
- pliers;
- roulette;
- square;
- Grinder;
- clamps;
- set of cutters;
- hacksaw.
First you need to make a table. You will need:
- boards 30 x 145 mm and 40 x 250 mm;
- wooden slats 40 x 40;
- bolts and “curly nails”;
- antiseptic primer.
Assembly is carried out in a simple sequence:
- Saw boards measuring 30 x 145 mm into four pieces of 1.2 m each. Make flanks on them on the right and left at an angle of 45 degrees. Stepping back 10 cm from the end of the blanks, cut off the excess material.
- Sand the workpieces properly. Coat everything with an antiseptic and let the boards dry.
- Fold the blanks crosswise.
If using clamps, mark where the mounting bolts will be located. There will be two bolts on each side. You also need to drill holes for the fasteners.
- Attach our blanks with bolts. Place the legs at a distance of a meter. From the boards that are left, make and attach two spacers.
- From boards of a different size, cut or saw three pieces measuring 1.75 m in size. Process the prepared pieces for the tabletop with a sander. Apply antiseptic and allow to dry.
- The slats should be divided into two parts measuring 77 cm. Treat with an antiseptic primer. Connect all the boards of the tabletop.
- Turn the finished tabletop over. Place it on the legs of the future table. Use self-tapping screws to secure the result.
Now you can safely use your handmade creation in your bathing life.
Console table
Materials required for work:
- five boards 30 x 200 mm, 0.8 m long;
- block 40 x 50 mm, length should be 1 m;
- two bars 40 x 50 mm, 0.75 m long;
- self-tapping screws
Assembly must be carried out in the following order:
- Choose a place where you will place your future table. Make a mark approximately 0.7–0.8 m from the floor level. Using it, when using a level, the width of the table surface is determined and measured.
- Process the bars with a sander thoroughly, without missing a detail. Coat the boards with an antiseptic primer. Dry the materials thoroughly.
- You need to create a tabletop from the existing boards. Fasten the boards using 0.75 m long bars. One of them needs to be attached to the table top with a distance of 7 cm from the end. The other is attached exactly along the edge.
- Place the assembled tabletop against a mark on the wall. The crossbar should be as close to the wall surface as possible. Attach the tabletop with self-tapping screws.
- We make the installation. Place the block under the table surface. Mark the locations of future cuts and make notches at an angle of forty-five degrees. This is necessary to completely press the bar against the wall. We install the support in the intended place, securing it with self-tapping screws.
Comfortable bench
Naturally, a bathhouse needs seating. Therefore, the next thing you should learn to make is a bath bench.
Materials for production:
- three boards 30 x 45 x 1500 mm;
- two wooden planks 1460 x 10 x 20 mm;
- two wooden boards 420 x 260 x 30 mm;
- one wooden board 1240 x 30 x 200 mm;
- glue for working with wood;
- self-tapping screws
Progress:
- In the first board from the list, use a cutter on the side to make a groove 10 mm deep. Do this work with all the boards. On one of them, grooves need to be made on both sides.
- Lay out the already milled boards in a row, placing a board with two recesses in the middle. Coat all existing grooves and strips with glue. Place them inside each other. Press the boards tightly against one another and secure the resulting “shield” with clamps.
- When using a jigsaw, we make semicircular cuts fifty millimeters deep. We do the same work with the second stand.
- On a board 1240 mm long, stepping back ten centimeters from the edges, we draw two parallel lines across. Draw a perpendicular from the middle of the lines. We will get a square. It must be cut out using a hacksaw.
- Sand the stands and the resulting beam. Treat them with an antiseptic and let them dry thoroughly.
- Assemble all the elements and fasten them with self-tapping screws.
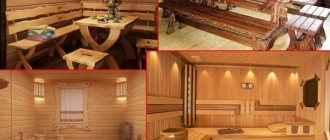
Varieties
To decorate your steam room and dressing room colorfully and elegantly, you should pay attention to the types of furniture that are most often used for furnishing. The photo below shows the most popular models and accessories for bathing.