To enhance traction, various devices and technical innovations are used. The complexity of the selected option directly affects the price. Agree, you always want to get good quality equipment at minimal cost.
The most profitable solution is to make a chimney deflector with your own hands. The design is extremely simple, and the effectiveness of its use is difficult to overestimate.
We will tell you how the device works and explain the principle of its operation. We will also provide step-by-step instructions for assembling and installing a simple deflector. We supplemented the information provided with visual photographs and videos demonstrating the nuances of the construction and installation of the ventilation hood.
Chimney deflector: dimensions, drawings, manufacturing and installation
If there is not enough draft, the operation of the stove will not be complete, anyone who has an idea about chimney pipes knows this.
In order to fully ensure normal draft, it is necessary that the air flow be sufficient and the gas outlet be carried out on time; for this, a deflector is needed on the chimney. Properly designed and high-quality smoke exhaust devices ensure the correct and trouble-free operation of any stove. The efficiency of the stove and ensuring normal draft is influenced by such factors as: changes in climatic conditions (wind, snowstorm, various types of precipitation), the presence of debris, which often falls directly into the chimney and clogs it.
To ensure the normal operation of a pipe in which there is no pressurization, a high-quality chimney is needed, which is able to ensure the timely and regular removal of combustion products. If the option under consideration is not possible for some reason, the presence of such a mechanism as a chimney deflector is an excellent assistant in this matter. Let's take a closer look at the topic - how to make a chimney deflector with your own hands: instructions and drawings.
Design Features
Whatever the appearance of the weather vane, its constituent elements are always the same:
- Protective umbrella . It is presented in various shapes, for example, a cone, a semicircle, a pyramid, etc. The function of such an element is to provide protection from precipitation, various debris and birds.
- Drip apron . This element in the design is designed to drain water flows that descend along the slopes of the umbrella.
- Brackets . Necessary for connecting the apron to the top of the device. The number of elements varies depending on the size of the chimney and the weight of the cap.
Working of a weather vane
What causes a chimney pipe to smoke?
A deflector is a device on a chimney pipe, the use of which creates obstacles in the path of air flow created by the wind. To put it simply, this is a very simple, but at the same time highly effective device for protecting the chimney from various types of litter, precipitation, etc.
Experts say that to increase the efficiency of the stove by 25%, it is enough to install a deflector on the smoke exhaust pipe. In order for it to work efficiently, correctly and without problems, it is necessary that the chimney itself be installed as expected (the required height of the structure, its location, the correct cross-section, etc.).
It often happens that the chimney pipe begins to smoke, and in order to eliminate this problem, you first need to find out what are the reasons for this behavior of the structure. So, the first reason is the increased speed and power of air flows due to strong, gusty winds. In this case, the smoke is simply “not allowed” to come out, crushing it with a strong flow entering the pipe.
The second reason is the incorrectly selected chimney diameter (the importance of this factor was previously mentioned). If the diameter is too small, the smoke will not have enough space to exit the pipe normally.
Smoke will be a regular process even if the chimney itself is not located correctly on the roof (as it turns out, even such seemingly insignificant details can affect the efficiency of the structure).
Drawings, dimensions and parameters
Each of the available types has its own parameters and manufacturing methods. In order to understand the designs and parameters of such a device, we will consider several of them, and also find out how to make a chimney deflector with your own hands using drawings.
Deflector for the Grigorovich chimney pipe: this type is characterized by its simple design and high efficiency. The height of the device in question is 1.6 d, the width of the manufactured cap should not exceed 1.9 d. During manufacturing, it is also worth paying attention to the carefully selected width of the diffuser; in this case, the parameter in question will be equal to 1.3 d (it is also worth noting that the d value means the selected diameter of the chimney, or more precisely, its channel).
TsAGI deflector: in the form under consideration, the correctly selected size of the diffuser (more precisely, its wide part) plays an important role. This parameter is equal to 1.25 d, since it is necessary to make a ring here, you need to know its dimensions (height 1.3 d, diameter at this height should be equal to 2.5 d). Since this design contains a part in the form of an umbrella, its parameters must also be calculated accurately - the width of the part is 1.8 d.
General information
Draft is a natural phenomenon in which air moves from one zone to another, namely from an air area with high pressure to an area where the pressure is lower. All this happens thanks to a special ventilation type device - a special channel in the chimney. Using such an aerdynamic process, humanity began to use stoves, fireplaces, boilers for heating, and bringing warmth into the house through the use of fuels such as firewood, coal, peat, etc.
Measurement methods
If there is any doubt that the draft in the chimney is at a sufficient level, a check should be performed. The easiest way is to check using a device such as an anemometer. If the device readings are approximately 10-2 Pa, then the thrust can be considered normal. But this method has a certain disadvantage, namely that the measurement accuracy is low. This will only apply to the use of inexpensive devices. For example, if the thrust is less than 1 Pa, then the device will show that it simply does not exist. This suggests that better quality measuring devices are required.
We recommend: Rating of the best sunflower oil of 2021 - for frying and baking
Professional devices for checking chimney draft are distinguished by accurate measurements and a fairly high price. Such devices are usually used only by experienced stove-makers.
If you don't have an anemometer, you can use one of the following methods:
By the smoke.
An obvious sign of whether there is a draft or not is the smoke that may enter the room. If the room starts to smoke, then the draft is poor, and then there is a high risk of carbon monoxide poisoning.- By the color of fire. If you look closely at the color of the fire, you will understand how strong the draft is in the system. So, if the fire inside the firebox has a white tint, and crackling sounds are heard when burning, then the required indicator is at a high level. A red-orange tint will indicate a low level of traction force. If everything is functioning correctly, the flame will have a golden yellow color.
- Using a match. If you light a candle or match and then bring it to the heating device, then at the optimal level of draft the flame will begin to tilt towards the firebox, and if the flame burns evenly, we can say that there is no draft at all. If the light begins to tilt away from the chimney, then there is only one explanation for this - there is a reverse draft.
- With a mirror. This method is often used to check the traction. You should bring a small mirror to the chimney, and if condensation appears on it, then the draft is small.
Please note that draft inside the chimney is formed due to the difference in pressure inside the room and outside. In a room that is constantly heated, the pressure will be higher than outside it!
During the operation of a stove or fireplace, owners of private buildings note that the exhaust force often decreases during certain periods of time, and in order to improve the situation, it is necessary to make a draft amplifier for the chimney with your own hands.
Operating principle and design of the chimney deflector
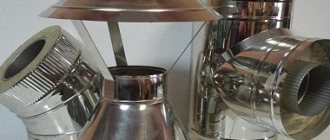
Before you start making a deflector for a chimney with your own hands, you need, first of all, to know its structure, drawings and understand the principle of its operation. So, such devices, despite their multiple varieties, consist of three main parts: a diffuser, a cylinder and, directly, a cap. We should not forget about the seemingly insignificant, but in fact, important component of the deflector - ring-type rebounds.
Despite the variety of types of chimney deflectors, the principle of their operation is identical:
- The movement of air flows that enter the chimney is hindered by the walls of the cylinder, which is located in the upper part of the deflector. It turns out that the air flows hit it and a portion of the air mass from the jet moves up the cylinder itself, taking with it the smoke that comes out of the chimney.
- As a result, it turns out that the speed of smoke exiting the chimney becomes greater, while the draft increases significantly, which in turn increases the efficiency of the chimney itself.
- If there is a deflector, it does not matter at all what the speed of the air flow from the outside is, and from which direction the wind blows, because there are special gaps in the cylinder that suck the smoke into the air.
Operating principle
The deflector can be a small cylinder that is mounted on the top of the pipe. It also has a special visor that prevents water from entering the chimney and, accordingly, its destruction. The principle of operation of the deflector is very simple. This device creates a vacuum of air inside the cylinder. This happens due to the fact that the streams that go around it lose their strength and partially rise up. Due to this, smoke is captured in the deflector and released outside. The deflector also prevents the backflow of air from occurring, which causes smoke to enter inside. Deflectors are mounted not only on smoke exhaust channels. They are also used for ventilation systems, so that air flows from the room without the use of additional fans. There are several types of such devices. Each deflector differs in efficiency to one degree or another. Among them are:
- round (Volper);
- open (Astato);
- TsAGI;
- Grigorovich;
- in the shape of the letter "H";
- in the shape of a star.
All of these deflectors can be purchased ready-made for a specific pipe diameter.
Installation of a deflector on a chimney pipe
Correct manufacturing of such a design is not the key to the success of its operation, because installation, which is the final stage for using the device, plays an equally important role.
The deflector is installed on the chimney, and it will be easy to install both a self-made structure and one purchased in a store. Since the device consists of many parts, before climbing onto the roof and proceeding with installation, it must be assembled into a single whole. Making a deflector, the instructions and drawings of which will be discussed below, is quite simple to install, and in this case no additional skills and knowledge are needed.
The installation method will depend on the chimney pipe itself on which the deflector will be located. Most often, for a strong attachment it is enough to use a couple of drill holes and a clamp (you cannot do without drilling holes in the chimney itself). If the material with which the roof is covered is flammable, then you will have to additionally purchase a spark arrester, which must be installed on the deflector.
Painting
During combustion of the furnace, the resulting smoke is accompanied by moist steam upon exiting. To reduce its impact, a layer of grated red lead primer is applied to the weather vane installed on the chimney pipe.
The mixture is mixed in a 1:1 ratio. An admixture to red lead is drying oil. Ten parts of the second are mixed with ten parts of the first substance. An alternative replacement for red lead is ocher, previously sifted through a fine mesh sieve, and dry clay. The metal is primed with the resulting mixture. The distribution of soil material should occur in an even manner. After the primer layer has completely dried, the finished product is coated with paint based on oil components.
Twenty-four hours are allotted for drying the product.
It is customary to paint a weather vane black, since after a month, under the influence of smoke coming out of the chimney, any shade becomes dark. Only those places that are not affected by the smoke flow should be highlighted with other paints. Before starting installation, you should dry the product so as not to damage the coating during operation.
Definition of a weather vane and its varieties
A weather vane is a metal device that consists of a flag and a counterweight. Its use was first recorded in Europe. The design is an original decoration of the roof and a protective element against precipitation and birds getting into the chimney. A weather vane fixed to the chimney aesthetically complements the roof, giving it completeness.
The simple principle of operation is as follows: wind flows act on the counterweight, directing it in the direction of the air flow, and the flag indicates the direction. It is the flag that has a decorative role. Its execution can be in the form of various figures: a crane, a cat, an animal or a person. Even from Old Russian fairy tales, we are familiar with the tower with the figurine of a rooster, because in ancient Rus' there was a belief that it was the voice of this bird that drove away evil spirits. Today, a figurine of a ship with sails, considered a symbol of happiness and good luck, is relevant. The image of a lion is marked by the symbolism of the enormous potential of the owner’s strength, justice and the desire to move forward.
There are the following types of weather vanes:
- indicating wind currents. This type is relevant for use at meteorological stations. Even despite the large amount of modern equipment, weather vanes are still used. They play a major role in coastal cities, where the direction of the wind determines the performance of ports. The sensitivity of the weather vane is very high and even at a low level of wind flow, the device will detect it, at a time when modern equipment does not yet work.
- Wilda. A modern type of weather vane that determines both the direction and strength of the wind flow. This device is equipped with a vertical plate, the angle of inclination of which indicates the force. from which the wind blows.
Tip! To make a weather vane yourself, you will need to strictly follow the step-by-step instructions, focusing on the drawing diagram.
Step-by-step instructions for creating a weather vane
A fairly large selection of variations on how to make a weather vane on a chimney is available on the Internet. With the help of drawings this process will not be difficult.
Unusual weather vane model
This model can be made of stainless steel or copper alloy, with a thickness of at least 1 mm. Both the first and second materials have positive anti-corrosion characteristics. They are quite light and have a durable composition.
Advice! By choosing copper as a manufacturing material, you can significantly increase the service life of the weather vane, but the estimate should take into account the expensive cost of the metal.
Making your own weather vane consists of the following steps:
- It is necessary to select dimensions and determine the approximate weight of the future structure. Using the figure below, this point can be easily understood.
- The elements of the weather vane are cut out from the prepared sheet of metal.
- All components are assembled based on the instructions in the picture.
- The assembled protection element must be installed on the chimney.
This type of weather vane is installed on the head of the chimney pipe. This element is not only decorative, but also helps prevent reverse draft.
Advice! Any vagaries of the weather: rain, hail, strong wind or sudden temperature changes - significantly reduce the service life of the chimney. Therefore, a weather vane is installed to protect it.
Choice of coverage
To ensure that the chimney lasts longer and is not exposed to the negative effects of the external environment, it is covered with a special layer. In addition, such processing increases the decorativeness of the structure.
Main types of coverage:
- Powder paint. Non-toxic, has a wide range of shades. Provides surfaces with increased strength. The advantages include ease of application and high drying speed. Gives the metal surface thermal insulation properties. Resistant to deformation and bending.
- Pural. Service life 30 years. The coating does not fade in the sun, is not subject to mechanical stress, and withstands temperature changes. Very plastic and highly durable, not susceptible to chemicals in precipitation. You can choose either a solid color or a textured one.
- Polyester. Beautiful coating with a noble shine. Durable and wear-resistant, does not peel off, does not fade in the sun. Resistant to high humidity and temperature changes. Will last from 5 years.
- Plastisol. Corrosion resistant, decorative, plastic and durable. It beats other coatings in that it is capable of self-healing - small cracks are healed while maintaining tightness. Service life – up to 20 years.
Weather vane deflector
Another popular option for making a protective element for a chimney yourself is a weather vane deflector. Below is a diagram of such a model. Its manufacture also does not require any special skills.
The weather vane deflector is mounted on a dome that covers the chimney. The manufacturing material must have anti-corrosion properties.
The first thing to do is the dome. To do this you will need to follow the instructions on the drawing:
- The first to be attached are the struts (4) to the bottom of the cylinder (9).
- Here M6 square nuts (8) will be used together with M6 bolts (7).
- Next, install the upper part of the cylinder (3), which is secured with a clamp (5).
- At the very top of the posts, a reverse cone (2) is fixed using rivets (6).
Let's move on to making a weather vane.
It is worth using the drawing below, which demonstratively shows the process of creating a decorative weather vane.
Manufacturing process:
- A support is made, which is a pipe 12.5 cm long and 1.3 cm in diameter.
- The pipe will need to be threaded.
- We select a bearing according to the diameter of the pipe, which then needs to be installed in the cavity of the base.
- Two metal plates are welded on the sides of the pipe, with an angle corresponding to the dome. Installation is carried out in such a way that during rotation the elements do not touch each other.
- It is necessary to mount a wind rose, represented by thin rods on which letters are attached indicating the cardinal directions.
- To prevent moisture from getting into the middle of the compass rose body, a visor is made above it.
- A lid made of steel is placed on a threaded base.
- A counterweight and a flag will be attached to the arrow-cover.
All elements of the weather vane have been assembled and you can evaluate the work done.
The presented weather vane models are an excellent solution for decorating and protecting the roof of your home. By choosing another design option, it can be recreated using a similar principle.
Barbecue oven with cauldron
Price on request
BBQ oven with smokehouse
Price on request
Still have questions? We'll be happy to help!
Materials for the production of smoke umbrellas
Basic requirements for the material for the chimney:
- Possibility of use at elevated temperatures. This requirement does not apply to weather vanes mounted on a ventilation duct.
- Long service life.
- Resistant to corrosion and oxidation.
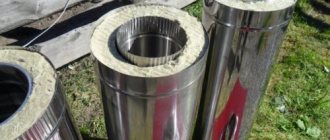
Copper is used for work. Such structures will last 50-100 years, are durable and reliable. Often, when installing chimneys, hardware - fastenings - are made of copper.
Zinc titanium alloy is another popular option. The chimney will last about 50 years, and costs much less than a copper structure. For installation, dowels or long threaded nails are used.
Vanes are also made of steel - stainless or galvanized. However, in any case, the fastenings must be galvanized. Chimneys made of galvanized steel with a polymer coating are very common. The coating allows you to choose the desired color from the RAL catalog.
What is a weather vane and its types?
The weather vane is an antique decorative element and also covers the chimney pipe, protecting it from the penetration of precipitation: rain and snow. A weather vane attached to the chimney will give the roof an aesthetically pleasing and complete appearance. It is a metal structure consisting of a flag and a counterweight.
A weather vane mounted on the chimney is the finishing touch. Dome on the chimney - protection, weather vane - decor
The principle of operation is simple: the counterweight is directed in the direction from which wind currents are blowing, and the flag indicates their direction. The tradition of installing a weather vane came from Europe. The flag is now a real decorative element. It can be made in the form of a figurine: a bird, an animal, a man. In Rus', the most popular figurine was the one depicting a rooster, since a popular legend said that its voice was capable of driving away demons. Nowadays, the image of a ship, which is considered a symbol of a happy and successful life, is relevant. The lion, in turn, is a symbol of enormous vitality, nobility, justice, as well as the desire to move forward.
Weathervane-arrow - you are probably already familiar with it
Main types of weather vanes:
- indicating the direction of the wind. It is widely used in meteorology. Despite the availability of many modern devices, weather vanes are still in demand. They occupy a special place in coastal cities, since the functioning of ports directly depends on the direction of the wind. The response of the weather vane is noticeable even at the slightest appearance of wind flow and is detected even when other devices are still powerless;
- Wilda. This is a more modern weather vane model, capable of determining not only the direction, but also the strength of the wind. This model has a plate mounted vertically. The angle of inclination shows strength.
We also recommend studying this topic: Do-it-yourself chimney deflector: drawings and diagrams
The chimney vane has a simple design and can be made with your own hands.
Advice! The process is simple and will not be difficult, the main thing is to strictly follow the instructions and focus on the drawings.
Readers found these materials useful:
- Do-it-yourself ceramic chimney installation, tips and tricks
- We install the heat exchanger on the chimney ourselves
How to install
An important point is how well this element is installed on the chimney.
To install it yourself, you will need to do the following:
- Initially, the required number of holes is drilled in the element skirt, which depends on the size of the device.
- Next, parallel points are drilled in the chimney pipe and a self-tapping screw is inserted into each of them.
- After this, the weather vane itself is attached using a screwdriver.
The process of attaching the chimney is very simple, but it is very important to make sure that the element is securely attached and that a strong gust of wind will not rip it off the roof. This cannot be neglected, because the weather vane has quite a lot of weight and if it is detached from the chimney, it can cause damage to both the roofing and anything on which it falls.
In addition, with their help it is possible to hide defects in the chimney pipe and create a finished look to the structure. The casing also protects the pipe walls from various external influences.
Step-by-step instructions for making a weather vane
There are many options for making a chimney weather vane with your own hands. The drawings will help with this.
Original weather vane
A chimney deflector made of stainless steel and bronze for a more durable service.
The material for the manufacture of such a model will be stainless steel or copper, the thickness of which is 1 millimeter. Both of these metals have good anti-corrosion properties, they are lightweight and durable.
Advice! If copper is used, the service life of the weather vane increases, but it should be taken into account that this metal is more expensive.
The process of making a weather vane with your own hands:
Step 1. Select the mass and dimensions of the future model. Drawing will help
Calculation of the mass of the future weather vane based on the parameters of the pipe diameter, steel thickness, weight of the axle, bushing and bearings.
Step 2. Parts for the weather vane should be cut from the selected steel.
Using metal scissors, parts are cut out of stainless steel for the future weather vane-dome for the chimney
Step 3. We assemble the structure as shown in the figure.
The design of the weather vane and the schematic principle of assembly. Help for those who want to create it themselves
Step 4. The weather vane is ready.
The final version of the weather vane. Blue arrow - air intake, red smoke exit
Installation of such a weather vane is carried out on top of the chimney. It not only serves as decoration and gives the chimney duct a finishing look, but also prevents the occurrence of reverse draft.
Advice! Wind, temperature changes, and precipitation are factors that destroy the chimney pipe. Installing a weather vane is necessary to increase its service life.
Installation
Installing a weather vane on a chimney is a complex undertaking, because the subsequent performance of the fireplace directly depends on it. A cap, correctly placed on the chimney, ensures high-quality draft and durability of the chimney, and in addition, affects the external visual perception of the entire roof of the house. Thus, you need to carefully prepare for the installation of the device, study all possible negative climatic factors, and select a convenient option for the device and protective coating.
- • preparatory;
- • assembly process;
- • installation.
Preparatory stage
- 1. Take measurements of the outer part of the chimney, and then make a sketch.
- 2. Select a suitable material for constructing a weather vane. The material must withstand the weight of precipitation, the temperature of volatile combustion products released into the atmosphere, as well as the effects of climatic conditions.
- 3. Select the hood configuration, taking into account the subsequent availability of equipment assembly and further maintenance.
- 4. Make a corresponding drawing of the weather vane with the cap unfolded in order to conveniently calculate the required amount of material.
- 5. Purchase material - metal sheets, the thickness of which can be 0.3 - 1 millimeter. In addition, you should stock up on metal screws or rivets, steel corners, shelves with a thickness of twenty millimeters and a thickness of one to two millimeters, a steel mesh with a cross-section of rods of one to two millimeters and a pitch of four to five centimeters.
cast iron fireboxes
- • metal scissors;
- • drill;
- • roulette;
- • hammer;
- • grinder;
- • marker;
- • welding machine.
Stage of manufacture and assembly of the weather vane
- 1. prepare a pattern from thick paper, cutting out its complex structural elements.
- 2. Using a pre-prepared paper template, use a marker to draw cutting lines on the metal.
- 3. Using a grinder, cut out the components of the device.
- 4. Bend the cap as shown in the drawing.
- 5. We carry out a single design using a welding machine.
- 6. Using the same grinder, cut out the corners.
- 7. We turn the cut out corners into brackets that combine the apron and cap.
- 8. We transform the steel sheets into an apron, with the help of which the weather vane will subsequently be fixed to the chimney of the hearth, after which we bend the apron at an angle of forty-five degrees and weld it into a solid device.
- 9. We connect all components in the same way as shown in the drawing.
- 10. We attach the steel mesh to the side walls of the brackets.
- 11. At the bottom of the apron, we fix a drip tray made of sheet steel with special rivets.
Installation steps
Before you begin the assembly procedure, you should prepare your work area. To do this, choose shoes with soft soles - they will not spoil the roof sheathing. You need to dress in comfortable, impervious clothing and gloves for working with metal. Do not forget about a reliable fastening for the safety rope.
Stages of installing a weather vane:
- To attach the weather vane, you need to drill holes with a diameter of approximately five millimeters. The indentation is fifteen millimeters from each other.
- Next, we place the weather vane on the chimney pipe of the fireplace and fix it on it for a while. Through the resulting holes in the product, we drill holes in the chimney itself.
- unscrew and remove the weather vane.
- We screw dowels into the holes for self-tapping screws.
- We place the weather vane on the chimney so that the holes match and screw it onto the self-tapping screws.
The weather vane is firmly secured to a brick chimney using a special steel clamp. The clamp is placed on the structure and crimped, after which it is also attached to the walls with self-tapping screws.
After completing all the necessary steps to attach the weather vane, you need to make sure that it is safe. In this case, you can accurately tap the perimeter of the apron with a hammer, checking that it does not move to the side.
Finally, a protective coating is applied to all metal surfaces of the device. The covering option is selected based on the price category, as well as the situations of use and the decorative characteristics of the building itself.
Making and installing a weather vane is a simple procedure, so the owner of a country house can do it himself. To do this, it is enough to stock up on a minimum set of tools and the desire to get a good result. In this way, you can protect the chimney, optimize draft and ensure complete combustion of fuel, that is, you will increase the productivity of the fireplace.
Weather vane with deflector
There is another option, how to make a weather vane for a chimney with your own hands. The drawings are presented in the article. You can buy it at the store or make it yourself. This model is the second manufacturing option, which does not require special skills.
The weather vane is installed on the dome, which covers the chimney pipe. The material must be selected to be corrosion-resistant.
Original dome affairs:
Scheme for assembling a dome for a chimney. Simple and clear
- Initially, the posts (4) should be secured to the lower cylinder (9).
- For this purpose, M 6 nuts (8) and M 6 bolts (7) are used.
- After this, the upper cylinder (3) is placed and secured with a clamp (5).
- After this, attach the reverse cone (2) to the very top of the posts using rivets (6).
The base is ready. Next you should make the weather vane itself.
Chimney weather vane with flag and counterweight. The flag figure can be anything, but the construction principle is similar
To do this, you should pay attention to the drawing, which exactly illustrates how easy it is to create a decorative weather vane.
Scheme for creating a weather vane. Its main parts and the order of their arrangement
Manufacturing stages:
- Stage 1. You need to make a support. It requires a pipe. A piece of twelve and a half centimeters should be cut off. Its diameter should be approximately 1.3 centimeters.
A pipe with a diameter of 13 millimeters, which will be the basis for the future weather vane
- Stage 2. The pipe needs to be threaded.
A pipe with a thread applied to one edge for fastening
- Stage 3. A bearing that fits in size should be placed inside the workpiece.
A pipe with a bearing inserted into it. Blank for a weather vane.
- Stage 4. It is necessary to weld two steel plates on the sides of the pipe, which will correspond in angle of inclination to the dome. It should be installed so that they do not interfere with the rotation of the structure.
Fasteners for a weather vane on a dome with plates welded on it
- Stage 5. You need to install a wind rose, which is thin steel rods. Letters are attached to them.
Rose of Wind. Arrows pointers indicating direction. They are set according to the compass.
- Stage 6. To prevent moisture from entering the case, a cap is installed above the compass rose.
The number 5 indicates a dome to protect the body of the future weather vane from water ingress.
- Step 7: Pay special attention to the lid. Made from steel. It should fit perfectly onto the pipe thread. It is made in the form of an arrow.
The uppermost part of the weather vane, which sits on a thread pre-made on the base
- Stage 8. A flag and a counterweight are attached to it.
The flag and counterweight of a weather vane to indicate the direction of the wind. Installed on the arrow-cover.
- Stage 9. The weather vane is ready.
A ready-made version of a weather vane, which will be installed on a previously prepared dome for it
Making a weather vane with your own hands is not difficult. These are just a few options for its manufacture. But the principle is basically the same in all models.
After the model is completely assembled, it should be properly secured to the roof; these tips will help with this.
Technological tricks
Incorrect design of chimney hood
The first rule is not to make chimneys like a gable roof or barrel vault (see figure on the right). These are suitable for their intended purpose only for mobile devices, when the axis of the umbrella can be arbitrarily oriented with the wind. Or as decorative for a false chimney. There is such a fashion in houses with bio-fireplaces. And in other cases, the craving will follow the will of the elements, even to the contrary.
Next, to make a chimney deflector with your own hands, you need to master some tinsmithing techniques. First of all, connecting the sheets into a fold (fold), or folding, see fig. below. Most often, the parts of the deflectors are connected with a single standing seam, but for umbrellas of imperfect deflectors, a double standing seam is sometimes used for decorative purposes.
Joining sheets of thin metal into a fold (folding)
Next, you need to learn how to mark the patterns of the deflector parts using the external dimensions. For those who prefer to learn visually, we provide a selection of video tutorials on making parts for smoke deflectors:
Transition from a square to a circle (a square inside a circle):
https://youtube.com/watch?v=ZLqFoeX74mo
Very important for closed baffles for low-power furnaces and boilers, see below
Moving from circle to circle:
https://youtube.com/watch?v=rOfAH4AqAWk
All these patterns can be constructed using only a ruler and a goat’s leg compass (into which a pencil is inserted. Well, for those who are inclined to study the basics in depth, before getting down to business, we provide a selection of projections and formulas for accurately constructing part developments
Pay attention to the elongated umbrellas: they are placed on 2-3 way chimneys. Smoke channels, each of the minimum cross-section allowed for a given heating device, are arranged in a row
The probability of blowing out 2 channels at once is extremely small, and all 3 are practically absent.
Here in Fig. - data for constructing a truncated cone, of which there are more than enough in deflectors. Initial data – height of the cone H, radii of the top and base R1, R2
Also pay attention to the inset marked in red: this is a development of the same Grigorovich cone. The forming angle (in this case 30 degrees) is found as φ = arcsin(H/r), where H is the height of the cone, and r is the radius of the base
The radius R is determined similarly to L for a truncated cone, but H and r are squared. However, for those who have not forgotten the Pythagorean theorem, this is already clear.
Construction of a development (pattern) of a tent (pyramid) with the vertex in the center
After the cones, it will not be difficult to figure out the development of a single-center tent, see fig. There is only one “but”: the allowance in the example of the pattern (on the right in the figure) is given based on a single riveting (for strength) solder seam.
How to construct a development of a truncated cone and Grigorovich cone
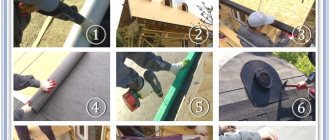
To connect metal up to 0.6 mm thick into a single fold, an allowance of 20 mm must be taken on one side, and 21+2+20 mm on the other. If the metal is 0.6-1.5 mm, then 30 and 31.5+3+30 mm respectively. But, generally speaking, a seam soldered and riveted at the edge is easier to make, it looks neater and resists corrosion better than a folded one. If the roof is covered with iron, then, of course, riveting and soldering the sheets is simply technically impossible. But the deflector umbrella is a different matter. It is assembled by soldering and riveting like this:
- Mark and cut out the development;
- Drill holes for the rivet;
- Bend the sides (wings) of the allowance inward at 90 degrees;
- Rivet the edge;
- The sides are compressed through wooden backing bars with clamps;
- Solder the seam.
In a similar way, a sweep is built and the hip tent (umbrella) of the chimney is assembled, see fig.
Construction of the development of the hip tent (umbrella) of the chimney
Construction of a development (pattern) of the transition from a square to a circle (circle inside) for the diffuser (skirt) of the chimney deflector