For a long time, when building a personal bathhouse on a site, the material for the roofing of its roof was made with one’s own hands. Moreover, only environmentally friendly and cost-effective materials were used - such as clay. That is why today, in the technogenic age, where even in the process of building houses practically nothing natural is used, ceramic tiles as a roofing material have become again in demand and popular. Moreover, clay tiles for the roof of your bathhouse can be made without the help of specialists - just like the old fashioned way.
Ceramic tiles have gained their popularity due to the naturalness of their material.
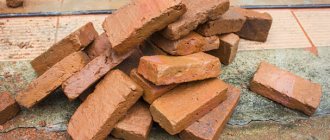
Stage I. Clay selection
The quality of the clay directly determines how durable and aesthetically pleasing ceramic tiles will be. It is best to take the clay that is usually used for making pots: not greasy, but not too sandy. Because natural tiles made from too fatty clay will begin to warp and crack when dried, and those made from thin clay will intensively absorb moisture and will not tolerate frost well . The clay should be viscous, soft and clean. Here's how you can determine its quality:
- Method 1. Crush a lump of clay and throw it forcefully onto the floor. It should be flattened like dough into a flat cake - without cracks and without crumbling pieces.
- Method 2. Rub the clay between your fingers – you shouldn’t feel any sand.
- Method 3. Knead the clay and try to make shapes out of it. It must be plastic.
And for even greater reliability, one ceramic tile is made from the selected clay for testing. If the clay was suitable, then:
- the color will be even, red;
- the surface will have an even glassy coating, without any distortions or cracks;
- high-quality ceramic tiles immersed in water should not greatly increase in weight;
- when hitting the tiles, a clear metallic ringing sound will be heard;
- the finished ceramic tile laid on two bars should easily support an adult standing on it;
- the total volume of one tile during firing did not decrease by more than 5%;
- When broken, good ceramic tiles will be the same color without bubbles.
You may be interested in: Website about sewerage.
How to make clay tiles yourself, clay grinder and proper firing
It's amazing how life changes. Much of what we now habitually buy in stores ready-made, 100 years ago people did with their own hands: they ground flour, baked bread, spun, wove, etc. They also built houses on their own, including preparing building materials: sawing timber, making boards and bricks, burning lime. But even in periods closer to our time, people were forced to return to economic “self-service”, remembering ancient methods and technologies. They were forced to do this either by the post-war devastation and the accompanying hunger for goods, or by being abandoned to the mercy of fate by the authorities. From those times, not only objects made by the hands of our grandfathers or the houses they built remained, but also a lot of literature devoted to the handicraft production of a wide variety of goods. Holding in your hands such books and brochures, published, as a rule, in the 20s or 40s of the 20th century, is very interesting. Moreover, this interest is not only historical. The fact is that the traditional technologies to which these manuals are devoted are interesting today due to the fact that they were based on the use of predominantly local natural materials - environmentally friendly and economically profitable. And this is already a reason for people who are tired of the dirt of modern production and constantly rising prices in the construction markets to become interested in them. Books of this kind also include the brochure by engineer A. Skachkov “Fireproof roof made of clay tiles”, published in 1925 in the series “Peasant’s Insurance Library”. It describes in detail how to make clay tiles with your own hands. We provide a short description of this technology.
Stage II. Preparing clay
Clay for tiles must be constantly mixed and also filled with water.
Once a good clay has been selected, it can begin to be prepared for processing. Typically, clay is prepared for tiles at any time of the year, but it still needs to survive the winter.
So, the clay taken out of the ground needs to be piled on the ground surface in the form of ridges 2 m wide and 70 cm high. Such ridges are usually called stacks. This is how the clay will have to lie until it warms up - it will get wet from the rains in the fall, freeze in the winter, and thaw in the spring. After all this it will be much easier to process. And in order for the clay to freeze better, it is advisable to periodically stir the piles and even fill them with water. After all, the longer it is frozen, the better. Even if the clay lies like this for several years, it will only benefit it.
Shingles
From the name it is clear that this type of natural roofing material was once torn by hand. This was done using a long wedge-shaped blade and a hammer or mallet, which was used to hit the blade.
We used coniferous wood when working with the blade: it is softer and easier to split. At the same time, they chose straight, knot-free trunks that were kept for at least 3 years to dry. After which they sawed them into logs about 40 cm long. The bark was removed from them and they began to make shingles.
This is how they make crap by hand today
But shingles are not only coniferous; they are made from aspen and linden. Their wood is denser and you can’t split it with your hands. For this purpose they used a special “machine” - mahalo. These are two logs of small diameter (12-16 cm), fastened together with a king pin. On the lower one they made a device for wedging logs, on the upper one a blade was attached horizontally. The distance from the blade to the log determines the thickness of the shingles.
Stage III. Preparing clay for processing
Before processing, the frozen clay needs to be soaked, and after two or three days you can begin to knead it. For this, there is a clay grinder, which you can make yourself from a wooden barrel or thick boards in the form of a box. A wooden or iron axle must be inserted inside the clay grinder, and iron knives must be screwed onto it. The mechanism is similar to twisting meat in a meat grinder. And for better mixing, you can place additional knives on the sides of the clay grinder. It is better to mix the clay itself at least twice.
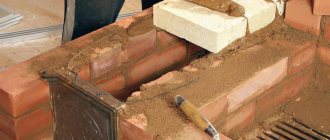
Stage IV. Shaping the tiles
The easiest way to make flat ceramic roofing tiles. To do this, you will need a wooden or iron molding frame with a handle with dimensions of 33x21 cm, and a thickness of slightly more than 2.5 cm. A board will be attached to the frame as a movable bottom, which will precisely pass through the frame and be equal in thickness to 1.25 cm, and also have a cutout at the top for a tenon.
So, a frame is placed on the desktop, and a board with a cutout is placed in it. All this is sprinkled with ash or dry sand. A large lump of already crumpled clay is placed on the table nearby and given the shape of a cube. Next, several layers with a thickness of 2 cm are cut using stretched thin steel wire.
Frame for making clay tiles.
Now one layer of clay is taken, placed in a frame and strongly compressed where the tile should have a spike. Then a lump of clay is added and a rolling pin dipped in water (to prevent it from sticking) is used to clean off the excess clay from the frame itself. After all this, the frame must be carefully removed, and the ceramic tile itself is covered with a drying board. Next you need to turn it over and remove the board. And that’s it - the tiles can be placed on drying shelves. The main thing is that when forming the tiles, the layer is cut so that the frame is completely filled, because after firing the added clay will lag behind.
Forming Roman or Dutch tiles is a little more difficult, but this technology can be mastered without any experience. There are even statistics that one worker alone is able to make such 500 pieces per day.
But the installation of natural tiles has its own characteristics . So, for the roof ridges, special ceramic tiles are prepared, called ridge tiles.
V stage. Drying clay tiles
The formed ceramic tiles must dry well - slowly and evenly over the entire surface, otherwise cracks cannot be avoided. And the drying time depends on how well the clay was mixed - the damper it was, the faster the water will come out.
Clay for tiles must dry thoroughly and evenly.
You can dry tiles only indoors, or at least under a canopy. To do this, you need to make temporary shelves or bricks as stands in advance. And it will need to dry for 10 days.
Stage VI. Treatment
Fired natural tiles do not always have a perfectly even color, and therefore they are often pre-processed. Basically this is glazing. The tiles are covered with a special glassy layer, which makes them more beautiful. But this is quite an expensive pleasure, and therefore more often glaze is applied to the tiles, which is made from red, pure, fatty clay. It is first dried and ground, and then diluted with water like thick milk. Before firing, the clay is dipped into such a solution and again placed on the drying shelf. After firing, the tiles turn out to be an even red color, with improved qualities and an extended service life.
VII stage. Burning
Firing is the most crucial moment in the production of tiles. The tiles need to be fired in special kilns called batch kilns. These can be seen in old Dutch villages, and it is quite possible to design something similar according to a similar scheme on your own site, albeit of a smaller size.
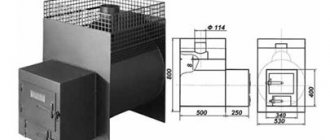
So, a kiln for firing tiles consists of four compartments - a firebox, an ash pan, a firing chamber and a pipe. Behind the firebox there is a wall with holes, which separates it from the firing chamber. Once the chamber is fully loaded with tiles, a temporary wall with holes will be laid in the back of the chamber. Also in such a furnace a special valve is installed to reduce or increase draft, and the furnace itself is covered with a roof.
By the way, at the back of such a stove there is always a larger hole for unloading and loading tiles. And during firing, it is laid with bricks or covered with sand to reduce heat loss. But a small door is always left in order to observe the progress of firing and take samples.
The tiles themselves can be laid for firing in different ways: vertically, if they are Dutch or Tatar tiles, and sideways on the edge, if they are flat. But any tiles should stand vertically, at a short distance from each other and without any tilt. To prevent it from tilting, you can wedge it with pieces of broken and already burned pieces.
The tiles need to be fired until they become slightly vitrified on their surface. In general, vitrification is a sign of overburning of the tiles, but it is better to overcook them in the fire than to underbake them. Typically, the longer a tile lasts in the oven, the stronger it is. And the installation of ceramic tiles with burnout is a guarantee of special strength and durability of the roof . But without fanaticism, it is quite possible to completely burn the clay.
Materials
Currently, the choice of wood from which this tile can be made is quite diverse, but larch and oak shingles are especially popular.
- Larch has a high density, which improves the quality characteristics of the roof. In addition, the resin that wood is rich in has antiseptic properties and is resistant to rotting. Material such as larch is more accessible for purchase. It has a pleasant natural red-yellow tint and interesting texture, which will give the roof a more impressive appearance;
- Oak is a strong and hard wood that is highly durable. This tree is also resistant to harsh weather conditions, and therefore is most popular in the northern part of the Russian Federation. Oak shingles do not rot, but have a pleasant dark brown color.
Today you can find tiles made from other materials, for example, cedar and pine. Thanks to the smooth texture of the wood, the shindel will emphasize the landscape of the site, taking on the role of its main decoration. High-quality materials will allow the roof to last from 5 to 10 years.
VIII stage. Sorting
The steeper the roof slope, the better for the tiles.
After the tiles have cooled, they are removed from the kiln and sorted. So, for the roof, all of it must be straight, clear, without cracks and evenly colored. And the rest of the tiles can be safely used to cover awnings. The tiles should be stored under a shelter, with good protection from snow and rain. And the bottom rows should not lie on the ground, but on boards.
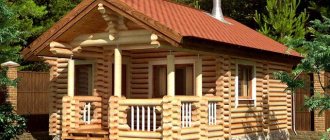
All tile roofs are durable, easy to maintain and very beautiful. And installing ceramic tiles will not be difficult even for a novice builder - everything is extremely simple . The steeper the slope, the better for the tile itself - the less snow will linger on it. But in hot areas, tiles can also be used to cover flat roofs.
Tiled roof installation
Tile behaves best on fairly steep slopes. The optimal slope is from 22° to 50°. If the slope is less steep, additional waterproofing is required; for larger slopes, additional fasteners are required. Then each tile is “set” on a self-tapping screw, roofing nail or clamp.
Selection of bars and installation pitch for the rafter system
The bars will require a large cross-section: one tile weighs from 2 kg.
The basis of the structure is the rafter system. This roofing material is heavy - the average weight of one square meter of clay tiles is 40-60 kg. Considerable mass. To this it is necessary to add the thickness of the snow cover that falls in the region. So the rafter system needs a powerful one.
But when constructing a rafter system, it is unprofitable to use very thick bars. It will be much cheaper if you install medium-sized rafters more often. The load-bearing capacity will not be affected, and you will pay less for building materials. So in central Russia, a beam of 75*150 mm is considered an acceptable option (maybe more or less depending on the amount of snow and slope). Installation step 60-90 cm.
Having finished installing the rafters, they are treated with antiseptic and fire-retardant impregnations. A wind barrier film is secured to the rafter system, and then installation of the sheathing begins.
Sheathing device
The distance between the horizontal slats is determined by the size of the selected tile and the angle of the roof. Most often, the installation step is specified by the manufacturer (found in the installation instructions). But you can decide for yourself.
The rafter system and lathing are two key points when laying a ceramic roof with your own hands
The length of the tiles varies, but the most common are 40-42 cm. When calculating the pitch of the sheathing, you need to take into account the useful or effective length. After all, the rows overlap each other. The more one tile overlaps another, the shorter the useful length. And the amount of overlap depends on the angle of inclination of the roof: the smaller it is, the more the rows overlap (so that water does not flow in):
- slope angle 11-25° - overlap 100 mm;
- slope 25-35° - approach 75 mm;
- steeper than 35° - approach 45 mm.
When calculating the pitch, take into account that it is possible to make a larger approach, but less - only to the detriment of the quality of the roof, since water can flow in. Excessively increasing the overlap of one row with another is unprofitable for material reasons (more tiles are required), so you shouldn’t get carried away with this either.
For the sheathing, timber 50*50 mm or 60*40 mm is used. It also needs to be treated with impregnations before installation. The number of crossbars is one less than the number of rows that will be laid on the roof (one is added running along the overhang).
Heat and vapor barrier
The heat insulator is installed from the side of the under-roof space. These are usually mineral wool mats and are rigid enough to fit between joists.
One of the roofing pie options for a tile roof
The heat insulator should fit very tightly and without gaps: the slightest gap is a bridge through which heat will escape. This is an unacceptable luxury for baths. That’s why we insulate it especially carefully. Then a sheathing is laid on top of the insulation, which will hold the insulation, and a vapor barrier membrane is fixed on top. It is secured with a counter-lattice, to which the interior decoration can be attached if the room is inhabited.
Read more about insulating a bath in the article “Vapor barrier for a bath.”