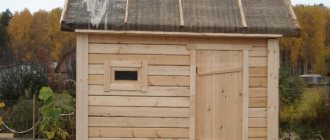
The 5x6 meter bathhouse is a fairly large-scale structure. The resulting usable area makes it possible to accommodate several very spacious rooms, which is very convenient. On the other hand, it is difficult to heat a large building, and therefore the layout of a 6x5 bathhouse should take into account the most effective insulation.
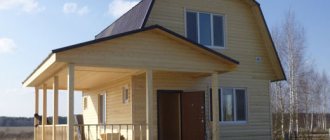
Construction of a one-story steam room with shower and dressing room
Below we will describe the main points of the construction of such a structure.
Bathhouse 5 by 6 with attic: design features
The bathhouse is a privilege of private land holdings, which, unfortunately, do not always have a large area. During construction, the bathhouse may turn out to be too compact due to lack of space, or you will have to abandon additional extensions that are used as places to relax after the steam room.
In order not to clutter the site with buildings, you can resort to a non-standard solution - combining a bathhouse with an attic.
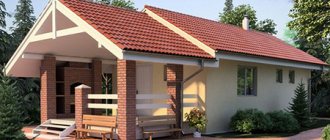
Bathhouse with attic
Ideally, the presence of an attic should be implied from the very beginning and be included in the building project being drawn up, and a single average instruction for its construction will not be very appropriate, since its contents will depend entirely on the final result. However, there are several main points that you should pay attention to when building a bathhouse with an attic, which must be taken into account.
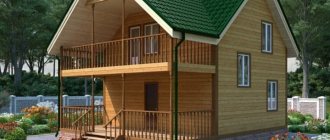
Bathhouse with attic 6x5 made of wooden beams
This article will describe all the most important construction aspects that should be taken into account when including an attic in a bathhouse project. It will be especially useful for those who carry out this process with their own hands, as it will help you avoid mistakes during construction, which in the future can lead to various unpleasant consequences.
Bathhouse with attic
A 5x6 bathhouse with an attic, which has the required area and is not too bulky, is considered optimal for construction. A smaller perimeter will not allow placing the necessary premises inside the building, and a larger one will not always be appropriate.
However, this opinion is not unambiguous - the final decision depends entirely on your own preferences. First of all, we will consider several of the most optimal projects, among which we will consider both the layout of a 6x5 bathhouse with an attic and other possible options.
Bathhouse project 5x6 with attic and terrace
Bathhouse 3 by 5 with an attic - ready-made diagram
Bathhouse 5x8 with an attic made of timber
Once you have decided on the project, you can begin to implement it. Below we will look at the basic requirements for the construction process that should be followed to achieve the required level of comfort, durability and safety.
Note! This article will not touch upon all stages of construction, since most of them are carried out in accordance with generally accepted construction standards - we will only consider the changes that need to be made to the design due to the presence of an attic.
Basic moments
Foundation
First of all, you need to make sure that the foundation for the future building will meet the necessary requirements, since the attic is not an ordinary non-residential attic, which will require a minimum of building material. So that you can rest comfortably in it, you need to build a solid floor.
Also, if you plan to use the attic all year round, you should take care of insulating the walls around its perimeter, which together will lead to a significant increase in the weight of the structure.
Bathhouse foundation
- Dimensions. The strength potential of a foundation largely depends on its size, which should. The minimum width of the foundation for a building with several floors is 50 - 70 cm and a height of at least 1 m. Only in this case will the foundation be able to withstand the additional load in the form of an attic;
- Structure. The concrete frame must have a reinforced structure and be located on a pre-filled area of sand or gravel. This will ensure the reliability and seismic resistance of the future structure;
- To reduce pressure on the ground, it is also permissible to use a reinforced concrete pad, which will evenly distribute the weight of the building;
These recommendations should be followed not only when building a bathhouse from scratch - if you are going to attach an attic to an existing building, you should pay attention to this factor first.
If the foundation is narrow, shallow and there is a suspicion that there is no metal frame, adding an attic is categorically undesirable, as this can lead to deformation and destruction of the structure.
Walls
To spend time in the attic all year round, you need to take care of the heat from the soundproofing of the walls of the second floor. Since the room will be heated (even if only heated floors are used for heating), it is impossible to do without insulation for the walls of the bathhouse, otherwise there will be no point in heating. In the summer, the lack of thermal insulation will cause strong heating of the room
Roof
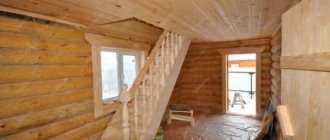
Attic room photo
For a regular attic space, it is customary to use a regular gable roof, however, to form an attic such a design would not be very appropriate, since it leaves a very small amount of usable space.
The optimal design for a residential attic would be a “broken” roof, which is also called a mansard roof. Despite the fact that its price will be an order of magnitude higher than an ordinary gable roof, there is much more usable space under it. (see also the article How to make a roof for a bathhouse: instructions)
Floor
The floor in the attic must be massive and strong in order to withstand the weight of furniture, a billiard table, internal partitions and other furnishings - the use of massive joists and reliable material to form the floor is mandatory.
Bottom line
Proper design and taking into account the specifics of the future building will allow you to create a reliable and comfortable bathhouse with an attic, despite the exotic layout. (see also the article Projects for saunas made of rounded logs: how to build it yourself) You can study this information in more detail by watching the video in this article.
9ban.ru>
Material selection
When choosing material for building a 5x5 bathhouse, it is necessary to take into account all the requirements of SNiP 30-02-97 for objects built on private territory.
There are few conditions for choosing material:
- quality;
- strength;
- thermal insulation properties;
- high resistance to significant temperature changes;
- moisture resistance;
- price.
In addition, the designs of future 3x5 baths and the location of buildings on the site play an important role.
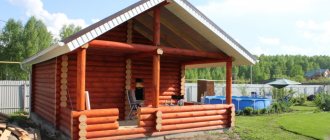
The traditional material for building baths is wood. Real Russian baths 4x5 or 5x6 are made from wood. Walls made of wood have:
- Vapor permeability.
- Low thermal conductivity coefficient.
- Resistant to sudden changes in temperature conditions.
Among the disadvantages of wood are:
- susceptibility to shrinkage;
- the need for periodic care;
- tendency to absorb moisture with subsequent swelling and cracking when drying;
- release of resin (conifers) when heated.
For the construction of 6x5 wooden baths, log houses made of chopped or rounded logs, edged, glued profiled timber are used.
Chopped logs are made by hand using an ax; the inner layers of wood are not destroyed.
Rounded logs are obtained by processing tree trunks using special equipment. After processing it is a smooth, even cylinder with cut out cups and grooves. During manufacturing, the outer layer of wood is destroyed, so the service life of the rounded log is reduced.
Edged timber is made from tree trunks by removing part of the section along the entire length. It has a rectangular end shape and a standard length of 6 meters.
Profiled timber is made from solid pieces by gluing. The cross section has a complex shape due to a system of grooves and protrusions. The quality of the material for the construction of walls, combined with high-quality insulation, ensures the absence of cold bridges. Glued laminated timber practically does not shrink.
In the construction of 5x5 baths, brick is often used. It is used more in steppe regions, where it is much more difficult and expensive to buy lumber.
In the construction of 5x5 baths, red brick is used. It is made from environmentally friendly material - clay. Bricks make durable buildings.
The advantages of brick are expressed in the following qualities:
- Durability.
- The correct shape of the product.
- Does not require additional finishing.
- Possibility to lay out any architectural forms.
- Contains no toxic substances.
- Non-flammability.
- Resistant to moisture absorption.
- The disadvantages of brick buildings include:
- The need for a solid foundation.
- High heat capacity.
- The need for additional thermal insulation.
- Availability of special knowledge and skills for making masonry.
- Material price.
You may be interested in: Layout and design of a bathhouse with dimensions 3x3, 3x4 and 4x4: tricks for zoning space
Traditional wood and brick have been replaced by modern building materials - foam concrete and aerated concrete blocks. Despite the similar characteristics of the new materials, the technology for their production is slightly different, as can be seen from their name.
In the production of foam concrete, cement, sand and foaming agent are used. During the hardening process, the solution turns into a porous mass, which is subsequently cut into blocks of different sizes.
Advantages of foam concrete:
- light weight of the product, simplifying its transportation and laying;
- low thermal conductivity;
- high noise insulation qualities;
- passivity to chemical influences and decay processes;
- high degree of vapor permeability;
- high processing potential;
- convenient block sizes.
Aerated concrete is made by adding a suspension of aluminum powder to a dry mixture of cement and sand. Upon contact with water, gas bubbles form, which after hardening give a porous structure. Aerated concrete, unlike foam concrete, is more susceptible to moisture. To avoid destruction of the material, it is necessary to provide reliable hydro and vapor barrier, as well as internal and external wall decoration.
5x6 bathhouse project: where to start
The bathhouse project is the first stage. To begin with, when designing a steam room, you need to decide on the location on the site where it will be located, as well as its dimensions. You must decide for yourself where exactly to build the steam room, but take into account its location relative to the territory of the neighboring site.
Designed bathhouse
Overall size
Buildings should be located no closer than 1-3 meters from the border of the neighbors' property. First of all, the design of a 5 by 6 bathhouse depends on the dimensions of the main premises - washing room, steam room, locker room and on the number of people who will use it. The size also depends on your financial status.
What you need to know when creating 5x6 log bathhouse projects:
- Building area.
- Construction volume.
- Bath room.
- Tambour.
- Effective area.
Locker room dimensions
The size of the dressing room (locker room, vestibule) is calculated based on how many people will use it. You also need to know that the locker room should be well insulated so that cold air does not enter the steam room. It is also necessary to insert a wide window.
Note! To avoid loss of steam, the door is mounted with a large threshold and a low frame.
The locker room should have everything you need:
- Hangers or lockers for clothes.
- Place for coal and firewood.
If you use the bathhouse only in the summer, then instead of a locker room you can make a terrace with your own hands, or minimize the area.
Helpful advice! The door from the steam room should open into the locker room, and not vice versa, in order to avoid dampening of clothes from the steam.
Steam room size
After the locker room there is a steam room and a washing room, sometimes these rooms are combined. There must be at least 1 square meter of room for each person in the steam room. Wooden benches are placed along a blank wall in several tiers.
Building material
Lumber and timber used in the construction of a bathhouse
- a – plate.
- b – double-edged beam.
- c – unedged board.
- g – quarter.
- d – four-edged timber with wane.
- e – semi-edged board with wane.
- g – clean-edged timber.
- h – croaker.
- and – edged board.
- 1.2 – wane.
- 3 – layer.
- 4 – rib.
The most suitable material option for a bathhouse is a log. Solid logs have good ventilation, and they also help regulate the humidity in the bathhouse.
5x6 bathhouse projects require the use of hardwood and softwood for the construction of the steam room. Oak is used for wall crowns, foundation pillars and joists. Pine (or hardwood board) is used for the floor and ceiling.
Hardwood is also needed in the foundation. The ceiling and walls are sheathed with linden or spruce; they perfectly absorb sound and moisture. Shelves, benches and durable furniture in the bathhouse are made from linden.
6x5 bathhouse project - consumables:
- Rafters.
- Rishtovka.
- Board.
- Under the rack run.
- Ceiling beams.
- Floor beams.
- Board for sheathing.
- Doors.
- Slate.
- Window.
Log selection
For the sauna, you need to take seasoned, straight logs to obtain the tightest possible joint after processing. It is better to choose spruce or pine; the wood should have as few resinous layers and knots as possible and have a pleasant aroma.
From the butt, the ends of the logs are cut off from the inside to a thickness equal to the upper diameter. To avoid burrs, the heel is made from the top to the butt. As the cutting progresses, the thin end is placed on the thick end of the log.
Scheme of a log house “in the oblo”
At the corners, logs can be connected in many ways to ensure the strength of the bathhouse. Basically, they choose a log house in >, as shown in the photo. It also has an exotic name > or >.
Norwegian and Canadian cup
Lining inside
The lining inside the bathhouse can be left untreated, but the beams or boards must have a smooth surface. And if you decide to line the walls with brick, use perforated or regular brick. Sand-lime or slotted bricks cannot be used.
It is better to cover brick walls with wooden clapboard. It is also necessary to leave space between the wall and the boards for ventilation of the inside.
Steam room foundation
The durability of a structure depends on the quality and design of the foundation. A 6x5 bathhouse project can have a strip or columnar foundation. By the way, bathhouse projects 5 by 6 by 5 may have the same foundation.
A strip foundation is the simplest technology, but it requires more space and material. This foundation is used for brick and wooden walls.
To lay such a foundation, a solution is poured into the dug trench using a vapor barrier; roofing material is suitable for it. The masonry is fastened with sand-cement mortar or cement-lime mortar. Make a sloped blind area to protect the foundation.
Strip foundation project
For lightweight structures, a columnar foundation is used; 5 by 5 by 6 bathhouse projects do not support it. In terms of installation time, it is faster than tape, and its price is much lower.
In chopped and cobblestone baths, where there is no need to install lintels between the pillars, a columnar foundation is mainly used.
Columnar foundation diagram
- Asbestos cement sheet.
- Concrete.
- Foundation filing.
- Asbestos-cement pipe filled with concrete.
Steam room roof
The roof of the bathhouse must withstand strong gusts of wind, and in winter the heavy weight of snow. To avoid snow accumulation, the roof is sloped and flat. The roof can be gable or single-pitch with a slight slope without an attic; the 6 by 5 by 5 bathhouse design is ideal for this.
Suitable for roofing:
- Profiled sheeting.
- Bituminous shingles.
- Ruberoid.
- Slate.
- Metal tiles.
- Roof tiles.
Standard corrugated slate sheets will not work as they will leak.
Conclusion
Well, now we’ve figured out the bathhouse projects, if anything is unclear, the instructions in the video in this article will help you!
9ban.ru>
Optimal bath: what is it like?
Many people have the desire to have their own bathhouse on site: it provides a unique opportunity to improve your health, relax and unwind after a hard day. And if the bathhouse is near your house or dacha, and you don’t need to go anywhere, this method of relaxation is generally priceless. But there are a lot of questions: where to put it, how to deploy it, how many and what kind of rooms there should be, what size and what kind of foundation to make, and a thousand others. For now, let's talk about the layout of the bathhouse on the site and inside.
Layout on the site
You need to start by choosing a place to build a bathhouse. In this case, you need to rely on data from a geological survey of the site: choose the best soils and the lowest location of groundwater. Then the foundation can be made inexpensively, and the bathhouse will stand well. Without such a survey of the site, you have to choose at random.
Minimum distances from various objects on the site to the bathhouse
In this case, it is advisable to immediately exclude places where groundwater comes close. They can be seen at sunset. Inspect the area in the evening. If there are places where small midges hover in a column in one place, there is water close below. It’s good to dig a well here, but you can’t build a house or a bathhouse.
Having excluded all wet areas, you can try to fit the planned building in dry areas. There are also some restrictions here:
- the distance to the well should not be less than 5 meters;
- the distance to the nearest residential building is at least 8 meters;
- The toilet and compost pit should be located as far away as possible.
If your site overlooks the shore of a river or lake, it makes sense to put a bathhouse nearby: you can take a dip and not bother with building a pool. It will also be possible to organize a water supply from the reservoir, but in this case it will be necessary to fool around with the drainage so that the wastewater does not get there. So the optimal location of the bathhouse on the site is an individual matter.
If the site overlooks a body of water, it makes sense to place the bathhouse near the shore
Bathhouse layout inside
The most common layout of baths: entrance to the south, windows of the rest room to the west. The entrance is in the south because the snow melts here first and there are usually fewer snowdrifts. And windows are made in the western wall, because most often they steam in the afternoon and the setting sun illuminates the room.
But this is only the most common layout and nothing more. You can place both the entrance and the windows in the way that seems most convenient to you: maybe you have an amazingly beautiful landscape to the east, and to the west all that is visible is the wall of the neighbor’s barn. No one will stop you from doing as you see fit.
What rooms are needed in a bathhouse?
There are constant battles around how to properly take a steam bath. They also apply to the number and volume of premises. There are several approaches to this issue. Choose the one that is closest to you.
Tambour
This bathhouse layout has a small vestibule. It will not allow cold air to rush into the room
The first postulate is that when using a bathhouse all-season (and in winter too), there should be a vestibule at the entrance to the bathhouse. Otherwise, the rest room will quickly get cold: with each opening of the door, a portion of cold air will rush into it. There is no debate here. There are only a few options for organizing a vestibule: it is fenced off inside or attached outside.
If you only steam during the warm season, there is no need for a vestibule. In the summer, people often relax outside after a steam room: on the terrace or porch.
Sink and steam room: separately or together?
But there is a dispute about the composition of the premises that are needed in the bathhouse. Most people are of the opinion that the steam room and sink should be separate. But since the size of the baths is usually small, these two rooms turn out to be small. This is good for dry-air saunas: small volumes warm up quickly. In this case, a separate sink from the steam room is also necessary: the sauna must be dry. No more than 10% humidity. A large amount of steam at a temperature of 100°C or higher will burn the nasopharynx and bronchi. Therefore, if the bathhouse is dry-air, then the sink must be separate.
A separate steam room is required for saunas
Some supporters of moderate temperatures and high humidity - a regime that is typical for a Russian bath - believe that a washing room and a steam room can and should be combined. There are several reasons for this:
- The first is that in a small steam room, when water is applied to the stones, the temperature and humidity conditions change sharply. There's nothing you can do about it: the volume is small, and the steam literally hits everyone who is in it. If it is possible to make the steam room larger, the issue is not so pressing.
- The second reason is physiological. In the steam room, the pores open. If it is much cooler in the washroom, they close again while you are in it. The next time you enter the steam room, you have to steam them again. If the “washing room” is a trestle bed located in the corner opposite from the shelves, then no “cooling” occurs.
In principle, the second problem can be solved: you need to maintain a fairly high temperature in the washing room, 35-40°C, and there is already enough humidity there. It will create an almost “hammam” atmosphere. Under such conditions, you can rest. To do this, trestle beds are made in the washing department, on which people rest in a warm, humid atmosphere after the steam room. Then the washing area should be large. And they go into the rest room only when they are no longer going to enter the steam room.
You can combine a steam room and a washing room in a Russian bath
The second approach to vaping is different: after the body has warmed up, it needs to be cooled down. For this purpose, contrasting procedures are used - cool or cold showers, dousing, rubbing with snow, etc. That’s when a separate washing room with a cool atmosphere is needed. There are also fonts with cold or cool water here. With this approach, they stay in the steam room for quite a long time - 10-15 minutes, because they need to warm up again.
Ideally, you will need to visit both types of sauna to decide which is best for you. Whichever one will be better for you is the one worth building.
Now, let's summarize. The bathhouse can have two or three rooms. There may be a relaxation room, and separate rooms for a steam room and a washing room. In another option, there is a relaxation room, and the steam room and washing room are combined in one room.
Locker room
This room can be classified as optional, but it is desirable. It is much more convenient if all things are collected in one place. But even here questions and disagreements arise: where should the doors go. There are usually two options: to the rest room and to the washing room. Both options are imperfect.
If the entrance to the locker room is made from the rest room, then after undressing you will have to walk through this room. If there is no one else in the bathhouse, this is one thing, but if a campaign has gathered and someone is already resting, this is a completely different story.
The second option is preferable from this point of view: from the locker room you immediately go to the sink, and from there to the steam room. But then damp air from the sink will inevitably end up in the locker room. And damp air = wet clothes. It's still a pleasure. So you usually have to choose: walk through the rest room in a negligee or put on wet clothes after the bath.
But more often, they still make an entrance to the locker room from the washing room, and solve the problem of humidity with good ventilation: they make two channels, one at the bottom for fresh air, and the second at the top for removing damp air. An exhaust fan is usually built into the top one (for wet rooms). This is how, in pairs, natural and forced ventilation cope with high humidity.
Dimensions of rooms in the bathhouse
In addition to the composition of the premises, it is necessary to determine the size. Since most often there are three rooms - the sink and the steam room are separate - we will describe approaches to choosing sizes for all three rooms.
Steam room layout
The main thing when planning a bath is to determine the optimal size of the steam room. It’s clear that you want to save on construction costs and on wood for burning. But a room that is too small is completely uncomfortable: the sauna overheats quickly, and you feel like you’re in a cage.
It is most reasonable to proceed from how many people should fit in the steam room at one time. Moreover, the sizes also depend on the type of steam room. No one moves much in the dry air vehicle. Everyone sits decorously on the shelves: at this temperature you can’t move. Therefore, one meter is enough for one person to “sit”. To lie down, it’s already 2.2. So here it is. Decide how long a person can sit with you and how long can lie down. Then you calculate the area of the shelves, add space for the stove and a little for the passage to the shelves. You get the minimum dimensions of a steam room for a sauna.
Even the same size bath can be divided in a dozen different ways
In a Russian bathhouse, they mostly lie on the shelves. And also, the bathhouse attendant is waving brooms. Therefore, the dimensions here should be larger.
For a wet Russian steam room, the width and length are chosen so that two or three can lie comfortably, depending on how many people will be steaming at the same time. We calculate the area of the required shelves (80-100 cm wide for one, 2.2 to 2.5 m long), add the area for placing the stove, the screen around it, approaches and gaps, and we get the minimum volume of the steam room for a Russian bath. If the dimensions do not allow, leave one “lying” place, always a place where the bath attendant stands, and, if possible, at least a small shelf for “sitting”.
In general, the area in the steam room is used more rationally if it is not square, but rectangular. Moreover, the stove is usually located on the long side. And also keep in mind that from the stove, even covered with a brick screen (for Russian baths it must be covered with a screen), there should be a distance of about 20-30 cm from the shelves, but more is better.
These are the approximate dimensions of the shelves and steps that can be pushed under them
For information on choosing the height of ceilings and doors, read the article “ Height of ceilings and shelves in bathhouses and saunas .” Briefly, we can say the following: for a conditioned steam room (steam is mixed evenly throughout the entire volume), the finishing ceiling is not lower than 2.10 m, and for a pie room (steam is collected under the ceiling) not lower than 2.4 m.
Let's immediately say about the height of the shelves - this is another stumbling block when designing a steam room. In general, each parameter is selected individually. If you customize the steam room “to suit you,” then the height of the shelf should be up to the knuckles of your lowered hand. Stand on the floor (on a grate or stool, if you have one), lower your hand down. Where your knuckles are is where the surface of the shelf should be.
If several tiers of shelves are planned, then the top one should not be closer to the ceiling than 115 cm. And one more thing: the second one is higher than the first - 45 cm: then you can not only lie on the top shelf, but also sit (if you want it “hotter” ).
You need to draw everything in size and it all should fit into the steam room in its “pure” form, taking into account the walls and insulation layer
But not everyone who will take a steam bath has the same height. That's why they make side steps. You can have several pieces of different heights for people of different heights: they lean on such a step when they need to climb onto shelves. The same steps are used by the bathhouse attendant: people have different waist circumferences, and sometimes even in a steam room that is tailored to suit you, you have to stand on a step to make it more comfortable.
One little tip: make the steps wide. Firstly, if necessary, you can sit on them, and secondly, wide and low ones are more stable.
Sink dimensions
Here again, there are two approaches: either try to get by with the minimum - this is if the size of the bathhouse is limited, or plan it as convenient as possible, and put the resulting dimensions into the project. If we talk about the minimum, then you can get by with a small shower, above which you can also attach a shower device. In this case, a size of 1.5 * 1.5 meters will be sufficient. A little cramped, but not too tight.
By separating a small gap from the rest room we get a vestibule at the entrance and a locker room or storage room
For comfort and in case you relax in the steam room, you need to place trestle beds here. Then, probably, you need to fence off the shower stall separately - it’s 1.2 * 1.2 m (or more, if you want). And add one or two trestle beds (depending on the number of people steaming in one go). The size of the trestle beds may be similar to the shelves in the steam room, or slightly different. Here the dimensions are no longer critical. The main thing is to lie comfortably.
Some people put fonts in the washing room. Here you can’t get by with small dimensions, and the sizes of the font can be different - from one and a half meters in diameter and more.
Dimensions of the rest room
And again, two layout options even in baths of the same size. Some try to block off as much area as possible for the relaxation room, leaving a minimum for the steam room and washing area. This option is suitable if the bathhouse is something like a club. Then the main action is precisely the gatherings in the relaxation room. And the room stands out and is accordingly spacious.
But there are people who enjoy precisely the processes taking place in the steam room. And then the situation changes radically: the necessary minimum is allocated for the rest room: a hanger, a table, several benches/armchairs/chairs. All. But all other areas are allocated for the steam room.
Pay careful attention to the location of the doors - passages eat up a lot of space
Having decided on the size of all the rooms and their location, take the time to draw everything to scale. This can be done on a computer using programs or the old-fashioned way on checkered paper. Just draw large, and while maintaining proportions, taking into account the thickness of the walls and partitions, insulation and finishing. Then count the real areas that remain in “pure” form. Absolutely: a surprise awaits you. And unpleasant. All the piers and walls take up a lot of space. And in the remaining space you will need to “fit” all the items. There are especially many difficulties with the steam room. So be especially careful here. Most likely, the already completed bathhouse plan will have to be redrawn, and more than once.
We just moved the doors to another wall, and immediately problems arose with the location
Pay attention to the location of the doors. It is desirable that they be located as close as possible. Especially in walk-through rooms. It's all about the same utilitarianism: it's impossible to use all the passages. So they eat up a decent amount of space.
From a security point of view
It is also necessary to consider the layout of the premises in the bathhouse from a safety point of view. Therefore, it is advisable to make the path from the steam room to the street as simple and short as possible, without labyrinths. This is necessary in case someone becomes ill. The sooner a person can get out into the fresh air, the better. Therefore, some projects provide two doors in the steam room: one from the washing room - for regular use, the second - to the vestibule - for emergency situations.
In order to be able to evacuate as quickly as possible, the washing room must have a window of decent size - no less than 50*50 cm. And it must open inward (again, safety precautions). And it’s better not to skimp on size: small sizes will not provide the amount of fresh air required for ventilation. It’s also difficult to climb out through the small window.
There should be windows in the steam room - one on the wall opposite the entrance, the other under the shelves
Many, by the way, do not install windows in either the washing room or the steam room, and they are very mistaken. Now we will briefly explain why.
These windows are needed not for lighting, but for ventilation. The steam room needs two windows - one in the wall opposite the door, measuring 40*40 cm or so. Its upper edge should be level with the door lintel. The second window in the steam room is made under the shelf. It can be small - 20*20 cm.
All of them are needed for ventilation and drying of rooms after use. Then you will not have any problems with wood and fungus. They are also opened to correct temperature/humidity. Everyone is comfortable with their own conditions, so they regulate them with the help of windows. Read more about where windows should be in a bathhouse and what sizes they are, and in the article “Which doors to choose for a bathhouse and sauna” we talk about doors and their sizes.
The window in the washing room is also an emergency exit. You shouldn’t forget about this either. Of course, we try not to break the rules and install the stoves correctly, but it’s better to be safe.
baniwood.ru>
Waiting room
The purpose of the dressing room is to enter the bathhouse, store firewood or other fuel, locker room (dressing room), separate the cold room from the room heated by the stove. The dressing room is a kind of terminator, with warm air on one side and cold air on the other. From the dressing room, the doors should lead to the shower room, the steam room, and the relaxation room.
Large dressing room in a small bathhouse
This plan for a bathhouse measuring 3 x 5 meters provides for a large and spacious (as far as the construction plans and construction area allow) dressing room, in which all other rooms can be equipped with the help of partitions - a firewood warehouse, a locker room, etc. In such a dressing room you can make a fairly large window, the main thing is that there is no window in the steam room. There should be only one door in the steam room, and they should exit into the same dressing room. From the dressing room itself you can get to all other rooms.
Common bathhouse project