Author: Yuriy Fedorovich Kolesnikov, thermal power engineer
Almost exclusively metal stoves are covered with brick. They are relatively inexpensive, compact, light in weight (for a stove), and heat up quickly. Metal furnaces of modern designs are very economical: their thermal efficiency reaches 85% or more. But at the same time, metal stoves quickly cool down, and when fired, they produce a powerful flow of thermal (infrared, IR) radiation, which can cause the fire of flammable objects nearby. The body of a metal stove (if it is not a stove in a steel case, see below) sometimes becomes red hot during combustion, and a burn from it can be very severe.
It may be necessary to line the stove with bricks in the following cases:
- To precisely coordinate the properties and qualities of the oven with the sanitary and hygienic requirements and conditions of a particular room. Its volume recommended in the furnace specifications is a very relative parameter;
- To reduce the fire hazard and injury hazard of the oven, if it cannot be installed exactly according to the requirements. rules;
- To increase the heat transfer time of the furnace after combustion;
- For decorative purposes, brick cladding serves as a kind of aesthetic bridge between the metal of the stove and, for example, wooden walls. Decorative cladding, as a rule, also carries out the functions according to paragraph 2.
Methods for lining stoves with bricks
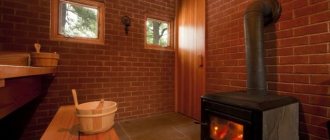
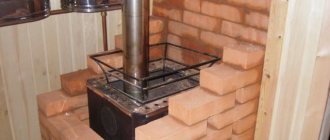
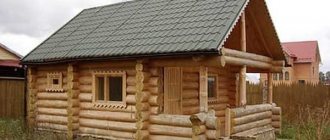
How the main methods of brick lining ovens appear externally is shown in the photo. Pos. 1 – continuous cladding. Reduces the thermal efficiency of the furnace: metal furnace designs are designed for rapid heat transfer. Suddenly, an additional obstacle appears on the way of heat from the firebox into the room, and it has no choice but to fly out into the chimney. It is used relatively rarely, in cases where a significant part of the thermal power of the furnace is taken away by the water heating circuit or for decorative purposes, when the efficiency of the furnace is not particularly important or is generally undesirable. For example, if a fireplace stove simply decorates a heated room.
Brick-lined ovens
Pos. 2 – simple heat shield. Cuts off the IR radiation of the furnace from fire hazardous objects. Does not significantly affect the technical parameters of the furnace. Pos. 3 – blind convector screen. With a blind convector screen, you can put a stove of obviously overestimated power in the bathhouse and heat it at a minimum. This is especially important if the bathhouse is made of stone (see below for more details). In this case, it is highly advisable to install a stove made of heat-resistant stainless steel, because... in a blind screen with full air supply it overheats greatly.
Pos. 3 – facing-convector with vents. The optimal option for a bathhouse: if you line the stove in a bathhouse with bricks in the form of a convector screen with vents (see below), then by varying their number and location, you can adapt almost any stove to any bathhouse. Practically, this means that the volume of the steam room can be approximately half that of the recommended specifications for the stove. If the convector with vents is made correctly (see below), then the heating time of the bath will not increase (perhaps even decrease), the steam will remain soft, and when the fire is set to minimum, the stove will not become overly voracious.
Finally, at pos. 4 is an example of decorative fireproof brick lining of a furnace. In this case, it is especially clearly visible how dark rough metal with the help of brick visually “flows” into light natural wood.
Specifications
Of the entire range of Butakov heaters, the Professor stove is the most powerful.
The engineering parameters speak for themselves:
- the volume of the heated room is about 1000 m³;
- maximum power – 40 kW;
- efficiency – 85%;
- dimensions (L x W x H) – 1110x670x1250 mm;
- unit weight – 57 kilograms;
- firebox range – 400 liters;
- chimney diameter – 20 cm;
- The minimum height of the chimney pipe is 8.0 m.
The average cost of this model, depending on the variety, is approximately 32.5 thousand rubles.
Please note: Butakov’s wood-burning convection ovens easily cope with the resulting condensate - it flows down the pipe into the firebox and burns out there.
Schemes for lining stoves with bricks
From the point of view of heating engineering, it is possible to cover a metal stove with bricks in 3 ways. Solid lining with stove or red working brick (on the left in the figure below) is used, as already mentioned, if the stove is only required to see the flames dancing behind the glass of the firebox or the stove is used primarily as a hot water boiler. In the first case, the cladding is made thick, no less than a brick. Its action is as follows:
- The oven is overheating.
- Exhaust gases heated to elevated temperatures create a strong draft in the chimney.
- Excess heat escapes into the chimney.
- 10-20 minutes after the start of combustion, the furnace mode stabilizes in such a way that the outer surface of the lining remains slightly warm.
- At the end of the fire, the view is not closed, or it is not closed at all. The heat accumulated in the inner layers of the cladding goes back into the furnace and flies into the pipe.
If the stove is converted into a water heater, the lining, on the contrary, is made no thicker than half a brick. The furnace mode is stabilized at a lower temperature of the exhaust gases, optimal for maximum heat transfer into the heat exchange water register (approx. 400 degrees between its bends). In this case, it would be correct to first line the stove with a quarter of a brick, and if the stove eats too much and heats the water too weakly, add another quarter. Of course, if the register for the stove is selected correctly.
Schemes for lining/cladding stoves with bricks
To increase the duration of heat transfer without a sharp decrease in the efficiency of the furnace, brick lining is used along the internal lining with fireclay bricks, in the center in Fig. This will most likely be needed for a country stove or an additional house stove in the off-season, when even during the autumn operation of the main brick stove it turns out to be too voracious. The duration of fuel combustion at a minimum air supply in flame combustion furnaces does not exceed 5-6 hours; A person needs 7-8 hours to get enough sleep. Long-burning stoves and boilers smolder for 10-12-24 hours or more; you cannot extinguish them half-burnt if it is time to leave the dacha. Here, lining with fireclay lining will add the missing 1-1.5 hours to the heat transfer time.
The ratio of the thermal conductivity of fireclay to its heat capacity is significantly higher than that of ceramic bricks, and the actual value of the heat capacity of fireclay is less than that of baked clay. This makes it possible to achieve a noticeable increase in the heat transfer time of a steel furnace in fireclay and brick without significantly reducing its efficiency. To do this, it is enough to make fireclay lining approx. twice as thick as brick cladding, and the thickness of the fireclay layer is approx. 1 brick per 12-17 kW of furnace thermal power.
Manufacturing instructions
All work is divided into several main stages:
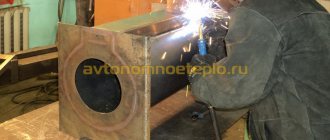
First we prepare the base. To do this, place the corner with the shelf inward and grab the parts
It is important to place the workpieces on a flat surface and check the diagonal. We make holes in the shelves and display the pipe blank
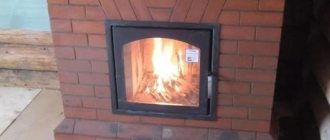
It should stand in a plane, we grab the pipes. Once again checking their correct location, we scald the joints. After welding, the slag must be removed and the quality of the seam checked. Pores or burns will require a second suture. The tubes can be tied together at the top for better stability. The bottom is covered with a sheet of metal, which is laid along the edge of the base and scalded. Now we move on to sheathing the structure with sheets. We install the side panels on the base flush along the outer surface and grab them. Then we install the back wall. At the same time, it is important to grab it not only with the base, but also with the sides. We fix the corner pieces at a distance of 100 mm from the base and lay the grate. We fix the jibs and insert convection pipes into them. For ease of welding, they should protrude slightly beyond the sheets. The jibs are attached to the sides and rear wall. We put the upper part on 6 end tubes, connect them and attach them to the jibs and the rear wall. We immediately make 3 tacks to the tubes. We join the front part, grab it with all the details. We have a closed box. In the front part we will have an ash drawer and a door for storing firewood. We cut out windows for them with a grinder. The door can be secured with homemade or door hinges and a cam lock installed. For the ash box, you can use metal 2 mm thick. We attach the handle to the front part. Using a grinder, we cut off the gussets at the connection of the jib with the front and back. We turn the stove and secure the gussets at the junction of the corners of the base. You can start welding the structure. Please note that the joints must be airtight. Having discovered a burn or undercut, these places must be digested. You should not weld the entire structure, immediately going through one of the seams completely and only then moving on to the next face. It is better to weld randomly. Having boiled a small area on one part, we move to the opposite side and cook the entire structure in this way. This welding will cause less deformation. On the top part we weld a section to connect to the chimney. We make a small hole in it at the edge and insert a rod with a diameter of 8-10 mm. We will make a gate valve from a sheet 6-8 mm thick by cutting a small groove in it. The gate is welded to a rod, which is bent at a right angle.
After igniting the furnace, closing the damper, we deplete the air in the furnace with oxygen. In this case, the wood will burn longer, providing only 2-3 stacks per day. You can close the damper completely; the groove will allow enough air to pass into the firebox for smoldering.
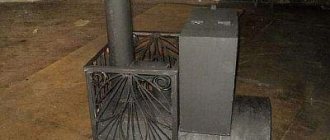
Professor Butakov's homemade stove is ready. All that remains is to clean the joints and scale with a grinder and a cleaning stone. In hard-to-reach places, scale can be removed with a chisel or file. It is recommended to attach asbestos rope to the door and ash pit lid to seal and prevent smoke from entering the room.
If desired, the oven can be painted with a heat-resistant primer or paint. Having once again checked the quality of welding and assembly of the furnace, you can begin its installation.
Stove in the bathhouse
In a bathhouse, it is most often necessary to cover an iron stove with bricks in the form of a convector screen with vents (on the right in the figure above) that enhance circulation and direct air flows. In order to build it correctly, you must first remember how the beneficial properties of a Russian bath depend on the mode of its firebox.
How to heat a sauna?
A Russian bathhouse will be beneficial if the steam in it is dry and light. To do this, it is necessary that the wooden walls warm up a little, but not excessively, faster than the air in the steam room. Then the flow of excess moisture vapor from them will go out. The design of a traditional Russian bathhouse with a brick sauna stove (a different design than the Russian heating and cooking stove) ensures that these conditions are met at the cost of a long, 4-6 hour heating of the bathhouse. It is not possible to reduce it with a brick kiln; the thermal conductivity of the brick is too low, and the amount of heat transfer from the brick kiln into the room per unit time is limited.
The advent of metal sauna stoves made a quiet revolution in the sauna business: with a powerful stream of infrared, you can quickly warm up the walls. Meanwhile, convection develops and heats the air in the steam room without the danger of oversaturation with moisture. The heating time of the bath was reduced to 1-1.5 hours. Traditionalists argue that a bathhouse with an iron stove is still not the same, but the average person who likes to take a steam bath in it can be even more pleasant and healthier than in a classic one. If the stove and heater are correctly selected for this particular steam room.
In modern life, waiting an hour and a half for a bath can be expensive or there is no time at all. The difference in the price of stoves of adjacent power values from the same product line is not particularly large; metal stoves are compact and not heavy. There is a temptation to quickly heat up the bathhouse - Runen is full of photos of steam rooms barely 8-9 cubic meters in size with stoves of at least 15 kW.
This is where it turns out that quantity turns into quality. Heat an excessively powerful stove at maximum - a powerful flow of infrared heats the walls so quickly that the density of water vapor released by them exceeds the critical one, and the flow of gaseous moisture goes inward. The steam is correspondingly heavy. The air in the steam room is oppressive, and a chill from the dressing room creeps up to your feet. Load less fuel and cover the air? Sauna stoves are therefore compact, lightweight and relatively inexpensive because they are not designed for a wide range of capacities. We heat and heat little by little, but the bathhouse still doesn’t heat up and doesn’t heat up. Flooded within normal limits - it overheats, the steam is heavy.
In this case, lining the stove with brick helps. And in an optimal way: while maintaining the intensity of the firebox by reducing its duration to 0.5-1 hour. The brick screen here acts primarily as a screen rather than a heat accumulator - it uses excess IR to enhance convection. IR heating is reduced, convection heating is enhanced, and the stove heats the bathhouse as it should, but faster; The excess power of the furnace is used effectively.
Note: IR “hardness”, i.e. its belonging to the far or near end of the IR spectrum has almost no effect on the hardness of the steam in the bathhouse, as is sometimes written. The IR flux density and the rate of its increase are of decisive importance for it. If a tree is exposed to heat very quickly, the moisture from it will not be forced out, but will be released into the room.
About stone baths
The walls of brick baths emit less moisture than wooden ones, but very slowly when heated to 150 degrees or more. It is impossible to steam and generally survive in such a bathhouse, so the oven in a brick bathhouse must be completely switched to convection with a blank screen, see above. In its lower part, a couple or two additional vents are made so that the potential influx of air into the convector obviously exceeds its outflow. Such a bath will warm up for at least 2 hours, and the steam in it will last up to 4–.
Note: a stove for a bath made of foam or aerated concrete is equipped with a screen, as for a wooden one. The heating time for a foam/aerated concrete bath is 1.5 hours due to the higher exchange moisture capacity of the structural material than wood. Par, as in stone, is 4 – at best.
The device of the sauna stove screen
To properly design and make a brick convector screen for a sauna stove with your own hands, you need to take into account 3 factors: the thickness of the screen, the gap between it and the stove body, as well as the number and location of vents. For simplicity, we take the air gap equal to the size of the butt part of a single brick, i.e. 120x65 mm. Blowing air into a one-and-a-half brick 120x88 mm does not noticeably change the results of convection calculations.
Note, just in case: the widest sides of a brick are its beds. Narrow long ones - spoons (emphasis on “and”). Narrow short (ends) - pokes, emphasis also on “and”. Accordingly, brickwork can be either spooned, when the spoons are visible from the outside, or bonded. SNiP does not recognize “bed” wall masonry due to its insignificant strength, but as for the screen for the stove, see below.
Thickness
The thickness of the screen is usually half a brick. To make it thicker - the effect of thick cladding described above is possible: we heat and heat, there is no steam. A quarter-brick screen (“bed” masonry) will save time, material and weight of the cladding. The latter will also simplify the installation of a stove with a screen, see below. There are no sanctions for a screen the size of a quarter of a brick, because... the design is not vital. But if you accidentally touch such a screen with a bucket of water, it may collapse.
Gap
The gap between the brick screen and the furnace is calculated simply: 3 cm + 2 cm for each kW of excess furnace power. If it comes out more than 12 cm - sorry, dear, with the stove you... rolled out too much. There is a limit to everything in the world, including technical capabilities.
The formula for calculating the convection gap gives an important consequence. Namely: if the stove is of suitable power, but the steam is still harsh, then a screen with a minimum gap of 3 cm will not harm at all. On the contrary, it will soften the steam; you just need to make it as ventilated as possible, see below.
Products
The number of vents with an obvious excess of furnace power is taken at 2 supply (below) and the same number of output (above) for each extra kW. This is approx. with a double margin, because You can always cover the vents. The supply vents are located closer to the wall, with 1-2 rows of bricks underneath them above the base of the stove, see below. The outlet vents in the screen are placed closer to the corner of the lining protruding into the room, pos. 1 in Fig.
Vents in the lining of sauna stoves
If a stove without a screen heats the steam room well and evenly, but the steam is slightly harsh, build a brick lattice screen, first bringing it to the level of the heater hearth, pos. 2. The steam is still a bit harsh - you can build higher in the same way. Also, a screen-grid with staggered vents is built around a horizontal round sauna stove (item 3), incl. with a clear excess of power, because The very shape of such an oven promotes the development of convection. The gap between the screen and the widest section of the body of a horizontal round sauna stove is taken to be minimal, 3 cm, for the same reason.
The vents in any brick furnace screen should be staggered. If the vents flow in straight or staggered rows (positions 4 and 5), then the convective flows will knock each other down and the screen will be ineffective. Curiously, a similar mechanism sometimes leads to explosions of rockets with many engines: an accidental weakening of the thrust of one of them leads to the suppression of its jet by the exhausts of neighboring ones. If the automation does not have time to slow down/accelerate, respectively. turbopumps, the combustion chamber overflows with a mixture of fuel and oxidizer, detonation, explosion.
Preparatory stage
Before laying brick over the fireplace insert, you need to go through a mandatory preparatory stage, which is as follows:
Preparatory work stage
Detailed description
Choosing a location
A fireplace insert lined with bricks must have the correct and most convenient location.
To do this, choose the most spacious room, with good ventilation and air circulation.
Pay attention to where the chimney is installed, if it is already in the house, based on this, determine a convenient place for installation.
If the fireplace has an oven or hob, it is recommended to place it in the dining room or kitchen.
Drawing up a project diagram
Covering a fireplace with brick requires a correctly drawn up and selected diagram, which will display the step-by-step process of work, according to which the heating unit will be assembled.
This procedure can be taken from the Internet, but it is better to seek help from a professional.
Calculation and purchase of building materials
The price of materials and different brands of bricks can be very different. However, it is worth noting in advance that the construction of such a structure is not the most inexpensive and budget-friendly.
According to the prepared diagram, calculate all materials, fasteners and accessories, purchase them with a small margin, since some bricks may have defects and damage that are not noticeable at first glance.
To make the frame you will definitely need a stove brick
You should not save money by buying cheaper silicate, as it does not tolerate high temperatures and their sudden changes.
You can either buy a mixture for masonry work or make it yourself. This composition should be based on sand, cement and clay, which, if desired, can be combined or replaced with plasticizers.
You can learn more about the preparatory stage of work by also watching the video in this article.
Brick for cladding
Suitable bricks for lining furnaces are red working brick or colored dry-molded facing brick. Sand-lime brick is not suitable: it will not withstand the “thermal swing” near the stove and is too heavy. The choice of brick design can be important when its heat capacity is not important (in the screen of a sauna stove), but weight and climatic resistance will be decisive. In this case, you need to know that 1 cu. m of masonry made of red working single solid brick for approx. 1.78 t, from one and a half hollow core approx. 1.35 t, and from front dry molding 0.85 t.
If the stove is lined with brick for decorative purposes and its heat is intended to fly into the chimney, the inner layer of the cladding should be laid from one-and-a-half hollow brick, it has the lowest heat capacity and thermal conductivity. It is advisable to cover a sauna stove with face brick: it is lightweight, resistant to moisture, temperature changes and allows you to get beautiful masonry with just a floor or a quarter of a brick. Statements that the screen of a sauna stove should have maximum heat capacity and breathe almost like wood are misconceptions; this is what the heater does. To get light dry steam from a metal sauna stove, you need a convector screen and nothing more.
Brick for furnace lining/cladding
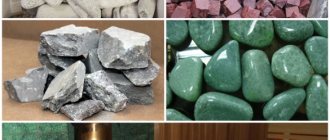
If the stove is lined with brick to increase the duration of heat transfer, then it should be lined only with solid single working brick - its heat capacity is the greatest. There is no need to take high-burnt bright red brick of the highest quality: it is expensive and its thermal conductivity is low. Burnt dark, swollen and warped brick is not suitable at all. You need to take moderately annealed working brick of 2-3 quality categories (grades); its low strength is insignificant in this case. Such a brick is light or pale red with yellowness (see figure); slight cracking on the surface is not a problem. When tapped with a plumber's hammer, it produces a dull sound with a short ringing sound.
The foundation is ordinary
Scheme of lining an iron stove with bricks: view from the dressing room.
If for some reason the installation of a columnar foundation causes difficulties, then a continuous structure can be made.
- A pit with a depth of 0.25 - 0.3 m is built.
- According to the above scheme, a solution is made with the only difference that it is better to bring it to a more liquid state.
- The hole is filled with crushed stone or broken bricks and filled with mortar.
- All this needs to be compacted.
- After drying, lay 1-2 bricks.
Note. Regardless of the type of foundation (columnar or regular), all work must be performed using a building level. After completion of the work, the surface should be ideally parallel to the axis of the earth.
Having completed all the work of the preparatory stage, proceed to the brick lining.
Masonry mortar
The inner surface of the brick lining of the stove can heat up to 350-400 degrees, so a regular cement-sand masonry mortar is only suitable for the screen of a sauna stove, spaced at least 7-8 cm from its body. In other cases, you need to use a clay-cement mortar, because stove clay is fragile and hygroscopic.
To prepare a solution for lining a stove with bricks, you must first sift the dry clay through a sieve with a mesh size of 1.5 mm. Next, the fat content of the clay solution is adjusted:
- A test portion of clay is mixed with mountain or ravine sand of fraction up to 1 mm in a 1:1 ratio by volume.
- Cover with water and knead until the dough becomes thick.
- Roll into a rope (sausage) approx. thick. 2 cm and length approx. 30 cm.
- Allow to dry not in direct light for 1-3 hours at a temperature of 30-15 degrees, respectively.
- Bend the tourniquet into a ring.
- If the rope is deeply cracked in several places or broken, the initial (base) solution is thin, you need to add more clay.
- The tourniquet bent smoothly or only the dried crust cracked - the base solution is greasy, you need to add more sand.
- The tourniquet cracked more or less evenly along its length to no more than 1/4 of the thickness - the fat content of the base solution is optimal.
A test portion of the working solution is prepared by replacing 1/8-1/3 of the clay with cement from M400; Usually they give 1/5 to start with. The dry mixture is gradually mixed with water, kneading until the cream becomes thick. Then check the solution for fluidity: dip a clean trowel into it and remove it, holding the nose down. There are 3 possible cases here:
- The solution drains, leaving stains on the trowel or completely exposing the metal - there is a lot of water;
- The solution drains, leaving a lumpy layer with lumps on the trowel - there is not enough water;
- The solution drains, leaving a thin, even layer of water in moderation.
Now you need to check the solution for stickiness (adhesion); This is important for laying half/quarter bricks. Take a brick, dip it in water, and apply a 3-5 mm layer of solution onto its bed with a trowel. Immediately take a dry brick and place it on a layer of solution, without pressing down, immediately lift it. The mortar should not stretch behind the dry brick; sticking of several small, match-head-sized lumps is acceptable. If the mortar follows the dry brick, the proportion of clay in the base mortar must be reduced, respectively. increase the proportion of cement.
Next, the dry brick is again placed on the mortar, tapped with the handle of a trowel and left for 5-6 minutes. They try to lift it, the wet brick should rise with it. If it remains lying or gradually comes off while hanging, you need to add more clay in the base solution and, accordingly. less cement.
Preparing pipes and parts
The oven has an outlet of 14 convection pipes. The diameter of the chimney outlet is 200 mm; we purchase it ready-made from a corrugated ventilation pipe.
For manufacturing we will need to prepare several parts. From 4 mm sheet steel we cut out:
- 2 side parts measuring 800/950 mm. The second dimension is the height of the structure;
- For the front and rear walls, we use a grinder to cut out parts 1110/670 mm. After final assembly, the protruding metal will be cut off and can be used as reinforcement for the base;
- for the top we cut out a piece measuring 350/950 mm. It is necessary to mark 6 holes of three pieces on the narrow sides and drill or cut them by welding. Pipes with a diameter of 40 mm will come out of them;
- for 2 side jibs, cut the workpiece to a size of 200/950 mm;
- for the base you can use a corner with a 100 mm shelf or a channel. 2 pieces 950 mm and 2 lintels 470 mm each. It is necessary to make holes in the base for the pipes, which must be coaxial with the top ones;
- For convection pipes we use steel parts with a cross section of 40 mm. 6 of them are straight, they run along the front and back walls. There are 4 holes on the jibs. 8 pipes will need to be bent to a certain angle. It is better to do this on a pipe bender.
You will also need to leave a sheet for making a door and an ash drawer. To make a grate, you can use a sheet 10 mm thick, making longitudinal grooves in it with a grinder. You can weld a grid from reinforcement or a rod with a diameter of 8-10 mm.
To install the grate, we will prepare several pieces of corner. It is better not to secure the grate tightly; this will make it easier to replace and maintain the stove. A hole is marked on the top part and made for connection to the outlet pipe. You will need to prepare a section with a cross-section of 180-190 mm and a length of 170 mm.
About round ovens
A horizontal round sauna stove, as mentioned above, does not require cladding, but the construction of a screen around it. How to line a round stove with bricks to increase the duration of heat transfer is illustrated in Fig. Below is an example of a horizontal furnace with a flat bottom; Here you can see all the main technological methods of this type of work:
Brick lining of a round stove
- The cushion under the stove is laid with working bricks on a clay-cement solution, and on it with fireclay on a clay stove (highlighted in tone).
- To the level of the greatest width of the body, the masonry is carried out from the bottom up, first with thin fireclay bricks (fireclay tiles) with dowels hemmed onto a wedge.
- The vault is laid out from sectored fireclay bricks. The thickness of the seam must be maintained within 3-6 mm, respectively. choosing the standard size of the sector brick.
- The seams of the fireclay masonry are cut to a depth of 3-5 mm.
- After the fireclay masonry has dried, it is coated with a layer of clay-cement solution approx. 5 mm.
- If the oven is large, the coating is done with belts so that the outer lining of working bricks is laid on top of the mortar that has already begun to set.
- The thickness of the seams of the external cladding is maintained within the range of 5-12 mm, for which the beds of facing bricks are oriented along the longitudinal axis of the furnace or across it.
As for vertical round stoves, most often they can be lined using mostly sector bricks, unless the stove is located close to the wall. But, generally speaking, there is no need to line such stoves with brick. Almost all vertical round stoves are channel or bell-type stoves in a steel case. Brick cladding will only ruin their heating technology. Such stoves need to be made beautiful by stripping/painting, tiling/porcelain tiles, etc. in ways that do not disturb the heat cycle of the stove.
The lineup
These stoves are intended for individual use at home or in a bathhouse. There are six main models of the furnace mechanism:
- Student.
- Engineer.
- High school student.
- Professor.
- Assistant professor.
- Academician.
Important! Professor Butakov’s installations have the same operating principle. They differ only in power and size
The maximum permissible power of the installation should not exceed 55 kW. Serial production is aimed only at the production of Student, Engineer and Associate Professor furnaces. To obtain other models of stoves, you will have to place an individual order.
The entire range of Butakov stoves has a beautiful design that will suit almost any interior.
High school student
Model "Gymnasium student"
The chimney outlet is located in the upper part of the body, which saves space in the room. However, this design has significant disadvantages: condensate and soot fall directly into the furnace;
It is inconvenient to clean the chimney, because... Each time you have to take it out of the oven, which is quite problematic.
The Gymnasist-1 modification features a design without a hob.
Characteristics:
- Power - 5 kW
- Efficiency - 85%
- The size of the heated room is 50-100 m³
- Weight - 34 kg
- Dimensions - 400x500x500 mm
- Wall thickness - 2.5 mm
- Firebox volume - 60 l
- Chimney pipe diameter - 115 mm
- The cost, depending on the modification, is from 4800 to 6800 rubles.
Model "Student".
Student
One of the most common models, ideal for country houses and small private houses, as well as for well-insulated larger private houses. The heating stove of Professor Butakov Student has an increased diameter of pipes, as well as a smaller thickness of their walls, which allows for increased heat transfer, because The “live” cross-section for air movement through the pipes increases in this case from 35% to 70%.
Characteristics:
- Power - 9 kW
- Efficiency - 85%
- The size of the heated room is 150 m³
- Weight - 57 kg
- Dimensions - 370x545x650 mm
- Firebox volume - 74 l
- Chimney pipe diameter - 120 mm
There are 3 modifications of this model:
- wood-burning with a metal door, price - 11,900 rubles;
- coal with a metal door, price - 12,800 rubles;
- with a cast iron door with built-in glass, price - 13,900 rubles.
Engineer
Model "Engineer"
It is the most popular model from the entire model range, because... ideal for private houses and cottages, as well as for small industrial premises. Just like the “Student”, the “Engineer” design consists of convective pipes of increased diameter with thinner walls, which also significantly increases the heat transfer of the furnace.
Characteristics:
- Power - 15 kW
- Efficiency - 85%
- The size of the heated room is 250 m³
- Weight - 75 kg
- Dimensions - 440x645x800 mm
- Firebox volume - 120 l
- Chimney pipe diameter - 120 mm
- Cost - wood: 16,000 rubles; coal: 16,700 rubles; with glass door: 17,700 rub.
Assistant professor
Model "Associate Professor"
This model is mainly used for heating warehouses and industrial premises, as well as large private houses.
Characteristics:
- Power - 25 kW
- Efficiency - 85%
- The size of the heated room is 500 m³
- Weight - 143 kg
- Dimensions - 570x800x1000 mm
- Firebox volume - 250 l
- Chimney pipe diameter - 150 mm
- Cost - from 28,000 rubles
Professor
Model "Professor"
Characteristics:
- Power - 40 kW
- Efficiency - 85%
- The size of the heated room is 1000 m³
- Weight - 57 kg
- Dimensions - 670x1110x1250 mm
- Chimney pipe diameter - 200 mm
- Cost depending on modification - from 32,500 rubles.
How to lay bricks
Reinforcement of brickwork seam
It is unacceptable to bandage the seams of masonry with fireclay and working bricks due to the large difference in the values (modules) of their thermal deformation coefficients TKR. It is highly advisable to lay continuous horizontal seams of masonry in the floor, and especially in a quarter brick, with a steel reinforcing mesh 1.5-2 mm thick, see fig. on right.
The thickness of the joint made of clay-cement mortar must be maintained within 3-6 mm. The widening of the diverging seams of the lining of a round stove is allowed up to 6 mm for clay mortar and up to 12 mm for clay-cement mortar. This is achieved by orienting the facing bricks along or across the longitudinal axis of the furnace.
Before placing each stone in place, dip it in clean water for 10-30 seconds; There is no need to soak them for a long time. Excess mortar that appears is immediately removed with the edge of a trowel. When traces of the solution on the face of the masonry have dried, it is washed with a soapy solution using a stiff hair brush, and then twice or thrice with clean water.
Stove pillow
It is useful to place any stove on a brick pad, as long as the weight calculation of the load-bearing capacity of the floor or the base of the stove allows it. The cushion under the stove greatly reduces the thermal load on the floor/base of the stove and increases fire safety.
Bandaging seams in a brick stove base
The question of a pillow under the stove already relates to the topic of installing stoves, but here we cannot ignore such a crucial moment as dressing the masonry seams in the pillow. It is needed both in the row and between the rows, if the pillow is more than one row. In a row, the seams are most reliably tied according to the so-called. circular pattern, symmetrically relative to the center and axes of symmetry of the pillow, on the left in Fig. Inter-row dressing of a square pillow in a circular pattern is obtained by rotating the same pattern by 90 degrees for each subsequent row.
Scheme of the stove base for decorative brick cladding
A pillow under a stove with decorative lining is most often required to be T-shaped, see fig. on right. It is quite difficult to develop a single-row dressing for it, so in a row up to 2 untied seams are allowed opposite each other and approx. in the middle of the length of the pillow, in the center in Fig. higher.
If, in order to save material and work on chipping bricks, the pillow under the stove is not tied at all (on the right in the figure above), then this is frankly rude hackwork. Such a pillow will only aggravate the negative impact of the stove on the structure of the building and its fire hazard.
What to do with weight?
A U-shaped fence 1 m high in half a brick with a niche 1x1.5 m in plan for the stove is exactly a cube of brickwork. Its weight together with the stove is more than a ton or two. The load-bearing capacity of the floor in residential and utility rooms is 250 kg/sq.m. m. From here it is clear that lining a metal stove with brick is equivalent to installing a stove in an existing building. This matter is very complex and requires separate consideration, although there are twists here that often make it possible to do without major construction work. In this publication, it would be appropriate to provide a diagram for installing a sauna stove with a brick screen, which allows you to avoid building a separate foundation for the stove weighing, together with the lining and base, up to 1.6 tons. The initial requirements for the design of the building and the stove are as follows:
- The dimensions of the room with the stove are up to 2.5x4 m in plan.
- The stove is on legs or other structures that do not necessarily require installation on a brick pad.
- Installation of the stove - on the ground floor no further than 1.5 m from any load-bearing wall. For the vast majority of steam rooms, these conditions are met.
- The foundation of the building is strip.
- The load-bearing structure of the floor is beams made of timber from 150x150 in increments of up to 0.8 m, supported along the length by columns made of brick or concrete in increments of up to 1.7 m.
- Across the floor beams there are logs made of 150x50 timber in increments of up to 0.6 m.
- Between the joists there is a subfloor made of 100x25 boards on 30x30 cranial blocks.
- Along the joists - the finished floor is made of the same board.
The supporting structure of the furnace base in this case (pos. A in the figure), firstly, is a square panel made of tongue-and-groove boards 150x40, covering at least 4 joists, i.e. from 1.8x1.8 m. The shield must be exactly a shield - solid, durable, assembled in advance, and not boards lined together in place. The diagram of its attachment to the floor is given in pos. In Fig. Plywood cannot be used; due to thermal deformations it will delaminate and lose its elasticity. The backing boards should be oriented perpendicular to the floor boards.
Installing a sauna stove on a floor without a foundation
The fire blind area complements the supporting furnace system not from a simple sheet, but in the form of a flat steel box with flaps; fastening them to the floor - at least at 5 points each, pos. B. All together, incl. a damper made of roofing felt and asbestos causes the load from the furnace in the screen to spread far over the floor area. The backing for the brickwork is basalt cardboard, impregnated with a liquid, fat-free kefir-thick clay mortar without sand.
One of the sides of the box-shaped blind area can be without a flap, then the stove can be moved 25 cm to the wall. In this design, the gap between the wall and the blind area must be coated with greasy clay or other plastic fire-resistant compound to prevent sparks from getting under the flooring. In this case, the back wall of the furnace screen should be blank, without vents.
Types of wood stoves
A wood stove is a universal device that can heat a small house and be connected to the heating system and water supply. Before purchasing, you need to study the features of the classification of heaters.
According to case material
Metal wood-burning stove for heating a house
Depending on the material of manufacture, a wood-burning stove can be:
- Cast iron. The thermal capacity of the housing and its ability to accumulate thermal energy ensure the operation of the device as auxiliary heating. A corrugated chimney or sleeve is designed to remove combustion products. The cast iron unit is equipped with a blower system to maintain temperature for a long time.
- Metal. Stainless metal reduces the time it takes to heat the air in the room. When purchasing, you should focus on the thickness of the walls - thin ones cool down very quickly. Structures with thick seams are less susceptible to cracking.
- Brick. It is built as the main source of heat and is equipped with a serpentine-shaped smoke pipe. Despite the long heating time, the brick can retain thermal energy for several hours.
Depending on the chimney design
External chimney for stove
The chimney pipe removes combustion products and, depending on the installation method, can be internal or external. In the first case, it is located outdoors and has good traction. External systems are not routed through the roof and are used for aesthetic purposes.
Based on the type of construction, several types of chimneys can be distinguished:
- Wall. The lower part is combined with the foundation of the wall. The chimney is made of brick.
- Root. It is installed on a separate base near the outer wall, equipped with a brick or ceramic liner.
- Sandwich. The single-layer pipe has the form of a nozzle and is quickly mounted on a fireplace or stove.
- Coaxial system Schindel. A two-pipe design that injects air in a counter-current manner and removes combustion products.
By type of design
Brick stove with stove bench
Reliable hearth stoves operate on wood and are designed to heat a home of any size. There are several types of devices based on their design.
A stove with a closed heater is suitable for installation in saunas or baths if it has a special compartment for laying stones. The heater is heated by convection or with an open flame. The water circuit is represented by a tank with pipes.
Russian stoves are made of brick and equipped with a sleeping place - a stove bench. The combustion chamber is located under the stove bench, the stove is next to the firebox. The heating intensity is adjusted through the blower. The Russian stove runs on a large amount of fuel and efficiently heats a room of more than 40 m2.
Depending on the location area in the room, you can select fireplaces:
- Angular. Models with a built-in or attached chimney are placed in the outer corner. Rectangular or square are distinguished by a wide fireplace podium with a niche for fuel.
- Wall-mounted. The back of the structure is located near the wall. The average size of the base is 75x125 cm, which is suitable for living rooms in a small house.
- Island. They are built on a separate foundation in large rooms. Perform zoning and heating functions.
Depending on the functional purpose, you can choose a fireplace stove for a wood-burning sauna or a design with a hob.
Swedish stove for home heating and cooking
Swedish stoves are distinguished by a rear chimney outlet and are classified according to the type of section into several types:
- Vertical. Smoke exhaust duct with 2-3 elbows and a cleaning door.
- Horizontal. It is laid out horizontally, has at least 2 bends and heats up evenly.
- Kolpakovy. Warm air masses are retained in 2-3 chambers, the shield heats up evenly.
Fuel combustion duration
A stove or fireplace with a long-burning system operates by burning pyrolysis gases, but wood-burning models are also divided into several types:
- With water circuit. They warm up large rooms efficiently, since the water type circuit is connected to heating radiators.
- No outline. Equipped with an afterburner chamber and a plate deflector. Primary air masses ignite the fuel, secondary air is supplied to the afterburner.
The long-burning system allows you to operate the stove with one load for 3-8 hours.
Do you need a cast iron brick?
The thermal advantages of cast iron stoves are great and undeniable, see the video below. Is it possible to improve a cast iron stove with brick lining? No way. First, cast iron is already a very good material for a stove. Lining a cast iron stove with bricks is generally the same as covering a brick stove: there will be no visible effect, but there is a lot of work and expense.
Second, cast iron is a brittle material with a large TCR. Under a brick lining, any furnace overheats beyond what is specified according to the specifications. The best structural cast iron (there is also raw cast iron for conversion into steel) will soon crack in a furnace under a brick. If a cast iron stove needs to fit into the interior, then the optimal means for this is decorative elements separate from the stove or overhead decorative elements made from cold forged parts.
What to make it from?
Several variants of furnace designs have been developed. This can be a simple barrel in which firewood is placed on top and the air flow is blocked by a gate valve. It will take more time to produce an analogue of industrial samples with a system of convection pipes and a separate gas combustion chamber.
The simplest and most uncomplicated scheme is a Butakov stove made from a gas cylinder. In this option, you can do without convection pipes or use 2-3 convection inserts.
We will examine in more detail the production of an analogue of an industrial design with a rectangular shape and a complete circuit of convection tubes and a system for long-term pyrolysis burning of wood. This design is the most productive and economical.
But during the manufacturing process it will be necessary to perform turning and drilling work. You can take the dimensions and bend angle from industrial sample pipes. The amount of material required for work depends on the chosen option and the dimensions of the furnace.
Features of application
Consumer reviews about Polinor insulation are quite common, which is explained by the ease of its use. The principle of working with it comes down to the following:
- Preparing the working surface for further finishing. To do this, you need to rid it of stains, dirt, and thoroughly moisturize it.
- The cylinder with insulation must be in the room at a temperature of at least 18 degrees.
- Before work, you need to put the special nozzle that comes with the kit on the cylinder until it clicks.
- Remove the cover from the cross and screw the gun onto the base. By the way, it is not included in the package. During this procedure, the balloon must be held vertically.
- The container is thoroughly shaken.
- Sprayed insulation is easily applied by dosing by pressing the gun trigger. You need to spray a layer no thicker than 5 cm.
It is recommended to shake the container during operation. To clean the gun after completion of insulation, you need to use a special liquid PULP Cleaner.
Due to its ease of use, Polinor insulation is very popular in everyday life. The instructions for its use are simple, so even a novice user can handle it. As already mentioned, the material can only be applied to a cleaned surface. Moreover, if you are working with a galvanized profiled metal sheet, you must first wipe its surface, remove all stains and oil film, which is always present on the metal due to the peculiarities of the technological process. Heating the aerosol is necessary so that the mass in the container does not freeze and is sprayed evenly.
Types of stove heaters
There are a lot of stoves for summer cottages into which you can load firewood. But based on the material from which the stove is made, they are divided into two types.
Table 1. Efficiency of different types of furnaces.
| Type of oven | Efficiency |
| Dutch oven | 45 — 55 % |
| "Swede" | 50 — 60 % |
| Iron potbelly stove | 60 — 70 % |
| Long burning stove | 80 — 90 % |
Brick ovens
Such structures are built from refractory brick - red, which is not afraid of temperature and does not crack from heating. Hollow bricks are used to lighten the load on the foundation. The furnace can have different shapes and configurations; not only its dimensions, but also its efficiency and degree of fuel combustion depend on this. The well-known Russian stove is also made of brick, and then coated and whitewashed. But it is not suitable for a modern dacha: it is too large and heavy, difficult to build, and in addition, it must be constantly heated. After complete cooling, it will heat the room only after a few hours.
More compact options with quick heating are much better suited for a country house: “Dutch” and “Swedish”. Both of these stoves do not require rough construction; heat is emitted by walls with a chimney duct running inside them. The heat transfer of the furnace, the degree of fuel combustion and other factors depend on the number of elbows and bends in the channel. Any summer resident can build such stoves with his own hands if you follow the instructions.
You can lay out a brick oven according to your design
Metal furnaces
The material for these products is cast iron or steel. Cast iron structures are good because they have thicker walls with a porous structure. Once heated, they cool down more slowly, continuing to give off heat. Steel ones have their own advantage - they weigh less, since the steel is stronger, and the walls of the furnace are made thinner. Such a stove, having gone out, quickly cools down, but also heats up in a matter of minutes - just right for a small house.
Market Review
Steel stoves include a potbelly stove - the simplest cylindrical stove with one door and a chimney made of a simple pipe. If you have the materials, you can do it yourself using a home inverter welding machine. At dachas they also install more complex structures - Buleryan and Butakova stoves. Their configuration allows the stove to operate as a convector, pumping air through flame-heated pipelines. Such systems are characterized by a very high warm-up rate.
The main advantage of metal stoves is that they are ready-made; you just need to pick them up and buy them. On the other hand, the price may be higher than when laying a brick oven yourself.
The iron stove is ready for use
Masonry
The production of fitting brickwork is carried out “dry” without mortar. The fitting masonry is made directly on the floor close to the parallelepiped frame with gaps between the elements of 7 mm.
Upon completion, a contour of the brick cladding is outlined on the floor for further laying it with mortar. Angles must be constantly monitored horizontally and vertically.
Work begins from the corners, constantly checking their horizontalness. Nails are driven into the side seams of the fireplace to tighten and secure the cord for laying an even row of cornices without deviations. Between the brick gap is filled with mortar.
What tools are needed?
For high-quality masonry, you must prepare the following tools in advance:
- Trowel (trowel) . This is the main tool for masonry, with which the mortar is applied and its excess is removed. If necessary, you can tap the element with the end of a pen.
- Pick hammer . With its help, the position of the brick is adjusted and split into pieces of the desired size.
- Joining . Designed to organize seams and give them an attractive appearance.
- Order . It is a set of a rail, a holder and a wedge. With its help, the height of the masonry is ensured.
- Rule . The tool is needed to level the surface of the base.
- Mooring cord . With its help, rows are aligned horizontally.
- Measuring and control tools - building level, plumb line, tape measure, square, metal ruler.
We recommend: Features of the design and construction of private brick houses.
How much does a one-story brick house cost? When carrying out brickwork, it is important to qualitatively prepare a brick element of the required size. An experienced master carefully performs this operation with a pick. For a less experienced person, it is better to use a grinder, which allows you to evenly cut the brick according to the markings.
In addition, when preparing the solution, it is advisable to use a construction mixer , which ensures uniform mixing. If you need to install additional fasteners, you will need an electric drill .
More on the topic: How to make a concrete mixer with your own hands?
Buying tips
In order for an ignorant user not to make a mistake when buying a stove, it is necessary to know how the original Novosibirsk Termofor product differs from a fake. Considering that the product is designed for long-term combustion, high-quality material is used for its manufacture: thick steel for the body and durable cast iron for the grates and doors. It is the design of the firebox door that is the main difference between the original and the fake.
Depending on the modification, the cost of the structure starts from 15,000 depending on the model. Considering the high functionality and efficiency of the devices, the price of Professor Butakov’s “Student” stove is quite adequate, which allows everyone to economically heat their country houses.
Requirements for facing materials
A furnace is a structure whose materials work under emergency conditions. Facing is no exception. There are certain requirements for the finishing material of the stove. He must:
- Withstand high temperatures.
- Possess the property of high heat transfer.
- Be resistant to mechanical damage.
- Have good adhesion to the fastening solution.
- Be attractive and have an aesthetic appearance.
Experts recommend lining stoves with brick, ceramic tiles (terracotta or majolica), tiles or natural stone (marble, basalt, sandstone, slate and granite). More recently, the use of soapstone and artificial stone has become popular. Some resort to the simplest methods, such as plastering or painting.
Photo gallery: beautiful stoves
You can combine different types of cladding
Painting the stove and applying patterns can be an economical decoration option.
Brick finishing looks very aesthetically pleasing
Ceramic tile finishing is most often done
Covering the stove with tiles will make it unique
Natural stone in the finishing of the stove looks very status
Why is there a need for finishing?
The iron stove is quite efficient, heats up quickly and takes up little space. In addition, it is quickly installed without additional costs. All this attracts owners of country houses and bathhouses. However, during operation, serious shortcomings , which, with frequent use of furnaces, become a significant negative factor.
The need for external cladding of metal furnaces is caused by the following circumstances:
- The metal heats up very quickly, but also cools down quickly, which requires constant heating during operation of the furnace. This is especially inconvenient in a steam room, when during a long procedure there is not enough fuel. The result is excessive fuel consumption .
- The metal casing becomes very hot, which can cause burns when touched . Furnaces are usually fenced off to prevent this, but the risk is quite high.
- Excessively heated metal is characterized by hard thermal radiation with a significant infrared component. Such radiation “burns” the oxygen in the air and has a harmful effect on humans if they stay in close proximity for a long time.
- An overheated metal casing has an increased fire hazard . If flammable substances accidentally come into contact with it, a fire will occur.
The outer lining of the furnace eliminates these disadvantages. Various materials can be used for this purpose (for example, ceramic tiles). The greatest effect and attractive, aesthetic appearance is provided by brickwork.