The strongest argument that supporters of organized recreation use in disputes with “savage” tourists is the lack of normal hygienic conditions. A particular problem is the inability to wash well - the water is cold, the dirt is not washed off, but is only distributed in an even layer. However, for experienced tourists this is not a problem.
5/5 — (1 vote)
If you have the skills and abilities, you can create quite comfortable conditions for yourself and even organize a very high-quality and functional bathhouse. People whose specific profession requires frequent exposure to field conditions have the ability to create a bathhouse from a minimal amount of available materials. It's not that difficult, it just takes a little time and effort. Let's take a closer look at this issue.
How is it arranged?
First of all, you need to understand the principle of operation of a conventional bath. There is a room that is thoroughly heated by lighting the stove. Then, in the steam room, a ladle or two of water is poured onto the heater, creating a specific microclimate - high temperature and humidity.
If there are no walls that require long-term heating, all that remains is to heat the heater efficiently. It consists of ordinary stones stacked into a dome. A fire is made inside it and burned for several hours, heating the stones. This point is the most important - the more you can heat them, the longer and better the bath will be.
All the time you need to monitor the combustion mode, add firewood, check the uniform heating of all areas of the heater.
When the stones are sufficiently hot, you need to remove the remains of the fire from the dome. To do this, take a shovel and carefully remove the burnt coals and ash through the firewood supply hole. It is necessary to remove all remnants of the fire - this will make the bathhouse better and the air in it cleaner.
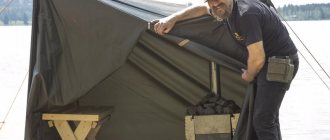
The next step is to install a tent or awning over the dome of hot stones. It should be a tent with a tightly closing canopy to prevent heat loss. All that remains is to go inside, close the curtain and splash water on the heater. Steam will come out, and a typical steam room microclimate will appear in the room.
If the stones are heated well enough, you can repeat entering the camping steam room several times - experienced people say that you can do this up to 10 times if the stones are massive and well heated.
Most often, the heater’s energy is enough for 3-4 passes, which is quite enough to thoroughly steam and wash.
Arrangement of the hearth
The main element of a camp sauna is a heated heater. It must be assembled in such a way that there is free space inside for a fire. Externally, this structure resembles an Eskimo dwelling - an igloo. A hole is made on the side and bottom for storing firewood, and a small hole is left on top for smoke to escape.
It will still come out through the cracks between the cobblestones, but a separate hole will reduce the amount of soot on them. This is important, since when water is supplied, this soot can create an unpleasant suspension in the internal air of the bathhouse. It will cause a sore throat and pain in the eyes, therefore, it is better to organize a more intense outlet for the smoke.
Expert opinion
Lovkachev Boris Petrovich
Bath master who knows everything about steaming
Laying stones is a complex procedure. Experienced tourists try to choose massive but flat cobblestones, which are easier to stack on top of each other and create a specific structure. At the same time, the choice of stones must be correct - you need dense and hard pieces of rock.
Light and layered stone is not suitable - it does not retain thermal energy well and can crumble from the very first ladle of water. Pebbles collected on the banks of rivers or lakes perform well. However, its shape complicates the installation of the dome.
Some users simplify their task by using auxiliary items when making a heater. Most often, ordinary grates are used, which are laid on a vertically laid closed wall with an outlet for stacking firewood.
This wall is made according to the size of the future fire, so that there is enough space inside for fuel. A layer of stones is then placed on top of the laid lattice, forming the top of the dome.
This option allows you to get a stable and fairly efficient heater that can retain heat for a long time. However, you will have to carry the grill with you, which means extra weight for hikers.
There is another design option for the heater. Take a piece of chain-link mesh or similar mesh (preferably made of stainless steel). It is recommended to choose a section based on the size of the backpack to make it easier to pack and not take up too much space. Before organizing a camp bath, the mesh is rolled into a pipe and the edges are connected with wire. Cobblestones are placed inside, resulting in a neat cylindrical heater.
The fire is lit around the cylinder, heating it from all sides. When the stones are warm enough, the cylinder is rolled out of the fire and rolled into the tent. The advantage of this option is that there is no need to assemble the dome and remove the fire after heating - it can continue to burn, heating another heater. If a large group takes part in the hike, this option is very effective and practical.
Homemade stove
If you travel by car, you can carry a camp stove. This is a metal structure, made by hand (usually) and is a firebox with a closing door and an attached chimney; there is only no tank for heating water - as a rule, it is not used to save space.
If possible, take a separate container with you - place it on the stove and heat the water.
Such a stove is convenient not only for organizing a camp bath. It can be used in any parking lot for washing dishes or carrying out hygiene procedures. You can heat your winter hut or tent if its size allows it.
As a rule, assembling a heater when using a stove is a fairly simple process - the entire body is covered with large pebbles, trying to pack them more tightly for more efficient transfer of thermal energy.
Some stoves are made with a special tray in the upper part of the body. You can put cobblestones in it and get a quite effective and small heater.
Basic formats
Devices of two schemes are very popular - “Beg” and “Poshekhonka”. All stoves for tourist baths, one way or another, belong to one of these two versions.
“Poshekhonka” is a particularly compact stove. Its dimensions are 0.3x0.3x0.5 m, weight is 8-9 kg, depending on the nuances of the design. To make Poshekhonok, stainless steel sheets 0.08 cm thick are used.
This design is completely disassembled. You can shoot:
- legs;
- insulating screens;
- fire door.
After dismantling, all these elements are placed inside the stove. The product is equipped with a pipe with two elbows with a total length of 1.5 m. Such a device ensures ease of installation of the pipe in any convenient place in the bathhouse. Although there is no heater here, there is a flat surface on top, on which stones also rest well. A special feature of the design is the air intake, thanks to which firewood can burn for a long time - up to 6 hours in a row. Side screens not only prevent accidental touching, but also help improve heat transfer.
The design of “Bereg” is noticeably different from “Poshekhonka”. In this version, the combustion chamber is thicker, and there is a characteristic bevel at the bottom. And also thanks to the monolithic casing, effective containment of entrained heat is guaranteed. From 20 to 25 kg of stone are placed in the “Bereg”.
The removable door has an opening that allows you to vary the air flow rate. This solution, coupled with the absence of hinges, made the oven more convenient. Some modifications may have a removable water tank with a capacity of 12 liters. Both the legs and the pipe can be detached. They can be put away in a case without any problems.
The top of the "Berega" firebox is equipped with a spark absorber. This device ensures safe operation of the stove. The total weight of all components reaches 11 kg, which is very light compared to other models.
Folding camp fires can heat a sauna to 80 or 100 degrees in a maximum of 40 minutes, achieving good steam. But not all people prefer to buy ready-made devices - many people prefer what they do with their own hands.
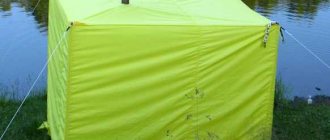
Setting up an awning or tent
Heating the heater is an important stage in arranging a camp sauna, but not the only one. It is also necessary to make a closed room so that the heat does not escape and the microclimate of the steam room is preserved.
As a rule, two options are used to create this assistance:
tent with a frame made of duralumin tubes;
a tarpaulin awning or polyethylene (polypropylene) film stretched over a frame of interconnected poles.
The first option is convenient and practical. A tent is always needed on a hike, and it can be used for an hour or two to organize a bathhouse. However, only a fairly high tent is suitable here - the bathhouse room should not be too small, otherwise you can get burned on the heater.
The second option is convenient because you only need to carry a rolled piece of polyethylene (or other fabric) with you. The poles can be cut anywhere, and tying them into a frame and stretching the film on top takes just a few minutes.
It is necessary to ensure that the tent is airtight. Usually its lower edges are covered with earth, providing additional stability and protection from gusts of wind. In addition, you need to make a fairly dense canopy. As a rule, it is laid with an overlap so that the left and right edges of the canvas overlap each other by at least 50 cm.
Ready-made models
There are ready-made kits of accessories for sale for assembling a camp sauna. Usually in retail chains they are called “mobile sauna-tent”.
The kit includes:
awning;
tent frame;
door frame;
transport bag.
The number of such kits is very large; there are offers costing from 6,000 rubles to 45,000 and above. The difference between them is the size of the tent, its height and the presence of additional parts. However, they are all some kind of regular tent.
For all models, it is also necessary to purchase or manufacture a stove. In general, the cost of a ready-made camping bathhouse set can range from 16,000 to 80,000 rubles, and even more.
This is only available to fairly wealthy people. Considering that it is impossible to carry these accessories on yourself, the option with a ready-made sauna tent is only suitable for tourists traveling by car (with a trailer, if possible).
There are manufacturers from whom you can order a complete set of baths, including a stove, shelves, a water tank and other accessories. However, all additions increase the overall price of the kit and are quite expensive.
Therefore, the demand for them is limited, and the reasons for this limitation are not only money, but also the size of the kits. Even when rolled up and packed, one such set can completely fill a spacious car trunk.
Special stoves for camp baths
If you most often travel by car, a smart decision would be to purchase a ready-made mobile sauna stove. It is quite compact and light weight. It requires much fewer stones to work (many people carry them with them so as not to waste time searching).
Such stoves are equipped with a spark arrester, which is very important when used in tents made of flammable material. They have a fairly attractive appearance.
Pipes for the chimney are included; most often, tents have special holes for their installation.
Compact camp stove for sauna
Frequently asked questions and answers to them
Users who are interested in the idea of organizing a camp sauna often have the same type of questions. If they are of interest to almost everyone, it would be advisable to answer them immediately and save users time searching for information.
How long does it take to heat up a medium sized heater?
The duration of heating depends on various factors - the size of the fire, the type of fuel, the configuration of the dome itself (or another type of heater). On average, it takes at least 3 hours, but if you use an oven, you can speed up the process by about a third.
Is it necessary to remove the fire from the dome, or can you let it burn out and put it out?
The presence of coals inside the dome is not important, but it is strongly recommended to remove them. There is always a risk of the presence of smoldering coals that produce carbon monoxide. Getting poisoned while traveling is an extremely undesirable and dangerous event, therefore, it is better to be on the safe side.
Where is the best place to install a camp sauna?
The best option is on the gently sloping shore of a lake or river, where you can cool off after the steam room and wash. It is recommended to first examine the bottom and make sure there are no sharp stones, holes, or a sharp increase in depth. However, you should not install a sauna in the lowlands - there are many mosquitoes there, turning pleasure into a serious test.
If I use plastic film, will it melt from the heat of the heater?
The heater should not be installed in close proximity to the fireplace. It is necessary to maintain at least a small gap - from 30 cm. If there is one, there is no need to fear for the integrity of the canvas.
Is it correct to light the fire first and lay down the stones, or vice versa?
It is difficult to lay a dome on a burning fire - it is easy to get burned, smoke and sparks get in the way. It's easier to first make a dome and then build a fire.
Features of visiting hiking steam rooms
We looked at how to make a sauna while camping, but we should note the basic rules that should be followed to ensure safety and achieve the best effect:
- Until the firewood burns out, one of the walls or the ceiling should be left open to prevent the accumulation of smoke and carbon monoxide.
- When the stones are hot enough, a container of water is placed on them, which will be used to water the heater.
- After the wood burns out, all the heat is carefully removed, after which the tent is completely closed.
- It is reasonable to additionally protect the walls around the heater with thick fabric or a screen made of wooden poles.
- You should ensure that the canopy is securely fastened; the less heat loss, the longer the good temperature in the bath will remain.
- The stones are watered, causing steam to be released. Cooling down takes one and a half to two hours, this time is enough for an average tourist group to take a steam bath.
- You should not build a structure that is too large for several people; the larger the frame, the greater the heat loss.
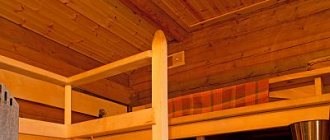
Small sauna for two or three people