Here you will learn:
- Why do you need a pumping station?
- Features of the pumping station design
- Selecting the appropriate pumping station model
- Pipe selection
- Choosing a location for installation
- Station connection options
- Connecting a station with a surface pump
- Two-pipe pumping station
- Connection with submersible pump
- Using recycling
- Common mistakes
- How to do a test run
- Very useful tips
Connecting the pumping station to the well is the final stage of arranging an autonomous water supply system. The connection procedure depends on which pumping station configuration you have chosen - with a surface or submersible pump.
Why do you need a pumping station?
The source of water for drinking and household needs is often a well or borehole. The second option is considered more reliable. High-quality drinking water can only be obtained from great depths.
The liquid rises to the surface and is directed into the water supply system using a submersible pump equipped with additional devices. It is possible to use surface pumping equipment. The installation can be used if there is a shallow well. This is due to the limited suction lift.
The introduction of a pump has a positive effect on the functioning of the water supply system. Compact equipment is designed to solve the following problems:
- extraction of water from a source and its supply to the water supply system of the house;
- equalizing pressure in pipes, preventing damage to the water supply system from water hammer that occurs during system startup;
- protection of equipment from spontaneous activation;
- storage of water reserves used during power outages.
The supply of liquid to the water supply system from the well does not occur every time the tap is opened. The protective relay and hydraulic accumulator monitor the required response value. Reducing the frequency of switching on extends the service life of the engine of the motor unit.
Operation and features of the control unit
For the full operation of the station, its management is necessary. The design of a station for home water supply is as follows:
- Constant automatic monitoring of pressure in the system is carried out around the clock;
- when it drops below a predetermined limit, the pump immediately turns on and the system is filled with water and the pressure increases;
- when the pressure reaches above the set barrier, a relay is activated, which turns off the pump;
- the pressure remains at the same level until the water consumption tap opens and it begins to drop.
To do this, you need a pressure gauge that measures pressure. And a pressure switch where the lower and upper limits are set.
Features of the pumping station design
Autonomous water supply based on a pumping station includes a set of devices that ensure automatic flow of water into the house. To organize a comfortable autonomous water supply, you need to select a suitable pumping unit, connect it correctly and configure it.
If the installation is done correctly and the operating instructions are followed, it will last a very long time. The house will always have clean water under pressure, allowing you to use modern appliances: from a regular shower and washing machine to a dishwasher and a jacuzzi.
The pumping station consists of three main elements:
- a pump that supplies water;
- hydraulic accumulator, where water is stored under pressure;
- control block.
The pump pumps water into a hydraulic accumulator (HA), which is a reservoir with an internal insert made of elastic material, often called a membrane or bulb because of its shape.
The task of the pumping station is to ensure a constant flow of water into the house at a sufficiently high level of pressure in the water supply system
The more water in the accumulator, the stronger the resistance of the membrane, the higher the pressure inside the tank. When liquid flows from the HA into the water supply, the pressure decreases. The pressure switch detects these changes and then turns the pump on or off.
It works like this:
- Water fills the hydraulic tank.
- The pressure rises to the upper set limit.
- The pressure switch turns off the pump and the flow of water stops.
- When the water is turned on, it begins to flow out of the HA.
- The pressure decreases to the lower limit.
- The pressure switch turns on the pump, the tank is filled with water.
If you remove the relay and hydraulic accumulator from the circuit, the pump will need to be turned on and off every time the water is opened and closed, i.e. Often. As a result, even a very good pump will quickly break down.
The use of a hydraulic accumulator provides owners with additional bonuses. Water is supplied to the system under a certain constant pressure.
All components and materials necessary for connection should be prepared in advance. They must match the size of the pipes of the existing equipment; adapters may be needed for successful installation
Good pressure is needed not only to take a shower comfortably, but also to operate an automatic washing machine or dishwasher, hydromassage and other benefits of civilization.
In addition, a small (about 20 liters) but necessary supply of water is stored in the tank if the equipment stops working. Sometimes this volume is enough to last until the problem is resolved.
Design and main components of equipment
The station consists of the following elements:
- Electric pump of surface or submersible type;
- A device for automatically controlling the start and stop of a pump motor (relay) at a certain hydraulic system pressure.
- Reserve capacity (hydraulic accumulator) , necessary to reduce the risk of water hammer, used as a source of water when the device engine is turned off.
- Filter element that prevents various impurities from entering the liquid supplied through the pipeline.
- Check valve that prevents liquid from flowing back through the pipeline when the pump motor is turned off.
- Pipelines connecting the main components, connecting fittings.
When the pump is running, water moves under pressure through the pipeline and enters the hydraulic accumulator. The latter is a small volume container (about 25 l), consisting of two cavities separated by an elastic membrane. The first compartment contains a gaseous medium (air), while liquid is supplied to the second. The liquid transfers static pressure to the air through a membrane. The required pressure is created by air pressure.
Selecting the appropriate pumping station model
When choosing a pumping station, they are guided not only by the cost of the equipment, but also by its operating mode, as well as other technical characteristics. Let us immediately note that small-sized pumping stations are purchased only if the depth of the drilled well does not exceed 20 meters. In deeper wells, the use of this equipment is considered ineffective and unprofitable.
When choosing a pumping station model, remember the following tips.
- For wells whose depth is less than 10 m, single-pipe stations are purchased. Their installation is very simple.
- For deeper wells (10-20 m), only two-pipe ejector stations are suitable, the power and design of which will ensure the lifting and distribution of water.
- If you plan to install a pumping station in the basement of a house, then you need to pay attention to less noisy models. As a rule, in low-noise units the manufacturer installs plastic impellers. You should not save on the cost of products, since the noise from the operation of cheap and little-known equipment will cause a lot of inconvenience during operation.
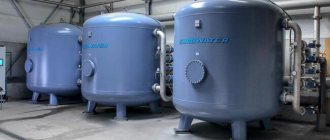
If the depth of the drilled well exceeds 20 meters, then a pumping station is not installed in the well. In this case, purchase a special deep-well pump. which supplies water to an intermediate tank equipped with sensors that monitor the upper and lower liquid levels. When dispensing water, the automation turns on the pump. Water from the tank enters the water supply network through a hydrophore - a device capable of maintaining a given level of pressure in the pipeline.
The Wilo-Jet HWJ water supply pumping station, the housing, impeller and shaft of which are made of stainless steel, provides a water column rise of 8 meters
Basic parameters for choosing a pump
So, we have already written about the height to which you need to raise water
What else should you pay attention to when choosing? We need to know exactly the distance of the well from the house, and the volume of pumped liquid, which will depend on the total volume of the water supply network and the maximum possible water consumption at any given time. A trivial example: we open the tap closest to the point of entry into the building - we get good pressure, open the second one - the pressure drops, and at a remote point the water flow will be the smallest. The calculations here are, in principle, not complicated, you can do them yourself by using an online calculator, or simply by studying the instructions from the manufacturer
The calculations here are, in principle, not complicated; you can do them yourself by using an online calculator, or simply by studying the instructions from the manufacturer.
What does the pressure in the system depend on? It depends on the power of the pump and the volume of the hydraulic accumulator - the larger it is, the more stable the average pressure in the water supply. The fact is that when turned on, the pump does not work constantly, since it requires cooling, and when the operating pressure is reached, it should not continue to increase it. The system is designed in such a way that it pumps water into a hydraulic accumulator, in which a check valve is installed, which prevents water from flowing back when the pump is turned off. When the pressure in the tank reaches the set threshold, the pump stops. If water withdrawal continues, it will gradually drop, reaching a minimum level, which is a signal to turn on the pump again.
That is, the smaller the accumulator, the more often the pump is forced to turn on and off, the more often the pressure will rise and fall. This leads to accelerated wear of the engine starting equipment - in this mode the pumps do not last long. Therefore, if you plan to use water from a well constantly, buy a tank with a larger capacity for the pumping station.
When constructing a well, a casing pipe is installed into it, through which water rises. This pipe can be of different diameters, that is, it may have different throughput. Based on the cross-section of the casing pipe, you can also choose the right equipment for your home.
All the necessary information will be in the instructions for the purchased pump. You can also get recommendations from the specialists who are drilling your well. They will know exactly the optimal operating parameters. It will also not be superfluous to make some reserve in the power of the unit so that the pressure in the system rises faster to a comfortable threshold, otherwise water will constantly flow sluggishly from the tap.
Pipe selection
Water supply polyethylene pipes
To install a water supply system, you need to purchase pipes for external and internal mains. It is better to lay the external line using HDPE products. They are not afraid of temperature changes, static and dynamic soil pressure. They have a smooth inner surface, which ensures normal water flow.
It is better to lay polypropylene pipes inside the house. Their installation is carried out by soldering. As a result, the melted polymer forms a perfectly sealed connection.
What is required for self-assembly?
The first step is to select a pump. In this case, it all depends on the type of source: a surface device is suitable for wells, and submersible equipment is suitable for deep wells.
Set for work
Other elements:
- Hydraulic accumulator. This is a kind of damper that allows you to avoid “pulling” the pump and regulates processes - accumulation/consumption of water.
- Automation block. The simplest option is a relay with a pressure gauge. A model with a built-in thermometer will allow you to monitor the condition of the system.
- A check valve is a mandatory element designed to prevent the outflow of water when the pressure decreases or when the pump stops.
- Filters. The fine cleaning product is installed on the pipeline behind the pumping station. Coarse filter - in front of the main unit. These elements (removable or non-removable) can be included with the check valve. These are the models that are recommended to buy.
Mandatory additional elements - hoses, fittings, pipes. When independently assembling a pumping station, products made from two competing materials are traditionally used to connect all components into the system - polypropylene or polyethylene. To seal the joints, purchase FUM tape, flax or sealing paste (plumbing sealant).
The main “duet” and its features
This “bundle” deserves to be stopped and examined in more detail. The pumping station can be assembled on any unit - surface or submersible. However, the main requirement for any device is sufficient power to lift liquid from depth.
Pump and its characteristics
This point can be considered using the example of surface equipment that will be located on a hydraulic accumulator. For example, in one of the rooms of the house. The main parameter that needs to be taken into account is the suction depth, indicated by the letter “H”. Find it using the formula:
H = (L/8) + h
L here is the strictly horizontal distance from the pumping station to the water source, and h is the distance from the surface of the earth to the water surface.
Suction depth is the maximum possible value, the distance from which the pump can reliably lift water. In order not to encounter problems, the unit must be purchased with at least a small reserve.
The choice of pump type depends on the source. The well requires a high-power submersible pump. The well offers two options - either deep equipment or surface equipment. But in the latter case there is a mandatory condition: the distance from the surface to the water surface should not be more than 8 m.
Pump in combination with a hydraulic accumulator
When choosing a storage container, first of all, look at its volume. The larger it is, the better, as stock is always welcome. More often they choose models designed for 25, 50, 100 or 200 liters. But in this case, the main condition is the appropriate pump performance. It is generally accepted that it is better to focus on the following ratios of pump power and accumulator volume:
- 0.5 kW - for containers up to 25 l;
- 1 kW - up to 50 l;
- 1.5 kW - up to 100 l.
In addition, the storage device must match the pump parameters (pressure) and be suitable for the system’s automation unit.
Choosing a location for installation
It is not difficult to make a pumping installation for a private house or cottage with your own hands. However, it is necessary to resolve the issue of how and where to properly install the pumping station. The location for installing the pumping station, the correct selection and arrangement of which will determine the efficiency of the equipment, must meet certain requirements.
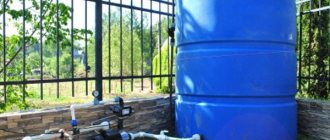
- If drilling a well or constructing a well on a personal plot has already been completed, then the pumping station is installed as close as possible to the source of water supply.
- In order to protect pumping equipment from water freezing in the cold season, the installation location must have comfortable temperature conditions.
- Since pumping units require regular maintenance, free access must be provided to their installation site.
Based on the above requirements, a caisson or a separate and specially equipped room is used as a place to install a pumping station in a country house or in a private house.
Ideally, a place for a pumping station should be provided at the stage of building a house, allocating a separate room for this
Sometimes pumping units are installed in buildings that already exist on the territory of a personal plot. Each of the listed options has its own pros and cons, which should be discussed in more detail.
Placing a pumping station in a separate room in a building with a well drilled under the house
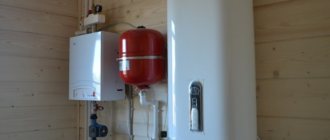
The installation diagram of a pumping station in the basement of a house is an almost ideal option for the location of such equipment. With this installation scheme, easy access to the equipment is provided, and the issue of reducing the noise level created during operation of the station is also easily resolved. This option will be most successful if the room for the pump is heated.
Placement of the pumping station in a warm, equipped basement
If the pumping unit is located in an outbuilding, quick access to it is somewhat difficult. But with this scheme for connecting the pumping station, the problem with noise from the operation of the equipment is radically solved.
The station can be installed on a bracket in a fairly wide and deep well
Particular attention should be paid to the issue of laying the pipeline system. The pipes through which water will be transported from the pumping station to the residential building are placed in the ground below its freezing level or, if they are installed on the surface of the ground, they are well insulated. This approach to pipeline installation will protect water from freezing in winter.
Installing the station in a caisson will provide protection against freezing and complete sound insulation
Quite often, pumping stations are mounted in a caisson - a special tank that is installed above the well head, directly into the pit. The caisson can be either a plastic or metal container buried in the ground below its freezing level, or a permanent underground structure, the walls and base of which are made of concrete or finished with brickwork. It should be borne in mind that when installing a pumping station in a caisson, access to the equipment is quite limited. In addition, if a connection diagram of this type is used for a pumping station, then the section of pipeline between the pumping equipment and the building it serves must be carefully insulated or placed in the ground at a depth below the freezing level.
Installation recommendations
The equipment must be installed on level ground and secured to prevent movement. Before the first start-up, it is necessary to measure the air pressure in the membrane tank; it should be 1.5-2 kg/cm². If its value does not correspond to the specified values, then you need to pump up or bleed the air. The hydraulic accumulator must be installed vertically so that the membrane does not come into contact with the walls of the housing.
The room with the pumping station must have a water collection system.
There is no need to configure the relay, since it has standard settings. If they need to be changed, the work should be carried out in accordance with the description, after first turning off the power supply.
In the room where the pumping station is located, there must be a system for collecting water and draining it into a special pit. The equipment must be installed in such a way that if it is necessary to replace an inoperative element, the entire installation does not have to be dismantled.
Station connection options
Connecting the pump via a well adapter
There are two ways to connect the pumping station to the pipeline:
- Through a borehole adapter. This is a device that is a kind of adapter between the water intake pipe in the source shaft and the water supply pipes outside. Thanks to the downhole adapter, it is possible to remove the pipeline from the hydraulic structure immediately below the freezing point of the soil and at the same time save on the installation of a caisson.
- Through the head. In this case, you will have to take care of high-quality insulation of the upper part of the source. Otherwise, ice will form here in sub-zero temperatures. The system will stop working or break in one of the places.
To connect the pumping station to the well, you need to use only high-quality fittings, fittings, and sealant. Otherwise, leaks in the system cannot be ruled out.
How the assembly process works
Assembly process.
When installing a block pumping station, the assembly process consists of connecting the suction and pressure pipelines. A filter with a check valve is connected to the pipe lowered into the well; it is removed from the wellbore through a downhole adapter or through a cap.
The suction line must be sealed, otherwise air will enter the hydraulic network through leaks, which will lead to pump failure. Shut-off or shut-off and control valves are installed on the pressure pipeline.
Assembling the station from individual elements begins with tying the membrane tank. First of all, a fitting with 5 outlets is installed. It connects directly to the hydraulic accumulator. Then a pre-configured pressure switch, pressure gauge and water supply inlet are installed. The free outlet serves to connect the pump pressure pipe. Experts recommend installing submersible units in wells deeper than 10 m. The use of these pumps solves problems associated with the equipment of the suction pipeline, installation of an ejector with additional pipes, etc.
Most often, withdrawal from the well is carried out through the well head. The pressure pipeline is laid to the house in a trench below the freezing level of the soil.
When the assembly of the hydraulic part is completed, installation of electrical connections begins. Wires from the network are connected to the input terminals of the pressure switch, and the output is connected to the pump starting unit. It will be correct to supply power through a separate circuit breaker.
Be sure to carry out a test run and check the tightness of the connections. The first filling of the hydraulic tank is done gradually so as not to damage the membrane.
Connecting a station with a surface pump
Pumping stations with a surface pump can only be used if the distance from the water surface to the pump inlet pipe is no more than 8 m.
For example, if you have a well or borehole with a depth of 12–13 m, and the distance to the water surface is 10 m, then the pumping station must be “buried” to a depth of 2.5–3 m.
In such cases, pits are installed or a more technologically advanced solution is the use of a caisson.
It should be remembered that although all manufacturers call their products self-priming, neither a vortex nor a centrifugal pump are. In order for the pump to work and not fail, it is necessary to fill the pump housing and supply pipe with water. This will ensure reliable starting of the pump.
The end of the suction pipe should be at the maximum depth, and the height from the bottom should not be less than 100–120 cm.
Installation should begin by installing a check valve with a coarse filter on the pipe. The filter will prevent large impurities in the form of stones and sand from entering the water supply. The check valve will provide support to the water column and protect the pumping station from idling. Connections must be carefully sealed to prevent air from entering the plumbing system.
1 - check valve with filter; 2 - pumping station; 3 — adapter for a plastic pipe; 4 - shut-off valve; 5 - caisson; 6 - to the water supply of the house
A shut-off valve, an American valve, and, if necessary, an elbow and an adapter with a coupling to a plastic pipe are installed at the entrance of the pumping station.
In the case of a well, you can use ready-made heads that are already equipped with a pipe outlet and an eye bolt. Additionally, the head seals the mouth of the casing pipe, increasing the flow rate of the well.
A water supply system is connected to the pump output.
Connection procedure: step-by-step instructions
Pumping stations are suitable for equipping relatively deep water intake workings. If the depth of the groundwater table exceeds the maximum value specified by the equipment manufacturer, remote ejectors are used.
To install, perform the following steps:
- A trench is laid connecting the well and housing.
- Pipes are laid in it.
- Install a water supply system (if it is missing).
- Install the unit in the selected location.
- The supply pipe is equipped with a filter and a check valve.
- Connect the line to the receiving pipe.
- Connect the unit to the water supply.
- Connect the equipment to the power supply.
- Fill the hydraulic tank with water.
- Perform a test run of the station.
- Check the joints.
- Set up the pressure switch.
The pipes of the external pipeline of the water supply system must be laid below the level to which the ground freezes. It is recommended to make a slight slope from the house to the well so that the water returns to the pump if it stops working. This will protect the device from overheating and damage due to dry running, i.e. work in the absence of water.
The same protective function is performed by a check valve, which does not allow liquid to leave the pipe and go into the well. When connecting a surface pump equipped with an ejector, it is necessary to connect another one to the suction pipe, which is connected to the ejector.
This unit directs part of the incoming liquid to the base of the pipe through which the liquid flows, which significantly increases the productivity of the equipment. If a submersible pump is used, the work is performed differently. It is connected to the suction pipe and suspended on a durable stainless steel cable.
The lower end of the supply pipe should be equipped with a strainer to prevent sand and other impurities from contaminating the water and damaging the equipment.
Submersible pumps are conveniently attached to a finished head. Such a device is mounted on the top of the casing pipe. It is believed that sealing a well with a cap allows it to slightly increase its flow rate. To prevent the cable and cable from getting tangled, they are fixed to the pipe using plastic ties.
If the filter is already in the pump, you are limited to installing a check valve. The edge of the surface pump supply line should be located at a height of more than a meter. This minimum distance is half a meter for a submersible pump.
Connections between the unit and pipes must be made using American taps; valves are used to shut off any section and disconnect it for repairs without damaging the remaining elements of the system.
It is recommended to install an additional coarse filter in front of the station, and after it, install a filter that will ensure the purity of drinking water by removing unwanted impurities
The well filter installed in the excavation wears out over time, and sand begins to seep through it. It is recommended to install an additional coarse filter at the pump inlet.
Power supply is provided by connecting a separate line to the equipment, equipped with an automatic shutdown device; care must be taken to ground it. Before starting, the device is filled with water through the hole provided for this purpose.
There should be pressure in the hydraulic tank:
- about 1.5 bar for containers less than 30 l;
- about 1.8 bar for 30-50 l;
- 2 bar or a little less for a 50-100 l tank.
Then the hole for filling the water is closed and the device is connected to the electrical network. You need to open the valve slightly to bleed the air. In a few minutes, water will flow from here. Otherwise, turn off the device and add a little more liquid.
To adjust the pressure switch, it is necessary to remove the housing from it in order to gain access to the screws with which the device is adjusted
Turn on again so that the device starts working normally. Now you need to configure the relay. To do this, the HA will have to be emptied and then filled again. Indicators are set by rotating the corresponding screws.
Two-pipe pumping station
Under conditions where it is necessary to lift water from a depth of more than 8 m and there is a pumping station with a surface pump, the system must be completed. To do this, a special device called an ejector is installed at the pump suction.
In this case, two pipes of different diameters are lowered into the well or borehole. In most cases, a 32 mm pipe is for suction and a 16 mm pipe is for recirculation.
A nozzle with a narrowed cross-section is mounted in the ejector body. Water is supplied through a recirculation pipe to the ejector chamber. Due to the narrowing, the water flow rate at the nozzle outlet is greater than in the suction pipe. Water creates a high-pressure zone, providing the necessary pressure in the suction pipeline. A zone of low pressure is formed under the nozzle, which will ensure the supply of water to the ejector from the well.
Pumping stations with an ejector can lift water from a depth of up to 30 m.
It is also necessary to install a check valve with a coarse filter on the ejector suction pipe. Connect a pipe with a check valve to the outlet of the suction chamber.
1 - check valve with filter; 2 - ejector; 3 - suction line; 4 - recirculation pipe
Pumping stations with a remote ejector can be located at a considerable distance from the water source - up to 40 m horizontally, which makes it possible to install the station in a house without installing additional technical structures.
Pumping stations with an ejector must be chosen with higher power, since part of the energy is spent on recirculation.
Operating principle of pressure equipment
Ejector-type installations are more powerful
The station installed on the surface is designed to supply liquid from sources at shallow depths: up to 8–9 meters. Pressure equipment does not need to be immersed in water.
The surface pump works according to this principle:
- The expansion tank or hydraulic accumulator connected to the pump is filled with water to the set level due to the design.
- The automation turns off the pump after the liquid reaches a certain point. Water intake stops.
- When the liquid level in the accumulator drops, the automation turns on the pump and it fills the hydraulic accumulator.
The principle of operation is based on the fact that a vacuum is created in the part of the suction hose that is not lowered into the liquid. Water rises through a conduit due to differences in pressure between its ends.
Installation of the installation itself is not difficult. To do this, you just need to carefully study the attached manual and connect the parts to each other. The installation diagram at the desired location and connection to the well is more complicated.
Connection with submersible pump
Pumping stations with submersible pumps are successfully used for wells and wells of any depth. Submersible pumps come in several types:
- vibration;
- centrifugal;
- drainage (well).
Regardless of the type of pump, they must all be below the water level. The water cools the pump, preventing it from overheating.
The connection and operation of the vibration pump is highly dependent on the frequency of the electrical network. To operate, some models of pumps from Western manufacturers require a network frequency of 60 Hz, instead of the 50 Hz that we have. Such a pump will work, but its effectiveness will be debatable.
Before lowering the pump into the well, it is necessary to check the tightness of the connecting screws. Since the pump is vibrating, they tend to unwind. The vibration pump must be inspected regularly.
Centrifugal submersible pumps in some cases are the only solution for lifting water from any depth. They have a large number of impellers (20 or more), which provides high pressure at the pump outlet. This in turn increases the length of the pump. Therefore, such pumps cannot be used in wells with a small water column.
The pump is installed at the maximum depth of the well, at least 50–70 cm from the bottom of the well. The pump is secured to a metal or polyamide cable. A check valve is installed on the pump, and then a pressure supply pipe.
1 - check valve with filter; 2 - submersible pump; 3 - cable
Depending on the manufacturer and model, the length of the electrical cable may not be sufficient for installation in the well, then it is necessary to arrange a hermetic cable coupling. The other end of the cable is attached to the eye bolt of the head, securely fixing the pump in the well.
The advantage of this scheme is that the hydraulic accumulator with the automation unit can be placed in any convenient place.
Submersible drainage pumps can also be used to organize a water supply system for a small house with 3-4 water outlets. Depending on the model, they create a pressure of up to 1.5 bar and have high performance. Drainage pumps operate quietly in contaminated water or water with solid impurities up to 5 mm, industrial models - up to 120 mm.
Installation of a submersible electric pump for installation in a well
To install a submersible electric pump in a well, work is performed in the following order:
- Screws a plastic adapter coupling into the outlet of the unit to connect the pressure pipeline. If there is no built-in check valve, install your own, mounting it first at the outlet of the electric pump, then screw on the fitting for connecting HDPE pipes.
- They attach a pipe to the pump and fix it with a plastic cuff, thread a cable through the ears of the housing and connect its ends at the outlet using two special clamps, the free end is screwed to the main cable with electrical tape.
- Connect the power cable, cable and pressure hose together using electrical tape or zip ties in 1 meter increments, making sure that the power cord is secured without tension.
- The electric pump is lowered into the well to a predetermined depth. To do this, measure and cut the pressure pipe to the required length, insert it into the head, to which the cable is tied.
- After a dive, you can immediately check the operation of the electric pump without connecting to the pipeline, if the liquid supply corresponds to the passport data, connect the entire water line and then monitor and regulate the operation of the equipment with automatic devices.
Rice. 8 Preparing the downhole electric pump for immersion
To connect a well pump to a water supply system, devices are used that automate its operation, prevent frequent startup and reduce the load on the line. They can be independently assembled in one module, installed in a living space, or left in a caisson pit with a borehole head.
Using recycling
The recirculation line serves to maintain water pressure in the supply and protect the pump from idling. It is necessary to understand that this wastes part of the pump power.
To organize recirculation, a tee must be installed on the pressure pipe of the water supply system. It is advisable to install a shut-off valve on the recirculation line. It will provide regulation of water flow. The second tee must be installed on the suction pipe in a convenient place and connected to the recirculation pipe.
1 - tee; 2 - shut-off valve; 3 - recirculation pipe
When repairing or servicing the water supply system, in order not to relieve the pump pressure and refill it with water, install a tap on the accumulator, then you will leave water under pressure in the accumulator. After the repair, simply unscrew the valve and the pump with the pressure pipe will fill with water. In most cases, the hydraulic accumulator reserve is sufficient to fill the pump and start it.
Such simple actions will increase the reliability of the uninterrupted operation of the system.
Some valuable recommendations
Threaded connections must be tightened with a wrench and not by hand to ensure the required tightness. To connect fittings, protective devices and the pumping station itself, it is better to use pipes whose diameter is slightly larger than the calculated one in order to compensate for the load increased due to bends in the line.
The recirculation line will protect the pump and increase the water pressure in the system. To install the return line you will need a tee
To protect the pump from idling, you can install a recirculation line. To do this, tees are placed on the supply and suction pipes and the free pipes are connected with a return line.
A valve should be placed on it to control the intensity of the reverse flow. This addition will improve the pressure, but will slightly reduce the performance of the device.
A bracket can be used as a base for the pumping station, but it must stand level on shock-absorbing pads so that vibration is minimal
The pumping station is placed on a perfectly level base equipped with shock-absorbing pads. This will reduce the vibration impact and also reduce the amount of noise.
About once every three months you need to check:
- condition of joints for leaks.
- condition of filters for timely cleaning.
- relay settings for their correction;
- the condition of the hydraulic tank to determine the location of leaks.
If the pressure level in the HA does not meet the required level, it is easy to pump it up using a compressor or pump. On larger containers a nipple connection is provided for this purpose. If fluid leaks from the hole, the inner membrane is torn and needs to be replaced.
Common mistakes
When installing all components of plumbing equipment, a number of common mistakes are possible, knowledge of which will help you avoid them:
- Small stock of pipe lengths used. Often overlooked are the presence of corners and the thickness of the foundation, which increase the distance to be laid. Be careful. It’s better to overpay for an extra length that can be reduced than to worry about increasing the product and losing large sums on sealed adapters.
- Tightening threaded fasteners with bare hands. At the moment of tightening, it may seem that the part is seated tightly, but during operation it may leak. Be sure to use a key to ensure complete sealing.
- Negligence in relation to the hydraulic accumulator. Be sure to check the internal pressure in it. If it falls below 1.2 atmospheres, then it must be increased using a compressor or pump for cars.
Filtration system at the station
Any water carries many impurities in the form of sand, clay and other heavy elements. They are harmful enough to the internal structure of the equipment that, if accumulated in large quantities, they can damage it. Therefore, if you want to extend the life of the station, its installation is required.
But at the same time, it is necessary to remember about the negative effect: a decrease in the force of water influx. To prevent this problem, it will be enough to regularly clean the dirty filter elements. The main thing is to prevent the system from becoming completely clogged, which will certainly lead to a breakdown of the device.
Preparing the hydraulic accumulator
The hydraulic tank can be installed in the basement of the house, since this unit builds up pressure in the system; water can be supplied even from water intake points located above the installation level of the hydraulic accumulator itself.
If the pressure is very high, this can cause the pump to start and stop very often, which will subsequently lead to its rapid wear. The reduced pressure in the air chamber will cause the bulb with water to overstretch, which will cause it to quickly fail.
Rules for preparing the hydraulic tank:
- Before pumping air into the air chamber of the accumulator, you must make sure that the rubber bulb is empty. If there is water in it, drain it by opening the bottom tap.
- After this, air is pumped into the chamber using a car pump. Pressure is also measured with a car pressure gauge. As a rule, the pressure in the hydraulic tank should be 10% less than the lower value. But since we have not yet set up the system and did not make the first start, we adjust the pressure like this:
- for a hydraulic accumulator with a capacity of 20 to 25 liters, the pressure should be in the range from 1.4 to 1.7 bar;
- for a storage tank with a volume of 50-100 l, the pressure is set in the range from 1.7 to 1.9 bar.
How to do a test run
The main condition for this is that the pumping station is filled with water, including all lines, as well as the hydraulic accumulator. Water enters the device through the filler hole. Turning on the power and starting the engine is carried out after the shut-off valves have been opened. After this, water gradually fills the pressure pipe. This is necessary in order to displace all the air from it. As a result, pressure increases. As a rule, this parameter can take values from the range from 1.5 to 3 atmospheres; when the limit is reached, the equipment turns off.
Thus, the effective operation of such equipment is ensured not only by the correct choice of model suitable for use in certain conditions, but also by proper connection. And for this, it is first decided where the equipment will be installed, after which a hermetically sealed connection of the equipment with the internal and external pipelines is organized.
Expert advice
When, thanks to the operation of the station, an uninterrupted water supply has been established in the household, it must be periodically serviced. First of all, you need to monitor the condition in which the coarse filter is located. If necessary, it must be cleaned.
If this is not done, the performance of the equipment will decrease and water will flow in fits and starts. When the filter is completely clogged, the pump will run idle and then turn off. The frequency of cleaning depends on the amount of impurities present in the water.
It is advisable to check the pressure in the air compartment of the hydraulic tank once a month after installing the water station. The same should be done in case of preservation for the winter, repairs, or downtime. Its value should be 1.2-1.5 atmospheres. If necessary, air is pumped up with a car pump or compressor.
When the station is used exclusively in the warm season, the water must be drained from it before frost sets in.
If all the recommendations on how to correctly install the pumping station specified in the instructions have been followed and the equipment is connected for debugging and determining the pressure at which it will turn off, two liters of water are poured into the receiving device and the unit is started.
When the station turns off, you need to record the fluid pressure. You should also know this parameter when starting the unit automatically. The station may not turn off at a certain liquid pressure. You can deal with this problem using the screws on the pressure switch. They adjust the compression ratio of the springs. To do this, first remove the cover on the device, then tighten the screw with the letters “DR” towards the “plus” or “minus”. To regulate the pressure at which the start will occur automatically, you need to engage the screw marked with the letter “P”.
Choosing a site for an Abyssinian well
The operation of an Abyssinian well is only possible if the distance to the aquifer is no more than 8 m. Otherwise, surface pumps will be ineffective, and a submersible pump will require a larger diameter pipe and a different drilling technology.
You might be interested in a do-it-yourself drill for a well
To prepare a set of pipes, you also need to know the approximate depth of the well. Excessive deepening of the suction pipe with a filter can lead to its penetration into dense layers of soil lying below the level of the vein.
How to choose a suitable location for a well and determine its expected depth?
- The surest sign of the possibility of developing an Abyssinian well is the presence of the same wells in the nearest neighbors. You can ask them not only about the depth, but also about the flow rate of the well in order to determine the required performance of the pumping equipment. Measuring the flow rate of a well is quite simple: you need to time 1 minute and determine how much water the well is capable of producing during this time.
Table 1. Required pump performance depending on the well flow rate.
| Well flow rate, l/min. | Maximum pump performance according to the passport, m3/hour | Pump operating capacity, m3/hour |
| 15-20 | 1,8-2,5 | 0,9-1,2 |
| 20-25 | 2,5-3,0 | 1,2-1,5 |
| 25-30 | 3,0-3,6 | 1,5-1,8 |
- If there are wells nearby, you can also find out the depth of the aquifer. Using a rope with a weight, measure the depth of the well to the bottom and to the water surface, and find out the approximate thickness of the aquifer.
- A sign of close occurrence of interstratal aquifers may be the emergence of springs and streams to the surface. If in your area there are springs with good, tasty water, then with a high degree of probability the same water will be in the drilled Abyssinian well, and the depth of the latter will be shallow.
- An indirect sign of the close passage of an aquifer is some plants with a deep root system: coltsfoot, burdock, horse sorrel, celandine and many others. Trees with tap roots also grow better in areas with nearby aquifers.
The presence of various plants depending on the level of underlying waters
- Fog after sunrise, as well as swarming of midges over certain areas, are also clear signs indicating the proximity of an aquifer.
- Well digging experts use metal frames to find the location. It is believed that this requires experience, but you can try to do everything yourself. Take two pieces of copper wire 35 cm long, bend the frames from them at an angle of 90 degrees with an aspect ratio of 10/25 cm. Take the frames in your hands by the short sides and place them parallel to each other, without squeezing too much. Walk slowly through the area. In the place where the aquifer passes, the free ends of the frames should meet.
Folk way to find water on site
Dowser mistakes
Note! Several signs indicating the proximity of water indicate a high probability of finding an aquifer with a high flow rate.
Abyssinian well maintenance
An Abyssinian well will last longer if used regularly. At the same time, the lens around the filter retains its dimensions, the water in it remains clean, and the flow rate of the well does not change. If you plan to use the Abyssinian well seasonally, you need to preserve it: drain the water from the supply pipe so that it does not freeze, cover the pump with waterproof material to protect it from snow and melt water. In the spring, before the start of the season, it is necessary to pump the well, as before the first commissioning.
Using the Abyssinian well
Where to begin?
It all starts with the project, since the site owner needs to know the technical characteristics of the equipment that is included in the pumping station.
In addition, there are factors that influence the choice of one or another element of the system. These include:
- Well flow rate, which determines how much water the pump will pump per unit of time from a given source.
- Volume of water consumption. It depends on how many people will live in the house on a permanent basis, what household appliances are connected to the system, whether the garden is watered, etc. But the volume of water consumption cannot exceed the flow rate of wells or wells.
- Source depth and other well characteristics. This is necessary in order to select a pump with suitable technical parameters.
In addition, when designing, the architectural features of the building are taken into account - for example, the number of floors, since it is necessary to ensure water intake from the lowest point and its stable supply to the upper one.
Preparation of materials accompanying installation
A stuck pump in a casing can be a major headache. And you need to pull it out (as well as lower it) using a special cable. If the pump is already equipped with a polymer cord, you need to make sure that it is of high quality and of sufficient length. Sometimes it makes more sense to purchase this item separately.
It is believed that a reliable cable or cord must be designed to withstand a load that is at least five times the weight of the equipment attached to it. Of course, it must withstand moisture well, since part of it will constantly be in water.
If the device is suspended relatively shallowly, less than ten meters from the surface, care must be taken to provide additional shock absorption for the equipment during operation. To do this, use a piece of flexible rubber or a medical tourniquet. Metal cable or wire is not suitable for suspension as it does not dampen vibration but may destroy the mount.
A special electrical cable is provided to power the pump. Its length should be sufficient so that the cable lies freely and is not strained.
To supply water from the pump to the house water supply, special plastic pipes are used. Designs with a diameter of 32 mm or larger are recommended. Otherwise, the water pressure in the system will be insufficient.
To install a submersible pump, a special cable is used, which is designed for long-term operation under water. Its cross-section must comply with the technical requirements specified in the product passport
Pipes can be used both metal and plastic. There is controversy regarding the connection of metal pipes. Some experts object to the threaded connection as less reliable. It is recommended to use flanges, and the bolt should be on top, this will prevent it from accidentally falling into the well.
But threaded connections in wells are used quite successfully. During installation, winding must be used. Some experts recommend using linen or “Tangit” sealing tape instead of the usual FUM tape or tow. The linen winding is additionally strengthened with silicone sealant or similar material.
The characteristics of the water supply pipe should be selected in accordance with its operating conditions. For depths up to 50 meters, HDPE pipes designed for a pressure of 10 atm are used. For a depth of 50-80 m, you will need pipes capable of operating under a pressure of 12.5 atm, and for deeper wells, pipes of 16 atm are used.
In addition to the pump, pipes and cord or cable, before installing a submersible pump in a well, it is recommended to stock up on the following materials:
- clamps for securing the electrical cable to the pipe;
- check valve;
- pressure gauge;
- shut-off valve for the water pipe;
- steel fastening unit;
- power cable, etc.
Before connecting the pipe to the pump, attach a nipple adapter to its outlet. Usually modern submersible pumps are equipped with such a device, but if it is not there, this unit must be purchased separately.
It should be remembered that to pump the well immediately after drilling, i.e. To remove large amounts of very dirty water from a well, such a pump cannot be used. It will quickly fail. Usually the well is pumped with a separate pump, which is cheaper and works better when working with dirty water.
How to adjust correctly (with hydraulic accumulator)
Before setting the relay, you need to remove the cover, under which there are two springs with nuts: large and small. By turning the large nut, the lower pressure in the hydraulic accumulator (P) is adjusted. By rotating the small nut, the pressure difference (ΔР) is set. The starting point is the position of the large spring, with the help of which the lower pressure limit is set.
Before you begin setting up the pressure switch for the pump, you must remove the top cover from the device, which hides the large and small springs
After the required air parameter has been reached in the accumulator, the tank should be connected to the system and turned on, observing the readings of the water pressure gauge. Please note that the technical documentation for each pump indicates operating and maximum pressure indicators, as well as the permissible water consumption rate. These values must not be exceeded when configuring the relay. If during system operation the operating pressure of the accumulator or the limit value of the pump is reached, it is necessary to turn off the pump manually. The maximum pressure is considered reached at the moment when the pressure stops increasing.
Fortunately, regular household pump models are not powerful enough to pump the tank to its maximum capacity. Most often, the difference between the set on and off pressures is 1-2 atmospheres, which fully ensures optimal use of the equipment.
Once the water pressure gauge shows the required lower pressure, the pump should be turned off. Further adjustment is made as follows:
Carefully rotate the small nut (ΔP) until the mechanism starts to work. Open the water to completely empty the system of water. When the relay turns on, the value of the lower indicator will be reached. Please note that the pump activation pressure should be approximately 0.1-0.3 atmospheres higher than the pressure reading in an empty hydraulic tank. This will protect the “pear” from premature damage. Now you need to rotate the large nut (P) to set the lower pressure limit. After this, the pump is turned on again and waited until the indicator in the system rises to the desired level. All that remains is to adjust the small nut (ΔP), after which the hydraulic accumulator can be considered adjusted
Adjustment diagram
Here is a diagram that is suitable for most devices:
The pressure switch for the pump is adjusted using two nuts: large and small
They must be handled very carefully so as not to damage the device.
Video: how to adjust the relay for the pump
In addition to the initial setup when connecting the relay to the pump, the home owner needs to periodically check the operation of the system and adjust the settings. At least once every three months, experts recommend completely draining the water tank and checking the air pressure, pumping up the required amount or bleeding off excess.
Types and depths of wells
The depth of immersion of the pump into the well largely depends on its parameters; when drilling, three main types are distinguished: Abyssinian, on sand, and artesian.
Abyssinian well
Abyssinian is the most affordable option from a financial point of view; its depth rarely exceeds 10 meters; the intake is carried out from the first aquifer (upper water). Drilling the Abyssinian is often done with your own hands using homemade drills; usually its channel pipe has a small diameter of 1.5 - 3 inches and is designed for water intake with a surface electric or manual mechanical pump.
The pipes lowered into the Abyssinian are equipped with a needle-shaped filter at the end; due to its light weight, it is located directly in the aquifer without sinking to the sandy muddy bottom - thanks to this, the water in the Abyssinian does not have sand and clay impurities. Although the Abyssinian spring has fairly clean water, the well is rarely used to provide a constant water supply to a residential building - its flow rate is too small.
Well in the sand
If water-bearing strata are not found at a shallow depth in the area, a sand well is drilled until water is found, the depth of which lies in the range from 15 to 60 m with an average of about 30 meters. This type is most common in individual water supply; when drilling, a column of plastic or steel pipes with a diameter of 100–160 mm is lowered into the shaft, which, due to its high weight, rests on the bottom of the water-bearing formation.
A perforated water filter is installed at the end of the column to purify water from sand and clay particles, but in many cases this is not enough and additional elements are installed in the pipeline that filter the water (sand, coarse and fine filters).
The use of pumping equipment for intake must take this factor into account (a large number of sand particles), so modifications are usually chosen for working with contaminated water. A well on sand, unlike an Abyssinian, has a higher flow rate and, most importantly, is suitable for water supply to an individual residential building, although its service life is short (depending on the size of the sand fractions) and averages about 5 years.
Rice. 2 Types of wells for installing a submersible pump
Artesian well
When searching for sources of artesian water, drilling is carried out to an aquifer with a calcareous bottom, while the depth of the borehole channel during domestic drilling can reach up to 200 m, and in industrial sources a threshold of about 300 m or more is considered normal. During installation, the casing with a special filter for large particles rests on a solid limestone bottom, which is free of clay and sand. Thanks to this, water from great depths is crystal clear and the only drawback is its high iron content. The deeper the aquifer is, the greater the pressure exerted on it by the higher layers of the earth - as a result, artesian springs have the highest flow rate and a constant static level.