Sanding timber.
What it is? What is it for? Is it necessary to sand the timber? Many people face this issue. First, I would like to put everything into perspective and give reasons why it is worth sanding a home made of timber. Before painting, you can notice various defects that arose after the timber shrinked. In such a situation, it is necessary to carry out grinding: it will not only help eliminate defects, but can also help align the internal walls.
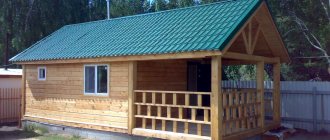
Over time, a timber building may fade and lose its visual appeal. To prevent this from happening and the wood to retain its beautiful appearance, you just need to sand it. Naturally, it is possible to do the interior decoration, but in this case the texture of the wood nature will be blocked and the reason why you built the house from timber will disappear.
Grinding is an uninteresting and thorough job, which is why the cost of grinding among experts is expensive, from two hundred and fifty to three hundred and fifty rubles per square meter.
Tools and equipment
For rough and final grinding of timber, including processing of grooves, you will need :
- belt or disc sander;
- angle grinder (grinder);
- drill with attachments;
- vibration tool (renovator).
Prepared or purchased in advance:
- scaffolding, trestle or stepladder;
- electrical extension cord;
- a set of sanding papers for rough, medium and finishing;
- a construction vacuum cleaner to remove dust if the work is carried out inside the house;
- wooden block, stapler or holder for sanding paper;
- protective equipment - glasses, respirator, headphones;
- cleaning products.
For work, you may additionally need a chisel and a hammer to level out large defects.
Planetary grinder
The main work is done with a grinding machine - leveling flat surfaces. The tool is reliable and has high performance. The work will not require much physical effort. However, profiled timber with rounded edges in this way; it is better to use a planetary grinder .
It is not advisable to use a grinder or drill to level large surfaces :
- The grinder will not withstand long-term continuous operation; frequent breaks will be required to cool the tool, otherwise the gearbox bearings will quickly fail.
- The drill is inconvenient to use due to the need to exert great effort to hold it.
Valera
The voice of the construction guru
Ask a Question
A grinder and a drill are in demand when processing grooves and small areas and removing traces of rot. For the same purpose, a renovator with suitable attachments can be used, and it can also replace a chisel.
Professional grinding services
Our specialists are highly qualified, have extensive experience and proven work skills. All this ensures high quality grinding, which we will perform in accordance with the deadlines specified in the contract. In our work, we use modern professional power tools that allow us to achieve a perfectly smooth and even surface. If you need high-quality sanding of a country cottage, country house or bathhouse, we are very willing to carry out work of any level of complexity. Contacting us is very simple - on the “Contacts” page you will find all the coordinates of our company, and you can also leave your request.
Calculate the cost of painting and insulating your home right now
Select types of work:
Select materials:
Preparatory stage
Before starting work, prepare:
- Check the serviceability of the power tool and extension cord. Detected deficiencies are eliminated.
- The timber is cleaned of layers of dirt, and if necessary, burrs are cut off with a chisel. Remove resin drips to extend the life of the sanding paper.
Consumables are prepared in advance, including impregnations, varnishes, paints, and mastics.
Leaving treated wood unprotected for a long time is undesirable; it can lead to rapid darkening of the surface and loss of attractiveness.
When to start processing?
You can start sanding as soon as the frame dries and shrinks. This will take approximately 10 days, if the sun warms well. Otherwise, the waiting time will have to increase.
Why can’t you immediately start sanding the frame as soon as it’s installed? Can! Only if you guarantee that your house is made of well-dried logs (timber), and the moisture content of the wood will not exceed the required 20%. Then place the crowns under the roof and begin sanding work followed by coating the log with various impregnations. The house will still have to be left to shrink, with or without impregnation.
If you are not sure of 20%, then there is no need to rush - wet wood will warp and the surface will not be smooth and beautiful.
Work procedure
The grinding technology inside and outside the building will be different.
In most cases, the work algorithm consists of general sections:
- preparation;
- grinding stage;
- finishing processing.
Depending on the place of work - inside or outside the house - as well as on the type of timber, different technologies are chosen.
The nuances of working inside and outside the house
Features of the work are related to the indoor microclimate and outdoor weather conditions.
As the wood gets wet, its surface becomes loose and fluff sometimes appears. Sanding wet timber will not give results . Before finishing, the walls must dry.
In outdoor conditions - with high humidity and ultraviolet irradiation - the wood quickly darkens after treatment. After finishing the work, the timber is cleaned of dust and treated with protective mastics, varnishes or paints.
Valera
The voice of the construction guru
Ask a Question
When operating power tools, a large amount of dust is generated, so indoors after construction or during repairs with grinding, it is advisable to remove pieces of furniture, household appliances, and securely cover the surfaces with non-woven material or plastic film. It is advisable to carry out the treatment of the internal walls of new buildings immediately before installing window frames; this will partially protect against excess dust.
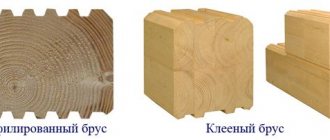
Features of grinding profiled and laminated timber
For glued and profiled timber, a sanding machine with medium and fine grain sandpaper is sufficient
. Timber houses almost do not shrink, so you can start finishing as soon as the walls are completely dry.
Sanding laminated veneer lumber eliminates the use of coarse sandpaper, since the outer layers of the material are processed by machine at the factory. First, use medium-grained and then fine-grained sandpaper.
Sanding profiled timber is technologically simple, since during installation there are no gaps between the crowns, but before work it is important to wait at least 2-3 months after the walls have been erected. As a rule, the only tool needed is a grinder.
End grinding
The ends of the timber, as a rule, have a fleecy structure.
In these places, moisture is absorbed especially quickly, the cut darkens and can be affected by fungus and rot. Before starting work, the pile is treated with a blowtorch.
It is more convenient to grind with a grinder with a sanding attachment.
Gradually replace the coarse skin with a finer one. It is important to achieve an almost polished surface - in this case, re-processing will not be required soon.
Wood polishing
Polishing wood products and wooden structures is used to prevent natural hairiness and cracking of wood; polishing enhances the attractiveness of the texture and protects it from external factors. Most often, polishing timber is used for finishing furniture and interior decoration. Technology includes:
- Grinding for polishing. Preparing wood for polishing differs from ordinary sanding; at the final stage of processing, fine-grained abrasive material No. P150-P180 is used.
- Primer. The operation is performed to seal microcracks and pores, strengthen the top layer and prevent the formation of fibers. Transparent impregnating mixtures are used for priming; the layer is applied with a swab or a flute brush. The most common compositions have a casein-rosin and nitrocellulose base. All types of primer are applied in 2-3 layers, the next layer is applied after 1-2 hours.
- Polishing. Apply 2-3 layers of colorless rosin varnish to the primer; after drying, each layer of varnish is treated with sandpaper with a fraction of up to 100 microns (grade P400-P600 according to GOST).
- Polishing. The surface is treated with a felt wheel using polishing or wax paste until a uniform shiny surface is obtained.
Recommendations from experts
Sanding is carried out along the grain of the wood.
Experienced builders and companies give some tips on how to sand timber correctly :
- work begins after the walls have settled and the roof has been erected, but before the window frames are installed;
- only dry timber is sanded;
- the power tool is turned on at low or medium speed - this saves consumables, and burn marks will not appear on the wood;
- the surface must be cleaned of any protruding resin; natural glue quickly “clogs” the skin;
- before sanding, knots and eyes are treated several times with wood glue, this will protect them from falling out;
- the sander is moved exclusively along the wood fibers;
- a clogged or worn-out attachment (emery belt) is immediately replaced;
- The wood is covered with protection in the shortest possible time.
Features before the house painting process
This process is characterized by special processing of the ends using a rubber hammer and sealant. For painting, different mixtures are used with the requirement of safety for health and the presence of protective functions. These are compositions based on water or natural oil.
The finished result of high-quality painting of a timber house
For outdoor use, it is recommended to use other options, since the above ones are not suitable for external walls.
When carrying out outdoor work in winter, you need to use drying oil diluted with gasoline, which you use as a covering material.
How to sand correctly
Sanding timber walls is carried out in stages. All work will come down to five main actions:
- Rough, initial sanding.
- Grinding corners and grooves.
- Processing the ends of logs.
- Finishing – finishing sanding.
- Coating wood with impregnation and other antiseptic compounds.
At the first stage (rough peeling), our task is to remove the darkened layer and smooth out all the unevenness left by the plane. The task is not difficult, but it requires time and attention.
How quickly you can manage will depend on:
- your skill in working with the selected tool;
- the type and species of wood from which the log house is made (the amount of resin and the quality of the initial processing of the log);
- the number of complex elements decorating the house;
- power and convenience of the tool;
- the total area of the processed surface of the log house.
The grooves with the ends must also undergo the same initial grinding procedure. On average, the speed of this work on a linear meter of a 30-40-centimeter log or beam will be about three minutes.
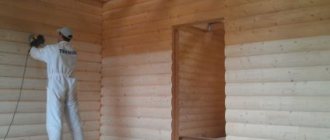
The next stage is very important. The final sanding before applying the impregnation must be carried out with special care - nothing can be corrected. Many craftsmen advise finishing sanding by hand if you are not sure that you will not leave holes and grooves with a sanding machine due to lack of experience. Final, finishing sanding is a delicate process and requires a steady hand! Sanding the timber inside the house is carried out in the same order as outside - in stages.
After all stages of sanding are completed, thoroughly clean the work area, and vacuum the “fresh” house and wipe it with a slightly damp rag soaked in white spirit to remove excess resin.
Resin is the enemy when covering with impregnation; it will not allow the impregnating film to lie flat, and this place will be left without protection!
When covering the house with an antiseptic, pay special attention to the ends - the consumption on them will be greater, because... They are porous and will absorb liquid like a sponge. Walk over them with antiseptic 3-4 times.