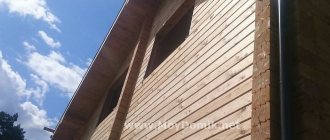
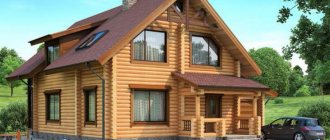
Let's touch on an issue that is not obvious, but extremely important for those who are just planning to build a wooden house or bathhouse - connecting timber in the corners.
In the article we will give a brief overview with diagrams of the popular types of connections used today in mass construction, we will go through the advantages and disadvantages, and most importantly, we will answer the question of which timber connection we consider the best and recommend that clients of SK Smirnov choose.
I’ll say right away that the texts for the blog are written by a person who is directly related to the production of timber and construction - therefore, the evaluative opinion will be based on personal experience.
Butt-butt
Is the easiest way. One beam is joined at the end to the side of the other. Each subsequent row is shifted, covering the joint itself. This method is considered not very reliable, and the corners may become blown out over time. Therefore, it is not recommended to use the method for residential buildings, but for outbuildings it is quite possible.
Butt joint of timber Photos from open sources
Nageli
Finally, a few comments regarding the fixation of wall elements.
- The pins should have a length of approximately 4/5 of the total height of the two crowns. However, it is also practiced to fix three beams with one dowel.
- Their optimal diameter is 25 - 30 millimeters.
- The step between two dowels is no more than one and a half meters; At the same time, fixing the corners with them is mandatory.
- Two horizontal rows of dowels are arranged in a checkerboard pattern, offset from row to row.
- The traditional material for their manufacture is birch. The fibers must be parallel to the axis; knots and cross-cutting are strictly prohibited.
The wood must be hard and free from obvious defects.
To the floor of a tree
One of the most common corner joint methods in construction. Its execution is accessible to a carpenter without much experience. The procedure involves cutting symmetrical straight notches from the end sides up to half the thickness of the lumber. Then the beams are laid on top of each other with their sawn sides.
Connecting a timber “to the floor of a tree” Photos from open sources
Fastening the crowns of the log house
A crown is one row of timber laid in a rectangle and fastened at the corners.
They make up the walls of the building, its foundation. The beams must be fastened together very carefully, both in corners and in straight sections, so that they do not rotate around their axis or shift. This is possible even if the beam is rectangular in cross-section. Iron nails cannot be used for wood - they will not withstand the load and conditions of use. Wood has a certain moisture content, which will cause the iron to oxidize and break down over time. And then the house itself will fall apart. When constructing log houses, wooden nails are used - dowels. They can be round or rectangular in cross-section, but preference is given to round ones. As the timber structure dries and shrinks, it creates less stress. The dowels must be placed strictly vertically.
On straight sections of walls, holes are drilled at regular intervals of 1.5-2 m, into which the dowels are driven. It is customary to retreat approximately 50cm from corners and openings. Then the top row is combined and installed. To make the task easier, the crowns are assembled on the ground in sections of several rows. For corners, there are several ways to attach timber.
In the paw
From the end sides of the beams, symmetrical oblique grooves are cut out, up to approximately half the thickness, with expansion towards the end. This method allows you to prevent windage than in the case of conjugation “into the floor of the tree”. If the cut is made in such a way that the opposite edges are parallel to each other, then the conjugation is called “straight paw”.
Connecting timber “into the paw” Photos from open sources
Which dowels to choose
It is best to use wooden fasteners to connect the crowns. Metal dowels are much stronger than wooden dowels, but they are used in especially loaded joints. Usually craftsmen are not particularly fond of metal for two reasons:
- Condensation always forms on a steel surface in winter, the wood swells and rots, and the strength of the connection drops to zero;
- After six months of use, the metal rusts and the connection between the crowns becomes jammed. Instead of normal shrinkage, the rows simply hang on metal rods.
If you choose dowels, then square rods made of dried birch wood are best suited. Thanks to the sharp angles, the fasteners firmly cut into the soft wood of the beam, making the connection strong and reliable.
Round wooden dowels are more difficult to install; if you make a mistake in the diameter of the hole by even half a millimeter, the connection of the two beams will not work, and the fasteners will easily fall out of the corner or wall. If you take the size with a margin, you can easily split the timber before a crack forms.
In addition, adhesive materials, paints and mastics cannot be used to assemble corners or walls made of timber. The only exception is polyurethane foam, which is blown in to seal the supporting surface of the tape. Any rigid connections will not help eliminate cracks and gaps.
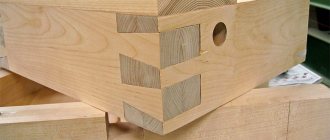
Dovetail
A type of “claw” connection. The joints in the connecting nodes are made in four planes, each of which has an inclined cut. The result is the shape of a complex trapezoidal prism. This method turns out to be quite durable and airtight, preventing the corners from diverging both inward and outward.
Angular connection of dovetail beams Photos from open sources
Corner connection requirement
Before taking on any work, it is always useful to know who exactly you want to get out of it. This rule also applies to corner joints.
But there are actually only two requirements here:
- Reliability
- And not ventilated
The first one is easy. If the beams do not hold together in the corners, the house has every chance of falling apart, because the walls are necessarily subject to not only vertical, but also horizontal, tearing forces.
There is also a logic to the second requirement. No owner will like a house where the wind blows through the corners.
As you can see, all the requirements are not without logic, but they tried to implement them in more than one way.
Tenon and groove (warm corner, root tenon)
A groove is cut out on the side of one beam. A tenon is cut out on the end of the other. It is necessary to take into account that when joining, it ends up on the inside of the wall being built - this way the corner of the wall allows less warm air to pass through from the room. The advantage of this method is that the corner becomes windproof.
Timber connection “tenon-groove,” “root tenon” or “warm corner” Photos from open sources
Construction technology has its own variations that provide more reliable fixation of the timber in the groove and eliminate the possibility of separation under loads or during the period of shrinkage of the log house.
Half a frying pan
The spike is made in the form of a rectangular trapezoid. Including, it is applicable for joining internal walls and is also called “half dovetail”.
Connecting timber with a “half-frying pan” Photo from open sources
Skovorodniy
The spike is made in the form of a symmetrical trapezoid. It is most often used for joining internal walls, as well as splicing, and is also called “dovetail”.
Connection of timber with a “frying pan” or “dovetail” Photo from open sources
Direct connections
If the length of the straight section of the wall is greater than the length of the material used, the latter must be spliced.
The fact that two wall elements are joined on the same line and not at an angle does not change the priorities. Durability and reliable wind protection are still important.
How can they be provided?
- Butt splicing with dowels prevents mutual transverse displacement of the crowns; At the same time, the key blocks the way for drafts. Of course, in this case too it is compacted with natural fiber - jute, felt, etc.
The dimensions of the key should leave a small gap for sealing.
- The root tenon is an excellent replacement for dowels. With direct splicing, it moves from the edge of the beam to its middle.
And here the same principle: the groove and tenon are laid with jute or felt.
- An oblique lock is the most labor-intensive and material-intensive method. Two beams overlap by at least two of their own sections; Strict requirements for fitting both halves of the lock do not make life easier either.
How do our sacrifices pay off? First of all, increased strength and the fundamental impossibility of gaps appearing due to any shrinkage.
Oblique castle.
Connection fastener
With the advent of modern fasteners made of durable alloy and galvanized steel, many construction processes have been simplified, including the installation of reliable connecting units in timber structures. Some of them have been used for a long time and are traditionally popular. Others appeared relatively recently, so they may be unknown to people whose profession and interests are not related to construction.
Traditional fasteners
The simplest and most reliable of them are dowels or dowels made of hard wood. They blend perfectly with the base material without causing it to deform, crack or rot. In combination with adhesives, they allow for durable fastening.
Assembling a log house on steel dowels Source remontik.org
Pins are also metal. Their main advantage is their high strength and durability, which is why they are often used to fasten timber crowns vertically.
Nails and staples, which used to be almost the only types of fasteners for wood, are now trying not to be used in the construction of permanent buildings, since the ferrous metal from which they are made is incompatible with wood. It corrodes easily, damaging the wood and gradually deteriorating. For the same reason, it is not recommended to use homemade dowels cut from reinforcing bars.
Modern fasteners
A wide variety of fasteners are made from perforated rolled steel with a thickness of at least 2 mm with an anti-corrosion coating. It is made from:
- plates of different lengths and widths with holes for screws and anchors. A large assortment of standard sizes allows you to solve problems such as connecting beams together along a length of 150 by 150, fastening rafters at the ridge part, or strengthening a sagging joint without lower support;
Galvanized connecting plate Source www.sibwindows.ru
How to fasten beams together across widths
The lumber material is used to make bridge decks, lay floors in freight cars and industrial buildings, and make panels for laying on foundations and soil. Unlike floor laths, timber structures are joined together without the use of a tongue-and-groove lateral connection; this method of installation is called “smooth reveal”. The structures are fastened with construction staples, fixed with 30-40 mm edged boards laid around the perimeter and 100 mm nails, and a screw metal tie is used. This connection allows
disassemble and assemble structures, make temporary flooring.
Reinforced floors are used in warehouses, sports and entertainment complexes. To hold lumber together indoors, synthetic glue is used; when finishing the interior, the timber is fastened with a longitudinal dovetail key.
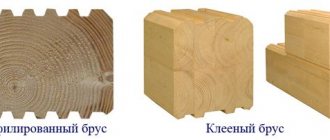
Corner connections for laminated timber
The types of laminated timber joints are different. The classification of corner joints is the same as for profiled beams and logs, however, the “in the edge” option cannot be used, since the lumber is rectangular in cross-section, so a round cut cannot be realized. You can choose options with leftover (into the bowl) or without leftover (into the paw). The first is the most common, it allows you to achieve good thermal insulation of the corner, aesthetics and stability of the building. Disadvantage: increased material consumption.
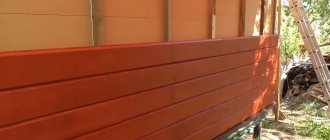
Without residue or in the paw - an option for connecting laminated veneer lumber, which helps to save material, but cladding is required. Otherwise, the surfaces will get wet and freeze.
These are the main options for connecting timber to each other. Of course, complete tightness can only be achieved if the work is performed by an experienced craftsman. Therefore, for those who do not have qualifications, it is better to contact the specialists of “Cozy Dacha”, who will carry out the work efficiently and quickly. The tree does not tolerate inattention; it should be handled by someone who knows how to do it.
Our own production gives “Cozy Dacha” the opportunity to perfectly precisely match the elements of house kits to one another. Projects ready for assembly are in stock, so after ordering, employees will deliver them to the site where they will be assembled. All you have to do is enjoy the comfort and warmth.
Connecting logs in corners with remainder
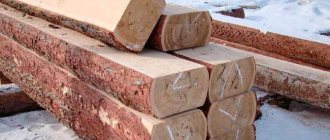
First, let's talk about log houses. Recently, they have become popular again, especially in suburban construction: they look attractive and are also natural. Moreover, even despite a significant overconsumption of material, the corners are made with a remainder. These methods of joining logs are traditional. They came to us from our great-grandfathers, this is how they built their houses.
Log house in a bowl
As has already been said, a longitudinal recess is made in each log - a groove. In the corners they are trimmed more, according to the shape of the log lying across. This notch is round in shape, which is why it is called a bowl, and the method of cutting a corner is called a bowl. The second name is “in the oblo”.
Marking the upper and lower bowl
Depending on the location of the bowl, there are upper and lower bowls. The upper bowl is so called because the log rests on top of the crown, clasping the lower one. This connection is also called “clap”. Remember: the bowl is upper, despite the fact that it is formed at the bottom of the log.
The work is carried out in several stages. The log is first placed in the log house and leveled. Then they outline the contours of the groove and the bowl, place it on a flat surface and process it there - cutting the bowls. When the excavation is ready, the log is raised again and placed in place, trying it on. If necessary, they are adjusted (removed again, trimmed where necessary) and only then laid on a compactor (tow, jute, moss). All these movements are compensated by the fact that with this method of cutting, sediment simply flows down the side surfaces of the wall, and they, as a rule, are well protected by several layers of impregnations and paints.
Types of bowls for joining logs in corners
The lower bowl can be molded directly in the log house: all manipulations can be done on the laid crown. When the walls are already raised high, it is very inconvenient to do this if you lack dexterity, so you still have to drag the logs up/down. Perhaps this is why this method is less popular.
It is easier to make a frame into a bowl: it allows you to correct almost all mistakes. In addition, despite all the apparent complexity, it is this type of joining of logs that is easier for beginners to do. All others require more carpentry skill.
How to make a joint from a log frame into the lower bowl is shown in the video below. The explanation is detailed, showing techniques for working with an ax and the full procedure. First you just need to talk about the tool that is used to draw the log. This is a carpenter's trait or scriber.
The device is very similar to a school compass. There is also a sharp stop on one side and a pencil on the other. Just like in a compass, the required distance is fixed with a screw. Having placed the ends at the required distance, the sharp part is guided along the log for which the bowl needs to be cut. Using a pencil, respectively, according to the one in which the groove and bowl will be cut. This produces markings, which are then drawn with a marker. It will become clearer when you see the process of marking the bowl in the video.
Actually, now a video about how to connect logs into the lower bowl. The first part deals with molding the longitudinal groove, the second directly deals with cutting the bowl.
Connection in okhryap
This type of connection consists of two semicircular bowls. In order for a corner folded using this method to be warm, considerable experience is required: even minor errors in the width of the groove or the thickness of the lintel will cause drafts.
Log in okhryap
Types of fasteners
Connecting bars at right angles is done using different methods. In fact, they are all divided into 2 types : with and without additional fasteners. This is due to the fact that the fastening for such joints is made of metal, and the properties of the latter are very different from the characteristics of wood.
The corner is a universal fastener. The bars are installed at 90 degrees at any length ratio, a metal corner is placed on one or both sides and secured with self-tapping screws, nails or screws. Since parts are produced with different angles between the plates, the bars can be secured at any desired angle.
Curly steel plates and iron staples can be used .
Assembly without corners is more common, although it requires more experience and skill. In this case, grooves are made in one or two bars and elements are inserted so that they form one whole. Due to the heterogeneous structure of the wood, a very large friction force occurs during adhesion, so the fastener is very reliable.
Construction technology
Waterproofing the foundation
The construction scheme and sequence of work during the construction of a wooden building are not much different from the algorithm for constructing a stone one. However, the characteristics of the material dictate a number of features.
- Selection of material - timber is selected not only according to its load-bearing capacity, but also according to heat conservation indicators. Otherwise, the house will have to be insulated, and thermal insulation has very different properties from wood.
- The foundation must be thoroughly waterproofed. The base draws moisture from the ground, and transferring it into wooden walls will lead to rapid deterioration of the material.
- The design of a wooden building must include detailed drawings of both the main angles and the connection of the timber - longitudinal, T-shaped, corner.
- In a house made of timber, floor joists and a subfloor are laid immediately after installing the bottom trim , and then the building frame is assembled.
If dry profiled timber is used, windows and doors can be installed immediately after installation of the roof. Then communications fail.
Cross Lap Knit
Lap knitting is a universal connection of lumber, used when laying walls made of logs and timber. The workpieces are placed at right angles into cut-out grooves; the size of this groove depends on the size of the material used. Such a lock is used in the construction of log houses and ceilings, the construction of bridges, and the construction of canopies. The main methods of cross fastening:
- Half-tree connection;
- Quarter and third wood joint;
- Notch in one row.
The most widespread cross-shaped connection in half a tree is when cutting corners into a bowl; it is used in the construction of utility structures, residential buildings and baths. The structure is reinforced with building brackets, dowels and dowels.
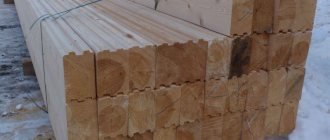
Length extension
The length of industrially produced timber is determined by GOST 24454-80; of the many sizes of timber, 3- and 6-meter blanks are most in demand. When splicing, the ends of the joined beams are secured in various ways:
- Half-tree connection;
- On the root thorn;
- Straight patch lock;
- Oblique patch lock;
- Oblique cut.
The choice of fastening for the connected beams depends on the tasks at hand. For decking, a straight lock is used; for vertical supports, a half-tree or tenon lock is used; for the construction of 3D structures, oblique locks are used. Locks are reinforced with building brackets, dowels and dowels; bolted fastenings are used for load-bearing supports. In order to maintain the uniformity of the surface texture of the laminated veneer lumber, the length is increased using the toothed connection method or butt joints with a key, and the joints are reinforced with waterproof glue.
The longitudinal installation of timber roof rafters has its own characteristics - it is necessary to take into account the impact of multidirectional loads. For the connection, an oblique cut is used, reinforced with bolted fastening with a diameter of 10-12 mm.
Cutting logs with corners without residue
As we said earlier, the corners are colder without any residue, but they allow you to significantly save on building materials.
Angle "to the paw"
Among the joints of logs in the corners, the “paw” method is popular. It is easy to implement, and at the same time provides high strength and reliability of the connection. Also, the presence of inclined cuts makes it possible to achieve high tightness. The method has been tested for a long time, even GOST standards have been developed: size tables for each log diameter (see photo).
Table of foot joint sizes for different log diameters
All dimensions are plotted relative to the found middle of the log and a vertical line drawn from it (it is drawn using a plumb line).
Connecting logs without leaving any residue. Angle to paw
The order of work is as follows:
- Find the length of the cut part (called the block). It must be no less than the diameter of the largest log available (in the figure it is marked L). We set this value aside from the edge of the log (let it be 250 mm), draw vertical lines in these places. They will be the boundaries of the idiot.
- Let the diameter of the processed log be 200 mm. From the middle line, ½ of the value of A is set aside. D for a 200 mm log is 141 mm. We divide this value in half and put it on both sides of the center. We draw vertical lines.
- We trim (cut with a chain saw). As a result, you should get the same picture as in figure a).
- We take the appropriate dimensions from the table and mark them on the block.
- We trim off the excess (cut it off). The result should be a figure like in Figure b).
This is what the angle from the logs into the paw looks like (dovetail due to the fact that the connection is in the form of a trapezoid)
All logs are processed in this way one by one. As you can see, the dimensions depend on the diameters of the logs. In order not to have to worry about drawing every time, they make templates from thin plywood according to the diameters of the logs that are available (they label them). Then, having found the middle and made a block, they apply and trace a suitable template. With this order of work, there is less chance of making mistakes, and chopping bowls takes less time.