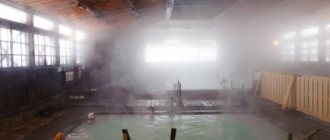
The bathhouse is that universal place where, since ancient times, people have become accustomed to relaxing, forgetting about problems, and cleansing and healing the body and spirit.
However, this is only possible if it is built correctly, since the bathhouse is a room in which the likelihood of a fire is quite high. Of course, to some extent this is justified by the presence of a stove in the building, as well as a chimney, because they heat the room to very high temperatures. But electrical wiring in a bathhouse is no less a fire hazard.
Quite high demands are placed on the quality of materials and devices for arranging electrical wiring, as well as directly on the installation process. The safety of both the premises itself and the people in it depends on compliance with these requirements.
Attention! Due to the increased danger of the bath room, it is recommended to trust the installation of electrical wiring to a professional in order to avoid mistakes and unpleasant consequences.
Dividing the steam room into zones
The electrical wiring in the steam room will be in different conditions depending on its location. The hottest areas are under the ceiling and near the stove. The only thing that remains unchanged in the steam room is the presence of moisture and splashes of water.
In order to formulate clear requirements for electrical equipment in the steam room and its placement, it is divided into 4 zones.
Zone No. 1 is a place to place devices for heating water. They may be electrified, but in any case there should not be any other electrical equipment there. The zone is limited to a horizontal distance of 0.5 m from the furnace body. Its upper edge is determined by the lower border of zone No. 4.
Zone No. 2 - equipment can be placed in it without restrictions on the effects of temperature. It starts from the floor of the steam room and ends at a height of 0.5 m above it.
Zone No. 3 already requires that electrical equipment located within its boundaries be heat-resistant. Cable insulation must be designed for a temperature of at least 170˚C, everything else - at least 125˚C.
Zone No. 4 is intended only for the installation of control devices for the operation of electric furnaces, that is, temperature sensors. Its boundaries are 0.3 m from the ceiling level. All space remaining from zones No. 1, 2 and 4 belongs to zone No. 3.
If an electric heater is used to heat the water in the steam room, then a sensor must be installed in zone No. 4 that turns off the heating when the temperature in it exceeds 140˚C. Of course, this value can be adjusted downward depending on the wishes of those being washed. But you cannot increase the shutdown threshold value of 140˚C.
Plug sockets should not be installed in any of the steam room zones , no matter how much temperature protection they have. Lamps can be placed in zones No. 2 and No. 3, but traditionally, on the ceiling, this will no longer work - zone No. 4 does not allow this.
Protection class of electrical equipment in the steam room
All electrical products are divided into classes according to the degree of protection against foreign objects and water getting inside the housing. The marking is applied to the packaging and body of the product and consists of the IP designation and at least two numbers.
The minimum requirement for electrical components in the steam room for this parameter is IP24 .
The first number indicates the size of objects that should not fall inside the housing. For the number “2” these are particles with a size of no more than 12.5 mm.
The second digit defines the conditions under which water should not enter the housing. For “4”, splashes or drops falling at any angle to the product should not penetrate inside.
Decoding the degrees of protection of electrical equipment
Since IP24 is the minimum requirement, with increasing numbers in the marking it is also met. If the product has IP44, then it can also be used, but IP21 or IP20 is no longer possible.
The protection class is indicated on the housings of all electrical installation products without exception.
Useful video
We do not agree with everything that the author of this video says, for example, when he recommends metal corrugation, which is prohibited by the PUE. But regarding the use of RKGM for inserting wires into steam room lamps, we completely agree.
*** So, this article examines only part of the theoretical issues related to electrics in the bathhouse. The practical part, which describes the procedures for installing it yourself in specific rooms, will be in the next article.
The topic of wiring in a bathhouse is discussed more widely on the page of the corresponding section.
What is prohibited to use in the bath
It is prohibited to lay cables in metal pipes or ducts in bathhouses. These products cannot even have a metal shell. This is due to the fact that metal in a humid environment is susceptible to corrosion, which will disrupt its connection with the grounding device. If a life-threatening potential appears on the metal surface, timely shutdown of the emergency section will be impossible. And it can appear due to damage to the insulation of the cable laid inside.
For the same reasons, cables with a metal sheath cannot be used for installation.
When using plastic pipes, the internal cavity must be sealed and not allow moisture to pass through. In other words, the same IP24 must be ensured for cavities with cable lines.
The following cannot be installed in the steam room:
- plug sockets;
- switches;
- junction boxes.
Wiring for standard temperature conditions
Typically, several types of cables are used in such premises. Among the most common are the following:
- NYM;
- AVVG;
- PVS;
- VVG.
Such wires can be laid using both hidden and surface methods. In this case, the main condition must be met - ensuring reliable insulation. After all, saunas and baths are usually built from wood, which is easily flammable. Cross-linked polyethylene, polyvinyl chloride, and other polymer materials are used as insulating materials.
If we talk about lighting devices, they are connected via cables:
- NYM 3*1.5;
- VVGng-LS 3*1.5;
- PPGng-HF 3*1.5.
https://youtube.com/watch?v=4KDD06XU380
Sockets are mounted using wires with a cross-section of 2.3 square meters. mm.
Laying hidden electrical wiring
Electrical Installation Rules (ELI) allow for both external and hidden installation of cables and wires in the bathhouse.
Hidden electrical wiring in the bathhouse is preferred, but theoretically both options are possible. Which one to choose?
Let's start with what materials the walls are made of. If it is brick or concrete, then performing hidden electrical wiring is more than justified. All cables will be hidden in grooves sealed with mortar. The electrical wiring is thus maximally protected from mechanical damage.
Basic elements of hidden wiring
Hidden laying of cables inside wooden walls or under lining is also possible, but for this it is necessary to additionally protect them by placing them in plastic pipes. Let us remind you: they should not have a metal shell. For pipes inside the walls you will have to choose grooves. In order for everything to turn out quite beautifully in the end, this must be done during the process of erecting the walls of the bathhouse.
The disadvantages of the hidden method of laying cables include:
- increased labor intensity and cost of work;
- It’s difficult to redo something after finishing work;
- you need to remember the location of the routes so that when you try to hammer a nail into the wall, you do not get into the cable line;
- access to cable products is permanently closed.
The PUE requires that it be possible to replace cables laid in pipes. But in fact, they can be changed if you make a route with a minimum of bends. When using corrugated pipes hidden in the wall, this opportunity is usually lost.
When installing hidden electrical wiring in rooms with wooden walls, special care is required. Any nick on the cable, the use of low-quality products, or installation errors can lead to a fire over time. Despite the fact that plastic for pipes does not burn readily, there is still a possibility of fires even when using cables that do not support combustion. It will be difficult to find such a source.
How to hang a lampshade
Fixed installation lamp
Bath lamp with wooden shade
Classic bath lamp
There are so many lighting lamps that it is unrealistic to consider the connection of each of them. We will only talk about general universal rules.
Step 1: Turn off the network power. If the shield is located far away, be sure to hang a warning sign on it
This is very important, power supply switching on by mistake by third parties has happened more than once
Turn off the power to the sauna
Step 2. Study the lamp's instructions. If it is not there, disassemble the lampshade, find on the body the place where the power cables enter and where the body is fixed. We hope that the switch is connected correctly and the phase is connected through it.
Fastening and cable entry point
Mounting the lamp
Step 3. Attach the lamp to the wall or ceiling, before inserting the wires into the mounting holes on the body. Check the serviceability of the cartridge with a tester. Sometimes the pins are not attached in good faith; the contacts will overheat and burn out over time. Tighten all the clamps; if the terminals are riveted, touch them, they should not wobble.
Step 4. Strip the ends of the wires to a length of approximately 5 mm; if the cable is multi-core, tin the ends or at least twist them tightly. Insert into terminal blocks and tighten.
Step 5. Screw in the light bulb, check the wiring for a short circuit. Everything is normal - put the decorative lamp in place and turn on the power.
Fixed luminaires
Pay attention to the strength of the attachment of the lampshade to the supporting surface. If the lampshade is plastic, be sure to follow the recommended maximum wattage of the incandescent light bulb
For energy-saving lamps, completely closed shades cannot be used - they must be constantly cooled with fresh air.
Ventilated lampshade for a bath - diagram
Wooden grille for lamp
Open cable routing
External cable routing is carried out in the form:
- wires on rollers;
- cables directly on the surface;
- in plastic cable channels;
- in corrugation;
- in the pipes.
But each of these methods has limitations for use depending on the material of the walls and the degree of flammability of the cables. Let's take a closer look at them.
Laying wires on rollers
This method copies the old electrical wiring that was used at the dawn of the country's electrification. Porcelain rollers are attached to the gasket path using a regular nail or self-tapping screw. The wires are twisted together and put on the recesses in these rollers. It looks kind of retro.
Installation of wires on rollers
But twisted two-core wires with this method can only be used in dry rooms. No matter how insulated they are, it is prohibited to use them in a bathhouse or sauna .
Open laying on surfaces
Cables sheathed in fire-resistant or non-combustible materials can be laid directly on the surfaces of any walls. If they do not satisfy this condition, then this method is only suitable for non-combustible walls.
Installation of cables with brackets
For installation, specially shaped plastic brackets are used, which have a recess for holding the cable and a hole for attaching to the wall. However, the cable does not have any additional protection, which is a serious drawback. The likelihood of mechanical damage to the cable in a bathhouse is negligible compared to outbuildings. But who will give an absolute guarantee that this will always be the case?
Another drawback is the low aesthetics of the resulting structure.
Laying cables in channels
Plastic cable channels make electrical wiring more aesthetically pleasing. They can be installed on both combustible and non-combustible surfaces made of any materials. In this case, the cables can be easily removed and replaced with new ones, and an additional line can be added to the channel at any time. The main thing is not to fill them to capacity so that the cooling conditions are not disturbed.
Installation of cables in plastic channels
But this method cannot be used in a steam room: the channels cannot be made perfectly sealed. But the dressing room is the right place for them.
Laying cables in corrugation
Corrugation is an abbreviated name for plastic corrugated pipe. That is, it is the same plastic pipe, only flexible. What gives it comprehensive spatial freedom: it can be bent anywhere and in any way, laid along any intricate path. The bending radius is limited only by the permissible bending radius for the cable located inside.
To attach the corrugation to the surface, plastic clips or metal brackets are used. For each pipe diameter, these products are personal, as they are designed to clearly fix it, without crushing or allowing loosening. Clips are also interesting because they can be assembled into blocks to attach several parallel lines at once.
Installation of electrical wiring in a corrugated
The diameter of the corrugated pipe is selected according to the outer diameter of the cable. He should go inside freely. To pull the cable into the pipe, a steel cable is laid inside it - a conductor.
When installing in damp areas, corrugated electrical wiring is subject to the following requirement: moisture should not get into it . Therefore, if in dry rooms it is enough to bring the corrugation to the lamp and insert the cable inside it through the gland, then in the bathhouse the corrugation should go into this gland itself. When entering the junction box, even though it is no longer in a humid room, it is recommended to do the same.
Laying electrical wiring in pipes
Since only plastic pipes are allowed in the bathhouse, it makes no sense to mention metal ones. Compared to corrugated ones, which can be laid quickly and without spending serious effort and financial resources, plastic ones will require a more serious approach.
In fact, such installation is very similar to the assembly of water supply pipelines. Each turn, entrance to a lamp, box, switch or socket will require additional fittings. The entire route will have to be marked in advance and the amount of materials needed will have to be calculated. Only after purchasing them should you begin installation. In this case, the dimensions of the pipes must be maintained with the necessary accuracy, otherwise, after attaching the structure to the walls, additional destructive forces will arise in it.
Despite the complexity, this wiring has many advantages over all previous ones. It provides the most reliable mechanical protection. Better - only steel pipes, but in the case of a bathhouse they cannot be used. Corrugation can break, and not all corrugations are suitable for baths - let’s remember about heat resistance. For both plastic and corrugated pipes, the requirements for placement in a steam room are the same as for electrical equipment.
The plastic pipe inside is slippery and smooth, therefore the requirement of the PUE to make electrical wiring in domestic premises replaceable is met. This quality can be useful for modernizing the electrical grid.
And one more advantage: cable passages through the wall from the steam room to the dressing room must be done in pipes for any type of electrical wiring. Moreover, there should be one cable in one pipe. If the electrical wiring is initially made in plastic pipes, then it will turn out very organically.
Attach cable duct to wall without drilling
How to attach a cable duct to a concrete wall You don't need to be a home renovation professional to securely attach it to the wall:
- How to attach a cable channel to a concrete wall; as an option, specialized stores sell self-adhesive cable channels that can be attached to various surfaces without the need for drilling;
- when purchasing, make sure that the adhesive surface is not too small so that the back will fit well to the wall in the future and will not sag;
- cut the cable box to the required length;
- then remove the protective film from the adhesive tape and press firmly to the surface;
- make sure that you place it exactly, as it will be impossible to correct it later;
- If you want to attach the channel to the tile, you must first remove dirt and grease from the surface. To do this, use warm water with dishwashing liquid or silicone remover. After this, the surface should be completely dry;
- if the cable channel will be used on an uneven surface, for example if, for example, wood chips stick, use additional installation adhesive;
- excess glue around the edges can be wiped off with a lint-free cloth;
- Allow the glue to dry thoroughly before inserting the cables.
Cable selection
The requirement for temperature resistance of cable insulation was indicated above. But this is only for products laid around the steam room. All other cables or wires passing through the dressing room may not have such qualities.
The permissible core material for cables is copper. The use of aluminum in domestic buildings is allowed only if its cross-section is equal to or greater than 16 mm2. An exception is possible only for engineering equipment, which includes:
- air heaters;
- fans;
- air conditioners;
- pumps.
But even in this case, the cross-section of the aluminum core should not be less than 2.5 mm2.
But the minimum cross-section for copper cables used in domestic premises should not be less than 1.5 mm2 for lighting networks, and 2.5 mm2 for socket groups. What it should actually be is calculated based on the load current. Change is only possible for the better.
For single-phase consumers (lamps, sockets, exhaust fans, etc.), the number of cores in the cable should be three. If the lamp is controlled by a two-key switch, 4 wires are used.
The purpose of the cores in a three-core cable: phase, neutral and protective conductor. A blue core is always used as a neutral wire, and a yellow-green wire is used as a protective wire. For phase, what is left is usually white or brown. It is prohibited to use the blue or yellow-green conductors for any other purpose.
Three-core cable core colors
The same applies to five-core cables used to connect three-phase loads.
Purpose of cores in a five-core cable
Even if the socket does not have a grounding contact, and the lamp is enclosed in a plastic case that does not have a terminal for connecting grounding, a three-wire cable must still be laid to them.
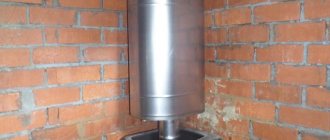
The use of electric heaters for baths
There are many supporters of heating a bathhouse the old fashioned way, with wood. But there are more and more people who want to steam with greater comfort, while putting a minimum of effort into preparatory operations. To do this, the water for the bath and the air in the steam room are heated with electricity.
For these purposes, either one device is used, or different ones. In the first case, an electric oven is installed in the steam room, heating both the water for washing and the air. In the second, the stove heats only the air, and a conventional boiler installed in the dressing room is used to produce hot water. If you have a boiler, a water supply system is required. There are other options, such as using an external storage tank.
Boiler in the dressing room
The installation location of the electric heater in the steam room belongs to zone No. 1. Apart from it, nothing should be there, but what about the power cable? Let's remember about the traditional method of heating with wood: after all, they are thrown not from the steam room, but from the dressing room. It’s the same with electricity: the cable is connected to the electric heater on the side of the steam room.
Attach to the wall
It is not always possible to lay cables under plaster. Cable channel is a good and inexpensive alternative.
Attach to the wall with self-tapping screws:
- Can also be secured with screws.
- Many already have pre-drilled holes.
- After cutting the duct to the required length, drill corresponding holes in the wall.
- Then you can insert the dowels and secure the air duct with self-tapping screws.
Placement of electrical equipment
Now that the basic principles of placing electrical equipment in a bathhouse are known, you can begin to develop a project. The final result depends on how well everything is thought out in advance.
You won’t have to think twice about electrical equipment in the steam room. Only lamps and, if necessary, temperature sensors can be installed there. All that remains is to select these same lamps in accordance with the requirements indicated above.
The number of sockets in the dressing room depends on personal wishes: you will need to decide what electrical appliances you will use there. There are many options, some of them approach the relaxation process so thoroughly that they can’t even do without a TV. Moreover, they want to be able to charge mobile phones.
The minimum possible number of consumers in the dressing room is electric lighting and an outlet.
Now we determine the exact location of sockets, lamps and switches. Let us remind you: all switches are located in the dressing room. Modern rules allow their installation at a height of no more than 1 m, while the distance to the door or window opening must be at least 10 cm.
Permissible distances to sockets and switches
Sockets can be installed at a height of 30 cm from the floor or more. But there’s no need to be shallow here. If you plan to quickly connect electrical appliances to an outlet, you need to provide better access to it. Therefore, under the table it is worth hiding only those sockets into which stationary electrical appliances are connected, for example, a TV or radio.
The socket for the boiler can generally be installed higher so that its power cord does not dangle under your feet. But at the same time, a space of 20 cm to the ceiling must be left free from electrical wiring, with the exception of lighting.
Attach cable duct without drilling
Drilling holes in the wall creates dirt and damages the wall. Because we only had one cable. Fortunately, now specialized stores have ready-made solutions with a built-in adhesive surface.
However, these tapes are very thin. Do not always work properly and whether this type of installation is recommended depends largely on the ground and the number of cables. In case of doubt, as already mentioned, using professional double-sided tape or mounting adhesive helps.
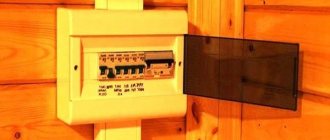
Electrical panel and protective devices
You can’t do without this element in a bathhouse. The power cable will come into it, and the protection elements will be placed there. Cable lines will run from it throughout the bathhouse. And they need to be protected from overloads and short circuits, for which automatic switches are installed in the panel.
Electric panel in the bathhouse
First, let's decide how many lines there will be and what kind. Let's start with something simple - lighting. It is impractical to divide it into separate groups: it is unlikely that all lighting fixtures in the bathhouse will have a significant load. We add up their powers, assuming that the lighting can all work at the same time. Dividing the resulting figure in watts by 220 (mains voltage), we get the maximum current consumption.
Even if there are 5 incandescent lamps with a power of 100 W each, the result is a meager value: 5 * 100/220 = 2.3 A. For such a situation, it would seem that a 4 A circuit breaker would be suitable - the closest standard one produced by industry. But in relation to lighting, it is better to slightly increase this value. Lamps consume little starting current when turned on, regardless of what type they are: incandescent, energy-saving or LED. In the last two types, the capacitors in the drivers are charged at the moment of switching on. This fact can lead to erroneous operation of the protection.
Let's add to this that the lighting lines will be made of copper cable with a cross-section of 1.5 mm2. It can withstand a load current of up to 15 A for a long time. In this case, the machine is more needed to protect the cable line, so for lighting networks it is customary to use 6 or 10 A circuit breakers.
16 A circuit breaker with characteristic C
We do the same with the rosette line. There is no point in splitting it into separate groups in the bathhouse either. But some consumers will require a separate line with a personal cable from the panel to the outlet. This:
- boiler;
- washing machine;
- air conditioner.
This also applies to electric stoves, but they are not appropriate in a bathhouse. But, if there is an electric heater in the steam room, a separate line with its own automatic switch is also made for it. The selection of a machine for its protection is made in the same way. To do this, the current consumption is calculated based on the rated power.
For boilers, washing machines and air conditioners, manufacturers often indicate the recommended parameters of protective devices in the data sheet. If this data is not available, then it is quite acceptable to use 16 A circuit breakers, and lay the electrical wiring from them with the same 2.5 mm2 three-core copper cable.
Calculation of the total power of consumers planned for connection to other outlets is advisable only if there are electric heaters among them. In all other cases, 10 or 16 A circuit breakers are quite sufficient.
And one more important point: all outgoing outlet lines in the bathhouse, including the power line of the electric heater, boiler, air conditioner and washing machine, must be additionally protected using an RCD. The differential current of the device used is no more than 30 mA, the rated current of the contact system is one step higher than that of the line machine.
Residual current device (RCD)
Now, having collected all the protective equipment together, you need to select the housing of the distribution panel so that it all fits. A typical shield diagram is shown below, but there are many variations.
Typical diagram of a shield for a bath
It is recommended to leave 30 percent of the volume reserve for expansion and development. We install the shield in the dressing room so that it is convenient to insert the supply line into it.
Lighting elements
Now let’s look at the components of each lamp, because inside the same model you can put lamps of different types, and surround the outside with a lampshade, which will make the sauna more comfortable and stylistically uniform.
Lamps
The following types are allowed in the sauna steam room:
- incandescent lamps;
- LED;
- halogens.
ATTENTION! Please note that we are only talking about lamps, so we will not mention LED strips and fiber optics, although they can also be installed in the steam room.
Incandescent lamps
Ordinary lamps, known since time immemorial when the entire country was electrified.
The only limitation that should be taken into account concerns power - it is not recommended to use more than 60 W in the steam room, but there are no restrictions on the number of light bulbs. However, there are two unpleasant aspects associated with them:
- Firstly, they are quite fragile, break easily, and burst easily if cold (relative to their own temperature) water gets on the flask when it is heated.
- Secondly, they are connected to a 220 V network, so if there is a problem, a person can be killed by such a current. Moreover, in a bathhouse, where it is humid and water conducts electricity very well. True, there is an option: installing 36-volt ones through a transformer, many people practice it.
To protect against the first - lampshades, nets and lampshades. From the second - RCD.
LED bulbs
LEDs can be in the form of lamps and in the form of strips. Here we will consider only lamps. More complete material can be found at this link.
The sockets are different, but the E27 socket is typical for bath lighting - this is a medium threaded socket with a diameter of 27 mm, which is suitable for incandescent lamps, and for LED lamps (if they are designed for 220 V), and for halogen lamps.
BY THE WAY! LEDs are still installed in the bathhouse not so much for the sake of reducing energy consumption, but because they are powered from a low-voltage network, most often 12 V (24 and 36 V are also possible).
For LED light bulbs that are powered from a 220 V network, you can also install an RCD. And for 12-volt ones, connect either a step-down transformer (see article on electricians in a bathhouse) or a switching power supply.
IMPORTANT! The power supply should preferably have galvanic isolation, which will not allow 220 V to flow into the circuit in the event of a failure. The transformer and power supply are installed outside the steam room
The transformer and power supply are installed outside the steam room.
And now the most important thing: you can put LED lamps in a sauna, but they will not last long, because for them the temperature is already above 65 degrees on the crystal. Just imagine that the crystal itself gets very hot during operation, so heat removal is needed, which is unattainable in an overheated sauna.
So you either need to place the strips somewhere lower, as a backlight, or abandon the idea of LEDs altogether, and use regular incandescent or halogen light bulbs closer to the ceiling.
Halogen
These bulbs tolerate high temperatures well, but are not without their drawbacks. In particular, this concerns their service life. Interestingly, LEDs do not respond to the number of times they are turned on, while for halogen ones, each turn on reduces their service life.
In principle, you can find both 220 V and 12 V halogen ones on sale, but the latter have a different base from the standard E27, and in general they are not intended for insertion into conventional structures with lampshades.
Power line laying
The bathhouse does not need to be connected to the overhead lines of the networks that transport electricity throughout the holiday village or village. It is connected to an electrical panel located in the main building. It is possible to connect to the input distribution panel where the electric meter is located, provided that it has space for installing an additional circuit breaker and the ability to output an additional line.
The automatic switch protecting the power line of the bath is selected from the total current of its load. To do this, you will need to add up the powers of all simultaneously switched on consumers. Based on this current, the cross-section of the cable or SIP is selected.
Voltage can be supplied to the bathhouse in two ways: overhead or underground. Let's look at how to do it better, identifying the advantages and disadvantages of both methods.
Overhead power line
This method of introducing power into the bathhouse is beneficial if it is not possible to dig a trench for the cable on the site.
The days of aluminum wires mounted on porcelain insulators are gone. Now overhead lines are laid using self-supporting insulated wire, abbreviated as SIP. Its cores are insulated along the entire length, resistant to weathering and not destroyed by sunlight.
And the main advantage of SIP is that it is not as afraid of falling trees as a bare aluminum wire. Not only does it withstand greater breaking force, but due to the strong insulation, it is very difficult to create a short circuit on the line. For the same reasons, it is safe, since a correctly assembled line does not have exposed conductive elements.
Structurally, self-supporting insulated wires are divided into types:
- SIP-1, SIP-1a - working insulated conductors are twisted around a supporting core having an increased cross-section. This core is used as a protective neutral (PE) or combined (PEN) conductor. For SIP-1, it does not have insulation, so laying it along the walls of buildings and in areas accessible to touch is prohibited. Fastening the wire to the supporting core.
- SIP-2, SIP-2a - have the same design, but a larger operating temperature range.
- SIP-4 (not to be confused with four-core wires!) - all wires are of the same cross-section, fastening is carried out by clamping them simultaneously.
The SIP-4 wire is used only for making entries into the building; it cannot be used for laying main lines. For this, SIP-1 and SIP-2 are used. These are exactly what will need to be used to transport electricity from the house to the bathhouse.
To fasten SIP, special fittings are used - anchor clamps, which are attached either to the load-bearing core (SIP-1, SIP-2), or to all the cores at the same time (SIP-4). To hook the clamp to a post or wall of the house, appropriate brackets are used. Naturally, each wire model has its own fittings.
Fittings for fastening SIP
The design of the SIP line from the house to the bathhouse will depend on local conditions: the distance between objects, the presence of obstacles on the route, the possibility of attaching anchors to the facades. At large distances, additional supports may be required; it is possible to use the existing support on which the metering unit is located. The choice of both the wire itself (it is even possible to use SIP-4) and the mounting hardware for it will depend on all of the above.
When designing a line, it is better to contact specialists in this field.
Although the introduction of self-supporting insulated wires into buildings with a connection directly to switching devices is used, it has a number of disadvantages:
- It is difficult to ensure a good connection with the terminals of automatic switches, since the material of the current-carrying core of the SIP is poorly deformed, the contact is point-like. Overheating is possible at the connection point.
- The wire is very rigid; sharp turns in small volumes of distribution panels are difficult to make.
- Due to the fact that the conductors do not have a common sheath, it is difficult to protect the input from moisture and dust where it is necessary.
Therefore, conventional cables are used for entry into the building.
Input into the building from SIP with cable
They are connected to the line wires using sealed branch clamps, also related to standard fittings for SIP.
Cable power line
The main advantage of powering a sauna with a cable is its complete invisibility. But this same property is also the main disadvantage: if it becomes necessary to carry out excavation work on the site over time, you must not forget about it.
If the cable is laid during the construction of a house along with a bathhouse, then places for the output and input of the line are organized in advance. To do this, pipes are laid in the foundations in advance. At this stage, you can dig a trench and bury the cable in it, leaving its ends inside the unfinished buildings. At the same time, ensuring their reliable protection from moisture.
If the installation is carried out between ready-made buildings, then where the cable goes underground it is protected from mechanical influences by steel pipes. They must be bent so that the transition of the cable from the vertical to the horizontal plane passes inside the pipe. Bolts must be welded to the pipes for connection to the ground loop. This is done before laying the cable in them.
Cables also pass through the wall through steel pipes. The insertion point is sealed with fireproof materials.
The trench for laying is at least 0.8 m deep. A sand “cushion” about 10 cm thick is poured onto its bottom; after laying the cable, it is covered with the same layer of sand. Do not pull the cable too tight - small zigzags will dampen the influence of seasonal ground movements.
Laying cables in the ground
Red brick is laid on top of the sand cushion for mechanical protection. Recently, it has been possible, instead, to cover the entire bottom of the trench over the cable with a special signal tape, so that during excavations, you can identify in advance a place where you can’t dig further.
Next, the trench is filled with soil without construction waste.
Connection technology
A separate power cable for the sauna and washing room is connected in two ways - overhead and underground, depending on the distance of the country house to the switchboard.
The first one is the most economical. When laying above a roadway, it is necessary to maintain a height to the ground surface of about 600 cm. The bathhouse has a water line height of 2.75 meters. SIP cable of various brands is used. The diameter of the conductors is 16 mm2, withstanding an electric charge of 63A. Connecting one phase and zero is designed for 14 kW of energy, three phases - 42 kW. Flaws:
- the surface is covered with insulating material that prevents connection to the contact protection communication device;
- The aluminum core does not bend well. Laying through the space under the roof is not allowed.
NYM, VVG, NG cables with hermetically sealed connectors are introduced into the building. Insulated conductors enclosed in a sheath are secured with anchor rollers.
Underground wiring requires additional financial investments:
- A narrow, long excavation is made in the ground, one meter deep. The base is covered with sedimentary rock. After laying the network cable, the backfilling operation is repeated;
- a high-cost armored cable with copper conductors V56Shv, which has a high guarantee of safety, is purchased. The steel braided coating between the plastic shells protects against rodents and natural destructive processes. Lining in hollow profiles is not used due to the accumulation of moisture from the evaporated liquid.
Bath grounding circuit
The bathhouse is a facility with increased electrical hazard, so having its own re-grounding circuit is highly desirable. Its resistance is not standardized, so you can do without complex calculations.
If your house, from which the bathhouse is powered, does not itself have a grounding loop, the question becomes even more pressing.
The simplest grounding loop can be made from three steel pipes or angles 2-3 meters long, hammered into a triangle at a distance of 2-3 m from each other. Before this, you need to dig a trench around the perimeter of this triangle with a depth of 0.5 m.
Building re-grounding circuit diagram
The pipes are almost completely clogged in the corners and connected to each other with a steel strip. The connection is made by welding, the seams are painted to protect against corrosion. All other parts located in the ground should not be painted.
A contact lead from the same strip is drawn from the circuit to the wall of the building. A bolt is welded to it to secure the grounding conductor. The conductor itself, yellow-green in color, with a cross-section of at least 10 mm2, connects the PE bus of the bathhouse panel to the circuit. The connection point is protected from corrosion; the use of a special box is allowed.
Output from the ground loop
The steel strip, starting from the point where it exits the ground, is painted black or alternating yellow-green stripes.
Choose the right cable channel
First, you need to choose the right size. As a rule, it is better to take a size larger. If the cable is added later, it can be inserted later without any problems. Therefore, if you want to run three cables, you should choose a channel for four cables so that you have some flexibility.
You also need to consider how the air duct will be attached to the wall. For long distances, large amounts of cables and ceiling mounting, it is imperative to use screws as the load is very high and otherwise the fastening may easily become loose.
You can also stick over short distances and several lines, for example on a TV. We really only need to run one network cable to the receiver. The duct tape was attached right to the back - perfect! This certainly made assembly very easy. Alternatively, double-sided tape can help here.