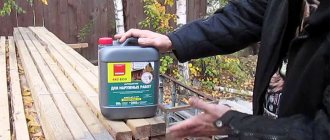
Wood has not lost its popularity for many centuries, but the material has a significant drawback: its decorative properties and reliability are lost due to external factors. You can increase the durability of a wooden product by using special solutions that can create a protective barrier from external factors. Often for this purpose they choose to cover the wood with stain or varnish. The features of each product, advantages and rules for their use will be discussed in detail below.
Modifications of stains
They are classified depending on what they are made from. They go on sale in the form of ready-made liquids, gels or powders, but the properties of stains depend only on the components and their proportions.
Water fighters
Pros:
- Such stains come in a wide variety of shades, so you can choose the composition for almost any type of wood and make it the required tint in relation to the interior of a particular room.
- "Environmental Safety". For those who are concerned about the “purity” of the product, water-based stains are the best option. No harmful fumes, regardless of external factors. First of all, temperatures.
- Considering the base, it is clear that it is not difficult to wash off such a stain with water. In some cases, this is relevant if, in the process of working with wood, it is necessary to slightly change the resulting shade.
Minuses:
- Water-based stains are deep penetration agents. This property also has a negative component. During the processing process, the wood is additionally saturated with liquid. What does this mean? Firstly, it becomes more susceptible to moisture absorption. Secondly, shrinkage lasts longer and often initiates curling of the processed workpiece. Therefore, the use of stains from this group requires both experience and accuracy.
- The need to subsequently apply a protective layer to the wood. For example, varnish, which is most often practiced.
Alcohol stains
Pros:
- The impregnation dries quickly. Some consider this a disadvantage, but the ease of use is obvious. Especially during outdoor work, when the weather is unstable and there is a possibility of precipitation.
- High-quality protection of wood from ultraviolet radiation and dampness.
Minuses:
- Strong specific smell. When organizing work in a room, it is necessary to ensure its effective ventilation. Will it be possible to do this in winter?
- Rapid absorption into the structure of the material. This makes it somewhat more difficult to treat wood with alcohol stains, since due to the uneven application of impregnation there is a risk of stains appearing against the general background. Experts advise using a spray gun, since it is almost impossible to achieve uniform shade of wood manually (with a brush) without proper experience.
Oil stains
Pros:
- Do not fill the wood with moisture.
- Easily change shade by adding dyes.
- The stains of this group are applied to the wood in a thin layer, evenly, so there are no difficulties in working with them.
- Do not fade when exposed to ultraviolet light.
- Application of an additional protective coating (varnish, wax) to the wood is not required.
- Inert to changes in ambient temperature and humidity.
Minuses:
- Certain toxicity.
- Long drying time (depending on application conditions).
Wax and nitro stains (acrylic)
Their characteristics are largely similar.
Pros:
- After such stains dry, a thin protective film appears on the wood.
- Uniformity of shade over the entire treated area is guaranteed. The presence of stains and bald spots is excluded.
- The structure of the tree stands out especially clearly.
Minuses:
- The difficulty of working with these stains. Mainly due to the quick “setting” of the impregnation. Therefore, any further alterations are no longer possible.
- One of the advantages of wood is lost - the ability to “breathe”. The reason is the film that forms. Not all users note this, but nevertheless. How permeable it is is a big question.
Rustic stains
Quite new drugs. Their main purpose is to emphasize the structure of the material, to achieve several shades in one area
The use of such compositions requires high professionalism, so the author does not focus on them. Only for informing the reader, since it is unlikely that it will be possible to process wood yourself
If, of course, we mean a quality result.
Kinds
There are 2 types of the product - aqueous and non-aqueous (oil and alcohol) stain.
Water-based stain is offered by manufacturers in a ready-to-use state or as a powder (dry mixture). This type of composition is used most often because it has a very diverse range of colors. The color of powder stain can be easily adjusted; it directly depends on the amount of granular substance, that is, the more of it, the richer and brighter the result will be.
The water-based composition has the advantage: there is no unpleasant odor, thanks to which the stain can be used indoors. The disadvantages of this type include the ability of the product to lift fibers during surface treatment. Due to this, the moisture resistance of the wood is reduced. The time required for the stain to dry completely varies between 10-14 hours, which can also be attributed to the disadvantages of the type of composition.
The technology of working with water-based stain requires first wetting the wooden surface, then sanding it. The composition is filtered before use. Only after completing such preparatory work can the wood be painted. It is not advisable to use this product on resinous woods.
Oil compositions include dyes dissolved in drying oil or oils. You can work with this type of impregnation with any tool. The product does not lift the fibers of the raw material and does not allow it to become saturated with excess moisture. Using a similar composition, you can get any color and shade, additionally using dyes. They are available in powder form; white spirit is used for dilution.
According to experts, oil stain is the simplest and most convenient to use. Oil-based impregnation is very popular among decorators and decorators due to the ability to obtain the desired color.
The advantages of oil stain include its environmental friendliness, since the most common base for it is linseed oil. It takes about 2 hours for the surface to dry completely. The composition does not leave stains.
Alcohol-based stain is a dissolved aniline dye. Impregnation is available in finished or powder form. The main task of the composition is to protect wood from the destructive effects of moisture and ultraviolet radiation.
The main advantage of alcohol stain is its ability to instantly absorb into the wood fibers. The composition dries on the surface in 30-40 minutes.
The disadvantages include the fact that it will not be possible to apply the composition to wood manually, since the alcohol will evaporate very quickly, which can lead to stains. For work it is better to use a spray gun.
Along with the above types of wood stains, fundamentally new products began to appear in the assortment of construction supermarkets. Modern technologies have allowed manufacturers to offer consumers water-based acrylic impregnation, as well as a wax composition. New products were developed to eliminate the main disadvantages of existing formulations.
Wax stain is used to restore old wood coverings; it perfectly covers up color discrepancies. In addition to the above characteristics, the positive qualities of modern compositions include their excellent moisture-proof properties. However, such products are very vulnerable to mechanical damage, so they should be varnished. Acrylic and wax liquids are available in a wide variety of colors. They highlight the wood structure well.
The disadvantages of acrylic stains include their high cost, as well as the possible formation of stains on the surface when applying two or more layers.
The main disadvantage of wax compounds is that they are not able to penetrate deep into the wood. The product only forms a protective layer on top of the material. This composition should not be used before treating wood with two-component varnishes or polyurethane.
Since the composition perfectly preserves the texture of the wood and protects it from the negative influence of many external factors, thereby extending its service life, the answer to the question of what is worth purchasing - varnish or stain - becomes obvious.
Experience of a stain coating specialist
An experienced craftsman selects stain depending on the chosen wood. For example, Minwax Wood Finish is suitable for soft aspen. This is a high-quality and inexpensive oil-based impregnation. On the Russian market it is represented in twenty-eight different colors.
Minwax Wood Finish stain colors
Coating with Gunstock color code 231 clearly demonstrates the features of working with stain. The work is carried out in stages.
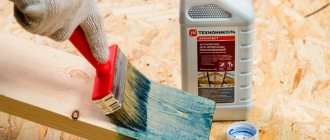
1. To ensure that the stain lays evenly on the wood and does not result in dark blots, use Minwax Pre-Stain Wood Conditioner as a primer. It penetrates deeply into the wood fibers, resulting in a uniform tone and beautiful texture once coated with an oil stain.
MINWAX stain and conditioner
2. Before covering the wooden surface with conditioner and stain, preparation is carried out. To do this, the wood is treated with 220-grit sandpaper and then cleaned of wood dust.
Sanding the surface Blowing away wood dust
3. Before applying the conditioner, mix the composition well. There should be no air bubbles in the jar as they will transfer to the coating.
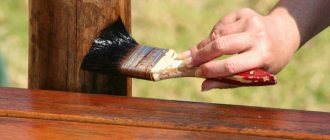
The conditioner is applied with a brush along the wood grain.
Surface coating with conditioner
4. Before applying stain, wipe the surface with a dry cloth. This must be done to remove particles of conditioner that have not been absorbed.
Cleaning surfaces covered with conditioner
5. Before application, the stain must be mixed, since the coloring pigment settles to the bottom of the jar during long-term storage. MINWAX Wood Finish is an oil-based stain that soaks in for 15 minutes and dries in 4 hours.
Like conditioner, stain is applied with a brush along the grain. In order for the coating to be expressive, the impregnation should not dry out during application, so layers are constantly added.
Applying stain to the surface
6. Separately, cover the end of the boards with stain, here it is absorbed like a sponge.
The end of the boards, impregnated with stain
7. The coating is allowed to dry, and after about an hour, any stain particles that have not been absorbed are removed with a dry cloth.
The coating is completely dry after four hours. As a result of staining, the wooden surface acquires the color Gunstock code 231, where the dark spots are dense wood fibers.
Surface coated with Gunstock stain code 231
8. To find out to what depth the impregnation has penetrated, cut out a thin strip of treated wood.
Impregnation control strip
9. The strip is ground until traces of impregnation appear on the reverse side. Use a caliper to measure the thickness of the strip. In the case described above, the depth of penetration of the stain into the wood was 0.07 mm.
Measuring the thickness of a strip impregnated with stain
In general, the surface treated with stain becomes bright with contrasting texture and relief
When choosing, it is important to take into account not only the characteristics of the impregnation specified in the instructions, but also the condition of the wood. In addition, you need to work with stain carefully so as not to spoil the wood.
Using materials: Websites: drevogid.com, womanadvice.ru, woodbuy.ru, stroisovety.org, stroy-podskazka.ru YouTube channel: The Fe Factor
Category “Wood Processing“
Join groups and Odnoklassniki
Gold plating
Before gilding with gold leaf, you need to prepare a very flat and smooth surface.
I cover the board with gesso primer. I let it dry completely and then sand it with fine-grit sandpaper. After sanding, it is better to smooth the surface with a piece of natural fabric, such as linen. Levskas has an absorbent surface, so you need to cover it with the first layer. In icon painting techniques, where gilding also requires a smooth surface, shellac varnishes are used for this, and here I also use shellac. After this, if any brush marks remain, you can sand and smooth the surface again. Then I apply another coat of shellac varnish.
If you want to get perfect smoothness, reminiscent of an even gold bar, it is better to use alcohol-based gilding compounds. I use acrylic water-based, it won’t achieve perfect smoothness, but you can get another beautiful effect. After the glue has dried to transparency, you can apply gold leaf. I use the classic one.
Ideally, special wide brushes are used to transfer it to the surface. Then the gold leaf will lie more smoothly and evenly. But I think that the resulting cracks and creases have their own charm. Moreover, you can scratch the gold leaf on top with a metal brush (Although I’m sure many would condemn me for this!). According to technology, classic gold leaf is sealed with alcohol varnishes to avoid oxidation. I use shellac varnish.
Flow calculation
The main indicator that must be taken into account when calculating consumption is the degree of porosity of the base material. Any stain has excellent absorbency. On average, one liter of composition is required per 15 m2
It is also important to consider the intensity of the shade. Conifers have low absorbency, so they will need to be processed in several layers to achieve the desired pattern, which will at least double the consumption
The amount of material used is affected by the shape of the surface to be painted, the presence of corner locks, and hard-to-reach places. On each container of the mixture, manufacturers indicate how much mixture must be used to obtain a certain pattern. The exception is oil compositions, the task of which is to saturate the wood until the pores are completely filled. In this case, the type of tree and its condition are taken into account.
Brushing without firing + washing technique
Of course, you can brush wood without firing it, which is exactly what I did before I bought the burner.
This can be done with special drill attachments and hard metal brushes. Or brush by hand, which is what I do. This, of course, is a great way to keep warm when there is no heating) You definitely need to sand the board after brushing so as not to get splinters.
Next I start painting. I apply purple and immediately wash off the unabsorbed paint with a wet rag. I introduce an additional color in some places - ultramarine - and do the same with it.
This technique allows you to delicately highlight the texture of the board. Next, I take green Chameleon paint, apply it to the entire surface, and also wash away the residue, allowing it to remain only in the depths of the pores. After drying, a delicate pearlescent effect is obtained.
Advantages and disadvantages
Due to its composition, water-soluble stain has a number of advantages over other types of tinting mixtures.
Let's highlight the main advantages:
- low price;
- no odor;
- environmental friendliness;
- ease of application.
Water-soluble mixtures are not the most functional type of stain.
- They take a long time to dry (fifteen hours).
- After processing and drying, lint may rise on the surface of the material. In this case, the wood must be sanded.
- Water stain applied in large quantities to a product can cause cracks to appear on the surface after drying.
Modern manufacturers of building materials also produce universal tinting mixtures, which can be classified as a type of water stain. Water, alcohol or acetone can be used as a diluent for universal compounds. The advantage of making an alcohol or acetone solution from a universal mixture is that it will dry faster.
Two-step craquelure
Two-step craquelure
imitates cracks that appear in the varnish over time. I will show how to create these cracks without covering the wood with paint or primer so that the texture of the wood remains visible. But, of course, such cracks can be created over a painted surface, or over decoupage, or painting, or even painting.
First I apply several layers of shellac varnish. I took the unbleached one because I really liked it in one of the previous methods. Wood is a very absorbent material, so you don’t even need to take into account the first layer of varnish; it will be completely absorbed. After it, it is better to apply another 3-4 layers of shellac varnish with intermediate drying.
Then, as in one-step craquelure, I distribute a thick layer of craquelure varnish over the surface. I leave it to dry for a day. In the morning, these gorgeous cracks appear in the light. If your room is humid or cool, there may be fewer cracks, then you need to warm the surface with warm air from a hairdryer. Craquelure loves dryness and warmth. To show the cracks, I rub oil paint into them. I cover the craquelure with shellac varnish.
Features of using wood stain
Wood stain is a special composition that is used to give wood surfaces a deeper shade. The compositions on the market are capable of painting wood in almost any color, and some of their varieties can also be used as an antiseptic. Unlike paints and varnishes, stains are able to penetrate deep into the wood structure without distorting its pattern and texture.
Depending on the main substance, wood compositions can be divided into five categories:
- alcohol-based - quick-drying compositions with aniline dyes. Sold in powder or liquid form;
- oil - mixtures of dyes diluted in oils. This type of composition is used to give wood bright colors. Dries quickly, easy to apply, creates an even layer;
- water-based - the most common, they allow you to paint wood in any color using a dye;
- with acrylic - form a moisture-proof film, painted without stains;
- wax - emphasize the texture of wood, making the natural pattern of fibers more expressive.
A separate variety is gel stain, which is a thick composition. This type of mixture is used when working with soft woods, as well as to imitate wood texture on surfaces made of other materials.
Where to buy wood stain at an affordable price in Moscow
Using the Leroy Merlin catalog, you can select and buy wood stain at an affordable price. We offer a wide range of products, low prices and convenient payment methods. Delivery of the ordered goods is carried out in Moscow and the Moscow region, as well as to other cities of Russia. Pickup available.
Selection of materials
Varnishing wood requires the use of high-quality materials and tools. Depending on the purpose of the wooden product and the conditions of its operation, it is necessary to use varnishes that have suitable characteristics.
There are several types of varnishing material:
- Oil varnishes are made on the basis of synthetic or natural oils, to which special components are added that increase the strength of the coating. Most often, oil varnishes are used indoors to treat walls and floors. The finished coating is transparent, but has a yellowish tint;
- alcohol formulations are made by dissolving natural or synthetic resins in alcohol. Alcohol varnishes create a thin coating that is unable to provide high-quality mechanical protection for wood, but at the same time they make its top layer more moisture resistant. Very often such products are used for priming wooden surfaces;
- Nitrocellulose products are prepared by dissolving nitrocellulose in organic solvents. Special additives are added to the composition to increase the strength of the varnish coating. Nitrocellulose varnishes are applied, usually in several layers;
- acrylic varnishes are made on the basis of polymer acrylic resins. They can be used to create not only transparent, but also painted surfaces. These materials are very durable and environmentally friendly, but they can only be used indoors;
- alkyd varnish materials are made from synthetic resins based on inorganic solvents. The surfaces obtained using these varnishes are highly durable and resistant to moisture. All this makes it possible to use such varnishes to cover the facades of buildings and wooden elements located on the street;
- polyurethane compositions based on polymers make it possible to obtain a thin coating that is resistant to mechanical stress. Very often, such varnishes are used for processing musical instruments.
Surfaces located outdoors or indoors can be varnished. Modern means make it possible to protect even wood submerged in water. If there is no varnish, then it is replaced with drying oil or wax mastic, after which the wooden surface becomes slightly velvety to the touch.
About painting technology
In addition to the correct choice of paint color for wood, painting technology is of great importance. Only in this case the paint will not peel off several months after painting.
Choosing color and painting wood
When painting externally and internally, you will have to choose between glazing and covering compounds. The former protect the wood from moisture and insects, but the texture remains visible. As for covering compounds, they form an opaque layer on the surface.
The choice of paint color depends on many factors; when painting surfaces inside the house, the color scheme of wood paints is selected taking into account the overall design of the room. For example, when decorating the kitchen of a timber house in the Provence style, preference is given to light shades, but dark shades (mahogany, ebony, wenge, etc.) are not used at all.
In the photo - a kitchen in Provence style
When painting the exterior of a house, there are more options, such as:
light, calm colors (beige, white, etc.). Finnish houses are usually decorated in exactly this color scheme;
Note! When using light shades, you can combine it with dark inserts. This will make the house look more impressive
- it is allowed to use rich shades, for example, the color of teak wood will give a reddish tint after painting;
- You can use other shades, for example, green. You just need to take into account that the paint consumption should be higher so that the wood texture does not show through.
Greenish tint of the house
Also, when choosing the color of wooden houses, you should take into account the surrounding environment. If the colors of neighboring buildings are in calm, light colors, then it makes sense to choose the same shade. In this case, using bright colors will be unnecessary; the house will simply look ridiculous against the background of its neighbors.
As for painting wood with your own hands, when doing exterior work you should adhere to the following recommendations:
- do not quit work halfway, then the border between areas will be noticeable;
- paint under normal conditions - low humidity, direct sunlight does not fall on the paint;
- Before applying the next layer, wait for the previous one to dry.
It's better to paint the whole house at once
When working inside the house, the instructions require:
- provide good ventilation;
- thoroughly sand the surface before painting;
- in order to prevent the paint from being absorbed into the wood, it must first be primed;
- To obtain an even, rich color, 3 or more layers of paint may be needed. The drying time for each layer depends on the type of paint.
It is important to understand that the final result largely depends on the type of surface. For example, the color walnut applied to a board with an expressive texture in 1 layer will give an interesting effect - the texture of the wood will be visible, so it will give the impression that the board is really made of walnut
But if you apply paint to a sheet of chipboard, you will get a solid, even color.
Experiments with paint
Sometimes the desired effect cannot be achieved by simply painting or applying varnish to a wooden surface. In this case, you have to experiment and combine different compositions.
Note! It is advisable to carry out experiments on an unnecessary piece of wood. Otherwise, the price of such creativity will be too high
This technique is often used when it is necessary to age wood or achieve the effect of bleached wood.
To get the desired effect you need:
first brush the wooden surface with a wire brush to remove soft wood fibers;
Removing soft fibers
- clean the surface of small sawdust;
- then the fun begins - apply 1 thin layer of light paint, wait until it dries;
- protruding hard fibers will remain unpainted, imitating an old surface. A couple of layers of varnish can be applied on top to protect the surface from abrasion and fading.
A combination of shades for the same purpose is also possible. This does not mean mixing different colors, but sequential coloring in different shades. Any colors of wood paints can be combined in this way, the main thing is to ensure that one shows through from under the other, creating the illusion of wear and tear received over years of use.
What composition should I use?
The choice of varnishes is huge. The compositions are classified into several groups according to the type of base. To choose a paint coating, use the following tips:
A good option is varnish for interior work.
If there is high humidity in the room, then it is better to choose paints and varnishes for outdoor use. Pay attention to resistance to sudden temperature fluctuations. Consider the interior style. For example, matte varnish is suitable for Provence style rooms. Surface quality
When varnishing interior doors, gloss will make defects and unevenness more visible, while matte will disguise it.
Attention It is necessary to check the selected composition for compatibility with the primer. Otherwise, a combination of inharmonious materials will lead to cracking or final damage to the canvas. Next, popular paints and varnishes, their advantages, features and disadvantages will be considered
Which varnish to choose is up to the individual to decide, based on personal wishes and financial capabilities.
Next, popular paints and varnishes, their advantages, features and disadvantages will be considered. Which varnish to choose is decided by the person himself, based on personal wishes and financial capabilities.
Alkyd
The varnishes are made with solvents; interior doors will have an off-white, rather yellowish tint.
Advantages:
- strength;
- moisture resistance;
- quick drying;
- acceptable price.
Minuses:
- unpleasant pungent odor;
- rapid fading in the sun;
- contains harmful substances.
Nitrovarnishes
Acetone and nitrogen compounds act as a base. The substance is transparent and can preserve the natural shade of wood. However, nitro varnish cannot be used in living rooms.
Pros:
- low price;
- strength;
- durability;
- short drying time - up to 1 hour.
Flaws:
- toxicity;
- flammability.
Important: It is prohibited to use this composition in homes where children and pets live.
Polyurethane
The basis is polymers with long molecules. When coated, this varnish changes the shade of interior doors to a darker one.
Advantages:
- nice smell;
- no toxicity.
But polyurethane varnish is applied only to a previously prepared primer layer.
Acrylic
Manufactured on a water basis. Eco-friendly, suitable for use in living rooms.
Pros:
- quick drying due to water evaporation;
- resistance to sunlight;
- mechanical damage.
Disadvantages - fragility.
Dealing with defects - what to do if the stain is applied incorrectly
Quite often, after applying stain, various defects form on the surface. They may not appear immediately, but only after drying. The sooner measures are taken to eliminate them, the greater the chance of complete restoration of the applied layer. Most often you have to work with the following defects:
- Streaks. If the resulting drip is noticed at the time of applying the stain, it must be impregnated with varnish, which will dissolve the bottom layer. Then the area should be wiped with a clean rag and treated with the mixture again. The already dried streak is first softened with a solvent, then removed with a knife, plane, or sandpaper.
- Stains. First of all, it is necessary to determine the cause of their occurrence. The problem may be poor quality wood that has black areas that unevenly absorb the stain. In the case of external solid wood, a plane will help; all the veneer will need to be removed from the plywood. It is better to re-coat the area with a thick wax mixture.
Boat board | multi-layer painting using a wax candle
I paint everything with thinly diluted brown paint.
After drying, in some places I rub the board with a wax candle. Keep in mind that the paint in these places will come off later! Then I paint one half with the color kraplak, and the other with dark green. The main thing is not to forget and not to start blow-drying, otherwise the wax will start to melt! After the paint has dried, I take a metal scraper and start removing the paint. In areas covered with wax, it can be removed very easily. Next, I take a candle and rub new areas with it.
I try to include both new colors and the color that we tore out from under the second layer. I cover one half with orange, and the other with light cobalt green. I dry it naturally in the same way, then remove the paint with a scraper. I cover some parts again with candle wax.
I paint everything with one color - Persian turquoise from the Acrylic De Luxe line. I dry it and scrape through the paint. This is another way of aging.
Dealing with defects
It happens that the stain is applied to the surface incorrectly. Here are the main ways to eliminate defects:
- For numbness. Immediately after tinting the wood, you need to cover the area with varnish, which will dissolve the stain. Then clean the treated area with a rag. When the drip has already dried, it will have to be softened with white spirit or ground off with sandpaper.
- For stains. If we are talking about plywood, you will have to remove all the veneer using a plane. Solid wood is also processed with this tool, removing the thin top layer.
How can I remove stain?
The easiest way to remove water stain from your hands or treated wood. Of course, you can only remove the top layer, because such stains are distinguished by deep penetration. Stained clothes can be washed with regular powder, then rinsed with conditioner. If necessary, use oxygen bleaches, and chlorine bleaches on white items.
If stain gets on linoleum, wipe off the stain with acetone or white spirit. You must work carefully so as not to discolor the surface of the material. You can get rid of stain stains on the skin using vegetable oil or by frequently washing your hands with soap. It is much more difficult to remove non-aqueous types of stains from surfaces; you will have to remove the top layer of wood along with the tinting coating.
Preparatory stage
Let's make a reservation right away - we are now talking about carpentry made from inexpensive types of wood - pine, alder, spruce. If you have enough money for doors made of oak or ash, and you are not a wood painter, refuse to varnish yourself, do not spoil the product. Hire a professional, he will polish everything as it should. Do not touch products with decorative veneer - they can be damaged irrevocably.
First of all, you need to find a table that is large enough, durable, and at a comfortable height. If it is too low, the back from the position bent over it will soon make itself known to you. A clean, soft, thick rag is spread on the table, and a door is placed on top to avoid dents and damage to it. This is especially true for joinery made of spruce, pine or alder.
If the door has glass, and you can’t remove them (or are reluctant), they are covered with masking tape. Be careful that the tape does not cover the wood; all overlaps are carefully trimmed with a utility knife.
To identify dents, cracks and other flaws, arrange several light sources in the room, and so that they illuminate the door obliquely, and not strictly vertically. Examine the surface and panels of the door from different angles, and eliminate flaws before starting sanding. There are three main ways to do this:
- using a mixture of sawdust and glue;
- choosing a putty that matches the color scheme;
- or by caulking a crack or hole with a piece of wood placed on glue.
It is best to putty, sand and varnish the door frame in a disassembled state. This is simpler, and you can immediately check the color of its ends and casing. There is no particular problem with this - today boxes are assembled mainly with self-tapping screws, and not with dowels or nails, as before.
All wood stains are divided into types depending on the base on which they are made
- Water-based wood stains;
- Alcohol-based wood stains;
- Nitro stains for wood;
- Oil stains for wood;
- Wax stains for wood.
Water-based wood stains.
As the name suggests, the basis of this type of stain is water. Water-based stain can be sold either ready-made or in the form of a powder that is dissolved in water. This stain is easy to work with, it is very easy to apply and dries quickly. The only, but significant, disadvantage of water-based wood stain is its ability to lift wood fibers. This is due to the fact that wood, when saturated with water, swells and its fibers rise. This feature disrupts the appearance of the material. To avoid this phenomenon, before starting to treat the wood with stain, you should moisten it with water and leave it for a while, after which, when the fibers rise, sand the surface, and only after that start processing with stain. The color range of such stains consists of colors close to natural wood, from light tones to the color of mahogany and wenge.
Alcohol-based wood stains.
Alcohol-based wood stains consist of a dye or tinting component dissolved in alcohol. Such stains are sold, just like water-based stains, in the form of a ready-made solution or powder. If you choose powder, be careful, alcohol-based stain is only diluted with 96% alcohol. If you are not sure that the alcohol you purchased is exactly 96%, it is better to choose a stain in a ready-made solution. A feature of this type of stain is its short drying time. Alcohol stains dry out very quickly, so you need to be very careful when using them. If, while staining the surface using alcohol stain, you are distracted or make incorrect strokes, stains may remain on the surface that are quite difficult to remove or tint.
Nitro stains for wood.
This type of wood stain is made on a solvent basis. Nitro stains, like alcohol stains, dry very quickly, which makes treating large surfaces very problematic, and they also have a strong and unpleasant odor, which limits the possibility of using them indoors. Nitro stains are best used for staining small surfaces, such as doors, windows, and small decorative elements.
Oil stains for wood.
Oil stains for wood are the most versatile and frequently used type of wood stain. The composition includes oils and oil-soluble coloring components. Oil-based wood stain is easy to apply, goes on smoothly, dries quickly enough, but at the same time makes it possible to cover the surface evenly and without streaks. Oil stains for wood are environmentally friendly, odorless, and can be used both outdoors and indoors. Oil stains, unlike others, have not only a decorative, but also a protective function for wood. Oil, penetrating into the upper layers of wood, protects it from dampness, moisture and other atmospheric phenomena. The color range of oil stains is very wide, here you can choose a color and shade to suit every taste and for any interior.
Wax stains for wood.
Wax stains are one of the modern construction developments. When applying this type of stain, a protective film of wax is created on the surface, which creates effective and thorough protection from moisture.
When choosing wood stains, it is important to consider the following factors:
- Tree species. Different types of wood respond differently to staining. For example, wood species that contain resins (pine, etc.) become stained when treated with stains, since the stain does not penetrate well into the areas where the resin is concentrated.
- Specifics of wood use. If you are going to stain wooden dishes or, for example, children's toys, it is better to use oil or wax stains; they are safe for health and do not have an unpleasant odor.
Irina Zheleznyak, Staff correspondent of the online publication “AtmWood. Wood-Industrial Bulletin"
How useful was the information for you?
| Copyright atmwood.com.ua. Copying of material is permitted provided a hyperlink to the source is provided. |
Application methods
There are four main ways to apply stain:
- Rubbing painting. The composition is applied to the surface, after which it is rubbed over the entire area. Recommended for use when processing porous wood species.
- Spraying. When staining wood by spraying, a manual or automatic sprayer is used as a tool for applying stain.
- Processing with a foam roller. This method avoids the formation of streaks and helps to distribute the mixture evenly over the entire surface.
- Processing wood with a paint brush. The method allows you to obtain a deeper and richer color of wood, but is not suitable for all types of impregnation.
Next, we will consider in detail how to stain wood. To obtain a high-quality and good coating, you must follow the basic rules for treating surfaces with stain:
- Before painting a surface with stain, it is necessary to remove old coatings from it, and then degrease it better.
- The surface made of coniferous species (for example, pine) must be deresined.
- It is necessary to paint wood with stain and remove excess only in the direction of the wood structure.
- It is recommended to cover the surface with 2-3 layers, while for the first layer a small volume of the mixture should be used.
- After the first layer has dried, the surface must be sanded and the raised lint removed, and then, if necessary, apply subsequent layers (each subsequent layer is applied only after the previous one has completely dried).
The approximate drying time for oil-based impregnations is about three days, and for water-based and solvent impregnations - 2-3 hours (depending on how many layers were applied). It is recommended to divide large areas of the surface to be treated into small areas and paint them in stages. To avoid the possibility of defects forming on the surface, the composition must be diluted. A solvent is used for this.
Plywood stains perform a purely decorative function. Therefore, if you are in doubt about whether to choose stain or varnish, it is recommended to use them in combination. Before covering the surface of the plywood, it must be moistened, and it is recommended to heat the mixture itself.
After covering the wood with stain, it should be treated with varnish (layers should be very thin to avoid the possibility of smudges). The tool you can use is a brush, roller or sponge. Wood varnish will enhance the protective properties of the impregnation. By following these recommendations, you can easily stain wood at home.
Selection of stain color for wood
In accordance with the international color classification, each stain is assigned its own code, as well as a name identical to the type of wood whose shade you will get by applying the composition. But if you choose a stain only based on the name on the label, you risk encountering an unexpected result. This can happen for various reasons.
Manufactured by different manufacturers, stains of the same color can give a different shade. Specialty stores have samples of wood painted with various types of stain. They convey the color as accurately as possible, in contrast to the picture presented on the label, so it is better to focus on them.
Any wood has its own special color, density and texture. All these factors influence the final result, and coloring may not give exactly the effect you expected.
Take porosity into account: the softer the wood, the more intense the staining result you will get. The composition will penetrate deeper and faster into the porous structure. If you compare, for example, pine and maple, pine is more porous, and accordingly, the staining results will be different
If you compare, for example, pine and maple, pine is more porous, and accordingly, the staining results will be different.
The structure of the wood in the form of a natural pattern (veins) also matters when painting, affecting the intensity of the result. For example, when painting oak, pigments easily penetrate deep into the veins, causing them to darken faster than the rest of the wood. The shade on the veins will look more saturated.
Before starting work, it is advisable to carry out a color test on a separate board, processed in the same way as the material for painting. First, treat the entire board in one layer, then apply a second layer to 2/3 of the part, and a third to 1/3. You can see how suitable the composition is for a particular surface.
Color palette
There are different colors of wood stain, and it is very difficult to answer the question of how to choose the most suitable one. This material allows you to add almost any shade to wood products. For example, black stain is very popular, which allows you to give the surface the appearance of a black mirror. It is recommended to polish the base before applying it.
Gray stain makes it possible to avoid highlighting the treated product from the overall interior. It is worth painting with it only if the walls and textiles in the interior are bright. Gray can cause depression, and products in this color will look too faded and gray.
Psychologists advise choosing a green stain (colored stain), since this shade evokes positive emotions. Green color is suitable for surface treatment of various interior items. Blue stain allows you to get a very expressive look to the finished product. Choose it to combine with yellow and white tones.
How to make wood stain at home
Most stains consist of a solvent and a natural pigment, so you can make your own wood stain.
Homemade fighters come in several types:
- based on plant components;
- based on synthetic materials;
- based on food products.
Wood stain is easy to make with your own hands using available materials.
In addition, chemicals can be used to stain wood at home. For example, slaked lime will enhance the brown color of oak. If you treat a nut with this product, the wood will acquire a greenish tint.
Helpful advice! To bleach wood, you can use regular hydrogen peroxide.
How to make your own plant-based wood stain
Pigments contained in plants are suitable for tinting wood. If you apply a decoction made from larch bark to the surface, it will acquire a reddish tint. The lighter the wood, the more contrast and brighter the result will be. The shade appears best on products made from birch. A golden hue can be obtained using onion peels. This option is only suitable for light wood species.
A universal means for tinting is walnut shell. With its help you can get different shades. The color depends on the amount of this ingredient in the stain. To begin with, the shells are finely ground to a powder state. Then it is added to boiling water and simmered on fire for 12 minutes. The resulting broth must be filtered and baking soda added to it.
Using walnut shells you can get different shades
If you also apply a dichromate solution to a surface soaked in a decoction of walnut shells, you can achieve a reddish tint. Treating painted wood with acetic acid will give a grayish color. To obtain black color, decoctions made from alder and oak or willow bark are used. Buckthorn fruits have a golden-yellow hue. They must be unripe.
A brown tint can be obtained by mixing the following components:
- oak bark;
- alder earrings;
- willow bark;
- walnut shells.
All ingredients are combined in equal proportions. To prepare the stain, you need to soak them in cold water and then bring to a boil. The broth should simmer on fire for some time, then soda is added to it after 10 minutes. it is removed from the stove.
There is another way to prepare stain for tinting brown. For this, a decoction of nut shells and apple tree bark is used. If you add alum to it, you can get a richer and darker shade.
Oak bark is used to obtain black stain
How to make your own stain based on food products and synthetic materials
Coloring pigments are also found in food products. You can use coffee to give wood a brown tint. The stain is made from ground grains and baking soda. Instant coffee can be used. To prepare the stain, you need to firmly brew the grains or granules, and then thoroughly saturate the wood with this product.
A brown tint can also be obtained using tea leaves. The tea contains theanine. This component gives the wood its natural brown color. Moreover, the saturation of the shade depends on how strong the tea is brewed.
The effect of ebony is obtained using vinegar. To prepare the solution you will need metal parts. Small pieces of metal are poured with vinegar, after which they must be left in a dark place for at least 48 hours.
Note! The longer the solution is infused, the richer and darker the color of the stain will be. At the same time, you cannot keep metal parts in vinegar for more than a week, and because of the pungent odor, it is better to carry out the treatment outside
Dark stain can be made from soda and coffee beans
Dark shades of cherry and brown can be obtained at home using a solution of potassium permanganate. To do this, you need to dilute 50 g of powder in 1 liter of warm water. After 5 min. After treating the wood with this solution, its surface is wiped with a soft cloth. To get a more saturated and dark shade, this procedure must be repeated. Potassium permanganate quickly fades in the sun. If it was used as a stain for wood processing, the surface of the material must be coated with a protective agent.
To give the tree a grassy shade, it should be treated with vinegar essence with the addition of verdigris (60 g). Before use, this solution must be boiled for 10 minutes.
Wood staining compositions made from coffee, tea and vinegar
Natural stains are good precisely because they are absolutely safe for human health - what bad things can happen from ordinary food products?
So, to give the wood a brown tint, you can do this:
- Brew the tea, let it brew, then strain out the tea leaves. The resulting composition can be impregnated with wood, saturating it with tannins (contained in tea). Depending on the amount of impregnation and the concentration of the brew, you can get many shades of brown.
- Ground coffee beans need to be brewed, infused and strained. Treat the wood with the resulting infusion. The color will be darker than in the previous case, and it depends on the strength of the resulting drink.
- You can add a little soda to the ground coffee - in a ratio of 1:4 (1 part soda to 4 parts ground coffee) and brew it the same way.
Vinegar is useful for giving wood a dark tint. True, you will need not only vinegar, but also small nails or iron filings (stock up if you know a metal turner).
The stain is done like this:
- Nails or shavings must be degreased and filled with vinegar.
- The container should be placed in a dark place and left for up to 7 days - depending on the desired color and concentration of stain.
- Then the wood is impregnated with stain. This process is called “ebonyization” - that is, giving the material a black tint. The method allows you to obtain various shades of black, but it is especially effective when used for staining species like walnut (with a high content of a substance such as tannin).
Using vinegar stain requires caution
Painting while preserving the structure
How to paint the lining to change the color but maintain a pronounced wood grain? You can use the brushing technique, which in this case involves processing the lining in several stages:
- First, pigmented oil, wax or glaze is applied to the surface.
- Then the selected varnish or paint for the lining is taken in a small amount, applied along the entire length of the board and gently shaded.
- After 10 minutes, use a soft, lint-free cloth to remove most of the oil.
The result of such manipulations will be a bright and expressive wood pattern, emphasized by the pigment remaining in the grooves and recesses. This method is great when using lining in different interiors: country, Provence and many others.
Alcohol varnishes
Shellac
A group of transparent and translucent coatings that can be used to add shine to a surface and also protect it from external factors. They include complex components:
- shellac;
- sandarac;
- dug;
- synthetic resins.
Carefully study the label with the varnish; the strength of the alcohol used must be at least 90º. Ethyl alcohol can be used as a solvent.
The right product will highlight the structure and tone of the wood.
How to solve the problem of spotting?
An uneven tone of the finish, when the stain is stronger in some places and weaker in others, is a common problem that is associated with the characteristics of certain types of wood. Spotting can occur when processing resinous wood, as well as wood with uneven density or plywood. In the first case, it is recommended to deresin the surface, in the second - to pre-treat the wood with special conditioners that will close the pores and ensure uniform absorption of the stain.