The traditional bathhouse for Russians has always been one of the most important events of the week. On bathing day, all matters were postponed; on this special day, life went on at its own special rhythm. Many are trying to continue this tradition today, however, traditional types of baths are most often replaced by newfangled high-tech procedures. Well, what about traditions? After all, not everyone has the opportunity to arrange their own steam room on their site.
Bathhouse underground
An underground bathhouse, whose design resembles a dugout, is considered an unusual but economical structure. The walls are lined with stone for reliability. There is often dampness in the dugout. High concentrations of moisture are observed in spring and autumn. The stone walls of the dugout easily resist moisture.
Bathhouse walls made of wood have a shorter service life. Dampness does not spare the material. The advantage of wooden dugouts is that they warm up quickly compared to stone buildings.
It will only be possible to install a dugout bathhouse in an area with deep underground layers of water. It is important to choose a hill. In the lowlands, the dugout will be flooded with melt and rain water. The height of the bathhouse is 25 cm greater than a person’s height. The dugout cannot be completely immersed in the ground. The pit is dug to such a depth that part of the bathhouse extends above ground level. Windows are installed in the protruding parts of the walls of the dugout for natural lighting and ventilation.
Advice! Dugouts that partially protrude from the ground are made if they use a bathhouse project without electricity.
The design of a wooden dugout involves the installation of log supports at the corners of the pit and in the center. Moreover, the pit can have not only a rectangular shape. If desired, the dugout bathhouse can be built with a tent of 6 or 8 corners. If the roof is supposed to be covered with earth, it should be made flat. The soil will not slide off such a bathhouse roof during rain or melting snow. The roofing material of the dugout is several layers of waterproofing. The material is laid on a continuous sheathing of boards. The rafters of the dugout are round timber cleared of bark. All wooden elements are impregnated with protective compounds against bark beetle and fungus.
Forest dugouts are not covered with waterproofing. The roof is covered with dense layers of clay, leaves, moss, and pine needles. The walls of the dugout need special waterproofing. On the soil side they are covered with roofing felt, film or membrane. To prevent the soil from falling into the dugout, the walls of the pit are strengthened with a board nailed to the supports.
Advice! It is better to build stone dugouts in a round shape. The design is more resistant to heaving and lateral shift of the soil in winter.
Do-it-yourself dugout bathhouse: photo
Some historical facts
In the Russian Federation, when building a bathhouse, a log house was built, and then a couple of zones were arranged in it - a steam room and a dressing room. A stove was always made in the bathhouse, and if the fireplace made of stones did not have a pipe, and there was a hole in the roof to remove the smoke, then this combustion method is called “black”. Soot began to settle on everything in the room - on the shelves, on the walls, and even on people. In order to make steam, you need to splash a little water on the hot stones. But the bathhouses, with an excellent stove, equipped with a chimney and pipe, were heated “white,” and everyone came out clean. The photo below shows a real dugout bathhouse.
Do-it-yourself bathhouse from a barn
You can get by without building a dugout if there is an old barn in the yard. After a little modernization, the building will turn out to be a good bathhouse. The shed is suitable from any material: wood, stone, foam block, brick.
The construction of a bathhouse begins with the layout. Most of the barn is used for the steam room. It is optimal to calculate 2 m2 of steam room area for 1 person.
Under the stove, choose a place where there will be a partition separating the steam room from the locker room. When planning a bathhouse, think through a convenient arrangement of shelves. It is optimal to make the floor pourable. The underground is filled with concrete screed or laid out with slabs and waterproofed with bitumen. Logs are laid on the base, a board 50 mm thick is laid with a gap of about 5 mm.
Ventilation windows - vents - are cut out in the foundation of the barn. Through them, they organize the drainage of water from the underground of the pouring floor.
Important! The concrete screed of the underground is made with a slope towards one of the walls for better water drainage.
It is optimal to cover the walls of the bathhouse with aspen boards. First, a timber frame is attached. The walls are covered with waterproofing, insulation is placed in the cells of the frame, covered with a vapor barrier, and the board is nailed down.
To cover the walls of a bathhouse, it is optimal to take a board with connecting grooves. The locking connection reduces the likelihood of steam penetration into the insulation. The nails are driven in with the heads going deep into the body of the board, otherwise you can get burned on them in the steam room.
Covering and insulating the ceiling of a bathhouse is no different from finishing the walls. You can use a thin board for cladding. The shelves for lying are made of boards 50 mm thick. The wood is sanded well. The optimal shelf width is 700 mm.
The video shows an example of remodeling a bathhouse:
Furnace and ventilation installation
A platform made of refractory bricks is laid under the stove in the bathhouse. The chimney exits through the roof. The stove itself is laid out in brick or a metal potbelly stove is installed. In any design there is a place for heating stones and water.
The furnace firebox is located in the dressing room of the bathhouse, and the rest is located inside the steam room. For ventilation, vents are cut out in opposite walls. The lower air intake window rises 500 mm from the floor, the upper exhaust window rises 2 m from the floor.
Determine the type of soil
First you need to find out whether it is possible to build a bathhouse without a foundation on your site. Is it always possible to do without it? No. A lot depends on the type of soil on your site. Rocky, mountainous terrain is ideal, where the soil is quite hard. Soft soil will inevitably sag, and it will do so unevenly, causing distortions of doors, windows, and even destruction of walls.
The soil must withstand a pressure of 12-15 kilograms per square centimeter. This is the minimum required hardness. If it is not there, you will have to make a strip or pile foundation, and this is a topic for another article.
Do-it-yourself kung sauna
A decommissioned car shed can be used for more than just a shed. The body will make an excellent bathhouse, after a simple conversion. The kung is installed on reliable supports. It is optimal to get 6 concrete blocks. The outside of the body is sheathed with a frame made of timber, increasing its length by 2 m. The added compartment is allocated to the veranda of the bathhouse. The multifunctional room will serve as a locker room and is suitable for relaxation. The roof of the entire frame is covered with corrugated sheets or metal tiles. Kung is completely hidden under the new roof.
The interior of the body is separated by a partition. The larger section of the bathhouse is reserved for the steam room. If there are not enough original windows, additional openings are cut out with a grinder and frames with glass are attached. Before finishing work begins, electrical wiring is laid in a metal sleeve along the walls.
Furnace installation
A combustion room is installed in a smaller compartment, separated by a body partition. The chimney is exhausted through the roof or a ready-made hole in the wall, if the kung was previously equipped with a stove. The entire furnace exits from the combustion chamber into the steam room. A place is prepared on the stove for stones and water heating.
Interior decoration
From the inside, sheathing is attached to the walls and ceiling of the bathhouse. Insulation is laid between the bars, covered with foil, and sheathed with boards. A pourable floor in a kung bathhouse does not work. The body metal will quickly rot. It is optimal to fill the screed, lay the tiles, and organize the drainage. The top tile floor is equipped with wooden gratings.
Exterior decoration of the bath
Exterior finishing of the bathhouse begins with laying insulation boards into the frame. The thermal insulation is covered with a vapor barrier. The frame is sheathed with any finishing material. Under the outer cladding, it is not even noticeable that the bathhouse was converted from an old car body.
General principles of planning and operation
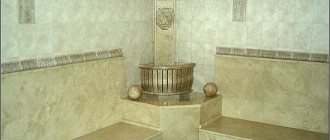
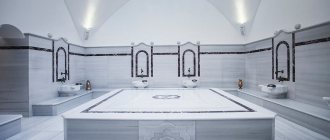
When designing a dugout bathhouse, you can, as a basic option, use the concept of old country-style bathhouses. If there is insufficient internal space, the steam room and washing compartment can be combined. An open boiler for hot water can be directly built into a stove-stove, while the natural evaporation of water from its surface will create a soft, moderate atmosphere, similar to that of Roman baths or oriental baths, such as hammams.
The biggest disadvantage of dugout baths should be considered the insufficiently effective supply and exhaust ventilation, and the use of methods for activating it leads to a directly proportional increase in heat loss. The second point that you should pay special attention to is the collection, disposal and disposal of wastewater, and the simplest method - the use of pouring floors - may be unacceptable due to insufficient permeability of the soil at the construction site. The way out, in this case, should be the organization of a drainage system and drainage grooves. A significant factor in the success of work in this direction should be the use of the natural slope of the area.
Insufficient ventilation and dampness can, to some extent, be compensated by periodic firing of the sauna stove without steam generation, solely for the purpose of reducing high air humidity in the interior of the sauna. In this case, you will have to reckon with the loss of time and put up with increased fuel consumption for the sauna stove.
Bathhouse from a gun carriage
In villages, in simple language, truck trailers are called carriages. For bathhouse builders, a carriage is a round timber hewn on both sides. The material is also called “two-roll timber”. The carriage was invented by the Norwegians. They came up with the idea of a strong locking connection. The docked carriage does not allow heat to pass through and ensures reliable stability of the walls of the bathhouse.
Advantages and disadvantages
Laft baths have a number of advantages, but there are also several disadvantages.
Positive features:
- The carriage is environmentally friendly. Wood does not emit chemical impurities in the bath, creates an aroma, and maintains a special microclimate.
- The locking connection of the carriage is considered one of the most durable. The walls of the bathhouse are not deformed in dampness or after drying. There are no gaps between the carriage.
- The appearance of the carriage has natural beauty. There is no need to additionally line the outside of the bathhouse.
- For the carriage, logs with a thickness of about 400 mm are used. Such a bath wall reliably retains heat without additional thermal insulation.
- The carriage inside the bathhouse is beautiful. The walls do not need to be sheathed with anything additional.
- The price of the carriage will seem high to many, but the construction of a bathhouse will be cheaper due to the absence of the need for additional interior and exterior decoration.
- If we compare two identical bathhouses made of a carriage and a rounded log, then the first building turns out to be more spacious.
- The walls made from gun carriages are lightweight. There is no need to pour a powerful foundation under the bathhouse.
Among the shortcomings of construction from a gun carriage, 3 important points are identified:
- The carriage is susceptible to rotting faster than a log. The problem is the hewn sides. The core of the tree is exposed, which is less resistant to moisture. To increase service life, the carriage is often and carefully treated with protective impregnations.
- The cost of a bathhouse built from a gun carriage will be cheaper when compared with stone buildings that require interior and exterior finishing. In other cases, the costs will be higher. Construction from logs or beams will cost less than a similar option from a gun carriage.
- An important drawback is the appearance of cracks on the carriage. However, not a single tree is immune from this problem. The cracks in the carriage are not through.
In terms of speed and ease of construction, timber construction wins. In the carriage there is a difficulty in making the locking connection.
Advice! It is better to buy a bathhouse carriage with ready-made locks.
Construction Features
A bathhouse is assembled from a gun carriage in the same way as a construction made from timber or logs. First, the foundation is poured, the walls and roof are installed, and the interior space is arranged. The difference in construction is the assembly of walls from gun carriages. Logs are used from coniferous trees. To make a carriage yourself, the round timber is dried. Pre-made longitudinal cuts will eliminate the appearance of cracks. The shrinkage of logs for carriages after drying reaches from 5 to 15 cm.
The corner connection of the carriage has a similar pattern to the Russian bathhouse. The edges are made with protruding ends. However, according to the Russian system, the lock of the bathhouse logs has a semicircular shape, and a secret wedge is made on the gun carriage. It goes inside the groove of the lower crown of the bathhouse.
The semicircular connecting lock of the Russian bath is connected to the insulation lining. The carriage wedge fits tightly into the groove. Without insulation, a castle according to the Norwegian system does not allow cold to pass through. The lower crown of the bath is laid on a 60 mm thick embedded board. The initial assembly of the log house is carried out without dowels. Major assembly is performed after errors are eliminated.
Important! If ventilation slots can be arranged between the logs, then the number will not work with a gun carriage. The air is left under the roof of the bathhouse.
The construction of the carriage is difficult only in construction. In all other matters, the bathhouse wins.
Security measures
In order for a basement sauna to have the right conditions, it is necessary to maintain the appropriate relationship between temperature and humidity. This relationship describes the "right to the sum of 110". According to this formula, the sum of the temperature (in degrees C) and humidity (in percent) in the steam room should be 110 (for example, 70 degrees C and 40%).
Otherwise, placing a bathhouse in the basement is a complete plus. You can start heating a sauna without leaving your home. Residents can take a steam bath and go out to drink kvass right in the kitchen. You will save on building a free-standing bathhouse - after all, you no longer need a log house, say, somewhere on the outskirts of a summer cottage.
Bathhouse made of tongue-and-groove boards
A special feature of the tongue and groove board is its strong locking connection, which does not let cold into the bathhouse. Assembly of the structure consists of the following steps:
- The frame of the bathhouse base is assembled from timber with a cross-section of 150 mm. A board 50 mm thick is suitable, but it is laid on edge in the amount of 3 pieces. The frame elements are connected at the corners. Additionally, grooves are cut for the vertical posts of the frame.
- The finished frame is installed on a columnar base. A support must be placed at each angle. Two layers of roofing material are laid between the base and the wooden part of the bathhouse. The horizontalness of the frame is measured using a level.
- The racks of the bath frame are installed in the grooves of the frame and secured with mounting angles. The optimal pitch of vertical elements is 600 mm. Additional racks are placed at the locations of windows and doors.
- Each rack is set vertically in level. Stability is ensured by temporary jibs.
- The racks are connected at the top by strapping made of boards 50 mm thick. In the finished bath frame, check the evenness of the corners and all vertical elements.
- On the outside, the tongue and groove board is nailed horizontally, tightly connecting the locks. The horizontal position of the board ensures the stability of the structure. Do not forget to attach waterproofing under the outer cladding to the bath frame.
- On the inside, mineral wool is laid between the frame posts. The thermal insulation is covered with a vapor barrier.
- Covering the walls of the bathhouse from the inside occurs in the reverse order. The boards are nailed vertically. A ventilation gap is provided between the sheathing and the vapor barrier.
The cladding of the bathhouse ceiling is carried out according to a similar scheme. Thermal insulation is used 2 times thicker than on the walls.
Choosing a wood species
The outside of the bathhouse is covered with any board. Pine and larch will do. Inside the bath, wood should have low thermal conductivity. Linden and aspen are ideal.
Sauna in the basement of the house: project
Traditionally, the basement area under the building is built over the entire area of the foundation. One of the layout options is shown in the project below.
In addition to a bathhouse or sauna, a boiler room or furnace room must be built on the ground floor; there may be a garage, a tool warehouse and a small recreation room. Small windows in the upper part of the relaxation room soften the cutting effect of artificial lighting well, so with proper equipment of a bathhouse in the basement or basement, the level of comfort is no worse than in ground-based steam rooms and saunas.
If you don’t want to bother with permits and fire safety permits, you can use the project shown in the diagram below to plan the room for a bathhouse and build partitions.
At first glance, there are not so many advantages from such an organization of the room; only a small part is used effectively, and even then, you have to steam in a sauna measuring 2x2 m.
There are no partitions in the basement, but there is a swimming pool, shower, washing machine and a place to relax. It is the absence of internal walls that provides the most important thing for a bathhouse located in a semi-basement - good ventilation, fresh air and enough space to participate in health procedures.
Bathhouse made of polystyrene concrete
Polystyrene concrete blocks have poor thermal conductivity. For a bath this is an ideal option. However, the material absorbs moisture. The walls of the bathhouse are protected to the maximum with reinforced waterproofing from the inside and outside.
Bathhouse construction technology
A reliable strip foundation is poured under a bathhouse made of polystyrene concrete blocks. From above, the base is covered with two layers of roofing material. Laying out the walls starts from the corners. The first row of bath blocks is placed on cement mortar. The subsequent rows are laid using glue. The thickness of the seam is kept to a maximum of 5 mm. Every third row is reinforced. Grooves are cut in the blocks for the rods. The laid reinforcement is filled with mortar. Further laying is again done using glue.
The roof of the bathhouse is made gable. Mauerlat is laid along the perimeter of the walls. Rafter legs and floor beams are attached to it. The rafters are filled with sheathing, waterproofing is rolled out, and a roofing covering, most often corrugated sheeting, is laid.
A ventilated façade is installed on the walls of the bathhouse outside. Mineral wool is used as insulation, and the cladding is chosen as desired. The inside walls of the bathhouse are similarly insulated and vapor barriered. Wooden lining is used for cladding. The ceiling of the bathhouse is hemmed in the same way as the walls. The floor is concreted. The rest room is tiled and heated with electric mats. Boards are laid inside the steam room.
The video gives tips on how to properly lay out the blocks:
Decorating the room
Wood looks good outside and inside without finishing. For interior painting, use compositions that are recommended for hot and humid rooms. Varnish should absolutely not be used, as it releases harmful components.
For decoration, a combination of wood species with different colors and grain patterns is used. There is light wood, for example, ash, alder. Dark species include pine, fir, and cedar. Porcelain stoneware and ceramic tiles are used for the floor. The materials used are environmentally friendly.
The rest room is furnished with furniture, a sofa, a table, and sometimes the space is combined with a kitchen, barbecue area, terrace and access to nature.
Polycarbonate bath
A summer version of a bathhouse can be built from polycarbonate without much expense. Under the sun, energy is accumulated through transparent sheets, it will be warm inside, and the water will warm up faster. The bathhouse is not used in winter due to the lack of a stove. Additional heating is carried out by electricity.
Step-by-step instruction
To build a bathhouse, you need to install a frame and cover it with polycarbonate. The process consists of the following steps:
- On the site, the dimensions of the bathhouse are marked with stakes and a cord. Concrete foundation pillars are dug in at each angle at the location of the piers.
- The base is covered with roofing felt. The frame of the bathhouse is assembled from timber - a rectangular frame. It is fixed to the foundation pillars with anchor pins. The polycarbonate bathhouse is light, with a large windage. Fixation with anchors will prevent the structure from overturning by the wind.
- Vertical posts made of 50 mm thick boards are fixed to the frame. They are tied on top with a similar board. The rafters are attached to the frame at a distance of 600 mm. To prevent the structure from playing, the racks are reinforced with jumpers and jibs. The rafters are connected with lathing.
- The roof of the bathhouse is covered with one layer of polycarbonate. On the walls, the internal and external cladding is made of two sheets, which eliminates translucency. The partitions inside the bathhouse are similarly made of polycarbonate.
- The floor is made in the simplest way - poured from wooden gratings. For a summer bath, a complex drain with sewerage and concrete screed is not needed.
- You can even supply water to the bathhouse from a boiler or install a heated tank similar to a summer shower.
Recommendations
Recommendations for choosing a foundation for a log bathhouse:
- If you need a large basement, ground floor, or a two-story bathhouse, it is recommended to choose a recessed strip base.
- A columnar foundation is suitable for small, one-story buildings, the dimensions of which do not exceed 4x4 meters.
- If the bathhouse is located on a slope, it is better to choose a pile foundation.
Less commonly, slab foundations are built for bathhouses from timber. They are expensive and require a large amount of excavation work. The most suitable, universal type of foundation for building a medium or large bathhouse is a strip foundation. If you need to save money, it is recommended to combine it with separate piles and concrete pores. If the terrain is complex and the soil is problematic, it is better to choose a pile-screw foundation.
Columnar foundation
When is it used?
As a rule, bath structures are small, which is quite enough for the construction of strip foundations that are small in height. The reinforced concrete structure has a high load-bearing capacity.
Despite this, MFs are built only on solid, dense foundations . These are rocky, rocky and loamy soils.
Peaty and weak soils have low resistance. On such foundations, the strip foundation will sag under load, which will inevitably lead to its complete destruction.
The level at which the tape is laid largely depends on the depth of soil freezing. Frozen water increases in volume, turning into ice. Accordingly, the frozen layer of soil begins to swell and move upward. This process is called soil heaving. Therefore, it is important that the sole is located below this zone.
The height of the foundation will be equal to the depth plus 200 mm (height above ground level). If the freezing depth is 300 mm, then the optimal tape height will be 400 + 200 = 600 mm.
What reduces the cost
A dugout bathhouse costs the owner much less than building a standard above-ground bathhouse. The dugout does not require expensive insulation materials. The entire globe is around the bathhouse, and heat loss is minimal. And in winter, snow is an insulator. You don’t have to spend money on expensive building material, but use dead wood. As a rule, there are no windows in such a bathhouse. And this is also a significant expense item. And its architecture is primitive.
Building options
Each builder does what he is capable of. As a result, bathhouses differ in location, depth, construction material, appearance and interior. But any bathhouse is a pleasure.
In a bathhouse you definitely need a stove - either a homemade one made of stone or a purchased metal one.
PHOTO: s.zapodlico.ru Stove-heater in a dugout bathhouse
Materials
To facilitate the construction process, everything you need must be prepared in advance. Traditionally, you will need wood for finishing, nails, and an anti-fungal coating. In addition, the room will need to be installed:
- double-glazed windows (if there are windows);
- door;
- stove with a container for water;
- water drainage hoses;
- container for cold water.
Don't forget about electrical wiring. You need to buy a cable with special reinforced insulation, as well as light bulbs to illuminate the room.
Features of the arrangement
Building a bathhouse is a very complex and difficult process. No matter who says it, but here you need to have certain knowledge, as well as skills, in order to erect the building correctly and quickly. If we are talking about the basement or basement of a garage, then the cost and price of the project is significantly reduced. It will also be much faster and easier to build all this, which makes such projects very attractive for people who want to save money or have insufficient experience in construction.
If you want to build such a building in an apartment building, then this is also legal, but before construction you need to obtain permission from other residents, as well as fill out certain documents.
A project for building a steam room in a residential building should look something like this:
- steam room parameters;
- functional plan for the placement of premises;
- diagram of the main communications;
- calculation of materials that will need to be spent.
When arranging a steam room in the basement of a garage or residential building, you need to pay attention to the following factors:
- If you didn’t have time to add a bathhouse to the project, you definitely need to do this.
- If the basement was previously used for economic purposes, this change must be made to the documentation.
- To safely operate the building, it is necessary to correctly install the chimney so that it has minimal contact with the walls.
Steam room installation
The most common material for equipping Finnish saunas is a sandwich panel; you can also make a frame from wooden elements - this option is easier to implement, the main thing is to choose the right dimensions and join the corners.
The main type of work when assembling the steam room will be fitting the elements one by one. Installation is carried out at the construction site, the load-bearing ones will be risers located vertically, and the sheathing and insulating layers are attached to the crossbars horizontally.
The outer part of the steam room is finished with clapboard, plywood or other materials, the lower part of which has mineral insulation. If you compare finishing with such materials with buying a ready-made sauna from panels made in production, you will notice obvious savings, up to 30%.
Thermal insulation of garage
The garage should be insulated both outside and inside. One way to insulate a garage quickly, with the least amount of effort and minimal financial losses, is to use polystyrene foam.
Insulation from outside
There are several rules for insulating a building with foam sheets:
- The thickness of the foam must be greater than or equal to 50 mm;
- Sheets of foam plastic must be installed in a checkerboard pattern (with a shift along the seam in each subsequent row);
- Polystyrene foam is a soft and crumbly material, so a reinforced mesh should be glued on top of it;
- The installed mesh must be puttied with a cement-sand mixture; it is better to choose a ratio of components of about 1:3 (one part cement to three parts sand);
- The facade should be painted with water-based paint to protect it from external humidity.
Insulation from the inside
The inside of the future bathhouse can be insulated, as well as the outside, with polystyrene foam or use mineral wool, which is used for thermal insulation of conventional baths. It is better to insulate metal garages from the inside in two layers: this will significantly reduce heat transfer in the cold season.
Accessories
After you have decided to arrange a place for swimming in the basement, you need to decide on its type and the set of basic components. The shape and depth of the reservoir will depend on the size of the basement of a private house, so here many homeowners are limited in their choice.
The selection of components is an important part in the design process of a home pond.
In total, there are three main types of pools for the home: stationary (monolithic), prefabricated, inflatable. The choice of one type or another will also depend on the dimensions of the basement of a private house.
A stationary pool represents strength and reliability, but its construction involves serious costs, not only in material but also in labor terms. Stationary structures on the ground floor are usually not made by hand. Their construction is carried out by professionals, so if you do not have the proper experience in carrying out such work, you should not start it. After all, if a stationary pool is made incorrectly, at least in some way, it threatens with serious consequences not only for the basement, but also for the entire house. For example, a large leak may damage the foundation of a building.
Prefabricated and inflatable pools are very easy to install, but there is no need to talk about functionality and large sizes here. If you are not going to swim and dive, but are making a pool with your own hands for children, then these are the types that will suit you best. In addition, the costs will be low.
A prefabricated pool, of course, is not as easy to assemble as it might seem at first glance. Typically, its installation will require the work of several people. It should be noted that in good weather such a pool can be assembled outdoors.
The most budget inflatable pond.
Work progress
When a place has been chosen, the future premises are marked, the turf is removed and after that you can start digging a pit. This may take several hours or several days - the volume is about 30 cubic meters.
Next, drainage is performed, where the water will flow, and roll waterproofing is installed.
Then we begin to build a “shed” inside the pit. You can use dead wood and dead wood for it. First, corner pillars and load-bearing pillars are installed under the roof, then logs are laid around the perimeter. The waterproofing is fixed, and the void between the logs is filled with earth. External walls can be treated with clay.
Next, the rafter structure is assembled, the ceiling and roof are installed.
Source