Cool hats for baths and saunas are now sold on almost any layout. They are made in different colors and are often decorated with all sorts of comic inscriptions like “Life is good” or “Oh, bathhouse and beer.” Many people think that these for the bath are just a stylish accessory, but in fact this is far from the case.
Felted or linen bath hats are necessary, first of all, to ensure that the head is reliably protected from overheating during the steam room. After all, sauna and steam bath lovers often heat the steam room to an unrealistically high temperature, at which one can easily get heatstroke or faint. Often a trip to the bathhouse leads to such consequences.
Therefore, it is highly advisable to acquire such a hat when going to the bathhouse or sauna with friends. However, if the options offered by sellers do not suit you, try making a bathhouse hat yourself. We will tell you how to do this below.
Double sided
A knitted hat for a child (the pattern and cutting diagram are presented later in the article) can be sewn from one piece of material and look exactly the same inside and out. Before sewing, you need to create a pattern.
To do this you need:
- Take a sheet folded in half and set aside from the fold an amount equal to ¼ of the length of the head circumference, and at the top measure the length of the cap and build a rectangle from the resulting points.
- From the top, retreat 2.5 cm from the fold line, and down a distance equal to ¼ of the length of the cap. Connect the resulting points and cut the corner along the line.
- On the other side, smoothly round the corner of the rectangle.
The resulting part is a pattern for half of the hat. When cut from the bottom and left, it will have folds.
To cut and sew a hat, you need to do the following:
- Fold the fabric so that the fold lines on the fabric coincide with the fold lines on the pattern, and cut out 1 solid piece of the hat with undercuts and seam allowances.
- Sew the middle undercuts using a machine.
- Fold the piece in half with the right side inward and sew with a continuous stitch in a circle. For turning inside out, leave an unstitched space of 4-5 cm long.
- Turn the hat inside out through the hole left and sew it with a hidden seam.
In addition, you can sew a simple scarf from the same fabric with a button closure. To do this, sew a rectangle of the desired length (so that it fits freely around the neck) from the inside out around the perimeter using an overlocker. Sew a fabric loop on one narrow side. Next, turn the product inside out through the hole left and sew on a button.
Knitting
The hat is knitted using stockinette stitch; the increases form six wedges.
ADDI circular knitting needles No. 3.5 (like these). Yarn thickness 8/2 (400 m per 100 grams), color Flame. Yarn consumption - 70 grams. You can knit in the round, you can knit flat, and then sew a hat. I knitted the first 30 rows not in the round, and when the width of the hat became large enough, I switched to circular knitting. The whole hat was knitted in 2.5 hours.
Having read advice on Osinka that shrinkage after felting can be 35-50%, I started knitting a large hat. (In the photo, the finished hat lies on an inch grid)
Knitting instructions:
We cast on 18 loops. We evenly add 6 loops in every second row until there are 120 loops on the knitting needles (20 loops in each wedge) Then we make increases in every fourth row until there are 156 loops on the knitting needles (26 loops in each wedge) Then we knit without increases of 6 cm. For the brim of the hat, again evenly add 6 loops in every second row until you get 198 loops (33 loops in each wedge). Close the loops, sew up the crown and hide the ends of the threads.
Material for sewing bathhouse hats
Felt. Non-woven material with high density, its thickness reaches several millimeters. Felt is produced manually from wool fibers using the felting method. The thickness of the felt pieces can vary depending on its purpose. Sheep wool is traditionally used as a raw material. Under the influence of hot steam and water, the cuticles of the hairs adhere tightly to each other, resulting in the formation of a dense, light mass.
Felt. This is “refined” felt. Its production requires finer wool from goats, rabbits, and merino wool. The technology for felting felt and felt is almost the same. This is one of the most ancient technologies that appeared long before the development of weaving. Sometimes synthetic fibers are added to felt. Types of felt: smooth (velor), fleecy. Thanks to the soft wool, the felt does not prick, which sometimes happens with coarser felt.
Linen. Natural material of plant origin. It has a beneficial effect on the scalp because... The phenolic compounds it contains destroy bacteria and fungus. A linen hat will well protect your scalp from drying out and your head from overheating at the highest temperatures. Finnish linen sauna hats are very comfortable, original and varied in design.
Cotton. Hygienic material, used for making hats along with linen
Cotton bathhouse caps are valued for their qualities: hygroscopicity, anti-allergenicity, which is important if you are allergic to wool. Since a thin hat is not suitable for a steam room, choose terry fabrics for it
In the absence of a special bath cap, you can wrap your head with a terry towel.
Primary requirements
Before purchasing a product, you need to know exactly what requirements apply to it. The first factor is safety to stay healthy.
The best option would be a product based on natural materials.
Important! It is not recommended to use a cap made of rubber. They are prohibited from wearing when visiting the bath and health complex.
When the rubber heats up, it can shrink, which can compress the blood vessels of the head. This negatively affects the blood circulation of the brain vessels. The consequences are nausea, soreness and fainting.
One of the selection criteria is protection. The product eliminates possible burns and overheating. It also prevents the development of fungus and bacteria on the scalp. Thus, seborrhea can be excluded. Based on these parameters, the material should not serve as a source of the “greenhouse effect”, but maintain a comfortable temperature.
The requirement for the product is practicality. The hat should not shrink; on the contrary, it should be washable and quickly become dry. When worn, it should be comfortable and match the size of your head. Positive emotions from hygiene procedures increase when the product has an attractive appearance.
How to make a lining pattern
Although the pattern is extremely simple, it is not recommended to immediately draw on the fabric. The lining of a knitted hat usually consists of four or six identical wedges. There are also options in five parts. The more wedges, the better the hat will fit on your head.
Constructing a pattern
- Measure the volume of your head or just remember what size the hat was knitted for. Let's say 54 cm.
- Divide the volume of the head into 6 parts. It turns out 54/6=9 cm. Plus 1 cm added for seams.
- Measure the height of the hat. Let's say 20 cm. Add 1 cm of height for the seam.
- Measure a 10 cm segment on paper. Find its middle and draw a perpendicular straight line up, mark a point after 21 cm.
- Draw two straight lines from the beginning and end of the segment upwards, mark points every 15 cm. From them draw smooth lines to the central point.
- The result should be a piece resembling a smooth triangle. Cut out.
- For a cap of four wedges, the following calculations: 54/4 = 13.5 cm. Plus 1 cm for margin. This is the base of the triangle. Next, the pattern is constructed in a similar way.
Felting a woolen bath hat
You can not only sew, but also felt a bath hat yourself. There are dry and wet felting. Dry felting requires skill, experience and the presence of a special tool - a felting needle; felting a hat using the wet method is easier for a beginner.
Types of wool for felting hats in the bathhouse
A wool sweater washed in hot water becomes dense, stiff, and reduced in size. In a word, he “felt.” This is the basis for the technique of wet felting a bath hat in a warm soapy solution. To make hats for the bath, different wool is used, differing in thickness, fiber length and production method:
- Oches
. Wool with short hairs. Felt is made from it. - Sliver
. Combed wool, without hard hairs, undyed. It is cheaper than dyed yarn. Very good for felting undyed bath hats. - Dyed combed wool
. Its fibers are smooth, unidirectional, elongated. The most common material for making colored bath caps. - Carding
. The wool fibers are tangled, directed in different directions, and it is very easy to felt wet or dry. A popular material, also called “wool wool”, is used to make not too thin felt hats for the bathhouse. - Combed wool from fine-wool sheep (merinos)
. The most expensive, high-quality wool, which is used to make delicate things. Soft and silky felt is suitable for felting model and designer bath caps.
Materials and tools for felting a bath cap
- Felting wool (not spun wool of the same or different colors);
- Dense material for the form, for example, linoleum or thick cellophane;
- Laundry bag (plastic wrap with bubble wrap or any mesh material will do);
- Hot soap solution in a proportion of 1 part water and 4 parts liquid soap;
- Sprayer or atomizer;
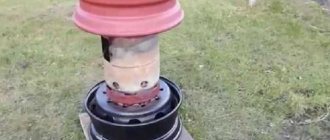
- Hat blank (flower pot, three-liter jar).
Wet felting a bath hat
If you decide to make a completely original unique model, then learn the technique of felting hats according to the proposed instructions. It will take time and dexterity, but the result will please you and make you proud of yourself. Let's look at the stages of wet felting a bath hat with your own hands:
- Take measurements of your future hat. Make a pattern from thick material. You can use a knitted hat of a suitable size. Trace it on the linoleum with a pencil. Remember to increase the outline size by 30% for shrinkage.
- Separate thin fibers from a skein of wool and lay them on the pattern in different directions, overlapping, for better adhesion. Go beyond the edges of the template, the extra pieces of felt will then turn up. Make sure there are no holes, lay thin strands in several layers, as if massaging, press with your fingers. The packing density should be uniform over the entire area of the pattern.
- Examine the fabric through the light and cover any possible bald spots. Apply pieces of wool in other directions to strengthen the felt. Repeat this step several times until you get the desired thickness.
- Carefully place the hat pieces into a washing bag and spray generously with hot soapy water from a spray bottle. If you don’t have such a bag, wet the product and simply cover it with a film, bubbles down, or a mesh.
- Pat the part with your palms for several minutes, gradually increasing the pressure until a rich foam forms. You can roll the workpiece using a gurney or a children's machine.
- Remove the film, turn the shape over with the wool down, fold the excess edges onto the pattern, and press well.
- Place another layer of wool on top of the pattern and repeat the felting process as in steps 4-6.
- Using a dry cloth, thoroughly blot the entire workpiece on both sides. Cut the bottom of the hat with scissors and remove the pattern.
- Lather the workpiece well with your hands, inside and out, remembering like dough, until the head thickens and stops falling apart.
- Place the wet product on the prepared blank and, smoothing it with your palms, give it shape. Leave to dry.
- In cool water, rinse the hat from the soap, alternating hot and cold water, squeeze it lightly without twisting it, and return it to the blank. Shape, leave to dry completely away from heating.
- Cut the dried hat to form a helmet, decorate it with decorative elements that can be cut from pieces of colored felted wool. Make the ribbon for decoration thinner than the hat itself, and iron it well before cutting.
How to felt a hat - watch the video: When visiting a sauna or bathhouse, do not forget to take with you your favorite bath accessory - a hat
It doesn’t matter whether it’s a purchased copy or an exclusive one made with your own hands. The main thing is to enjoy the steam room and stay healthy
And there is a fashion
Yes, now we live in an era of enormous choice, often getting lost in front of a rich assortment of even insignificant, but very pleasing little things. For the sake of pleasant moments, we are ready to spend hours choosing accessories that will diversify our life and color our vacation with even small, but childishly delightful moments.
Do you know that even such a seemingly trifle as bathhouse hats has been embellished by modern life to such an extent that by purchasing this accessory, you can not only use it for its intended purpose, but also feel like a completely different, original character. For example, there are hats for baths in the form of kokoshniks, caps, budenovkas, even watermelons.
But the most traditional and consistently popular is the bell bath cap. If you wish, you can even do it yourself. More on this later.
Return to content
We cut, felt, put on... a bath “bell”
Now we come to the most interesting moment for many who love exclusives.
A felt “bell” is quite easy to felt and sew at home, even for someone who has never done anything like this. The main thing here is desire and a little information. Do you want to understand what a DIY bath hat is? Then read on how to do it.
MATERIALS FOR WORK:
STEP-BY-STEP INSTRUCTIONS FOR “CUTTING-SEWING” HATS
We measure the head around the circumference. We divide the resulting head size result in half and add ⅓ of this half to it (this is an increase taking into account the shrinkage of the hat after felting). Now on a piece of film we draw a circle with a diameter equal to the result obtained. Select the upper part of the circle, then measure down 10 cm from the lower part and draw a horizontal line. Now we connect the extreme points of the arc with the line. Thus, the pattern of the bathhouse cap is ready, all that remains is to cut it out. We lay out the pattern on the film spread on the table.
We use it to comb scraps of wool of different colors for the future hat. First of all, the lapel of the cap is laid out. We start with black wool, because the wrong side of the bottom of the hat will later turn out to be the front side. Next, fill the lapel with green pieces of wool, then brown, and finally white. The pieces should be laid overlapping each other. The pieces carefully laid out in this way should protrude beyond the edges of the pattern with a margin. It is important to ensure that the thickness of the wool layer is the same everywhere.
Moreover, now the colors are laid out in the opposite order - first white pieces of wool, then brown, green and, finally, black.
It should be warm, because wool lies much better in warm water. Now you need to properly wet the wool without going beyond the template.
If it seems to you that the layer is too thin after soaking, at this point you can add pieces of wool in those places where you think it is necessary. When soaked and pressed with hands, wool fibers begin to fall off, interlocking with each other.
In the same order as originally, we lay out wool scraps on the back side of the template, alternating colors, starting the operation again from the lapel
We wet it with a soap solution, again always warm. And we lay out the remaining space with scraps of wool, overlapping them on top of each other. We make sure that the layer is the same thickness everywhere.
The soap should be beaten with light hand movements towards the middle from the edges. We make sure that no folds form. To prevent excess water from spreading to the sides, you can cover the work area with towels.
As soon as it becomes clear that the drawing will no longer “float”, knead it with your hands, making circular movements.
Periodically turning the product over, repeat these steps alternately on both sides. If the workpiece no longer falls apart, then you can take it to the bath.
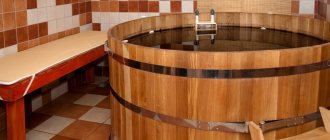
In the bath, carefully pour hot water over it from the shower. It is convenient to continue further felting right at the bottom of the bath, pouring it with soapy water and massaging it with your hands. The cooled workpiece should be periodically doused with hot water.
Now you can remove it from the template and knead it with your hands and crumple it. The process will go faster if you crumple it and forcefully throw it directly onto the bottom of the bath. It is better to repeat this 20-30 times. With this procedure, the product shrinks, and felting occurs much more efficiently. If it is necessary to shrink even more, pour the hat first with as hot water as possible, then with very cold water.
We dilute fabric conditioner in almost cold water and rinse the hat in it. When squeezing, you should not twist it; it is best to wrap the cap in a towel.
Then we cut the edge of the lapel and bend it. This edge can be soaped again, then rinsed and gently squeezed. It is very convenient to dry the hat on an inverted jar or plastic bottle, previously wrapped in a towel.
After this treatment, the surface becomes much smoother, and the product becomes like felt. Also, needle processing allows you to add scraps of wool to the thinnest areas during the process.
Now the hat is ready, it needs to be ironed well, setting the mode for woolen products. You need to iron through the fabric. It is very convenient to use a mitten “pot holder” when ironing the front side of a hat. Using a mittened hand from the inside, carefully form and straighten the top of the hat.
Advice from the master!
Now that you have learned how to sew a bathhouse hat, you can safely begin making it. A thing made with your own hands will please you much more than something bought in a store.
We sew a fashionable headband. DIY turban-turban. Part 2
I continue the theme of the first part about the “turban-turban” headbands. These headbands and hats are so varied, there is no limit to your imagination. The main thing is that it is fashionable now and such headbands always look beautiful and original. We make a two-layer bandage from woolen knitwear, not double-sided and not two-color, but double - warm. Perhaps I will tell you about other options later.
We buy some knitted fabric - 20-30 cm. It depends on the thickness of the knitted fabric and on your desire to make the headband warm or super warm to wear as a headband, or sometimes as a hat. I have a strip 100 by 26 cm. In the photo I folded it in half, scissors show the direction of the loops.
As in the first bandage, fold the fabric in half, facing inward. It is better to pin such a long strip with needles at the stitching site. This will make it more convenient for you to stitch, especially for those who don’t work much with knitwear. The knitwear may stretch relative to the two sides being sewn and then the seam will need to be unraveled.
We sew this long seam and turn the entire strip onto the face. The photo shows the seam that we place in the middle.
Then we start folding the turban on the side of the face.
And on the back of the head.
Then, just like in the first part of the master class, we stitch the back seam and leave a small hole.
Which needs to be sewn up with exactly the same threads, unraveling a piece of this fabric. Then you need to turn the turban over your face, leaving all the internal seams inside. This is what the back side looks like:
I fasten (the 2 back parts) to each other by hand with threads unraveled from the same fabric so that the headband is solid, but I only do this along the back seam and inside. Nothing is visible on the front side.
This is what the front looks like, which it would be advisable to work with a little more. But you can leave it like this (it’s not for everyone) and adjust it on your head every time you put on the bandage:
But if you want to fix the folds, then exactly in the center of the back seam, fasten the folds with the same thread (from the dissolution) on one side, then on the other side.
This is what you get:
If you want to secure this knot forever, then they need to be sewn together. Be careful not to twist them.
That's all, the headband is ready, you can wear it and enjoy it.
And another girl asked me to sew the same bandage, only single-layer. She looks a little softer and thinner. More small and shallow gatherings. Here is a photo of this dressing, you can compare it with a two-layer one. I need to sew two more single-layer ones, I will try to make a master class on such a bandage.
An openwork hat is a way of self-expression
There are a great variety of hats - for all occasions, for any weather and age.
- Panama hats and skullcaps, caps and berets, helmets and caps, caps and hats.
- Scarf hats, scarf hats, transformable hats.
- Hats with small and long ears, with a visor, ponytail, and braids.
- Decorated with embroidery, rhinestones, ribbons, beads;
- with an emphasis on the back of the head, plain, with multi-colored ornaments, asymmetrical
- etc.
Elegant and flirty, feminine and funny, romantic and stylish hats will tell more about their owner than a service or neighborly characteristic.
First cap
The openwork hat is the third topic in the crochet teaching program. The first is knitting elements: loop, chain, stitch. The second is a small cloth: an oven mitt, a collar, a scarf. The third is a hat. A simple hat, starting from the bottom, with a modest pattern, knitted easily and quickly, remains to live with the owner forever. Even if it turns out to be too small/wide, they won’t dissolve it or throw it away. It will serve as a small relic of the first independent creativity, and inspire the creation of new openwork masterpieces - for daughters and sons, for mothers and mothers-in-law, for girlfriends and bosses.
No to market Panama hats! Yes – to lacy hats and caps!
An openwork hat is a decoration for a woman’s head, regardless of age. It's easy to decorate yourself with a hook. As soon as the basics of knitting hats are mastered, imagination and inspiration come. Senile, saggy Panama hats are a thing of the past. Magic hats made from natural threads with small or large openwork brims appear, which make your head feel so good. The husband is delighted, the neighbors are jealous, and instead of the aunt, a beautiful, elegant Woman appears.
Crocheted openwork hat, work by Lyubava
I found the hat pattern on the Internet. The pattern is very simple and easy to knit, so I knitted everything together very quickly. I wear it with pleasure. Yarn - 25% wool, 75% acrylic.
Crochet hat pattern
Openwork Crochet Spring Hat, master class!
Author Efimiya Andreevskikh.
Hat size: 54-56. Knitted to order with crochet No. 2 from wool blend yarn 340m x 100g. in two threads. Consumption about 50 g. If you add a lining to it, you can wear it in winter. I have been knitting and wearing this pattern for several years. Friends will see and order. Crochet hat, description of the knitting process: The hat is knitted from the bottom in circular rows. The drawing consists of arches made of air. loops and single crochets. 1st row - In a ring of 15 air. loops we knit arches from 15 air. loops attaching into a ring st. b. n. There are 16 arches in total. We knit the 17th arch like this: 7 air. loops + double crochet stitch. (Adding another arch of 15 air loops will result in a hat size 56-58.)
2 row - 3 air. loops + st. b. n. in each arch of 15 air. loops of the previous row.
3rd row—4 air. loops + st. b. n. inserting the hook into the middle of the st. b. n. previous row.
4th and 5th rows—5 air. loops + art. b. n.
6th row—2nd connection. loops, inserting a hook between the 3rd and 4th rows we knit “1 tbsp. b. n. + 5 air loops" From "and to" repeat until the end of the row. 7th—8th—9th rows—6 air. loops + art. b. n. in the middle of the column of the previous row. 10 row—3 connections. loops and inserting a hook between the 7th and 8th rows we knit “stitch b. n.+ 6 air. loops" From "and to" repeat until the end of the row. 11-12-13th rows - According to the figure 6 air. loops + art. b. n. 14th row—The pattern is repeated from the 10th row to the 28th row. 29th row—Knit in one thread. In arches of 6 air. knit loops 6 tbsp. b. n. + 1 tbsp. b. n. in Art. b. n. previous row. 30th row—Across the entire row of st. b. n. 31st row—Apply an elastic band 3mm wide. (See pictures) and tying the elastic we knit st. b. n. + pico from 3 air. loops
We tighten the elastic slightly while knitting. It is so that the product keeps its shape when worn.
Openwork crochet hat from Fashion Magazine
Cap size: 56-58 cm. You will need: 50 g each of Vista yarn and viscose silk; some dark yarn for finishing; hook number 2.
Sequence of knitting a hat
- Tie 1 circle with a diameter of 15 cm according to the pattern.
- Next, continue knitting without increasing to a height of 4-5 cm.
- Knit the fragments separately according to pattern 2, connecting them to each other and to the bottom while knitting the last row.
- Tie the edge of the cap with 3 rows of sc. In the last row of sc, knit a picot.
Openwork patterns for knitting a hat
Openwork hat - beanie, crocheted
Are you planning to make a splash at the resort? Forget wide-brimmed hats. Better knit a pair of fashionable berets or hats. They will look good with both dresses and shorts. You will need: VIOLET yarn (100% cotton) - 50 g purple and 10 g beige, hook number 1.5. Basic pattern: crochet according to the pattern.
Openwork crochet beanie hat, description
- Use a purple thread to make a chain of 210 chain stitches. p. + 2 air. lifting point.
- Knit the 1st row with b/n stitches. 2nd row - *st. s/n, air. p.*, repeat *-*.
- 3rd row - art. b/n.
- Then step back 36 sts to tie and then knit, repeating the pattern from the 1st row. At the same time, at the end of the 4th row, leave 36 stitches unknitted for tying.
- Starting from the 6th row, knit in the round.
- In the 8th row add 1 repeat, in the 9th row - 2 repeats.
- Knit the 11th row with beige thread.
- Then knit 6 rows with purple thread, 1 row with beige thread, 6 rows with purple thread, 1 row with beige thread.
- After this, knit 6 rows again with purple thread, and in the 6th row, decrease 1 air. etc. in each rapport.
- Then knit 1 row with beige thread according to the pattern and 6 rows with purple thread, decreasing 1 stitch in each repeat.
- Knit all remaining rows in st. b/n, gradually decreasing to 6 loops. Tighten the remaining loops with thread.
Openwork hat - beanie, knitting pattern
A bath hat protects the head from overheating and heat stroke and prevents the skin from coming into contact with hot steam, which can leave a painful burn if carelessly swung with a broom. When choosing a headdress, everything matters: the material, its density and thickness, the size of the hat and much more. In order not to confuse yourself with the search for a suitable bath helmet, you can sew one.
Let's emphasize individuality
But there are even cooler examples. This is already handmade. Below are the original works of Elena Fedoriv (if you wish, you can order such a wonderful thing from her). If you want to pleasantly surprise a person, this is your option.
Author's works by Elena Fedoriv
Well, what man wouldn’t be flattered if you gave him a hat with a bear or an eagle? Some people will be more pleased with a tiger or a wolf. It all depends on the character. And in the bathhouse wearing such a hat you will be in a better mood than ever.
Flatter your man by giving him such a hat.
For serious or dangerous...
By the way, there are also options for bath hats for women. You can't always joke with them and you can't guess how they'll react, but no one will be against such beauty. So as a gift for a girl, this is a win-win option.
Ladies' version of a bath cap
https://youtube.com/watch?v=DW3DKN7XntA
Do I need to fold the edges of kitchen towels?
The shape of the finished towel may vary. For convenience, women sew such products with loops or “purses” with a clasp at the top, on which an unusual towel is hung. The edge of the canvas can be folded (twice), then stitched so that it does not fray. You can simply cover it with a special tape for finishing the edges. The bottom, top and sides of the product are also trimmed with a zigzag or trimmed with other fabric in the form of ruffles, frills, etc.
How to process the edges of a towel?
When processing the edges, so that the corners do not turn out too thick, it is advisable to cut off small pieces of fabric in these places with scissors, then all the folds will come out extremely neat.
If you decide to trim the edge with a special ribbon for this type of work, then choose the color of the ribbon to match the towel itself. Then everything will be in harmony.
Beanie
To make a hat with a flip at the top of the head, you only need to sew 3 seams. Job completion time: 10 minutes. To cut a hat, you need to place the fabric in front of you and set aside along the stretch line a size equal to the circumference of your head and subtract 4 cm for tension. Measure 55 cm in height and cut out the part.
The nuances of making a beanie hat:
- First you need to fold the rectangle in half, perpendicular to the stretch line, align the side cuts and pin them together with pins.
- Next, lay a straight machine stitch along the edge, leaving a hole (5 cm long) in the seam for subsequent turning of the product.
- The next step allows you to create a curl at the top of the head. To do this, you need to place the stitched part in front of you vertically, take the upper right corner and align it with the lower left corner of the rectangle. Then take the top left corner and align it with the bottom right corner.
- The bottom cut produces 4 layers of fabric. The middle 2 layers need to be moved slightly inward and the 2 outer layers need to be pinned together.
- Next you need to start sewing the chipped sections together using a machine. Having reached the opposite edge, you need to do the following: gradually begin to straighten the folded edges and continue sewing in a circle. As a result, the machine stitch will be laid along the entire lower circumference.
- After stitching, the product must be turned inside out. The hole must be sewn up on the front side with a hidden seam or machine stitched.
Categories
- Diamond embroidery
- Balayage
- Curlers
- Biowave hair
- Biolamination
- Biorevitalization
- Beads
- Brands and types of cosmetics
- Booking
- Boost up
- Types and techniques of hair coloring
- Vitamins for hair
- Embroidery
- Beadwork
- Satin embroidery
- Cross-stitch
- Embroidery ribbons
- Knitting
- Crochet
- Knitting
- Gel polish
- Depilation
- Nail design
- Curling and straightening hair
- A tan
- Conspiracies
- How to guess
- How to sew a doll
- How to sew bed linen
- How to sew a skirt
- Hair carving
- Keratin hair straightening
- Hair coloring
- Eyebrow correction
- Cosmetics
- Eyebrow dye
- Hair dye reviews
- Hair dyes color palette
- Depilatory cream
- Face cream
- Cutting and sewing
- Laser hair removal
- Lamination of hair
- Lifting
- Patchwork
- The best hair dye
- Love
- Magical properties of stones
- Makeup
- Eye makeup
- Macrame
- Manicure
- Clay face mask
- Hair masks
- Homemade face masks
- Mesotherapy
- Highlighting
- Eyebrow microblading
- Hair extension
- Nail extensions
- Eyelash extensions
- Eyebrow tinting
- Eyebrow dyeing with henna
- Hair coloring
- Ombre/amber
- Hair lightening
- Perfumery
- Pedicure
- Permanent makeup
- Peeling
- Curling Hair
- Damage, evil eye and amulets
- Weight loss
- Love spell
- Hairstyles
- Hairstyles for long hair
- Bob hairstyles
- Hairstyles for short hair
- Hairstyles for medium hair
- Problem skin
- Yarn
- Powder eyebrows
- Comb straightener
- Wedding hairstyles
- Dreams starting with the letter A
- Dreams starting with the letter B
- Dreams starting with the letter B
- Dreams starting with the letter G
- Dreams starting with the letter D
- Dreams starting with the letter Z
- Dreams starting with the letter K
- Dreams starting with the letter L
- Dreams starting with the letter M
- Dreams starting with the letter N
- Dreams starting with the letter P
- Dreams starting with the letter R
- Dreams starting with the letter C
- Dreams starting with the letter H
- Compatibility of zodiac signs
- Compatibility according to the eastern horoscope
- Solarium
- Tanning products
- Haircuts
- Tattoo
- Eyebrow tattoo
- Lip tattoo
- Makeup shadows
- Concealer
- Hair tinting
- Depilation
- Hair straightener
- Eyebrow care
- Hair care
- Skin care
- Cuticle care
- Facial care
- Nail care
- Body care
- Baubles
- Nail shapes
- French on nails
- Perm hair
- Palmistry
- Henna for eyebrows
- Floriculture
- Face cleaning
- Shatush
- Sugaring
- Sugaring at home
- Epilation
- Bikini hair removal
What fabric is used to sew a turban?
Initially, a turban is not a ready-made headdress, but strips of fabric wrapped using a special method. The finished design was worn on a hat or scarf. This was done in order to avoid slipping off the head and to give the headdress a more voluminous look. Currently, the turban manufacturing scheme has been slightly modernized - now it is not twisted, but sewn.
To make a truly high-quality product, you need not only to find a step-by-step master class on the Internet on how to pattern a turban, but also to decide on the material from which it will be made. As a rule, brocade or silk is used for tailoring, but in general, any fabric can be used, provided that it is flexible and drapes well.
Brocade turban
An original accessory with an oriental flavor can be sewn from the following types of fabrics:
- Silk and chiffon - as a rule, stylish and bright hats are made from these materials.
- Viscose and cotton are used if you need to sew a turban to wear on the beach or in nature in hot weather.
- Cashmere or velvet are used when you need to get an autumn accessory.
- Brocade - this fabric is used to make a bright and elegant headdress.
Chiffon turban If desired, a turban can be worn even in winter. To do this, it is made from natural or artificial fur. You definitely shouldn’t take thick and coarse fabrics, as the headdress made from them will be completely inelastic. In general, the most versatile option would be knitwear. You can use it to make a summer, autumn and winter turban, or make a children's turban for matinees or masquerades. But this material must also be of high quality.
Turban made of knitted fabric
Additional Information! The most successful turban colors for women are black, sand, gray and wine.
Diversity
Living in an era of enormous choice, we sometimes get lost in front of a colossal assortment of goods. We are ready to spend hours selecting the accessories we like that can diversify our life and enrich our vacation with bright, unforgettable moments. Even such a seemingly insignificant thing as a bath hat has been decorated by modern life in such a way that by wearing it, you will not only protect yourself from overheating in the steam room, but you will also be able to transform yourself into an original, cheerful character.
For example, the “Budenovka” bathhouse hat is very popular; you can also be offered hats in the form of a cocked hat, papakha, or kokoshnik. However, the classic bell hat remains traditional and especially popular. If desired, it is quite possible to make it yourself, for example, sew it from ready-made material or felt it from wool fibers. Let's consider both options.
Simple version of the product
It is recommended to iron the fabric before cutting. If the knitwear has a pattern, it is necessary to position the pattern so that the objects are placed centrally or symmetrically around the center line.
First you need to decide on the size of the hat: measure the volume of your head and choose the desired height of the product.
Next, to create a pattern you need:
- Divide the head circumference measurement by 4 and make a deduction for the stretch of the product (for dense fabrics, subtract 0.5 cm, for thinner and more elastic ones - 1 cm).
- On a sheet of paper, construct a rectangle with the following parameters: the width is equal to a quarter of the circumference of the head, taking into account the necessary deductions, the length is the height of the hat with an increase of 5 cm for the lapel (optional).
- On the left side, move 2.5 cm from the corner to the left, and down ¼ of the height of the cap. Connect the dots to get a dart.
- Round the upper left corner of the rectangle.
- The resulting part is ¼ of the cap.
Knitted hat for a child, a simple pattern. - To create half of the hat pattern, attach the resulting piece to a sheet of folded paper so that the side line with the dart coincides with the fold line, trace the template and cut it out.
Preparing fabric for cutting
The length of the fabric cut for the hat depends on how it will be cut:
- If the product is single-layer, then a fabric size equal to 1 cap length plus an increase for the lapel will be sufficient.
- For a two-layer model without a seam on the bottom fold, you will need double the length of fabric.
- If the hat is double-sided, made of knitwear of different colors, you need to take 2 pieces of fabric, equal in length to one size of the length of the hat.
Sequencing
The main characteristic of knitted fabric is its elasticity. It can stretch in one direction or in two
When cutting products, you should pay attention to the main direction of stretching and place the pattern strictly perpendicular to the direction of the stretching line
For correct cutting you need:
- Fold the piece of fabric across the stretch line with the right side facing inward.
- Attach the hat pattern, trace it with chalk or pencil and cut out the resulting parts, leaving a 1 cm seam allowance.
- When cutting out two-layer products, the fabric needs to be folded across and separately cut out 2 parts with a fold at the bottom.
- To sew a hat with a lining, cut out 4 identical parts or 2 parts with a side fold.
Important properties of bath caps
A headdress purchased for a bath or made by hand must meet the following requirements:
- safety – the use of natural fabrics that do not emit toxic substances at high temperatures;
- protection – ensuring health, protection from burns and heat strokes, maintaining a comfortable head temperature;
- comfort – the bath cap should be comfortable and match the size of the head;
- practicality - the material of the headdress should be quick-drying and non-fading;
- attractiveness – the design of the hat should bring positive emotions to the owner and others.
The shape of the bath cap can be varied. The main thing is that the back of the head is closed and protected from hot temperatures. Otherwise, after visiting the bathhouse you will experience a severe migraine, nausea as a result of heat stroke, or worse consequences. Eyes and hair should also be insulated from hot air and boiling water. Under such conditions, staying in the bathhouse will be safe for health.
What to look for when choosing
The choice of a bath cap does not depend on which bath you like best.
Try to be guided by the following criteria:
- comfort of wearing;
- health safety;
- ease of maintenance and operation - washing, drying;
- the beauty of the headdress;
- head protection from heat stroke.
Let's look at the last point in more detail.
In the photo - options for bath caps
Choosing a model based on face type
Let us dwell on the classification of styles recommended for a certain type of face:
If you have an oval-shaped face, then any shape will suit you, just beware of too tall ones, they lengthen the oval of the face.
Those with a long face should pay attention to low models with horizontal seams and folds. Abundant turban decor is also for you.
Chubby girls will suit tall, raised styles.
We soften the features of a square face with light folds and draperies.
The decor is minimal.
A triangular face - a heart shape - will be favorably emphasized by a massive turban with all sorts of decorative additions.
The simplest model of a turban
Let's take a step-by-step look at how to sew an interesting model with your own hands from knitwear or other material (diagrams in the photo). It is easy to perform. This model has only two seams on the back of the hat. It is made from a finished scarf or a rectangular piece of fabric.
Required:
- Rectangular knitted fabric, one and a half head circumference long.
- Threads to match.
- Brooch.
Progress:
- We fold the knitted or cut fabric in half to form a circle equal to the circumference of the head.
- The cross of the ends will be in front.
- We throw the loose ends back and sew them to the back of the turban.
- Attach a brooch.
- Let's try it on.
Turban
A simple model with an original knot at the front. A brooch will complete the look.
Required:
- Elastic fabric 30-35 cm.
- Threads to match.
- Sewing machine.
- Brooch.
Progress:
- We make a pattern - a rectangle 30 by 60 centimeters.
- We place the patterns on the prepared material and shallow it.
- Fold the fabric in half.
- Round two corners. They will be on top.
- We process the cuts.
- Sew the side and top edges.
- The bottom edge is free.
- We form the assembly at the front. You can fold it, or just tie it with thread. It is more convenient to gradually pull the material from the back of the turban and make folds from it on the front.
- We attach the brooch.
- Let's try it on.
Long billet turban
The model is sewn according to the principle of a regular hat, the previous pattern will work well, but we lengthen our hat to get beautiful folds in the front and back.
Required:
- knitted fabric;
- matching threads;
- decor
Progress:
- We make a pattern; you can use any comfortable hat.
- Add 20-25 centimeters down to the paper pattern along the bottom seam. We get a “stocking”.
Advice! You can make the lower and upper parts of the pattern separately; the turban will be sewn together. This will help save fabric.
- We lay out the parts of the “stocking” on a previously prepared fabric and shallow it.
- Cut out, not forgetting the seam allowances.
- Sew the front and back parts of the turban.
- We process the bottom cut.
- We begin to form gathers or folds along the front and back of the turban. We make the folds deeper along the front.
- We secure the folds with several stitches and add decor if necessary.
- Let's try it on.
Making a bell hat for a bathhouse yourself
The third method is implemented in two ways. The hat can be felted from wool or sewn from ready-made material.
Felting a bath hat
What do you need for felting?
Wool. Obtained by shearing sheep. After shearing, the fleece is dirty. Therefore, it is thoroughly washed, removing grass and dirt. The washed wool is carefully combed several times.
You don't have to do this yourself. You can purchase ready-made wool for felting at a specialized store.
Pattern of a bell hat.
Tip: Buy combed sliver rather than fleece wool. The latter may still contain pieces of uncombed wool. Carded sliver is the final step in wool processing.
Basic soap solution. It is prepared in the ratio of one tablespoon of soap per liter of water. The water heats up to 60 degrees. Then the soap dissolves in it.
Workplace. A plastic film is spread on the floor or a strong, reliable table, and a rubber mat is placed on top. On top of the rug is a shaped film (the one that is covered in pimples).
This structure is surrounded in a circle with towels rolled into rolls. From above, the entire structure is again covered with a shaped film. Its use is not accidental. Pimples contribute to better felting.
The result is an impromptu bath that must not let the soap solution leave the designated area.
In addition, you will have to acquire: scissors, a hat block, paper, a rolling pin, a felting needle.
First there must be a pattern
The bath hat pattern is quite simple to prepare.
Budenovka hat pattern
We take the size of the head circumference (by the ears) - this is the width of the hat or the volume of the head. The size from the ear to the crown is the depth of the hat. Don't forget to take into account the size of the fields.
The width of a pattern or template is found by dividing the volume of the head by two and multiplying by the shrinkage percentage. Take 30% - you can't go wrong.
The template height is the depth of the header multiplied by the shrinkage percentage. Plus the size of the fields calculated in a similar way.
According to the obtained dimensions, we will construct a hat pattern on a sheet of thick paper, cut it out and transfer the pattern to shaped film. Be sure to check the symmetry of the hat pattern relative to the longitudinal axis.
Play around, but don't be a fool
Place the finished pattern in the previously prepared bath.
We tear off pieces from the combed woolen tape and lay them out on the pattern in a vertical direction, with an allowance on the top and sides.
We wet it with soapy water, cover it with film and begin the felting process. Simply crush the wool by hand or using a rolling pin. Carefully turn the pattern over and place the wool on it in the same way, folding in the allowances left earlier. Let's roll again.
Lay out the second layer horizontally. We wet it again, cover it with film and roll it out.
In this way we process from two to four layers. The higher the number of layers, the denser your hat will be.
Hat-helmet pattern.
When the formation of layers is completed, it is time to carefully work with a rolling pin. The hat must be rolled at least 500 times on both sides.
The hat begins to fall off and sit down. We cut the workpiece from below and carefully remove the pattern. Carefully press out the seams by hand.
Further, the process proceeds without a workpiece. We crumple the hat and roll it out like yeast dough. Unlike the latter, we constantly smooth out our work and squeeze out excess water. We remove the film and throw our hats on the table. Between throws we straighten and smooth the almost finished product. During the felting process, be sure to keep track of the desired size of the hat. To do this, we have a hat blank or our own head with a plastic bag on it. At first the hat will be very large, but as the felting process progresses its size decreases. The main thing is not to miss the moment of truth.
When finished, thoroughly rinse the hat and hang it to dry on a hat block or three-liter glass jar.
Advice:
- the soap solution must be hot all the time;
- you need to work with the pattern inside the workpiece for as long as possible;
- shape and shrinkage should be monitored as often as possible;
- for better felting, use a punch felting needle;
- bubble wrap can be replaced with smooth curtain fabric;
- It would be a good idea to lubricate your hands with cream before and after work;
- If you have delicate skin, it is better to use rubber gloves.
That's all the wisdom. As you can see, everything ingenious is simple. A piece like this could make a wonderful gift. Let the love and warmth of your hands protect him not only at home, but also where he is hiding from you with friends.
Why is there a hat in the bathhouse?
Surely everyone has heard that in hot countries, for example in Central Asia, people dress strangely, to say the least. Even in forty-degree heat, residents of Turkmenistan can walk around in warm robes and large hats on their heads. For our mentality this seems surprising and unacceptable, but such attire is much more subject to common sense than we think. The point is that under thick, thick clothing a constant body temperature is maintained, regardless of the hot climate of the environment.
The burning rays of the sun do not penetrate through the shaggy hat, so the head remains cheerful and fresh. A large amount of sweat released on the body protects a person from overheating. Sometimes it’s worth learning some of the traditions of peoples living in extreme conditions. By the way, these same residents of hot countries drink hot tea at high temperatures, due to which the body does not lose heat balance and, accordingly, dehydration does not occur.
In a Russian steam room, if the interior decoration of the bathhouse is done correctly and the stove allows it, you can increase the temperature so extreme that they will be much higher than even those to which the residents of Turkmenistan are accustomed. Therefore, protection from overheating is no less important here.
Of course, no one will wear a cotton robe in the bathhouse, but it is imperative to protect the head, which is largely associated with the process of thermoregulation of the entire body. If this is not done, then exposure to high temperature on the head can lead to various consequences, including a heart attack and loss of consciousness. Hats for baths and saunas maintain the thermoregulation of the head at the same level as before visiting the steam room, which allows you to increase the time you spend in hot conditions.
Views from photos
Caps for visiting a bathhouse or sauna come in different shapes. First of all, the requirements should be taken into account that they cover the back of the head and eyes. They sat well and did not slip. This will protect the scalp, hair and face from possible burns.
They are purchased by people who pay attention to their health
The back of the head is the most vulnerable; 50% of the liquid evaporates through it. This area of the head contains the most important parts of the brain. Products in the shape of a bell and budenovka are popular. An unusual design in the form of a kokoshnik, cowboy, etc. can be chosen.
Similar headdresses are sewn from different materials. Felt-based hats help you have a great time in the steam room and get a healing effect. The product is characterized by volume, the layer of fabric reaches one centimeter. At the same time it is light in weight. The product is also soft, protecting the head from the high temperatures present in the steam room.
From felt
This is a more advanced version of felt material. It is soft in accordance with its structure. The product is quite pleasant to the touch. And this is the main advantage of felt over felt, since it does not irritate the scalp. The natural material has the property of allowing air to pass through and provides protection to the vessels of the head from temperature changes. The fabric is capable of evaporation and absorption of moisture. Felt is made by felting, but does not have a pronounced wool smell.
Made from linen
The production of linen products can maintain a stable body temperature, having a positive effect on it. Flax contains phenol, which destroys bacteria. They have the ability to actively spread in a steam room in a humid environment. Linen will not lead to loss of excessive amounts of moisture, which will protect the skin and hair from drying out.
The linen-based texture of the bath cap will make it comfortable and pleasant. Cotton has the advantage of increased hygroscopicity. The material has the ability to quickly absorb and evaporate moisture. At the same time, cotton is hypoallergenic and hygienic. Experts recommend choosing terry types of products.