How is the floor finished in a steam room?
The process of finishing a bathhouse begins with organizing the floor. It is recommended to raise it 150-200 mm above the floor level in other rooms. This allows you to maintain heat in the steam room due to the absence of drafts.
Shunted plank flooring
It is best to use tiles, tongue and groove or edged boards as the material. The level of safety of moving indoors and its comfort will depend on the choice made. Flooring from boards is made on logs, which are placed on brick pillars. The base is sand or concrete. For installation, galvanized, bronze, brass or stainless steel fasteners are used.
Tile
Tile is used most rarely for interior decoration of a bathhouse. Although this is a highly practical material, it is easy to care for, resistant to moisture and has a long service life. The main thing is to choose a tile that is ideal for the conditions of the steam room. Glazed models tolerate sudden temperature changes well. Non-enamelled and porous tiles are absolutely not suitable. In addition, the surface should not be smooth, but rough, so that it is safe to stay and wash in the bathhouse. The tiles are installed using the same technology as in other rooms.
The shape of the tile can be either classic (rectangle, square) or non-standard (rhombus, hexagon, circle, etc.). You can come up with a lot of options for how to arrange a bathhouse inside. The photo below is one example.
Features of arranging a steam room
When building a steam room with your own hands, you must adhere to the following recommendations.
Selection of oven
The main parameters on which the operation of the device depends are: the number of stones and the duration of their heating, the heat resistance of the body, the grate material, the power consumption of the unit and its design. To provide heat, in addition to the steam room, to adjacent rooms with a total area of 22 square meters, a power of 24 kW is sufficient. Making a stove with your own hands will reduce the cost of arranging a bathhouse.
Choosing a stove is an important matter
Floor covering
The best solution for flooring materials would be to use porcelain tiles or natural stone. For safe movement, a boardwalk is laid. Thermal insulation of the floor is not required. In this case, one of the requirements for the floor is the installation of a hole for draining water. Wood as a flooring material is not the best option, since high humidity will lead to its deformation and rapid failure.
Ceiling
For a ceiling, a sufficient height is 2.2 m, which is due to the physical properties of steam and human physiology. If the ceiling height exceeds the specified value, will the steam rise? and the effect of its influence will be lost. Reducing the height will lead to discomfort during bath procedures, as there will be a risk of head injury and difficulties will arise when working with a broom.
Windows and doors
Window organization is not a requirement.
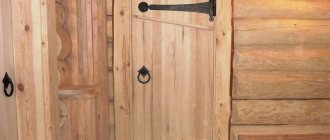
Wood or glass are the best material options for making doors. If a wooden door is tradition, then glass is practical.
Selecting a steam source and determining a location for the furnace
An important factor when choosing a stove is the method of generating steam, the energy source and the size of the steam room.
The traditional fuel is wood, but both electricity and gas can be used. There are several types of ovens.
Wood burning
Installing such a stove will provide a unique atmosphere in the bathhouse. Even the fact that such a device requires periodic cleaning of soot from the stones cannot spoil the pleasure of taking a bath procedure. To reduce the formation of soot, aspen wood should be used as fuel. To maintain a stable temperature, it is necessary to constantly monitor the combustion process.
Steam room with wood stove
Electric
The electric heater is very easy to use. Such an electrical appliance is compact, has sufficient power and allows you to quickly reach the required temperature. Its device does not require the organization of a chimney.
The electric heater is safe for the environment and humans, its maintenance is simplified as much as possible due to the use of automation, and its design features eliminate the possibility of injury. The main disadvantage of the device is its significant energy consumption.
Electric heater
Gas
The use of a gas furnace is characterized by ease of operation, high heating speed and maintenance of the set temperature in the steam room. A significant disadvantage of this device is the dimensions of the furnace and the significant need of the device for gas. The use of a furnace of this type is impractical if there is no connection to the gas main.
Types of heaters
The stove can be open or closed.
There are different types of heaters
In the case when several people plan to take bath procedures, the best choice would be an open type of heater. The firebox (the place where the fuel is burned) does not have fireproof masonry. It serves as a place for laying stones. This arrangement of the stove allows you to heat all the rooms of the bathhouse and allow the stones to heat up.
When exposed to water, heaters with such a device quickly lose temperature. This design is used in furnaces with electric heating.
A closed heater is a traditional way of constructing a Russian bath. At the same time, a large number of stones are located in a specially designated area of the furnace. In this case, the steam exits through a special door, the level of which is located opposite the stones of the first row. This door must remain closed during fuel combustion. To warm up the steam room, open it in advance.
Bathroom and washroom
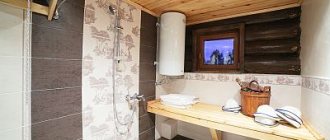
These rooms do not have very high temperatures, although the humidity is as high as in a steam room. The choice of finishes in the bathroom and washroom is more extensive. Fans of bath procedures recommend using natural raw materials for such rooms - wood or stone. Among wood, pine is the leader - it is an affordable material, however, it darkens with prolonged use.
An example of a washing station design Source profstroiplotnik.ru
Plastic is acceptable since there is no high temperature, and it tolerates humid air well. You can use regular tiles for the shower.
Preparing to build a sauna
When planning the construction of a steam room, you need to decide what size it will be. There should be 0.7 m2 per person in the sauna.
The steam room should not be cramped or very spacious. In the first option it will be uncomfortable, and in the other it will be quite cool, because it is difficult to heat a large room. It is preferable to create a steam room measuring 2x2.4 meters. But it is not allowed to deviate from ordinary decisions.
Sauna size designation
To a certain extent, the width of the steam room depends on the way a person is positioned on the shelf. If it is planned that a person relaxing in a bathhouse will sit on a platform, then the room is made miniature.
When it is decided to steam while lying down, more space is required to create a steam room. In this situation, the best width is considered to be equal to the height of the tallest person in the family, plus another 20 cm.
The dimensions of the shelf and bath are selected taking into account the position in which it is comfortable to steam
The height of the steam room can be from 2.2 to 2.4 meters. It is determined based on the height of the tallest visitor to the bathhouse. When entering the steam room, this person should not touch the ceiling with his head.
Features of lighting installation
Any bathhouse (even one built according to all the rules) is a potentially dangerous structure. Because there is always a possibility of fire and electric shock. How to arrange lighting in a bathhouse correctly? In fact, there are few rules here. The voltage should not be higher than 12 V. Lamps must be chosen those that have moisture-proof housings. The ideal solution is light guide lighting devices. Of course, they are expensive, but they are completely safe. In addition, with their help you can recreate beautiful effects.
Bath design options
At the beginning of construction work, a design for the future structure is developed. You can do this yourself by using one of the ready-made drawings on the Internet as a template. There is a good alternative that will save time - order a project from specialists. The same team will also handle step-by-step turnkey construction.
There are ready-made modular bathhouses on sale, which are simply assembled according to the principle of a designer and do not require external or internal finishing.
Most popular sizes:
- 3x4 m;
- 3x6 m;
- 5x5 m;
- 6x6 m;
- 6x8 m.
If you decide to make sketches yourself, then you need to consider the following points:
Correct location of the building
It is important to organize a convenient supply of communications here. Type of soil on the site. The type of foundation depends on this
In particular, for a bathhouse with a swimming pool, it is important that groundwater does not wash away the structure. Construction layout, dimensions. If a two-story bathhouse is built, then the load on the frame will be greater. It is important to calculate in advance where to install the stove, determine the height of the chimney pipe, where it will go on the roof. The diagram must indicate where: ventilation, electrical wiring, sewage are located. The shape of the roof, the material for its flooring. The ceiling power is calculated.
For communications, it is advisable to draw up a separate drawing.
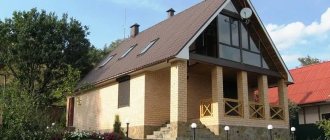
On a large estate, a whole bathhouse complex with a terrace, a relaxation room, a dining room, and a bedroom would look good. In such a building it is great to spend time with guests all year round.
Projects with an attic are popular. According to the standard plan, the recreation room on the ground floor occupies up to 20 square meters. m. From it there is a staircase upstairs, where the bedroom is located.
The cost does not differ significantly from a one-story bathhouse
Attention is paid to strengthening the foundation, since the load on it is greater
We recommend that you read:
- Step-by-step construction of a bathhouse with a terrace
- Frame bathhouse with gazebo
In most frame structures for the floor, they use an edged board (rough flooring) and tongue and groove board (finish flooring). All wooden elements are thoroughly treated with antiseptics.
It is convenient to use lining on partitions, walls, and ceilings. For thermal insulation, it is better to take mineral wool and lay 2 layers of vapor barrier on top.
The steam room will perfectly accommodate a wood-burning stove with a water tank. You can lay it out manually from brick or buy a factory made metal one.
Thematic material:
- Brick stove for a bath
- Metal stove for a bath
At dachas, small baths of 3 * 4 m are often installed. It is easier to make them in a square or rectangular shape. Bathhouses in the shape of a barrel, triangular, look unusual. The steam room can accommodate 2-3 people. Inside the building there are only main rooms:
- steam room;
- shower;
- dressing room (dressing room).
A small veranda is allowed. The sauna is heated by a wood-burning stove or boiler.
The main advantages of a mini-bath are the speed of construction and low expenses.
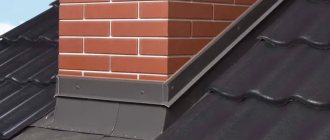
Ceiling protection
Before finishing, you should protect the ceiling from hot steam. To do this, use aluminum foil or a construction membrane.
Important ! Do not use foil with mineral wool or polypropylene foam glued on it. When heated, these materials release toxic substances.
Protecting the ceiling in a bathhouse using aluminum foil Source ko.aviarydecor.com
Arrangement of floors in the bathhouse
Scheme for laying thermal insulation of the floor in a steam room of a Russian bath
To finish the floors of the steam room, you need to use a material that is not afraid of the temperature and humidity conditions typical for a bath and does not emit any harmful substances. The ideal material in terms of its properties is aspen. This wood is inexpensive, looks beautiful, is easy to process and serves well. It is recommended to attach bath benches not to the floor, but to the walls - this way you can save additional space.
Bath floor
You can also use ceramic tiles to cover the floor in the bathhouse. This is a coating that is easier to install and less demanding to use, and can be easily installed with your own hands.
First step. Clean the base from dirt and fill it with a 15-centimeter layer of sand and gravel mixture. Compact the backfill.
Second step. Cover the backfill layer with concrete mixture. A 5cm fill will be sufficient. Level the concrete thoroughly.
Third step. After the concrete has hardened, lay ceramic tiles on it.
Finishing a bathhouse inside: basic rules
A bathhouse is, first of all, a place to relax. It is better to exclude bright colors and expressive shapes here. The main principle is to create an ideal environment for a cozy and relaxing pastime, without unnecessary details.
Lighting should be soft, with warm shades, conducive to a pleasant and relaxing holiday. This effect can be achieved by using a two-tier lampshade that diffuses light. All electrical wiring parts must be reliably protected from moisture.A modern interior for a bathhouse is a manifestation of the designer’s imagination and taste. Tell us about your favorite places to rest and relax. Were there any of them that impressed you the most with their exquisite interior?
Some nuances of construction
In order to competently make a steam room with your own hands, you need to know the nuances that can help in arranging a bathhouse. First of all, you need to find out what building materials and tools are needed for the work. The most important thing is the ability to correctly select and install the main elements of the steam room: floor, ceiling, shelves, stove, lighting, ventilation, door and window openings.
When building a bathhouse, it would be a good idea to take into account some nuances.
When choosing a stove, you need to pay attention to the following technological and design features: the number of stones and the rate of their heating, the material of the grate in the firebox, the heat resistance of the steel lining, power, and the appearance of the unit. On average, a steam room with an area of 22 m² requires a stove with a power of 24 kW
This will allow you to heat the steam room, as well as adjacent rooms: dressing room, washroom and locker room. If you wish, you can make a stove with your own hands. This will significantly save money.
As for the material for the floor, tiles are best suited for a bathhouse, preferably made of porcelain stoneware or natural stone. On top of it you need to lay a wooden flooring so as not to slip when moving along the floor. It is not necessary to install thermal insulation for the floor, but it is necessary to make a drain hole for accelerated drainage of water. It is not recommended to make the floor itself from wood, since this material is susceptible to deformation under the influence of moisture.
The average ceiling height should not exceed 2.2 meters. This is due to the properties of steam and the physiological characteristics of a person. If you make the ceiling higher, all the steam will go up and you won’t get high-quality vaping. If you lower the ceiling too much, there is a risk of hitting your head on it when getting up from the shelf, or the broom will constantly hit the ceiling. Window openings are optional. Doors are best made of either wood or glass. A wooden door is a traditional option, while a glass door is practical, as it will not be exposed to moisture.
Types of interior design of baths
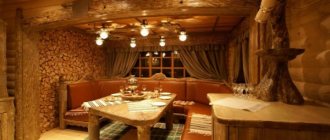
The classic layout of a bathhouse includes 3 rooms: a dressing room (dressing room), a washing room (shower room) and a steam room. Although in traditional Russian baths the steam room and shower can be combined. All additional premises - a font (swimming pool), a games room (billiards), a kitchen, a recreation area, a toilet, a smoking room - are a matter of financial capabilities and personal preferences of the owners.
However, the most popular decoration is in the usual Russian style - restrained, laconic, with a massive table, benches and couches. Billiards or TV will add a touch of modernity.
The interior of an old-style bathhouse can be complemented with forged elements, wooden household items and utensils decorated with carvings. Walls decorated with oak, birch brooms or bundles of fragrant herbs will also look colorful.
Preparing a steam room project
Before you start arranging the steam room, prepare its design. It doesn’t have to be a lot of detailed drawings, but you can’t do without at least basic sketches. When developing a project, you need to start from the main element of the steam room - the stove.
Steam room project
Each sauna stove has its own characteristics and imposes individual requirements regarding the dimensions of the steam room, room ventilation, distance from installing shelves, etc.
When determining the appropriate size of the steam room, proceed from how many people will be visiting the bathhouse at the same time
Here it is important to think through everything thoroughly so that as a result, visitors to the steam room feel comfortable, and at the same time, there is no extra space left in the bathhouse that would be heated in vain. The optimal size of the steam room is 240x200 cm with a ceiling height of 220 cm
Lighting in the steam room
There is no need for windows in the steam room - artificial lighting will be more than enough
It is important to take into account the fact that each window will require increased thermal insulation measures (find out more about how to insulate windows), and this is an additional cost. The permissible maximum is a completely blind window measuring no more than 50x50 cm
At the same time, double-glazed windows must be of the highest quality, with good heat and sound insulation properties.
Blind window in the steam room
When drawing up a project, be sure to consider the organization of ventilation. Without high-quality air exchange, wood will deteriorate very quickly when exposed to moisture. Mold will begin to appear in the steam room, and in general the microclimate will become absolutely unsafe for humans.
Ventilation
When the room arrangement project is ready, you can move on to the gradual implementation of your plan. It is recommended to begin work on preparing the steam room for use with the installation of thermal insulation.
Bathhouse from the inside: designer tips for creating a steam room interior
It’s probably worth getting a little away from the specifics of styles and giving a few tips that apply to any styles in the bathhouse, because they affect general color decisions.
Light and dark. Most people already know that light colors create the illusion of a larger room than it actually is, and dark colors create the illusion of a smaller room. But by visually increasing the volume, we must fill it so that it does not look empty. A variety of color accents distributed in space are suitable for this.
If you choose dark, then even a reduction in volume can be played out correctly - as creating intimacy and comfort in your bathhouse . To do this, the number of objects in the room should be small, and they themselves should be proportional to the size of the room.
ADVICE! If we are talking about a small steam room in a bathhouse, hanging loungers will visually take up less space than a stepped “pyramid” sewn up on all sides.
In a dark room, bright colors acquire even greater brightness and saturation.
the monotony of a space painted in one neutral color if you interest the eye with furniture details and color spots. Look on the Internet for examples of Scandinavian style - plain walls, simple furniture, but bright objects make it not boring and very attractive.
It is also worth remembering that the human eye is constantly looking for correspondence, patterns, and we catch harmony where there is a visual “rhyme” - the color of the lampshade and the color of textiles, for example. Or playing with some form - round or linear - in the decoration of the walls and the shape of the bathhouse furniture.
However, there are no unshakable rules of composition - everything is always decided by the sense of proportion and taste of a particular person.
Choosing the type of wood for making benches and deck chairs
To determine suitable raw materials, consider the following:
- The use of softwood lumber is contraindicated. Otherwise, when heated, resin begins to release, which sticks to the body.
- The wood must be resistant to conditions of high humidity, constant temperature changes, and have high-quality antiseptic protection. Otherwise, the shelves will rot and quickly become deformed.
- There should be no chips, burrs or other defects on the surface.
- Low thermal conductivity of the material is necessary so that the benches do not heat up and this does not cause discomfort for vacationers.
Let's look at the properties of the most popular breeds that are suitable for shelving in a Russian bathhouse.
Aspen
Very popular among residents of the private sector due to the availability of raw materials and low price.
Other benefits of aspen include:
- resistant to moisture;
- does not rot;
- does not deform;
- has healing properties;
- cleans the air of bacteria and germs;
- does not require maintenance.
It is generally accepted that products made from aspen restore strength, give vigor, and act as a neutralizer of negative energy.
From constant exposure to moisture, aspen can change its shade to grayish.
Thermal aspen
Thermal aspen is wood that has been treated with high temperatures (over 200 degrees) and steam.
Resulting in:
- The humidity of the raw materials has decreased.
- Essential oils evaporated from the structure, which means the material became more resistant to fire.
- Density has increased. Therefore, thermoaspen absorbs less moisture.
Thermal aspen does not swell, does not rot, and lasts a long time. This material is considered a reliable decorative option for finishing bath rooms. Thermal aspen shelves and furniture look very beautiful.
Disadvantages: fragility and high price.
Larch
It is characterized by increased resistance to moisture. Has a strong solid structure. It is chosen for the manufacture of furniture, decoration in saunas, open verandas and gazebos.
Alder (black alder)
Alder is the optimal raw material for making steam room benches yourself.
Its advantages:
- high strength;
- low thermal conductivity;
- durability;
- wear resistance;
- does not deform;
- does not change color even after years;
- perfectly tolerates temperature changes and constant humidity.
More expensive than linden. The structure is uniform.
To contrast the colors in the steam room, you can assemble racks of light and black alder.
Linden
Linden is often used to decorate steam rooms. It has a pleasant aroma that has a relaxing effect on a person.
Among the advantages of raw materials:
- it is convenient to handle;
- a light weight;
- ease of installation;
- smooth surface;
- even over the years it does not lose its attractiveness;
- tolerates temperature changes and humidity well.
For homemade shelves, it is recommended to take thoroughly dried linden, otherwise the structures will begin to darken.
Linden is more expensive than alder, but in terms of quality and properties these species are almost equal.
Poplar
It is distinguished by soft and easy-to-work wood. Solid poplar has a light brown, sometimes white tone. Light in weight.
In terms of resistance to moisture and temperature changes, it is inferior to other breeds.
It is customary to make furniture and carved decorative elements from poplar.
Maple
The main advantage of maple is its strength. Products made from this raw material are difficult to break or damage, they do not crack.
Other advantages:
- long service life;
- ease of processing;
- affordable price;
- resistance to moisture, wear;
- homogeneous structure.
Examples of maple with a beautiful texture are the “sugar” and “bird’s eye” types.
Abacha (abashi, abash)
Abash has gained wide popularity in recent years for finishing and making furniture for baths and saunas.
This is the name of African oak. It differs from other breeds in a lot of advantages:
- The raw material tolerates temperature changes well.
- Due to its strength, it can withstand heavy weight loads.
- Looks beautiful.
- Lasts a long time.
- Does not rot, does not crack.
- When heated, abash emits a pleasant odor, which has a positive effect on the human respiratory system.
- Wood without knots. It is easy to handle. The surface is smooth.
- Even over time it does not lose its original appearance.
In the absence of high-quality ventilation in the steam room, the abash begins to darken in places. This is expensive material.
But benches made from budget alder or linden will look no worse and last a long time.
Waiting room
The materials in this room should retain heat and not be afraid of moisture. The tiles are completely unsuitable due to the feeling of cold. Any wood will be optimal here, because it retains heat and heats up quickly. In addition, the natural material has a pleasant aroma that has a calming effect on a person. This is especially true for the dressing room if it is additionally used as a rest room. The design of the walls using wicker or bamboo weaving looks original. This decor is practical, durable and incredibly beautiful. Another unusual option can be seen in the photo below. Setting up a bathhouse inside with your own hands in this way is not difficult, but very expensive. This is a full-fledged living room with all amenities.
Advantages and disadvantages of frame construction
Among the advantages of such a construction:
- Minimum assembly time. Carefully thought-out technology allows you to build baths of different sizes very quickly.
- Environmental friendliness of raw materials. The main material is wood. There will always be a pleasant aroma of natural wood inside the bathhouse.
- There is no need to pour a massive foundation under the building. A columnar base or screw piles (depending on the type of soil) will suffice.
- The structure warms up faster, unlike brick or log baths.
- Fuel economy. For a good heating of such a bathhouse, you will need 2–3 times less firewood than for a brick one.
- Low price for materials.
- Possibility of construction at any time and weather.
Among the disadvantages of a frame bath:
- For year-round operation, the building will have to be insulated, which will entail additional costs.
- External and internal finishing of the structure is required.
- The bathhouse needs periodic antiseptic and fire retardant treatment.
- There is a high probability of the bathhouse shrinking after 1.5–2 years. Shrinkage can be up to 10 cm. Because of this, deformation of the finish occurs inside and outside.
Installation and insulation
Even if the steam room is made entirely of wood, it must be insulated. Thermal insulation will save money and also create favorable conditions for procedures. If the process of insulation and installation is carried out with your own hands, then you will need step-by-step instructions.
Ceiling: proper ventilation
If the steam room is wooden, then its ceiling is made according to the ceiling beam structure. A waterproofing film two millimeters thick is placed on top of them. Its strips should overlap, attached to each other with self-adhesive tape, and to the beams with staples using a construction stapler.
On top of the waterproofing tape are sheets of moisture-resistant plywood, which are joined along the beams. Next are boards with a thickness of forty millimeters, which must be joined very precisely. The next stage of insulation occurs inside the steam room. To do this, you need to lay insulation between the beams in such an order that it is stretched with the ceiling elements. This makes it impossible for cold to get inside.
The next step is to install a vapor barrier. Everything is done in the same way as in the case of waterproofing. And only after this the ceiling surface is formed.
Also, do not forget about the ventilation system, which is absolutely necessary. After all, a person who steams breathes hot steam, inhaling oxygen and exhaling carbon dioxide. And there is no ventilation, no fresh air will come in, and there will be a lack of oxygen. In such a steam room, a person may simply begin to suffocate.
Therefore, the ventilation system occupies an important place in the construction of a steam room. It not only delivers fresh air to the room, but also dries it
For air circulation, two types of openings are needed: exhaust and supply. In order for air to enter the steam room, supply openings are needed, installed closer to the floor, and also located near the stove.
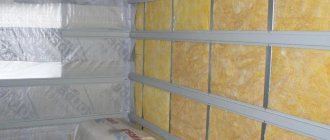
Pie walls
After this, the walls are insulated, or the so-called “pie” in the steam room, consisting of several elements. This is a wall covered with wooden beams, a heat insulator located between them, a vapor barrier, and also a sheathing constructed from slats.
The algorithm for wall insulation is as follows:
- First of all, the beams are attached to the wall.
- Later, it is necessary to lay a heat insulator here, with a thickness equal to the width of the bars.
- After this, a layer of vapor barrier is placed, which in most cases is foil.
- Then a sheathing of 50 by 50 millimeter slats is attached. Finishing at this stage can be done both vertically and horizontally.
- The slats are aligned in one plane and secured with self-tapping screws.
- Then the fishing line is stretched in three rows and vertical slats are attached every meter exactly along the marked fishing lines.
- After finishing the sheathing, foil insulation is placed.
- After this, the entire wall is covered with a vapor barrier coating. The gap between the ceiling and walls must be sealed with self-adhesive foil tape.
Floor
In order to start thermal insulation of the floor, you need to determine in advance what it will be: wooden, ceramic or concrete.
For a wooden floor, the base of the steam room in the bathhouse is made of logs, which are first installed between the foundation in the same plane. At the bottom along their edges, slats of 40 by 40 millimeters are nailed. Boards are placed on top of them, and then they are covered with a vapor barrier film, and only after all this the entire floor is covered with waterproofing in two layers. The plank floor rests very tightly on it.
To insulate a concrete floor, you need a completely different technology. First, the soil is leveled, for which sand, crushed stone and gravel are poured alternately. And then it all gets compacted tightly. The next step will be laying a frame made of metal mesh, and only then a layer of waterproofing film is laid.
Do not forget about ventilation in the steam room, which requires special care. After all, ventilation helps prevent moisture from collecting and also prevents fresh air from entering the steam room. For this purpose, special channels are made near the stove, above the floor level, in the wall - closer to the ceiling, and also in the ceiling itself. To regulate them, special valves are made.
Features of wood cladding
Wood is the best material for walls, ceilings and floors in a bathhouse. In turn, a rich assortment of wood-based finishes can be confusing.
Sometimes simple boards are used to cover walls. Of course, you should choose only products of the highest quality, without mechanical defects and traces of mold. The lamellas are fastened at an angle of 90 degrees on a wooden crate, also pre-treated with antiseptics and anti-feathers. However, it should be borne in mind that the cost of such material is quite high, and therefore it is rarely used for these purposes.
Combining shades of wood in the interior of a steam room
It is better to choose a material specially designed for wall decoration - lining . They are easy to install, they do not weigh much, unlike boards, and have all the positive qualities of natural wood.
The advantages of lining include the following:
- A wide range of shades and textures - different types of wood are used to make lining.
- The slats are equipped with a tongue and groove, which allows them to fit tightly to each other and greatly simplifies installation.
- Visually, this finishing makes the walls smooth and aesthetically attractive.
- The design of the lamellas assumes natural air exchange between the sheathing and the wall.
A bathhouse usually consists of several rooms: a dressing room, a washing room, a steam room, and sometimes a relaxation room. For finishing, you should use different types of wood, based on the purpose and operating conditions in the room.
Wood goes well with stone on the floor
Where the temperature remains at the same level and humidity is minimal (dressing room, rest room), choose pine trim. It is characterized by low cost, stability, low thermal conductivity and a beautiful natural pattern. Pine contains phytoncides, which, when released into the environment, have a beneficial effect on the body. The aroma that such cladding exudes is especially expressive. Due to the presence of resin in the composition and natural antiseptics, this finish is not susceptible to the formation of mold and mildew. But this wood is not suitable for a steam room, since when heated strongly, it begins to release resin and a pungent odor.
pine paneling
Steam room materials
For the walls in the steam room, lining made of aspen, oak, linden, birch or cedar is used. As a cheaper material, you can use edged boards made from the same types of wood. The surface of the boards must be sanded to a perfectly smooth state and treated with protective compounds. If they are to be installed in the dressing room and rest room, then the top can be varnished. Planed boards are almost twice as thick as lining, so they provide high-quality thermal insulation, but you should not give up insulation.
Boards as wall decoration
Washing material
The washing room has a comfortable temperature, since it is most often located in front of the steam room. There is high humidity here, so the materials are subject to requirements regarding moisture resistance. Often the walls are sheathed with clapboard made of larch - a stable, moisture-resistant material that dries quickly and does not deform.
Larch paneling
larch paneling
Material for the rest room
When decorating a relaxation room, decorativeness and creating a cozy atmosphere come to the fore. There are the following options for wall cladding made of natural wood:
- You can cover the walls with pine wood boards. This is the most affordable material with excellent performance properties. Pine is not subject to rotting, it contains natural antiseptics, the wood dries quickly, and has a beautiful natural pattern and shade. Scandinavian pine has the greatest durability, so it is worth choosing it. The shade of pine is light pink, over time it darkens a little and becomes deeper.
- Another inexpensive but high-quality material for walls is spruce lining. During its manufacture, heat treatment is used, due to which the lining becomes very durable and moisture resistant. This type of wood does not contain as much resin as pine, has a pleasant aroma and a unique natural pattern with knots.
Rest room (dressing room)
Note! If the bathhouse is made in the form of a log house, then all finishing measures are carried out only after its complete shrinkage.
spruce lining
The process of covering walls with clapboard: step-by-step instructions
Covering walls with clapboard involves installing insulation. For example, you can use a material with a fiberglass base of the URSA brand together with a vapor-proof layer of foamed foil polyethylene on top.
First the walls need to be prepared. They are cleaned of contaminants, primed, dried and markings are applied - the places where the timber is attached.
Table. Sequence of actions when installing the sheathing
| Illustration | Description |
| Installation of guides is carried out at intervals of 60 cm. If we take into account the width of the beam, the distance between adjacent elements will be 56 - 58 cm. Dowels are used to fix the beam. The caps are recessed so that they do not protrude above the surface (flush). Thermal insulating material is placed in the formed niches between the guides. An important point: the thickness of the sheathing should be the same as the thickness of the insulation. Mats with a thickness of 60 cm, when choosing this step of guides, will fit tightly, without forming gaps and without requiring additional fixation. |
| Fixing the vapor barrier | Foamed polyethylene with a foil front covering is used as a vapor barrier. Material no more than 2 mm thick is fixed around the entire perimeter of the room on top of the insulation. It is attached to the guides with brackets. For joints, use foil-coated moisture-resistant tape. |
| Fixing slats | Horizontal wooden slats measuring 2 x 4 cm are attached to the vertical guides through a vapor barrier foil material with self-tapping screws at a distance of 40 - 50 cm. |
| Alignment of slats | When fixing the slats, it is important to maintain their even position in space in the horizontal and vertical plane. If during fastening you find uneven areas, then you can place a piece of plywood or thin lath under the slats. It is important that the plane of the wall is level. |
| Fastening when aligning slats | If an additional leveling element is placed under the rail, then it is attached to the sheathing using a longer self-tapping screw (5-6 cm), through the plywood. |
| Attaching the bottom rails | The height at which the bottom rail is fixed is 3-5 cm from the floor level. This will make it easier to fix the lining at the bottom of the wall. |
| Attaching additional rails | Additional slats are fixed in corners, as well as around windows and doors. The installation method (vertically, horizontally) depends on the location of the element’s fixation. |
Table. Cladding walls with clapboard
| Illustration | Description |
| Fixing the first lamella | Attaching the first lamella begins in the corner. Its position is strictly leveled in the plane using a building level. Additionally, you can apply pencil marks to the slats. |
| The first lamella is attached in the corner | The panel is secured with self-tapping screws to each rail on the corner side. If you first make thin holes in the lining with a drill of a smaller diameter, then when attaching it to a self-tapping screw, the likelihood that the lamella will crack is reduced to zero. |
| Fixing the clamp on a nail | At the opposite end, the lamellas are secured using clamps. It is pushed inside the groove at the end of the panel so that it rests. It is fixed to the rail with a small nail or a stapler. If a nail is used, it must be held by the leg with pliers so as not to accidentally damage the lining. |
| Fastening subsequent lamellas | To fix the next panel, its groove is placed in the tenon of the fixed lamella. On the free side, the fixation also occurs: the clamp is inserted into the groove and secured to the sheathing batten. |
| Padding of lamellas | If you cannot get the slats to fit tightly, then most likely the tenon has not fully entered the groove and you need to “help” it. To do this, apply the lath to the locking part of the lamella and gently tap it with a hammer. |
| There should be a flat wall | All subsequent panels are fixed in the same way. The sheathing should create a flat plane with recesses, depending on the profile of the lining. |
| Fastening the corner | When all the walls are sheathed, to complete the finish, install overhead elements at the corners and at the joints between the ceiling and the wall, as well as baseboards. Small nails are used to secure these elements. |
| Tinted lining | To tint the lining, protective substances with anti-foam and antiseptics are used. This treatment will not only add aesthetics to the wooden finish, but will also protect it from negative external influences. |
How to make proper ventilation in a bathhouse and prevent rotting? Read in the special article.
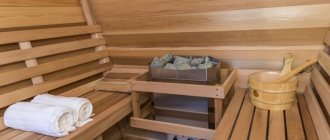
How to make a bench for a bath: choosing materials
If a bathhouse building can be constructed from a variety of building materials, then bathhouse benches and other furniture can only be made of wood.
When choosing materials, they simultaneously select the type of construction that would be combined with the style of the building. But in any case, there are certain rules for choosing wood based on experience and many years of practice.
Criteria for choosing wood for a bathhouse bench:
- The steam room uses benches made of hardwood that can withstand high temperatures and humidity - oak, linden and larch. The aroma of these trees has healing properties.
- Benches made of aspen and larch can be used in the washing room, since these materials tolerate high humidity well at relatively low air temperatures.
- Furniture made from linden, aspen, larch, maple, oak or birch can be used in the relaxation room, however, due to increased moisture, all bath benches must be treated with special impregnations.
Benches and benches made of pine are never installed in the steam room, since under the influence of high temperatures, resin is released from the wood, which leaves marks on the body, but most importantly, it can cause a burn to the body.
There are increased requirements for the material of bath benches:
- Moisture resistance, allowing the furniture to be used for a long time in conditions of high humidity.
- Low thermal conductivity, in which the bench does not overheat in high temperature conditions, threatening burns.
- High density wood so that it does not quickly become saturated with water, otherwise cracks will appear on the bench during use, it will rot and warp.
- High drying speed. The bath bench should dry quickly and be easy to clean.
Linden is the best material for making bath benches, especially for use in steam rooms: it tolerates high temperatures well and is resistant to moisture, easy to process and emits a pleasant aroma. Aspen has also proven itself well, but over time, the furniture in the bathhouse begins to rot from the inside.
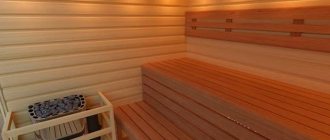
And now the shelves
A very important point is the shelves in the bathhouse. Since constant tactile contact is assumed with them, increased requirements are put forward for these elements:
- they should not get very hot ;
- it is better if they cool slowly ;
- must be environmentally friendly ;
- do not slip or be very rough;
- have no external damage ;
- easy to wash.
Again, wood is most suitable for this purpose. Carefully cleaned, without knots or nicks, it has served people in bathhouses and steam rooms for centuries. Shelves should not have sharp corners that could cause injury. They are not made solid, leaving a small distance between the wooden boards.
Wall decoration
It is best to use lining for finishing bath walls. Before starting work, bring the lining into the steam room and leave it there for a day or two so that the material has time to adapt to the surrounding conditions. All wood must be treated with an antiseptic. In general, the work is extremely simple and is performed in several stages.
First stage. Assemble the frame. When choosing a material for assembling the frame, consider the expected level of the upcoming load. If the shelves will be attached to the walls, the sheathing should be assembled from bars. If the shelves will not be attached to the walls, the frame can be made of slats.
Assemble the frame
When choosing an option for fastening the sheathing elements, be guided by how the lining will be secured in the future. If you attach the sheets vertically, fix the slats or beams horizontally, and vice versa.
Attach the first and last slats to the wall. Use self-tapping screws for fastening. Select the pitch of the sheathing in accordance with the width of the insulation boards.
Second phase. Attach waterproofing (polyethylene film) over the sheathing and begin laying the insulation. For insulation, mineral wool is most often used.
Attach waterproofing over the sheathing
Third stage. Secure a vapor barrier material over the laid insulation. To fix vapor barrier membranes, it is most convenient to use a construction stapler.
Mineral wool, vapor barrier and clapboard finishing
Fourth stage. Proceed with the installation of the lining. Start attaching the sheathing sheets from the far corner of the steam room. The lining can be secured with self-tapping screws or other convenient fasteners. Cover all the walls of the steam room with clapboard.
In the case of finishing a bathhouse, it is strongly not recommended to use varnishes and paints for finishing the lining.
Imitation of timber
This material looks like a natural board on the walls, but is much more practical to use. In addition, it is an inexpensive, environmentally friendly material that provides additional heat and sound insulation.
How to arrange a bathhouse inside with imitation timber with your own hands? There are some peculiarities in its installation. First you need to remove it from the package and leave it open for several days. At this time, you can prepare the walls: clean them from dust, prime them and cover them with lathing. Only after this is it recommended to install imitation timber. If it is necessary to increase resistance to an aggressive environment, then the finish should be coated with a protective varnish.
Step-by-step instructions for installing electrical wiring in a bathhouse with your own hands
Before work, a general scheme for the electrification of the bathhouse must be prepared. Beginners should not undertake such a process without the supervision of a specialist. This should only be done under the clear guidance of a specialist, otherwise it risks a short circuit due to connection errors.
The distribution box, sockets, and switches can only be installed in a dry room. A dressing room or rest room would be suitable.
The entire installation process consists of four steps.
Electrical panel installation
Occurs subject to the following conditions:
- The place for installation is dry, well ventilated.
- Condensation does not accumulate in the room, there is no high humidity.
- You can freely approach the shield.
- The area of the room is brightly lit.
- The recommended mounting height of the box is 1.5 – 1.8 m from the floor.
- In small baths, it is permissible to use a three-core cable for single-phase wiring.
Electrical wiring starts from the central panel.
It is equipped with:
- input circuit breaker;
- RCD;
- automatic machines for boiler, electric heater, lamps.
The power calculation for each individual machine is also carried out.
Wiring
Depending on the material of the bath, an open or closed installation method is used (discussed in the section above). Near the electric one they often run a wire for the Internet and telephony.
Output of switches and sockets
When the cable is laid, you can begin to assemble sockets and switches. The recommended installation distance is 90 cm from the floor. They are fixed in all rooms except the steam room. If the elements will be located near the steam room, then it is better to choose options with protective covers.
Lighting installation
For lighting, devices of protection class IP44 are used.
In the steam room and shower room, waterproof lamps are installed that are mounted on the wall.
Fiber optic lamps are in demand. They are resistant to temperature changes, humidity, and provide soft, diffused, relaxing light.
Built-in lamps look great, especially when the finishing is done with clapboard.
The recommended body material is metal; it is better to take lamp shades from glass. These are the requirements for lamps in a steam room. In other rooms there are no restrictions on the choice of lighting fixtures.
Hammam
Despite the fact that reproducing a Turkish hammam is much more expensive for the average Russian than the same sauna, this type of national baths is still gaining popularity.
BY THE WAY! Calling this type of baths “Turkish” is not entirely legitimate, because it is widespread throughout the East - from Arabia to Central Asia, and the source for them was... Roman baths. But we are already used to it.
The problem is that for a Turkish bath you need a very specific room with a ceiling that has either the shape of a dome or a vault.
And if you do everything according to the rules, then you won’t be limited to one room. The layout of a classic hammam is similar to a palm, where there is a central room with an exit to several smaller ones. In the smaller ones they accept procedures, in the central one they communicate. In other words, the classic hammam is a public bath, not a personal one.
But today this issue can be easily resolved - an individual hammam requires the same room with a domed or vaulted ceiling so that the condensation flows down it onto the walls and does not drip on people - such a room can be one with a lounger and a traditional washbasin.
And the second prerequisite is a room for generating water vapor , where the bathhouse equipment is located.
Materials
Due to the fact that the humidity in a Turkish bath reaches a record 100%, the main requirement for the materials used in it will be water resistance.
stone and meet this requirement . Metals are only stainless, but they have no special use there. Wood should absolutely not be used as the main or finishing material for this type of bathhouse.
But most often tiles are used to decorate a Turkish bath. Of course, there are very expensive baths where massive pieces of stone are used as sun loungers, where the walls are literally decorated with stone panels. But a more common budget option is finishing with ordinary ceramic tiles. This can be small mosaic tiles, or larger ones - at the request of the owner.
Styles
The choice of tiles is not accidental. After all, it not only meets the requirements of water resistance, but is also the basis of the ornaments for which the oriental style is famous. In fact, both baths and mosques of the Muslim world were decorated with tiles.
So the owner of the hammam will only have to decide on the choice of the eastern country ornamental style he likes the most. It is not for nothing that we mentioned above that this bathhouse is widespread throughout the Muslim East - this significantly expands the possibilities of its decoration. Each country has its own unique style, its own peculiarity that can be emphasized.
Hammam, tiled. Photo StroySpaComplex
On the other hand, if there is no desire to somehow emphasize the Eastern origin, you can take abstractions and chaotic patterns , fortunately, tiles are produced in a variety of colors and patterns.
So, to exaggerate it completely, you can either choose ethno or abstraction.
Preparation of tools and materials
To assemble the table for the bathhouse, you need to prepare the following tools and materials.
Tools
- any saw - hand saw, miter saw, circular saw, even a jigsaw;
- (possibly) an electric drill with drills to match the diameter of the dowels;
- any grinding machine - manual, grinder, regular electric.
ATTENTION! It is assumed that you purchased high-quality material, and you will not have to joint the boards, bringing them to uniform dimensions
Choosing wood
As you know, almost all bath furniture, including bath tables, are made from three types of wood:
- Aspen;
- Abashi;
- Linden.
Note that their properties and characteristics are of high quality, and are simply ideal for use in rooms with high humidity and temperature conditions. Let's take a closer look at their distinctive qualities:
- Low level of thermal conductivity;
- No defects;
- Density and strength of the material;
- Absence of any problems during wood processing;
- Lack of resins in the structure of the material.
Today, linden and aspen are considered the most popular types of wood, since they have a fairly reasonable and competitive price on the building materials market. Abashi wood is often used for more expensive finishing, so a table made from such material will be quite presentable in its external characteristics. In turn, it will be distinguished by a unique creamy shade, which will have its original appearance for quite a long period of time.
If you do not want to spend a considerable amount of money on decorative wood, then purchase linden. The use of this material will make it possible to produce fairly high-quality furniture, which will be characterized not only by a beautiful appearance, but also by a long service life. When the final choice of building material has been made, the actual work should begin.
- Tabletop board – 50 x 100 x 1200 (mm), 8 pcs.
- Mounting strip – 50 x 100 x 700 (mm), 2 pcs.
- Leg – 50 x 50 x 650 (mm), 4 pcs.
- Crossbar – 25 x 100 x 750 (mm), 2 pcs.
- Longitudinal crossbar – 25 x 100 x 1050 (mm), 2 pcs.
Date: September 25, 2021
Block house
It is a lining-type planed board, which in appearance resembles a profiled beam or segments of a rounded log. This material has its advantages. It is natural, environmentally friendly and of decent thickness, which contributes to additional insulation of the structure. In addition, the block house looks very beautiful on the walls, as evidenced by the photo below.
How to arrange a bathhouse inside with your own hands using such material? The boards must be attached directly to the wooden sheathing, and then treated with an antiseptic, which will prevent the development of fungus. Places of contact with heating devices should be insulated with mineral wool.
For a bathhouse (especially for a steam room), a block house of only a certain class is ideal. “A” is a processed surface with no cracks or knots. It is allowed for use. Extra class will be optimal. This means that there is absolutely no damage to the boards. Classes “B” and “C” are absolutely unacceptable for performing work inside a bathhouse.