Rolled and sheet penofol is attached to the concrete base only with special glue. The adhesive composition allows you to preserve and even strengthen the technical qualities of the heat-insulating material. For high-quality fastening of polyethylene foam, targeted adhesive preparations are used, the technological development of which is aimed at the rapid connection of concrete with penofol.
Features of penofol fastening
Penofol (isolon) is produced by special foaming of polyethylene. The insulation is covered with aluminum foil, which maximizes heat retention. It is used for internal and external work, in finishing production mechanisms, preserving heat in pipelines or air conditioning systems. It comes in rolls and individual plates. It may have additional characteristics – thickness, color. The bonding of foil to the plane of foamed polyethylene can be chemical or physical (cross-linked).
- small thickness;
- environmentally friendly;
- does not require additional skin and respiratory protection;
- there is no need for special tools;
- ease of fastening.
What kind of glue to glue foamed polyethylene with?
When choosing insulation, a special place is occupied by foamed polyethylene - a material with sound, heat and vapor barrier properties. Depending on the manufacturer, it can be penofol, isolon or polyfoam. The construction market offers different types: with one-sided or double-sided foil, as well as with a self-adhesive plane. The material on which the insulation is attached also varies. Based on all the parameters, you need to be able to choose the appropriate adhesive for polyethylene foam.
Manufacturers: list of verified brands
You need to select an adhesive for gluing penofol to concrete based on the type of surface where the material will be installed. For example, heat-resistant compounds are used for lining a sauna, and products that are frost-resistant and hydrophobic are used for exterior work. When choosing an adhesive for internal use, you should read the quality certificate to confirm the safe properties of the product.
The list of high-quality adhesive compositions is presented in the table:
If the insulation is self-adhesive, it is easy to glue. Using penofol. the usual adhesive composition is applied to the side without foil in an even layer, thinly, evenly over the entire surface. The edges need to be impregnated with glue more thoroughly so that during operation the insulation does not begin to lag.
The insulation is kept for 10 - 50 seconds so that the adhesive composition has time to set. This way it connects better to the surface. Then the penofol is pressed against the concrete, smoothed, evenly distributed until completely fixed. The seams need to be additionally glued.
How to glue correctly: advice from professionals
Preparatory work
A high-quality start of work and processing of the base is a guarantee of an excellent result.
High-quality penofol adhesive is not a guarantee of a positive outcome. In order for the material to firmly adhere to the base and to restore a reliable monolithic screed between the elements, it is necessary to properly prepare the intended plane for the front of the work. To do this you need:
- Eliminate existing defects on the concrete surface, such as chips, cracks, depressions and unevenness.
- To improve adhesion, treat the surface with a primer.
- Dust the site, remove dirt, remove elements that have peeled off from the base.
- Treat the existing metal parts with a special agent that prevents the corrosion process.
- Apply an antiseptic solution to the concrete surface.
Gluing stage
Modern industry has simplified the fastening process by developing self-adhesive penofol. Ordinary polyethylene foam is glued using a special adhesive. The selected glue is applied in an even layer to the side where there is no foil. The edge parts of the penofol are lubricated with the substance more abundantly to avoid material lag at the joints. To ensure that the glue sets properly, wait 1 minute, then glue the polyethylene to the plane. To ensure high-quality installation of the material, the penofol is leveled and pressed until it is fixed. The resulting seams are additionally treated with glue. The plastered structure can be used 12 hours after installation of the heat-insulating material.
How to glue penofol to the wall behind the battery
All of the listed brands of glue can be used to make reflective screens from foil polyethylene foam. Provided that the distance from the penofol glued to the wall to the heating device is at least 40-45 cm.
For a water heating battery, you have to use a different method:
- From inside a niche or just behind the radiator, we clean the space on the wall from dirt, wallpaper and paint residues;
- We cover the wall with acrylic primer;
- We cut out the required size sheet from the foam sheet;
- Using a mounting gun, we apply plumbing silicone sealant from the tube along the contour onto the wall so that a seam with a height of at least 7-8 mm is formed.
All that remains is to place penofol from the inside behind the battery and lightly press along the contour. To prevent the reflective sheet from falling off while the sealant dries, we temporarily fix the insulation to the wall with ordinary tape.
If everything is done correctly, there will be an air gap of several millimeters between the screen and the wall from the inside. This is more than enough to compensate for the expansion and contraction of polyethylene during strong and moderate heating of the battery. It is clear that the best screens are made from penofol with smooth foil.
Which penofol is best to use for wall insulation?
It is clear that a universal heat insulator for gluing rooms from the inside has not yet been invented. Each insulation method has its own disadvantages and advantages, and penofol is no exception. On the building materials market you can buy penofol itself of three brands, A, B, C, as well as many of its fakes and imitations, both domestic and Chinese.
It’s easy to spot a fake insulation fabric. Firstly, such polyethylene foam burns like matches, and secondly, instead of expensive aluminum foil, counterfeits use metallized coating.
When choosing a suitable brand of insulating walls with penofol from the inside with your own hands, you must take into account the original purpose of the canvas:
- Grade A - foamed polyethylene with one-sided foil covering. Grade B - with double-sided aluminum gluing, grade C - single-sided polyethylene foam with one-sided foil and the presence of an adhesive layer to simplify installation on walls and floors;
- The material practically does not allow water vapor to pass through, its permeability is no more than 0.001 mg/m*h*Pa. Therefore, insulating walls inside a house with penofol can be equated to gluing with waterproofing or thick plastic film.
There is one more nuance that few people remember when choosing penofol with foil as insulation for walls. The thickness of the material is relatively small, 4-15 mm. Industrial samples of penofol can be up to 24 mm thick.
Simply laying penofol on the wall will not provide any special advantages, since the insulation power of 4-10 mm is clearly not enough for complete thermal insulation. The thermal conductivity coefficient of foamed polyethylene is only slightly better than expanded polystyrene, so a thin panel simply glued from the inside to the wall will not give the insulation effect that foam plastic or mineral wool of 25-50 mm will provide.
Important! The trick to using penofol is to glue it from the inside to the wall, leaving an air gap 10-12 mm thick.
Only in this case, a sandwich of two panels of penofol with two air gaps can provide insulation that is equal in efficiency to a 50 mm mineral wool slab. And if the room is also heated by a stove, potbelly stove, electric heater or infrared heaters, then the efficiency of penofol laid on the walls increases by 20-30%. For convective methods of heating rooms, the reflective properties of penofol insulation are not so pronounced.
How to properly lay and attach penofol to the wall
Insulation with foamed foil polyethylene makes sense only if there is an air gap between the wall and the thermal insulation sheet. For cold rooms, the dew point will fall within this period. Accordingly, water condensation will fall out from the inside on the aluminum foil and be removed through vents in the upper part of the walls.
What tools and materials will be needed
To perform insulation, first of all, you will need penofol itself, aluminized tape and a stationery knife. The canvas turns out to be quite capricious when cutting, so any unnecessary cuts or accidental damage to the surface must be “treated” in a timely manner.
To assemble the sheathing you need:
- Wooden slats 20x20 mm, the footage is calculated based on the step of laying on the wall of at least 50-60 cm;
- Self-tapping screws or mounting mushrooms used for fastening polystyrene foam insulation;
- Polyurethane adhesive, polyurethane foam.
To work, you will also need carpentry tools, a tape measure, and a jigsaw. As a rule, a certain amount of plastic or pine lining is purchased immediately. Leaving penofol insulation open is risky due to possible accidental damage to the fabric, and in addition, an additional air gap from inside the lining will only improve the quality of thermal insulation.
Which side should you lay and attach foil penofol to the walls?
In all schemes for insulating a room from the inside, foil thermal insulation is laid with the aluminum surface facing up. It doesn’t matter that wooden or plastic wall cladding will be packed over the laid penofol; for infrared thermal radiation emanating from a heater or a hot stove, this does not matter at all. Radiant heat penetrates much deeper, approximately 5-7 cm, so a warm zone is formed under the lining from the inside, providing heating and removal of water vapor beyond the insulation layer.
The canvas can be mounted on walls vertically or horizontally, the main thing is to connect the edges end-to-end, not overlapping, and be sure to glue them with aluminized tape.
How to lay and attach penofol to a wooden wall
Most often it is necessary to resort to insulation of plank, timber and log buildings. In order to insulate a box made of logs or timber from the inside, you have to assemble a floating sheathing. This means that the vertical slats are attached to the wall through movable joints.
How to insulate a room from the inside yourself?
Insulating the inside of the house
Before you begin, you need to insulate the electrical wires and stock up on the necessary materials. In addition to penofol, the contractor will need assembly glue or a stapler, as well as wooden sheathing and hardware.
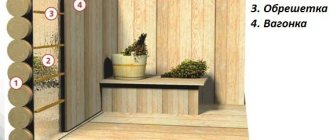
- The first task facing the performer of this work is the construction of a wooden frame to which the penofol will be attached. The air layer separating the insulation from the wall should not be less than 20 millimeters.
- Then, armed with glue or a stapler, you need to fix the insulation on the wooden frame, not forgetting that foil is an excellent conductor of electric current. All electrical wiring must be insulated in advance.
- Now it's time to install the second wooden frame. Finishing materials will be applied to it. The maximum thickness of the structure is 20 millimeters.
How to choose glue
There is a fairly wide range of different adhesives for sale for working with polyethylene foam. And it is advisable to make the choice using the following criteria.
- The temperature range must match this characteristic of the insulation.
- Adhesive properties must be extremely high.
- If you plan to use glue for interior decoration, it must be certified and non-toxic.
- If adhesive is selected for exterior finishing, it must be resistant to a variety of weather conditions and temperature changes.
- If you intend to finish the sauna and bathhouse, then the glue will need to be mixed with water-repellent agents.
Water-based adhesive is absolutely not suitable for working with isolon, because it does not allow the adhesive to penetrate into all the pores of the insulation. Consequently, the level of adhesion will be insufficient.
Glue characteristics: advantages of the material and selection criteria
To understand how to glue isolon to concrete, you need to study the basic requirements for the composition. Attaching penofol to glue today is considered the highest priority option, due to the ability to quickly and efficiently complete the work and provide a number of additional advantages.
Advantages of adhesives
Before starting work, it is advisable to familiarize yourself with all the advantages of this type of fastening in order to determine its relevance for a specific situation and select the appropriate composition.
The main advantages of placing penofol on glue:
- Speed and ease of installation.
- Cost-effective - glue is relatively inexpensive and requires little consumption.
- The ability to carry out installation yourself, since the work does not require special skills, tools, or knowledge.
- Properly selected adhesive for foil foam foam holds the lightweight material well.
- Adhesive compositions intended for this type of work are not afraid of moisture and effectively resist water.
- There are absolutely safe and environmentally friendly natural-based adhesive compositions, which, nevertheless, guarantee high efficiency.
Mandatory requirements for glue
When choosing what to glue foamed polyethylene covered with foil to concrete, you need to focus on the basic requirements for the compositions.
What should be the adhesive composition for fixing penofol to concrete:
- Demonstrate a high level of water resistance.
- The composition must exhibit high adhesion to both concrete and penofol.
- The glue should not negatively affect both types of material (do not spoil, destroy, or change properties).
- Resistance to sudden temperature changes, environmental influences, and bacteria.
- The ability to maintain its technical characteristics for a long time and provide high fixation strength.
- Compliance with the type of room in which the work is planned to be performed - non-toxic certified compounds are chosen for residential premises and offices; for external finishing, an adhesive composition that is resistant to frost/heat and humidity is needed; for baths and saunas, adhesives with water-repellent characteristics are used.
Regardless of what type of glue was chosen, it is advisable to choose products from trusted manufacturers who provide a certificate for the product confirming compliance with quality standards and established norms.
How to insulate a ceiling?
Experts recommend penofol as an ideal thermal insulator for the ceiling. This opinion is due to its low weight and small thickness, as well as the minimal amount of effort that will be required to be applied by the person carrying out the installation.
To successfully carry out the work, the contractor, in addition to penofol, will need wooden slats, hardware, tools and facing material.
- Thermal insulation of the ceiling is carried out in two steps. First, using wooden slats, the initial layer is attached to the surface. For this, the thinnest type of penofol is usually chosen. When fixing the first layer, the slats are laid in the longitudinal direction, and when attaching the next layer, in the transverse direction.
- Insulating materials are covered with cladding made of foam plastic or other lightweight materials.
Advantages and disadvantages of penofol
Advantages of foil material
Even a person who does not have the skills of a builder can easily cut this material and apply it to any surface. Since the main components of the product are polyethylene and food foil, rodents and all kinds of household pests are indifferent to penofol.
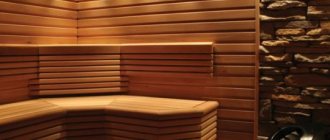
The material is environmentally friendly and will not ignite even if other household items catch fire. Due to the fact that the product practically does not allow steam to pass through, it is widely used to insulate public and home saunas.
Regarding the disadvantages, it is better to insulate with penofol from the inside. The product is not recommended for use when finishing the outside of a living space. It is difficult to fix with glue and adhesive solution, and if fixed with nails, it can tear. Penofol is inconvenient from a technological point of view - this material is difficult to “disguise” due to the softness of its structure.
Bonding with epoxy glue
This is the most accessible method, if we talk specifically about gluing and not welding. Before gluing polyethylene, you need to prepare the surfaces.
Epoxy glue packaging
Epoxy glue is not a glue for gluing polyethylene, but, nevertheless, phenol-formaldehyde resin has very decent adhesion to the surface of polyethylene. In this case, you need to act like this:
- Roughen the surfaces with emery cloth, then degrease and dry.
- Treat both surfaces with a 15-25% solution of chromic anhydride or 20-30% potassium dichromate. (Caution, caustic substances and dangerous carcinogens!) You can take another strong oxidizing agent: a strong solution of potassium permanganate. It is not much less effective, but is much safer. After treatment, dry the surfaces again.
- Prepare epoxy glue according to instructions.
- Apply a thin layer of glue to both surfaces and join.
- Maintain at a temperature of +30...+45°C for several hours, but it is better to keep for a day until ready.
Preparing walls before insulation
The amount of preparatory work depends on the surface material and the purpose of the structure, whether it is an internal partition, or whether insulation is needed from the inside along the main walls. And, of course, on the method of attaching penofol to the wall.
The simplest case is an internal wall; it is often necessary to do additional insulation if a wall separates a warm room from a closed but unheated space, as in the case of a loggia, balcony or a garage built into a house. The surface of the walls for laying penofol from the inside is simply cleaned, painted with water-based emulsion or treated with an antifungal vitriol solution.
A more common insulation scheme is to lay penofol from the inside on the walls of the balcony itself or any other similar room. In this case, the rough surface of the wall must be coated with waterproof varnish. If you plan to glue insulation, the supporting surface must be smooth.
The third option is to lay penofol from the inside onto the main walls, which provide primary insulation due to its own mass. It doesn’t matter whether it is a brick, a concrete wall or a wooden frame, if there is a structural thickness of 10-25 cm, the walls already provide an initial level of insulation, which allows you to move the dew point inside the masonry or slab. In this case, it is best to cover the inside of the walls with steam-permeable or “breathable” latex paint.
Joining polyethylene by welding
The most reliable seam can be obtained by properly welding this material. What complicates the welding process? The next nuance that must be taken into account: polyethylene is molded hot and under high pressure, reaching hundreds of kg per square centimeter. When welding, it is heated again under normal atmospheric pressure until it melts, and then it shrinks somewhat, complicating the welder’s work. Based on the type of object being welded, a distinction is made between film welding and welding of products made of thick polyethylene - cans, pipes, etc.
Thin polyethylene film is welded using a special apparatus or preheated improvised devices. In the machine, the film is glued together as follows: its joined layers are pulled along a wedge heated to a certain temperature, and then pressed against each other with a pair of special rollers. Proper selection of the degree of heating and pressure of the rollers ensures a tight and reliable connection.
If you practice, you can get the hang of gluing polyethylene even with a regular electric soldering iron or iron. The latter should work through paper to prevent damage to its sole. This is done like this: the edges of the film are connected to the overlay, covered with paper and quickly passed over it with the edge of the hot sole of the iron. With a soldering iron tip connected through a voltage regulator, polyethylene is welded even better, and without any paper.
Distinctive characteristics of ceiling insulation work with penofol
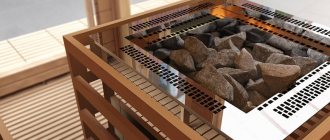
Penofol is a material made from synthetic products and has several layers. The insulation is based on polyethylene foam, which, due to its characteristics, is considered an unusual heat insulator. So, on the outside it is covered with aluminum foil 10 microns thick. The main function is to reflect heat in the direction where it is needed. It is noteworthy that the mirror-shaped surface retains up to 97% of heat.
Penfol is also divided into several groups of modifications, distinguished by a metallized shell on one or both sides, as well as the presence of an adhesive layer.
Penofol insulation has unique characteristics that prevent heat loss through convection, conduction and infrared radiation. At the same time, other types of modifications do not have such a degree of protective properties. It is noteworthy that penofol has the ability to replace several other types of heat insulator at once, or one, but with greater thickness.
Please note: the average thickness of penofol is from 2 to 10 mm. There are also more massive models on the market, but experts note that installation is inconvenient.
This insulation is used in everyday life and production as both a primary heat insulator and an additional one. In addition to the main functionality, it also solves the problem of vapor barrier. Because of this, it is used in hammam, bathhouse, sauna and steam rooms.
When installing penofol, you should know that it cannot be fixed with screws or nails. Otherwise, the material will lose its ability to reflect heat. Therefore, the manufacturer advises installing the insulation with glue. 100% efficiency is achieved if there is a gap of 1.5-2 cm between the ceiling and the canvas. As a rule, after installation, a ceiling is installed under the material. However, in rooms with high humidity (basements, garages and industrial buildings), experts leave the material without decoration.
Most often, penofol is used in conjunction with polystyrene foam. In this case, the auxiliary material is installed as the first layer, and then the main insulation is fixed onto it. The “pie” is covered with plasterboard. As a result, a microclimate is created in the room in which cold does not enter and heat does not evaporate.
What is foil insulation
Foil insulation is a combined material consisting of heat-insulating raw materials and a metallized layer. The reflective coating is installed on 1 or 2 sides at once.
Foil reflects thermal energy back into the room, which is why this insulation is thinner than other materials.
Aluminum film has increased reflectivity, and metallized film has good resistance to alkali.
Features and applications of penoplex glue
There are many options for materials for construction and finishing. Penoplex is in great demand. The surface finished with such panels should serve for a long period. Properly selected adhesive for penoplex will ensure the performance of this function.
You need to choose the adhesive for insulation very carefully. After all, it is on this that the slabs themselves will need to be glued, and the entire insulating structure rests on it. If the glue cannot cope with the load, the consequences will not be very pleasant.
Applying glue to a foam board
It is the choice of adhesive for extruded polystyrene that will be discussed in this article. By the way, we recommend buying polystyrene foam in Ufa.
1 Mounting features
Penoplex material can be glued to walls quite easily, and you can use different types of glue. First, the panels should be glued, and then they are additionally secured with dowels. The dowels are installed when the fasteners are pre-drilled.
The purpose of dowels is to secure the slabs. They are not the main ones, although they can perform such a function if necessary. There are different types of dowels.
For example, there are special dowels used for concrete walls. The most common dowels for working on concrete with vapor barrier for penoplex are two types of dowels:
- Dowel for concrete: “D 6 mm”, the length of which is 60 mm.
- Dowel for concrete: “D 8 mm” whose length is 80 mm.
Dowels driven into concrete can be removed by turning the nail out of the dowel, and then directly removing it from the hole. Dowels secured to concrete (concrete products) are removed using pliers. If excessive force is used when driving a dowel into concrete, then pulling out the nail will be problematic.
1.1 What is penoplex intended for?
Penoplex is a new thermal insulation material. It is foamed polystyrene.
Penoplex structure: homogeneous, with very small air cells up to 1 mm in size.
Manufacturers offer two types of insulation boards. This is: material having a density of 35 kg/m³; material with a density of 45 kg/m³.
Their differences are:
- in thermal parameters;
- different flammability;
- different compressive strengths.
Penoplex 35 with glue for extruded polystyrene foam - used in thermal insulation work on industrial and civil construction. The following are insulated: roofing, plinths, foundations, floors.
Bonding foam boards to insulate a house
Penoplex 45 is used in railway and automobile construction, during gas or oil pipeline laying processes in regions with low temperatures.
1.2 Main characteristics of penoplex
Let us now consider the properties of penoplex, its technical parameters and other nuances. Characteristics of penoplex:
- Chemical inertness.
- Low thermal conductivity.
- Low water absorption like penoplex for foundation insulation.
- High level of strength.
- Resistance to combustion is provided by a substance such as a fire retardant.
- The material is not exposed to aggressive biological environments.
As you can see, the characteristics are very useful. And not every insulation material has similar properties.
2 Making a choice of glue for insulation
The composition of the adhesive is divided into the following types:
- mineral (cement);
- gypsum based;
- polyurethane;
- waterproofing;
- composite polymer on penoplex M45.
The most important difference for all of them is the components on the basis of which they were made. Mineral glue is in greatest demand. It is used when it is necessary to glue the material to a dry base (it does not matter which one - metal, concrete, brick, wood).
It also hardens very quickly, so you need to mix the glue in portions (in small quantities) and try to work quickly with it before the mixture hardens. Waterproofing glue should be used to glue penoplex, which is mounted on insulation made on the basis of bitumen.
Before gluing penoplex, it is necessary to study the recommendations from the manufacturer regarding suitability in order to carry out the insulation for a long time and reliably.
An economically advantageous option, according to experts, is also the ability to glue M35 penoplex using a composition such as liquid nails.
Installation of foam insulation using glue and dowels
There is also polyurethane foam adhesive Titan Styro. It adheres well and is a good sealant. Titan Styro is applied with a special gun (installation gun), there are also cylinders with dispensers and tubes. When gluing penoplex to a structure, you need to choose an environmentally friendly and sustainable glue.
Penoplex can be glued to concrete, metal, brick, plywood. Penoplex is also glued to metal using dry mixtures.
Preparing the surface for fixing penoplex is the next step after selecting the adhesive composition and bringing it into working condition.
Steps to take:
- Clean the surface from dust and debris.
- Basically, manufacturers recommend using a primer to treat the surface.
- At the stage of fixing the slabs, you need to pay attention to the temperature. The list of mineral mixtures is not used at negative temperatures outside.
- After the foam has been well fixed, further work should begin.
2.1 Penoplex installation technology
There are 5 stages in the foam gluing process:
- Cleaning the surface from contamination.
- Drying the surface.
- Drawing up a diagram of future installation work.
- Applying glue for foam plastic or penoplex. There are such methods for gluing: solid, dot and boundary. Usually you should give preference to the second method. The glue is applied with a spatula. Its width can range from 100 mm to 200 mm.
- Having chosen the necessary tool and glue, you need to start gluing the foam. The glue is applied at certain intervals and then pressed tightly onto the surface that is being insulated.
The resulting joints will have to be sealed somehow to avoid the appearance of cold bridges. Therefore, they should be filled with foam for installation. Polyurethane foam can be used according to the recommendations. An alternative to foam is the same glue, but sealing the joints in this case will cost you more.
2.2 Glue consumption
The glue consumption is indicated on the packaging by the manufacturer. The warranty period for the glue is 1 year. This material should be stored in a cool place. Glue consumption can be quite economical if there is a quick-hardening composition and if the work is done professionally.
Pros and cons of ceiling insulation
Penofol for the ceiling today is a popular material due to its versatility and easy installation. In addition, construction specialists value insulation for such parameters as:
- Light in weight, due to which the material can be worked at any height.
- To fix the insulation, no additional tools or devices are required.
- The coating is not water- and vapor-proof, incl. not subject to destruction under the influence of precipitation.
- Insulation performs several functions. So, when fixed to the ceiling, it prevents heat loss and absorbs noise. Often used in conjunction with other insulators to improve properties.
- When exposed to high temperatures, it does not release toxins. In the manufacturing process of the material, polyethylene and foil are used, which are used in food production.
- After installing the heat insulator, there is no significant loss of usable area. Because of this, penofol is often used in rooms with low ceilings.
- The material is sold in roll form, which makes the work much easier.
- The products are not subject to combustion and are resistant to rodents.
As for the disadvantages of insulation, there are few of them. Thus, these include a high price tag and the need to use secondary heat insulators to improve the properties of the first one. The second significant disadvantage is the use of glue as fasteners, which also increases the financial burden. Third, the material has a soft structure, so it cannot be used in rooms where you plan to wallpaper the ceiling.
Insulation with sawdust and wood shavings
Sawdust insulation was widely used in the 60s and 70s in Western countries. But later sawdust was replaced with modern, highly effective insulation, more durable and reliable, which is easier to install.
However, it may be advisable to insulate with sawdust even now, if it is possible to “get” them for free. Until now, many organizations that process wood are ready to give sawdust and shavings for free or at no cost; there are still costs for their transportation, for additional materials that are mixed with sawdust, as well as for the increased labor intensity of using this insulation.
But before we consider how to insulate using sawdust and shavings, let’s decide how much and what kind of sawdust will be needed for insulation, what layer needs to be created...
What sawdust and wood shavings should be used for insulation?
It should be taken into account that the larger the sawdust, the more advisable it is to insulate with it - the specific gravity and thermal conductivity coefficient are slightly lower. Also, as the size of sawdust increases, the dependence on its moisture content sharply decreases.
In fact, it is recommended to use small wood shavings, twisted into rings. It can form an elastic thick carpet filled with air with a volumetric weight of less than 200 kg/m3. It is better to leave small sawdust from sawing aside.
It is unacceptable to use small sawdust and shavings from sawing plywood, which are abundant in furniture factories and which no one needs. This plywood waste is oversaturated with formaldehyde and is not safe. Their thermal conductivity coefficient is high.
Sawdust layer thickness
The thermal conductivity coefficient of the sawdust layer is approximately 0.07 - 0.095 W/m?C, depending on the moisture content of the material, its size and packing density. For design and calculations, you can take the average value of 0.08 W/m?S.
Those. Compared to modern insulation materials (0.03 - 0.045 W/m?C), sawdust has approximately twice the body conductivity, and the thickness of their layer will be required twice as much.
For regions with the Moscow climate, when insulating the attic of a house, you will need a sawdust layer thickness of at least 32 cm to achieve optimal insulation according to the standard, and better - 35 cm. For a house of 100 sq. m. in the attic you will need a 30 m cube of sawdust, about 7 tons.
On the wall, for its insulation, there must be a layer of sawdust of at least 20 cm. Under the floor with a positive temperature - at least 26 cm, which no longer fits between the joists.
It is because of these figures that the question arises: “Is it advisable to use sawdust as insulation?” But still, the monetary savings compared to mineral wool insulation can be impressive with free material, especially if you do it yourself.
How to protect against rodents and decay
It’s probably hard to think of a better home for a rodent than sawdust. And all possible insects and microorganisms will eat sawdust very quickly. Therefore, there is no particular point in filling them in in their pure form; the material must be treated with antiseptics. The most common and accessible is fluff lime. But it's not cheap.
Recipe for use: 20 volumes of sawdust per volume of lime. Water is added to this mixture to create a suspension and all the sawdust is saturated with antiseptics. But soap, boric acid, and copper sulfate are additionally dissolved in water (you can do a little of everything together for a comprehensive solution, so to speak...). The material is laid wet, then within a week or two the water evaporates, and the dry, treated insulation remains in place.
Bonding the composition
Additionally, it is recommended to add two volumes of cement to this solution. As a result, after laying, the sawdust will bind together and become stronger, which will prevent their further shrinkage. When laying in vertical panels, binding sawdust with cement or gypsum is mandatory.
It is not permissible to place sawdust or wood shavings in direct contact with chimneys or similar heating structures. A fire barrier made of mineral wool of at least 30 cm is required. Electrical wiring is laid through sawdust only in a fireproof shell (in metal pipes).
How to use on floors
Sawdust and wood shavings are vapor-transparent materials, so you need to use the usual recommendations for the use of such insulation. A vapor barrier must be installed on the attic floor on the side of the house; it will reduce the humidity inside the thermal insulation layer and prevent it from getting wet in cold weather.
A ventilation gap with a thickness of 3 cm to the flooring or fence must be left on top of the layer. Typically, shavings are poured onto a vapor barrier film between the joists, then a counter-lattice with a height of 15 cm is made and the mixture is topped up, leaving the vent. gap under the top deck.
How to use wood chips to insulate walls
When insulating walls, wood shavings can be placed between the wall and the mesh fencing. If the wall is thick and made of dense materials (not a thin shield), then a vapor barrier is not needed.
A vertical sheathing is installed on hangers with a pitch of 600 mm along the thickness of the insulation - 20 cm from the wall, on which a fine fiberglass mesh is fixed.
Moistened wood shavings impregnated with cement or gypsum are gradually poured between the mesh and the wall from bottom to top in layers of 20 cm. To prevent the mesh from blowing out too much, plywood panels are used, temporarily installed on the sheathing until the insulation dries.
30 mm thick beams are placed on top of the sheathing to form a ventilation gap, after which siding or other cladding is installed.
Typical mistakes when insulating with sawdust
In this video about insulating an attic using sawdust, you can see some actions that can negatively affect the quality of insulation.
- There are gaps allowed during construction, which are sealed with polyurethane foam. But it is better not to use this foam in layers of insulation, where water vapor condenses due to temperature differences, since it is easily saturated with water and therefore collapses, leaving cracks open. Replaced with polyurethane foam glue.
- There is no vapor barrier on the room side. As a result, the insulation will become moisturized during the cold season, losing its heat-saving properties, with accelerated decomposition.
- Clean sawdust is used without treatment with antiseptics, as a result of which soon they may become putrefactive and become waterlogged.
- A layer thickness that is not optimal for economic feasibility is used - by eye, according to speculation and recommendations... - as a result, money is lost due to insufficient energy savings.