Spa areas
- All articles
- Saunas
- Hamams
- Salt rooms
- Baths
- Snow rooms
- Shower of impressions
- Laconiums
Wood is a living material that is sensitive to what is happening around it. To ensure that the font pleases you, your children and even your grandchildren, be prepared to comply with a number of requirements.
The main enemies of the font are changes in humidity and ultraviolet radiation.
Changes in humidity
The wood of Blumenberg hot tubs is dried to a state corresponding to normal indoor air humidity. After processing, the finished font is coated with a protective varnish that does not allow moisture to pass through. Changes in humidity and, as a consequence, in the size of such a font are insignificant and can be easily eliminated by tightening the hoops.
Changes in humidity should not be sudden. The filling period should be equal to the period when the barrel is empty. The optimal filling period is a week, then you need to leave the barrel for a week without water.
If the font is constantly filled with water, this is not critical. The wood will gradually adapt to high humidity levels. It is much worse when the font is filled with water for several weeks and then the water is drained. Swollen wood dries out, hoops weaken, and cracks appear in the wood. If this happens, it is important to promptly adjust the tension of the hoops. Small cracks may disappear when humidity increases, or they can be filled with silicone.
Indications for water procedures in the font
- Strengthening the immune system, increasing the overall tone of the body.
- Warm baths help relieve insomnia, anxiety and stress.
- Regular procedures are often prescribed as part of rehabilitation measures after injuries to relieve pain.
- Hot baths speed up metabolism and normalize the functioning of the nervous and cardiovascular systems.
As a rule, procedures are recommended to be carried out every other day. There are no restrictions on the duration of the course - it all depends on the state of health and desire of the person himself.
Ultraviolet
For our hot tubs you can order the option of anti-UV varnish treatment. This is a must if you plan to use the hot tub outdoors.
Place a font made of untreated wood in the sun, and over time it will darken. The moisture-proof varnish will peel and crumble.
On the outside of the hot tub the UV coating is transparent, and on the inside it is blue or black. Although in the photo it looks like a plastic insert, it is actually a coating applied to natural wood. In theory, the coating on the inside can be made transparent, but then the font will have to be covered.
Attention spa owners! Ultraviolet rays are emitted by a solarium. Keep the font away from him.
Do-it-yourself bath font made of wood: step-by-step instructions
Traditionally, after the high temperatures of a Russian steam room, it was customary to plunge into cold water, which is why they tried to install baths on the banks of a river or other body of water. Similar traditions have been preserved to this day, but today, more and more often, bathhouse lovers prefer, upon leaving the steam room, to jump into a font built under the roof, rather than run in the cold to the nearest body of water.
Is it possible to build a bathhouse with your own hands? If there is a desire, then, of course, it is quite possible. It can be made of wood, poured with concrete, or a ready-made bowl made of special plastic can be installed, which is subsequently lined with decorative material.
An interesting parallel is that Japanese culture has its own traditional bathhouse called ofuro. It basically consists of a wooden barrel. Ofuro differs from a regular font in that it is heated using a metal stove installed next to the barrel or even inside it. By building a similar option, you can get another bathhouse and a font at the same time.
Shape and material of the font
The font is most often made in four geometric shapes - square, round, triangular or oval.
- The most popular shape of a wooden font is oval. This structure is the most compact of all, and can be installed even in a small room. In addition, the oval shape has good rigidity, and this design is easy to assemble.
The oval-shaped hot tub fits well even in cramped spaces
- The round shape is well suited for making a wooden Japanese bathhouse, since it needs to have a compartment for installing a stove.
- A square font made of wood is extremely rarely made, since it is not very convenient to use, and its design does not have sufficient rigidity. In addition, the corners of square structures take longer to dry out, and the process is uneven, which is very undesirable for wooden structures. Therefore, craftsmen often simply round the inner corners of the font.
- The triangular font can be made of wood or plastic. It is convenient because it is compactly installed in the corner of the room and does not occupy a significant area of the bathhouse. This design looks very neat and quite respectable, and will probably be suitable for any interior of a bath room.
A concrete font located in the floor of a bathhouse can have the most arbitrary shapes, since its rigidity is provided by reinforced walls and a bottom.
Plastic hot tubs also have different geometric shapes. Such mini-pools are usually installed on a bath floor (on the surface or in a pit made). The shapes of the font do not affect its performance characteristics in any way, and you can choose any of them to suit the taste of the bathhouse owner.
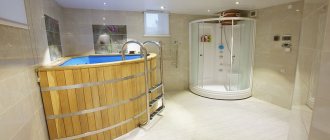
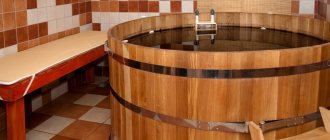
Wooden font
If you decide to make a wooden font yourself, then you first need to choose a suitable material for it, since not every wood is suitable for making containers that are constantly in contact with water.
For such products, hardwood is suitable, as it absorbs moisture into its structure to a minimum, which means it will last the longest possible time.
It has long been known that certain trees have beneficial healing properties that give a person additional vitality. Therefore, it is precisely these breeds that are chosen for the manufacture of not only bathtubs, but also other accessories that are used in the bathhouse.
Trees that have similar qualities include larch, Siberian cedar, beech and oak.
Larch
Larch wood is an excellent choice for any bath accessories, as it has specific properties that have a beneficial effect on human health. Thus, it has been noted that larch aromas and infusions increase the overall tone of the body, activate protective reactions, and also cleanse and rejuvenate the skin.
Larch can withstand both extremely high temperatures and temperature changes; it has a solid structure, therefore it is strong and durable, as it perfectly resists the penetration of excess moisture into the thickness of the tree. Thanks to its special antiseptic properties, it is not susceptible to putrefactive processes and the formation of fungus.
Cedar
Cedar wood has even greater density than larch, and has no worse characteristics in terms of resistance to the external environment. In addition, it is a source of phytoncides that inhibit the growth of bacteria, which eliminates the appearance of mold and fungal colonies.
Cedar wood is enriched with essential oils, which have a healing effect even at the cellular level. Cedar has the property of normalizing the functioning of the cardiovascular and nervous systems, calming and helping to relax, and in addition, it is considered a strong aphrodisiac.
Beech
Beech wood has a dense and durable structure, which helps it resist external negative influences and withstand humidity and temperature changes over a very wide range. Beech has a tart aroma and strengthens the human immune system. A font made from this wood will last a very long time.
Oak
Oak wood has been known for its remarkable properties for hundreds of years. Oak has always been a symbol of strength and excellent health, since the tree itself has a dense and durable structure. Having an oak font, you can receive a charge of vivacity and energy every time you go to the bathhouse. In addition, this wood promotes wound healing, improves sleep, normalizes metabolism, and neutralizes inflammatory processes.
Oak can easily be called the most popular material for making bath accessories, which is why bath lovers most often choose this wood.
Wooden bathtubs also have their disadvantages - they are difficult to operate and maintain. The parts should not be allowed to dry out, so after using and washing the container, you need to pour a small amount of water into it and close the lid on top so that it evaporates more slowly, but constantly maintains a certain level of humidity inside.
To install wooden hot tubs, it is necessary to prepare a perfectly flat surface to avoid distortion and deformation of the structure. If it is impossible to find such a platform, you can level the font itself by placing wooden pads of the required thickness under the desired side.
Pouring font
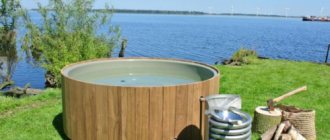
In addition to the bathtubs installed on the floor and embedded in it, dousing bathtubs are also made. They are usually used in cases where there is not enough space in the bathhouse, and it is impossible to install a full-fledged mini-pool that a person could climb into. In addition, dousing baths are often installed in Russian baths and saunas simply for those who like to take an instant cold shower.
Video: do-it-yourself bath font drawings
Prices for bath fonts
Bath font
Installation of a wooden font
Drawing of the font and materials for its manufacture
Before buying materials for making a font, you need to draw up a high-quality assembly drawing of this container with accurate calculations of the dimensions and number of parts.
It is recommended to make the drawing in several projections - then it will be easier to calculate all the parameters of the necessary components - parts of the walls, bottom, stairs.
The staircase may have steps, as in the presented drawing, or simply wooden rungs. But in the latter case, for safety reasons, it is necessary that the ladder hooks onto the edge of the font.
- Boards will be needed for the walls and bottom of the font, stands under it, internal benches and stairs. Typically, material with a cross-section of 20 × 120 mm is used, taking into account that the edges of the board will be milled. The length of the board will depend on the chosen height of the font.
- For stands under the font, you will need a beam 100 × 100 or 150 × 150 mm. Its length will depend on the width and length of the font.
- In addition to the boards, you will need metal strips and bolts with which the installed boards will be tightened. The metal for the strips should be flexible enough, but very durable.
- Self-tapping screws will be needed to fasten the individual parts of the bottom and screw in the legs. But you also need to take into account that there should not be a single metal part inside the font.
Manufacturing parts for a wooden font
Making wooden elements for assembling a font is not as simple as it seems, since they will have to create a single, strong, and at the same time, airtight structure that will not leak in any place. The boards should fit tightly together, creating a solid, crack-free surface on the walls and on the bottom plane. In addition, the walls of the font must be tightly connected to the bottom plane.
- The boards are sawn into equal sections (in accordance with the drawing), equal to the height of the walls plus 100 ÷ 120 mm. This is the distance that the bottom of the font will rise above the floor. The lower part of the boards will close this space from drafts.
- Then each of the boards is milled along the edges. A semicircular tenon is formed from one, and a semicircular groove is cut out from the other, having exactly the same radius as that of the tenon - they should fit each other perfectly.
- The boards for the bottom should also be milled for a tongue-and-groove joint without side chamfers, so that the floor surface is perfectly flat and does not have even small gaps.
- Another option is that the boards should be smooth, perfectly fitted, without tongue and groove joints.
- Next, on each of the boards intended for the walls of the font, the same distance is measured from their lower edge, for example, 100 mm. Above it, the exact thickness of the board from which the bottom will be mounted is noted, for example, 25 or 30 mm.
- In the marked area, a square groove is carefully milled, with a depth of one third of the thickness of the board, in this case - 8 ÷ 10 mm.
- Having finished manufacturing the parts according to the calculated dimensions, they are thoroughly polished. So, the boards for the walls should be perfectly smooth on both sides, and the bottom parts should be at least on the side that faces the inside of the font.
Installation stages
The principle of installing a wooden font is similar to making barrels. The difference in this process lies in the shape and thickness of the wooden elements that form the walls of the resulting container. The boards for the font are absolutely flat, and for the barrel they taper towards the bottom and upper open part of the container.
The installation of the font is carried out in stages, as follows:
- The first stage is the installation of a shield made of boards. It will then serve as a blank from which the bottom of the font will be formed. The boards are glued together with wood glue and compressed with clamps until the wooden panel is completely ready.
It is clear that for an oval font a rectangular shield is assembled, for a round one - a square one.
- After the glue has dried, the desired figure is marked and drawn on the wooden surface with dimensions corresponding to the drawing. Then the bottom assembly part is cut out very carefully. Errors when cutting out this curvilinear figure cannot be allowed - it is better not to rush in order to avoid a fatal mistake. The edge of the finished bottom must be carefully sanded to remove burrs and small irregularities.
- Next, the resulting shield must be additionally strengthened on the lower side of the bottom with 20 × 30 mm bars. They are screwed with self-tapping screws, which in no case should go through, otherwise their sharp ends will stick out in the floor of the font, which can lead to injury.
Additionally, you can attach support bars, which will subsequently act as legs - they are installed along the edges of the bottom plane.
If you purchase ready-made hot tubs, the bottom is usually divided into three parts. This is done only for ease of transportation. The parts from the kit are assembled into a whole plane in the same way as mentioned above - using glue, bars and self-tapping screws.
- Next, to conveniently drain water from the container, closer to the edge of the bottom, a hole of the required diameter is drilled into which a siphon with a hose is installed.
If it is not possible to install a drain pipe due to the lack of sewerage, then water can be pumped out of the font using a pump, but this option, however, will become more complex and inconvenient.
- The next step is to move on to assembling the walls. To do this, the bottom part is lifted onto a work table that has the same height as the walls of the font - this will make it more convenient to mount the boards on the edge of the bottom shield.
- First, fitting is done - one of the prepared boards is tightly installed on the edge of the shield. It is put on the shield with a square groove and tapped all the way with a rubber hammer.
- Next, a pencil mark is made along the installed first board, and then the resulting line is extended along the entire edge of the shield. This will serve as a guide for installing the remaining boards.
It is very important to correctly install the boards on semicircular turns, while respecting the angle, which must be determined in advance and noted in the font drawing.
- The boards are installed as closely as possible to each other and are also tapped with a rubber hammer.
- The last board begins to be mounted on top, between two already installed elements. It fits neatly into the general row. In this case, neighboring boards may even move slightly away from the bottom surface.
It’s not scary - after the last part is moved to the same level as the rest of the wall elements, it and the adjacent boards are tapped from the side so that they sit tightly with their grooves on the bottom plane.
- The next step is to tighten the assembled font with metal strips. They have special lugs along the edges into which the tightening bolt will be installed. After installing the bolt, a nut is attached to its thread, turning which tightens the metal hoop, thereby pressing the boards as tightly as possible to each other.
There should be at least three such hoop stripes. They are located in the lower and middle parts of the font, as well as at a distance of 100 ÷ 250 mm from the top of the structure.
- After this, the font is turned over and installed on the bottom. On top, all parts are treated with fine-grained sandpaper and then sanded to perfect smoothness to absolutely eliminate the possibility of skin injury.
- The next stage is the manufacture of an extension ladder. The simplest option consists of two well-treated boards installed vertically and horizontal rungs. It is advisable to install hooks on the top of the stairs or secure wooden supports behind the support boards.
- Ready-made wooden seats are installed inside the font, and if desired, a shelf-table can be attached to the side outer wall of the container.
In addition, water supply systems, filtration, heating or forced circulation are often installed in the finished font to create massage jets - like a Jacuzzi. But these are tasks of a different level of complexity and are not considered in this article.
- The last step, after installing the hot tub indoors or outdoors in its regular place, is to connect the water drainage hose to the sewer pipe.
Video: the work of a master making a wooden font
The installation of a Japanese Ofuro bath is carried out in almost the same way. However, there is also a characteristic feature - in addition, the font should also have a wooden grate, which should separate part of the space for a special stove installed directly into the water.
The stove has a special, absolutely sealed design to prevent water from entering its firebox. Firewood is placed into such a stove through its upper compartment, and the air is blown through a hole that is led out through the wall of the font.
Another option for installing the stove is used - in close proximity to the font. The stove in this case is equipped with a water circuit through which water circulates, heating up and returning back to the font. This is somewhat different from the Japanese tradition, but nevertheless the effect is almost the same.
An ofuro bathhouse is usually installed outdoors, preferably under a canopy. If it is installed indoors, the pipe from the stove is connected to the chimney or discharged through the wall or roof.
How to make a concrete font
A concrete plunge pool is essentially a mini-swimming pool, which is why it is built according to the same principle.
- The construction of such a font is quite hard work, since the first thing that needs to be done is to dig a foundation pit for it. It should have a depth slightly less than the height of the average person, that is, approximately 1500 ÷ 1600 mm, plus 170 ÷ 200 mm for laying the sand cushion, reinforcement and pouring cement. The width of the font is made at the request of the bathhouse owner and according to the real possibilities of the available space.
- A pit along the length and width in each direction (or along the radius - if a round font is planned) is dug 150 ÷ 170 mm larger than the selected size, since this is exactly the thickness of the concrete walls.
- If you plan to make a drain at the bottom of the pool to drain water, then you need to dig a trench in the wall located closer to the drainage pit to the same depth as the pit, and then lay a drainage pipe there with the required slope. But usually in such a font a pump is used to pump out water.
- After the pit is ready, sand is poured onto its bottom, which must be moistened and compacted well. The thickness of this sand cushion should be 80 ÷ 100 mm.
- Next, a reinforcement grid made of rods with a diameter of 8 ÷ 10 mm is fixed to the bottom and walls. It is secured to the walls using brackets made of 5 mm wire. It must be remembered that the grate should be located at a distance of 50 ÷ 70 mm from the ground walls.
- To fill smooth walls, a solid plywood formwork is installed vertically, which is additionally reinforced with bars and spacer angles.
The formwork is installed level, at a distance of 150 ÷ 170 mm from the earthen walls. It usually rises 120 ÷ 150 mm above the floor surface - to create sides that will prevent water from spilling over the surface.
Additionally, the plywood walls of the formwork are bursting with bars, which will not allow them to bend under the weight of the poured mortar.
- The solution is poured into the formwork, which, as it hardens, forms reliable concrete walls of the font.
The surface of the sides is well leveled, and the entire structure is left to harden, which will take about 25 ÷ 28 days.
- After the concrete has gained the required strength, you need to remove the formwork and make a screed on the floor of the font. It should have a total thickness of 60 ÷ 80 mm.
- Next, after the floor is ready, you can begin leveling the walls using plaster mixtures. The plaster is applied in such a layer as to reliably fill all possible cavities caused by air bubbles and other uneven surfaces of the walls.
- The next step is to move on to waterproofing work. It is necessary to waterproof not only the walls and floor of the pool, but also the walls of the room around it, if the font is adjacent to them.
For waterproofing, a special deep penetration impregnation is usually used, which is applied in several layers using a wide brush or roller. Moreover, with each subsequent layer, the impregnation penetrates deeper into the wall, and is capable of impregnating it to a thickness of up to 200 mm. This waterproofing composition penetrates into all pores of the plaster and concrete wall, reliably sealing them from subsequent penetration of moisture.
- Next, after the waterproofing composition has dried, decorative tiles should be immediately laid on the walls around the font and on its sides.
- After covering the walls around the font and its protruding sides, you can proceed to applying liquid rubber or laying ceramic tiles on the walls inside the resulting mini-pool.
— If you choose ceramic cladding, it is recommended to choose the option in the form of small tiles, which are laid on the surface using waterproof tile adhesive. The grout for sealing joints should also only be waterproof.
— Liquid rubber is usually applied by spraying, but it can also be done using a roller. The main thing is to create a continuous surface on the walls and floor of the font. This material forms a smooth, elastic and durable film that is not afraid of mechanical damage and at the same time will not allow water to come into contact with concrete walls.
- The last to be installed is the staircase leading to the font. It can be hooked onto the side of the pool, or it can be embedded in the floor next to it, depending on the chosen model.
- It is recommended to make a drainage groove near the pool, through which the water flowing from a person when leaving the font will be drained. The drain is covered with a grate on top.
Plastic font
To get rid of unnecessary hassle, you can purchase a ready-made plastic hot tub container, especially since they are produced in a variety of shapes, and you can not only choose the most suitable one, but also order your own exclusive version with specific dimensions from the manufacturer.
A plastic plunge pool can be recessed into the floor - this process is carried out in almost the same way as building a concrete mini-pool. The difference is that instead of laying a ceramic decorative coating or spraying a rubber film, a plastic container is installed.
Another option for its installation is installation in a frame built according to its shape and further covering with panels (for example, wooden).
- It is very important to properly prepare the surface for installing the font - it should be even and fairly smooth. A plastic container is placed on it, in which a hole for draining is made in advance. When installing a drain pipe, its connection to the font must be well waterproofed.
- Next, a frame of wooden blocks is mounted around the font, onto which wooden or plastic panels will be attached. The panels themselves in this case do not play any load-bearing role - they only perform a decorative function. All loads must be taken by the frame made of timber, so it must be made reliable and rigid.
- For the frame, you need to prepare beams with a cross-section of at least 50 × 50 mm, and for the outer cladding - thin boards (even about 10 ÷ 15 mm thick), but always treated with water-repellent compounds. Plastic panels or lining with a pattern that imitates the texture of wood are quite suitable. Installation of finishing material is carried out depending on its type.
If a wooden or plastic lining is chosen, then the sheathing under it is made more often, and it is secured to its bars using clamps, which can be screwed, nailed or stapled.
If wooden panels are chosen, then they are screwed to the frame with self-tapping screws into holes drilled “under countersunk”, and the top of the caps are covered with a composition made from a mixture of wood glue and sawdust.
If during cladding it is necessary to veneer the corners, then they can be covered with special fitting corners - in this case they can simply be glued to “liquid nails”.
Installation of a shower font
The principle of making a dousing font is the same as for a large wooden “vessel”, but in a pinch, you can even use an ordinary hard plastic bucket, which, for beauty, can be lined with wooden slats on top and tightened with metal hoops.
The shower font is installed on the wall using wooden brackets. Two semi-axles provide mounting mobility. To tip a cold water font over yourself, you need to secure a rope.
A special float mechanism can be installed inside the font, which controls the presence of water in the container. After the bucket is emptied, it is automatically filled from the water pipe. In principle, the design is comparable in operating principle to a cistern. This version of the font does not require large expenses, is easy to manufacture and install, and has proven its effectiveness in bathing procedures.
Making your own bath font is quite a difficult task. But if you want, even this is possible. Using step-by-step instructions and using all your creative abilities, you can cope with a similar task. If there is no confidence in its successful completion, then it would probably be wiser to purchase ready-made products or invite qualified craftsmen to build the font.
Choosing the future design of the font and the material for its construction
Design and material are interconnected. Their choice equally depends on both the installation location of the future font and your skills. If you are an expert in laying bricks, tiles and mixing cement mortar, then it is better to take on a concrete structure. If you love and know how to work with wood, then go for cedar or oak. But still, the determining factor will be the design and size of your bathhouse, the presence and type of sewage system.
A concrete font holds a much larger cubic capacity of water than a wooden one, but requires a well-designed drainage system and significant financial costs. But it is often easier to build and will last much longer. A wooden font is very difficult to manufacture specifically in terms of tightness; you need to have great patience and accuracy when assembling, and accurately follow the geometry of the parts.
Types of pollution in an artificial reservoir
The main types of pollution of street water bodies:
- Physical - particles of sand and dust, hair, flowers and leaves of plants, pine needles, cosmetics, etc.
- Chemical - change in the ph balance of water after precipitation.
- Biological - blooming of raw water with the subsequent appearance of blue-green algae.
During operation, all of the listed types of contaminants will certainly appear. But, if you know the rules and nuances of using outdoor swimming pools, you can protect the reservoir and make water procedures safe.
How to make swimming safe?
As soon as the artificial reservoir is filled with clean water, its condition should be monitored:
- Measure and regulate acidity levels. The pH value should not exceed 7.4 and be below 7. The optimal or neutral value is 7.2. At high levels, the water is too hard, which can lead to skin irritation, redness of the eyes, and itching. Sediment falls at the bottom of the font. With soft water (below 7.0), pathogenic flora multiplies quickly and corrosion of metal parts accelerates.
- Disinfect your personal pond and its contents. Two types of substances are used for disinfection: chlorine and oxygen-activated. In the first case, slow chlorine tablets in a protective housing are used. Chlorination lasts for more than two weeks and protects water from the development of bacteria. Active oxygen granules - the second method of disinfection also maintains cleanliness for 14 days or more.
- Install a filtration system that will purify the water from physical and natural contaminants so that the contents of the font will not become cloudy. This market segment offers a huge selection of filters with different characteristics to suit any budget.
- Install a device for removing coarse debris. Using a skimmer, you can rid a street pond of leaves, twigs, hair, flowers, etc. A suspended device pumps the upper water masses.
If the owner follows the listed rules, problems should not arise. If something goes wrong, you need to know the solutions to every pollution problem.